background image

13

Operating the DJ-202

Using the Sequencer

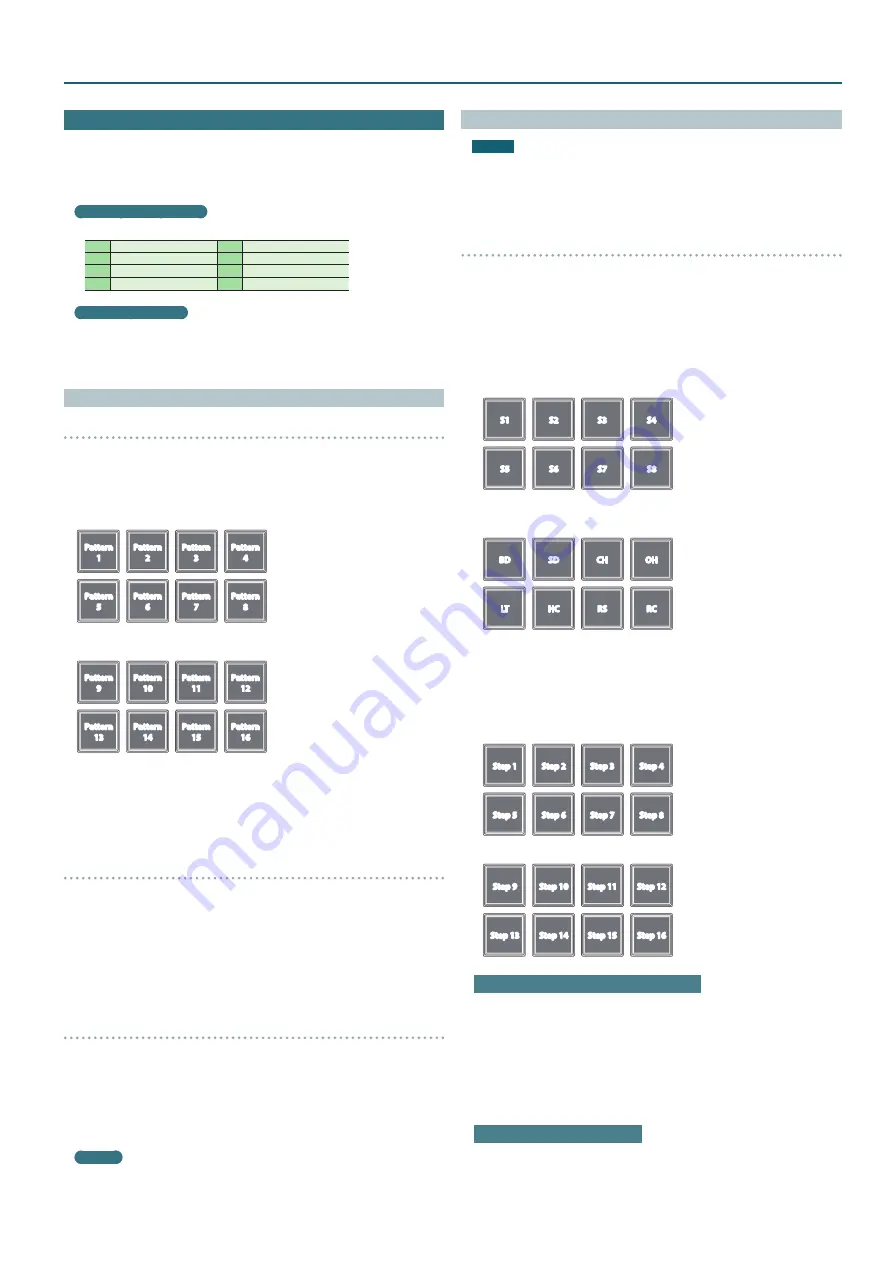
Using the sequencer, “patterns” created using drum sounds (instruments) of 

a Roland TR-909 or TR-808 rhythm machine, or samples of Serato Sampler, 

can be edited in step recording (sequencer mode) or realtime recording 

(INST REC mode).

What are instruments?

These are drum sounds handled by the sequencer.

BD

bass Drum

SD

snare drum

CH

closed Hi-hat

OH

open hi-hat

LT

low tom

HC

hand clap

RS

rim shot

RC

ride cymbal

What are patterns?

“Patterns” contain performance data for instruments and samples in 

step recording or realtime recording.
You can create and save 16 patterns.

Selecting, Playing, Copying, or Deleting Patterns

Selecting and playing patterns

1  

Hold down the [SHIFT] button and press the [SEQUENCER] 

button to access pattern mode.

In pattern mode, the button blinks slowly.

2  

Press a performance button to select a pattern.

Patterns are assigned to performance pads as follows.

Pattern

1

Pattern

2

Pattern

3

Pattern

4

Pattern

5

Pattern

6

Pattern

7

Pattern

8

By holding down the [SHIFT] button and pressing a performance pad, you 

can select patterns 9–16.

Pattern

9

Pattern

10

Pattern

11

Pattern

12

Pattern

13

Pattern

14

Pattern

15

Pattern

16

3  

To play the selected pattern, press the SEQUENCER section’s 

[START/STOP] button.

When you press the button once again, the pattern playback stops.


5

By holding down a performance pad and pressing the performance 

pad of the pattern that you want to play next, you can play back 

patterns in succession.

Copying a pattern

1  

Hold down the PARAM [+] button and press the performance 

pad of the copy-source pattern.

The PARAM [+] button blinks.


5

To select a pattern 9–16, hold down the [SHIFT] button and press a 

performance pad.

2  

Press the copy-destination performance pad.

The pattern is copied.

Deleting a pattern

1  

Hold down the PARAM [−] button and press the performance 

pad of the pattern that you want to delete.


5

To select a pattern 9–16, hold down the [SHIFT] button and press a 

performance pad.

The pattern is deleted.

MEMO

If you copy/delete while a pattern is playing, the copy-destination 

pattern or the deleted pattern is played.

Editing a Pattern

NOTE

When you edit a pattern, the pattern is updated immediately, so you 

won’t be able to return the pattern to its state prior to editing.
If you have favorite patterns that you want to keep, you should copy 

them or back them up before you edit (p. 16).

Step recording (Sequencer mode)

1  

Press the [SEQUENCER] button to make the button light.

You’re now in sequencer mode.

2  

Hold down the [SHIFT] button and press a performance pad to 

select the instrument that you want to record.

You can hold down the [SHIFT] button and use the PARAM [–] [+] buttons 

to switch instruments and Serato Sampler's samples.


5

PARAM [−] button is lit

You can select Serato Sampler’s samples.

S1

S2

S3

S4

S5

S6

S7

S8

*  S5–8 can be selected 

when using Serato DJ


5

PARAM [+] button is lit

You can select instruments.

BD

SD

CH

OH

LT

HC

RS

RC

3  

Press a performance pad to select the step that you want to 

record.

The performance pad you press is lit.

You can use the PARAM [−] [+] buttons to switch the step that will be 

recorded.


5

PARAM [−] button is lit

Step 1

Step 2

Step 3

Step 4

Step 5

Step 6

Step 7

Step 8


5

PARAM [+] button is lit

Step 9

Step 10

Step 11

Step 12

Step 13

Step 14

Step 15

Step 16

Clearing a recorded instrument (sample)

Press a lit performance pad to make it go dark.

4  

Repeat steps 2–3.

*  If you press the PARAM [−] [+] buttons simultaneously while a pattern 

is playing, the performance pad corresponding to the currently-playing 

step (indicating pads 1–8 if 1–8 are playing, or pads 9–16 if 9–16 are 

playing) is lit, allowing you to edit (record or delete) the currently-

playing step.

Switching the instrument kit

In INST PLAY mode you can switch kits. For details, refer to “INST PLAY 

Operations” (p. 11).

Содержание DJ-202

Страница 1: ... Before using this unit carefully read USING THE UNIT SAFELY and IMPORTANT NOTES Startup Guide After reading keep the document s where it will be available for immediate reference Copyright 2017 ROLAND CORPORATION 01 ...

Страница 2: ...ATTERN 11 INST PLAY Operations 11 Sampler Operations SAMPLER 12 Effect Operations 12 Changing the Effect Tempo 12 Using the Sequencer 13 Selecting Playing Copying or Deleting Patterns 13 Editing a Pattern 13 Synchronizing the Sequencer Tempo with the Serato DJ Intro Tempo 14 System Settings 15 Backing Up or Restoring Sequencer Data 16 Returning to the Factory Settings Factory Reset 16 Appendix 17 ...

Страница 3: ...access the following Serato DJ Intro webpage https serato com dj intro downloads 2 Click DOWNLOAD SERATO DJ INTRO 3 Enter your email address and click CONTINUE 4 Enter your password and country and click CONTINUE An email is sent to the address you specified 5 Click Download Serato DJ Intro as directed by the email 6 Follow the instructions as directed by the screen then download the Serato DJ Int...

Страница 4: ...rading to Serato DJ 1 Browser section 2 Deck section 3 Mixer section 1 2 2 3 Browser Section Use these controls to operate Serato DJ Intro and load songs 2 1 1 1 LOAD buttons Load a song selected on Serato DJ Intro into a deck SHIFT Sorts the song library by BPM SHIFT Sorts the song library by SONG 2 Rotary selector Turn this knob to move the cursor up down Press this knob to move the cursor to a ...

Страница 5: ...he song the location returns to the beginning of the song If you press the buttons at the beginning of the song the previous song in the song list is loaded 6 r button Plays or pauses the song SHIFT r Returns to the temporary cue point and plays 7 Pad Mode select Here you can select the control mode of the performance pads HOT CUE button Selects hot cue mode p 11 Press HOT CUE Button Lit Assigns h...

Страница 6: ... LOCK Specifies the variable range of the Tempo slider The setting changes in the order of 8 0 16 0 50 11 DECK 3 DECK 4 buttons Switch the deck left decks 1 and 3 right decks 2 and 4 to be operated 12 Tempo slider Adjusts the playback speed of the song If the key lock function is on Changes the playback speed side Lowers the playback speed side Raises the playback speed If the key lock function is...

Страница 7: ...s fader Switches between the audio output of the left and right decks 7 MASTER LEVEL knob Adjusts the master output level 8 MIXING knob Adjusts the volume balance of the channel whose Channel CUE button is lit and the master output for phones output 9 PHONES LEVEL knob Adjusts the volume of the headphones 10 SAMPLER LEVEL knob Adjusts the sampler and instrument output level 11 SAMPLER CUE button T...

Страница 8: ...included USB cable to connect this port to your computer When this is connected power is supplied from the computer To connect this to your computer you must install the USB driver Installing the Software p 3 2 MIDI OUT connector This outputs MIDI messages such as MIDI clock 3 MASTER OUT L R jacks Connect your powered speakers or power amp here 4 MIC IN jack Connect your microphone here MEMO In Sy...

Страница 9: ...pheral devices connected to your computer are displayed 2 In the Files panel click the folder that contains the songs you want to add to the library 3 Drag and drop the selected folder onto the crate panel A crate is created and the songs are added to the library Loading a Song Here s how to load a song so that it can be output 1 On the DJ 202 hold down the SHIFT button and press the rotary select...

Страница 10: ... the level of the speakers Monitoring Through Headphones 1 Set the DJ 202 s knobs as follows MIXING knob Turned all the way to the left PHONES LEVEL knob 2 Press the channel CUE button of the channel that you want to monitor 3 Turn the PHONES LEVEL knob toward the right to adjust the headphone level Closing Serato DJ Intro 1 Close the Serato DJ Intro screen Mac OS In the upper left of the Serato D...

Страница 11: ...ack you can press performance pad 5 and then use the jog dial to make fine adjustments to the loop IN point If you once again press performance pad 5 you ll return to loop playback 5 5 During playback you can press performance pad 6 and then use the jog dial to make fine adjustments to the loop OUT point If you once again press performance pad 6 you ll return to loop playback Loop Operations LOOP ...

Страница 12: ...deck 2 Click Serato DJ Intro s DJ FX key to open the DJ FX panel 1 1 1 2 3 4 3 4 3 4 1 Currently selected effect type 2 Time at which the effect is applied 3 Effect on off status highlighted when on 4 Effect depth 1 To select the effect type hold down the SHIFT button and press an effect button 1 3 of the deck that you want to operate The effect type changes each time you press the button FX 1 FX ...

Страница 13: ...1 Hold down the PARAM button and press the performance pad of the pattern that you want to delete 5 5 To select a pattern 9 16 hold down the SHIFT button and press a performance pad The pattern is deleted MEMO If you copy delete while a pattern is playing the copy destination pattern or the deleted pattern is played Editing a Pattern NOTE When you edit a pattern the pattern is updated immediately ...

Страница 14: ...down the SHIFT button and press the PARAM button you ll switch to instruments BD SD CH OH LT HC RS RC Clearing a recorded instrument sample Hold down the SHIFT button and press the performance pad that corresponds to the instrument sample that you want to clear Switching the instrument kit In INST PLAY mode you can switch kits For details refer to INST PLAY Operations p 11 Synchronizing the Sequen...

Страница 15: ...election Off Reverb Delay Delay Reverb Specifies the effect that is applied to the mic audio Reverb Reverb is applied Delay Delay is applied Delay Reverb Delay and reverb are applied simultaneously OFF No effect is applied 4 Mic input effect setting Off 1 2 3 4 5 6 7 8 9 10 Adjusts the depth of the effect that is applied to the mic audio 1 10 Higher values apply the effect more deeply OFF No effec...

Страница 16: ... operate your computer to eject the Roland drive 5 Press the SEQUENCER section s START STOP button The performance pads blink alternately and then all performance pads blink NOTE Never turn off the power while the performance pads are blinking alternately 6 Disconnect the USB cable to power off the DJ 202 MEMO Sequencer data is compatible between the DJ 202 and the DJ 505 If the DJ 505 s sequencer...

Страница 17: ...nt volume Are the knobs and faders that adjust the volume set correctly Set the TRIM knob channel fader cross fader and MASTER LEVEL knob to the appropriate positions p 7 Are the powered speakers or amp connected correctly Check the connections of the powered speakers or amp p 8 Are the connected powered speakers or amp set correctly Check the volume settings of the powered speakers or amp Sound i...

Отзывы: