background image

User Manual
Belize radiator

Models

0330RAD | 0550RAD | 0770RAD | 0990RAD | 1210RAD | 1430RAD | 1600RAD

Please read this manual carefully before installation and operation. Please keep this manual for future 
reference and your product guarantee conditions.

Содержание Belize 0330RAD

Страница 1: ...adiator Models 0330RAD 0550RAD 0770RAD 0990RAD 1210RAD 1430RAD 1600RAD Please read this manual carefully before installation and operation Please keep this manual for future reference and your product guarantee conditions ...

Страница 2: ...comfort Using a unique design ROINTE radiators utilise natural air convection with an air speed of 0 1 m s Cold air is introduced at the bottom of the radiator and raises its temperature by passing through the interior of the heating element and expelling at the top as warm air This allows a constant room temperature with a small variation of only 0 25ºC To ensure maximum energy efficiency ROINTE ...

Страница 3: ...ming pools or other bodies of water The product must never be installed where itself or the switches control panel is within the reach of persons in water Never use the product with wet hands Do not place any water containers glasses vases etc on or near the product WARNING To avoid overheating or the interruption of the natural convection cycle do not cover the product This includes furniture cur...

Страница 4: ...t consumption and usage statistics in the Rointe Connect Lite app Built in WiFi e life technology The high powered Wi Fi module and e life technology built into your Rointe product allows real time synchronization with the Rointe Connect Lite app Any change made via the Rointe Connect Lite app will update your product instantly for easier energy management You won t need intermediate or additional...

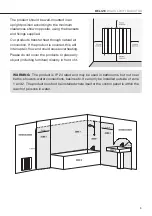
Страница 5: ...roduct is covered this will interrupt air flow and could cause overheating Please do not cover the products or place any object including furniture directly in front of it WARNING The product is IP 24 rated and may be used in bathrooms but not near baths showers water connections basins etc It can only be installed outside of zone 1 and 2 The product must not be installed where itself or the contr...

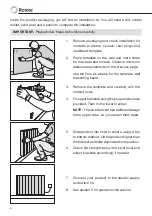
Страница 6: ...us page Use the floor as a base for the template not the skirting board 3 Remove the template and carefully drill the marked holes 4 Fix upper brackets using the plugs and screws provided Then fix the lower bracket NOTE The lower bracket has a different design to the upper ones so you can tell them apart 5 Slide product into fixed brackets using a top to bottom method Lift the product higher than ...

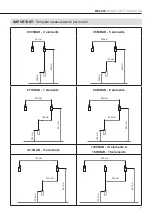
Страница 7: ...elements 0550RAD 5 elements 80 mm 661 mm 206 mm 240 mm 80 mm 661 mm 206 mm 0770RAD 7 elements 0990RAD 9 elements 400 mm 160 mm 661 mm 206 mm 560 mm 240 mm 661 mm 206 mm 1210RAD 11 elements 1430RAD 13 elements 1600RAD 15 elements 720 mm 320 mm 661 mm 206 mm 880 mm 400 mm 661 mm 206 mm ...

Страница 8: ...n TFT screen Programming button 1 Selected temperature 2 Current time and day 3 Heating element on 4 Comfort mode 5 Eco mode 6 Anti Frost mode 7 Locked buttonpad 8 Manual mode 9 Automatic mode 10 Preset programs mode 11 Hourly programming 12 WiFi connection indicator 13 Open Windows indicator 14 Energy consumption indicator ...

Страница 9: ...and press the button to confirm 5 2 Select the set temperature You can regulate the set temperature of the radiator by using the buttons Press the button to increase the product temperature by 0 5 ºC or the button to decrease the temperature by 0 5 ºC The temperature ranges for each mode are as follows COMFORT 19 30 ºC ECO 7 5 18 5 ºC ANTI FROST 7 ºC 5 3 Temperature control When the temperature in...

Страница 10: ...ked Press the button for 3 seconds to switch the product on or off 5 5 Configuration menu Press the button to access the configuration menu The available options are Settings Energy WiFi and Programming mode Settings Set time Backlight Language Firmware Energy Open windows function Balance mode Adaptative mode WiFi On Off Link device WiFi info Prog mode On Off Preset programs User mode Pilot wire ...

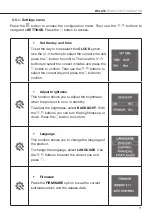
Страница 11: ... button to confirm Then use the buttons to select the correct day and press the button to confirm Adjust brightness This function allows you to adjust the brightness when the product is on or in standby To adjust the brightness select BACKLIGHT With the buttons you can turn the brightness up or down Press the button to confirm Language This function allows you to change the language of the product...

Страница 12: ...lect this option and press to confirm The screen will show 19ºC in Manual mode Adaptive mode This function anticipates the product start up so that the room temperature at the start of the selected time is equal to the set temperature at the exact time that we have established during programming This means your product will begin heating before the time set This ensures the temperature is at the s...

Страница 13: ...e The LINK DEVICE option generates a WiFi network to connect your product When you select LINK DEVICE the following screen will appear where you will be given the name of the network and the password For more information on the pairing process see section 6 Use the buttons to select this option and press to confirm WiFi info The WIFI INFO option allows you to view information on the network status...

Страница 14: ...buttons to select manual or programming and press to confirm Preset heating programs From the PRE PROGRAMS menu you can select a preset heating program to use There are 4 available Use to select between the different programs and press to confirm Available pre programs PRE PROGRAM 1 0 1 2 3 4 5 6 7 8 9 10 11 12 13 14 15 16 17 18 19 20 21 22 23 Mon Fri Sat Sun PRE PROGRAM 2 0 1 2 3 4 5 6 7 8 9 10 1...

Страница 15: ...n menu Then follow the steps below STEP 1 1 Select the COMFORT temperature Temperature range 19 30 C Use the buttons to select the desired Comfort temperature Press to confirm 2 Select the ECO temperature Temperature range 7 5 18 5 C Use the buttons to select the desired Eco temperature Press to confirm 3 Select between ANTI FROST or OFF Temperature range 7 C OFF Use the buttons to select the ANTI...

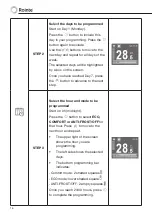
Страница 16: ...7 press the button to advance to the next step STEP 3 Select the hour and mode to be programmed Start on 0h midnight Press the button to select ECO COMFORT or ANTI FROST OFF for that hour Press to move to the next hour and repeat The upper right of the screen shows the hour you are programming The left side shows the selected days The bottom programming bar indicates Comfort mode 2 shaded squares ...

Страница 17: ...ou can connect your device Starting process The following screen will show the data of the created network NET and the password PIN for the product you want to pair Connection When the smartphone is connected to the radiator network the following display will appear Product configuration When the product has received the configuration from the smartphone it will start processing and display the fo...

Страница 18: ...rizontal line is marked on all of ROINTE products to remind the consumer of the obligation to separate them on disposal The consumer should contact their local authority or council office or original point of sale to learn about the correct method of disposal for this product 9 GUARANTEE There are certain terms and conditions on this ROINTE product These conditions comply with all the rights const...

Страница 19: ...the guarantee when this information has been removed or modified after the original product purchase 2 2 The guarantee is only applicable if the product has been installed by a competent person in accordance with this installation manual and all current regulations at the time of installation 2 3 The guarantee is only applicable to those cases that concern material design and manufacturing defects...

Страница 20: ... parts not covered under this guarantee or out of guarantee 4 This guarantee will be invalid if the product has been manipulated modified and or repaired in any way and or by unauthorised persons This guarantee will also be invalid if the product is not correctly installed 5 This guarantee is not transferable and does not include claims due to damage by lime scale or frost 6 Proof of purchase will...

Страница 21: ...f purchase such as invoice in PDF JPEG or PNG format This is not mandatory but by doing so you ensure your guarantee period is accurate 7 Click Register 8 Congratulations Your product is now registered EMAIL 1 Send an email to support rointe co uk with the following information Customer name Address and postcode Telephone number and email address Product reference as described above Serial number ...

Страница 22: ... TYPE OF HEAT OUTPUT ROOM TEMPERATURE CONTROL SELECT ONE Single level heat output no internal temperature control Two or more manual levels without internal temperature control Internal temperature control by mechanical thermostat With electronic interior temperature control Electronic indoor temperature control and daily timer Electronic indoor temperature control and weekly timer OTHER CONTROL O...

Страница 23: ... 98 98 98 98 98 Installed Depth mm 120 120 120 120 120 120 120 Weight kg 8 12 16 20 24 28 32 Finish White RAL 9010 ELECTRICAL CHARACTERISTICS Nominal Power W 330 550 770 990 1 210 1 430 1 600 Voltage V 230 V 230 V 230 V 230 V 230 V 230 V 230 V Current A 1 5 2 4 3 4 4 3 5 3 6 2 7 0 Power per Element W 110 110 110 110 110 110 110 INSTALLATION SAFETY Safety thermostat Installation kit Protection Grad...

Страница 24: ...ur continuous improvement policy we reserve the right to alter or modify any product or specifications without notice This also applies to products already on order provided that such alterations can be made without subsequent changes to specifications already agreed We cannot accept responsibility for any errors in catalogues or other printed materials IMBRUK20V1 re ad y www rointe co uk technica...

Отзывы: