55
General Settings
8 General Settings
Important general settings, such as basic settings or in-
terface settings may be selected via SETUP key. Press the
key to move up one level.
8.1 Update (Instrument Firmware)
The instrument firmware is packed in a ZIP file. After down
-
loading the ZIP file, un-pack the data to the base directory
of a USB stick. Then connect the USB stick with the USB
port of the multimeter and press the SETUP key. Press
the soft menu key UPDATE to access the update menu.
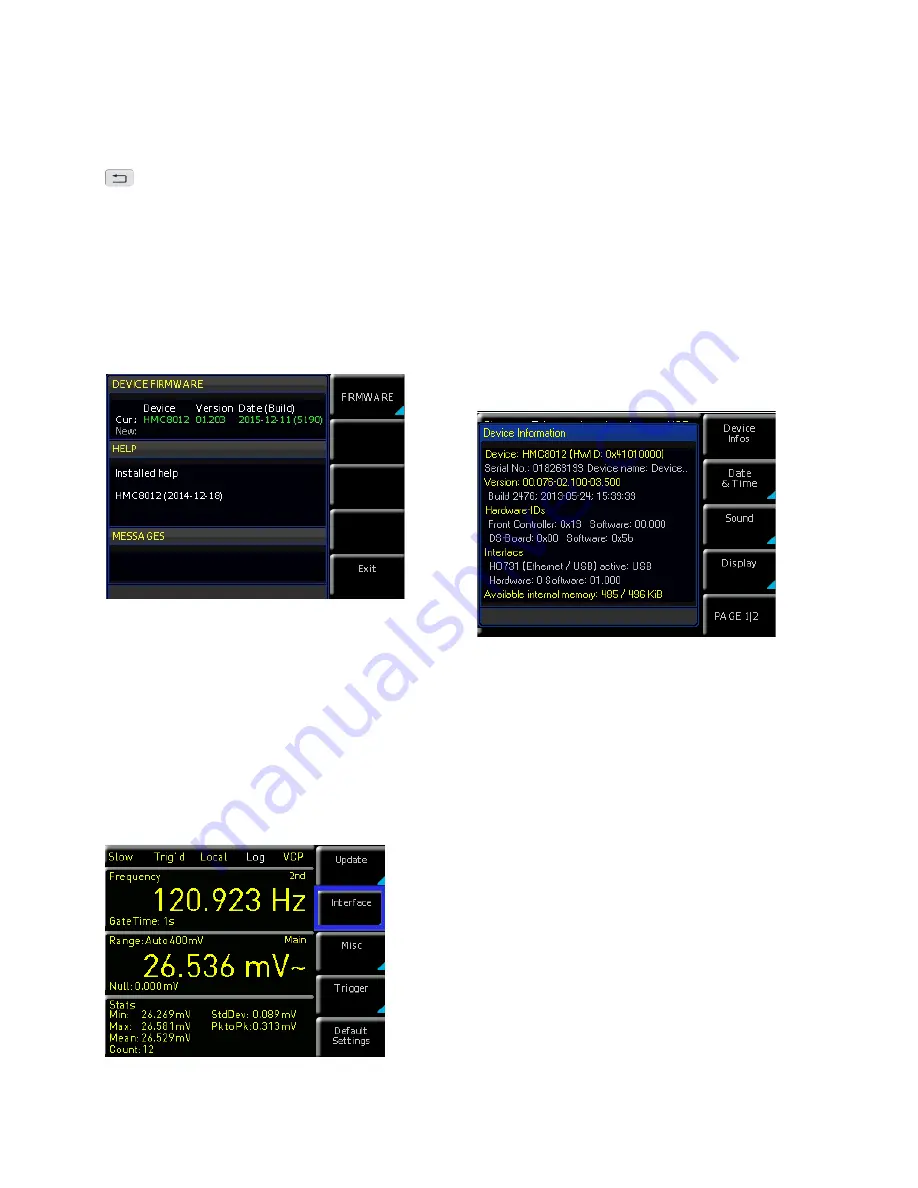
Selecting this menu item opens a window displaying ver-
sion number, date and build information of the currently
installed firmware.
Pressing the soft menu key FIRMWARE to update the
instrument firmware will result in a search for the corres
-
ponding file on the
USB stick. The information for the new
firmware to be installed will then be displayed on the stick
below the row labeled NEW:. The version number will be
displayed in red in case the existing firmware on the instru
-
ment is identical to the latest version; otherwise the version
number will be shown in green. Only if this is the case,
press the soft menu EXECUTE to start the update.
8.2 Interface Setting
The soft menu INTERFACE enables you to select the set-
tings for:
Fig. 8.1: Firmware update menu
Fig. 8.2: Setup menu
❙
VCP
(Virtual COM Port)
❙
USB
(TMC)
❙
Ethernet
(IP address, sub-net mask etc.) and
❙
IEEE-488
GPIB interface (GPIB address)
Select the respective interface for the communication via
respective soft menu key. Set the required interface para-
meters via soft menu item Parameter. Please refer to chap-
ter 9 „Remote Control“ for more information.
8.3 Default Settings
The soft menu key DEFAULT SETTINGS allows you to load
the factory default settings.
8.4 General Settings (Misc)
8.4.1 Device Infos
This soft menu key allows you to retrieve instrument infor-
mation such as serial number, software version etc. Addi-
tionally, the still available internal memory will be displayed.
8.4.2 Date & Time
The soft menu key DATE&TIME allows you to set the time
and date and add a date and time stamp to printouts and
saved data records. The user can reset the date and time.
Date and time can be set via knob. The respective soft
menu item is activated when it is marked in yellow. Press
SAVE to accept the date and time parameters.
8.4.3 Sound
The ¸HMC8012 offers the option to issue a signal in
the event of an error (or simply as a control measure). This
signal can be activated (ON) or deactivated (OFF) via soft
menu key ERROR BEEP or CONTROL BEEP. The respective
soft menu item is activated when it is marked in yellow.
8.4.4 Display
The soft menu DISPLAY and the soft menu key BACK-
LIGHT allows you to set the screen intensity via knob from
10% to 100%. The soft menu key CONTRAST enables you
to select the contrast, and the BRIGHTNESS key allows
you to select the screen brightness from 10% to 100%. The
respective soft menu item is activated when it is marked in
yellow.
Fig. 8.3: Device Infos
Содержание HMC8012
Страница 34: ...34 Anhang ...
Страница 66: ...66 Appendix ...
Страница 67: ...67 Appendix ...
Страница 68: ...68 Appendix ...


