Rohde & Schwarz 4091.7009.02 Скачать руководство пользователя страница 57

Software and Firmware Update

R&S

®

 EB510

57

Getting Started 4091.7338.02 ─ 01

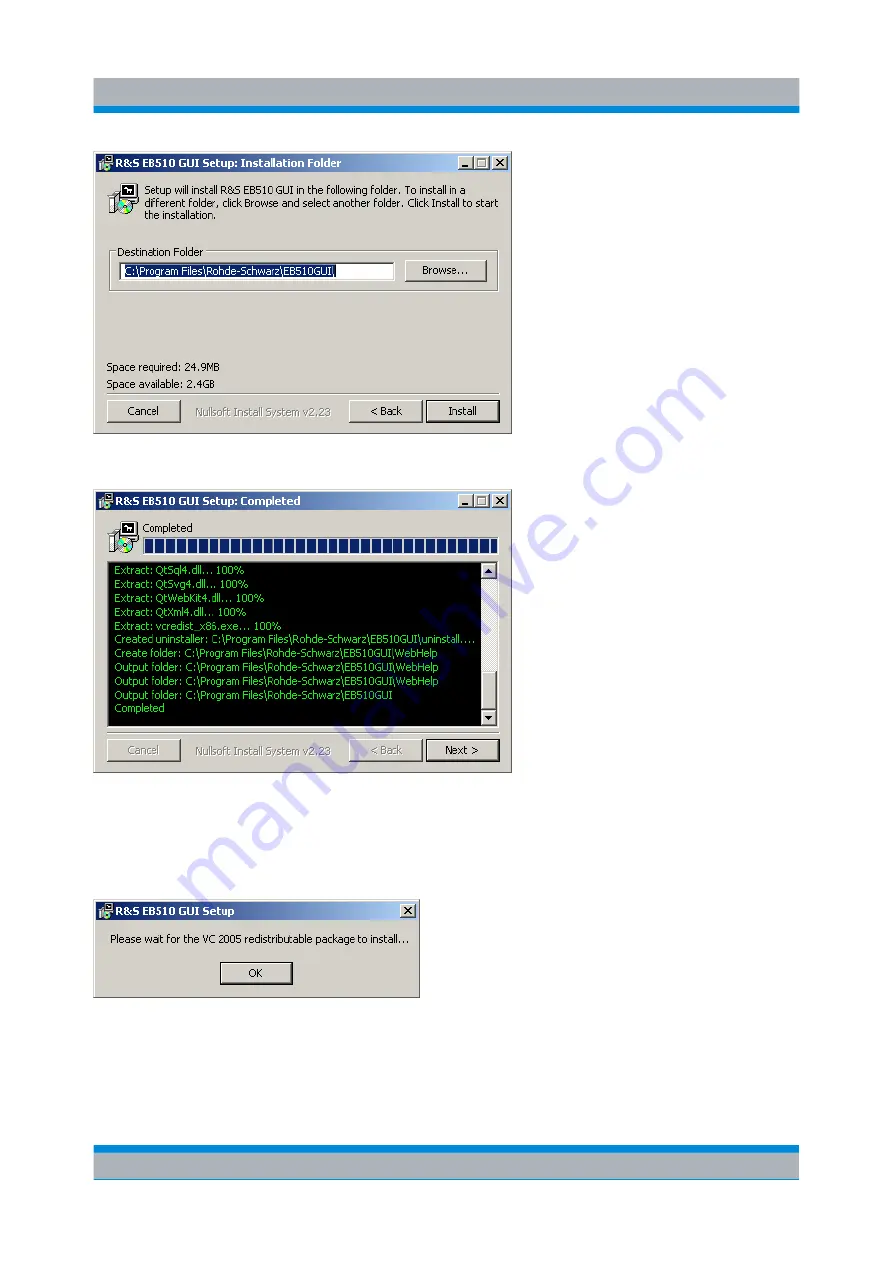
Installation will take a few minutes. Click "Next" when completed.

The Remote Access GUI requires an additional "Redistributable" package, distrib-
uted by Microsoft for the deployment of certain software built for the Windows oper-
ating system. It is included in the installation file as well, so there is no need to
download it from the Microsoft website.

Click OK to install the "Redistributable" package. Installation will take a few minutes.

GUI Installation for Remote Access

Содержание 4091.7009.02

Страница 1: ...R S EB510 HF Monitoring Receiver Getting Started Getting Started X V2 4091 7338 02 01 Radiomonitoring Radiolocation...

Страница 2: ...he verbatim license texts Rohde Schwarz would like to thank the open source community for their valuable contribution to embedded computing 2011 Rohde Schwarz GmbH Co KG Muehldorfstr 15 81671 Munich G...

Страница 3: ...to the Power Supply 8 1 2 6 Power On and Off 10 1 2 7 STANDBY and READY 10 1 2 8 Connecting External Accessories 11 2 Operation 12 2 1 Front Panel Tour 12 2 1 1 EB510 with front control panel 12 2 1 2...

Страница 4: ...1 Preparations 41 4 2 2 Update Procedure 43 4 3 Receiver Firmware Update for EB510 without front control panel 48 4 3 1 Preparations 49 4 3 2 Firmware Update Using Update32 Tool 50 4 4 GUI Installatio...

Страница 5: ...ions for setup and connection to prevent personal injury or damage to the R S EB510 This is of particular importance when you use the R S EB510 for the first time The following safety instructions app...

Страница 6: ...shows no condensation Non observance may cause damage to the R S EB510 or other devices in the setup The R S EB510 is supplied completely assembled except for the handles and mounting brackets which m...

Страница 7: ...B510 when its feet are folded out The overall load the R S EB510 s own weight plus that of any devices stacked on top of it on the folded out feet must not exceed 500 N Place the R S EB510 on a stable...

Страница 8: ...nting For use in vehicles the R S EB510 can be powered directly from the vehicle s battery via the DC input 1 2 4 EMI Protective Measures In order to avoid electromagnetic interference EMI the R S EB5...

Страница 9: ...ector counterclockwise and withdraw it Fig 1 1 Speakon NL4FX 1 2 5 2 Connecting to the DC Source The R S EB510 is connected to an external 10 VDC to 32 VDC source e g battery via connector X1 on the r...

Страница 10: ...ate and vice versa In STANDBY state the amber LED on the right will turn on and only the power switch circuit is being powered In this state it is safe to remove the DC power and disconnect the R S EB...

Страница 11: ...2 Connect a LAN cable to the LAN port The R S EB510 has an internal switch which automatically detects the type of LAN cable connected so you can use any standard type of LAN cable to establish a netw...

Страница 12: ...information required to access the various con figuration options and settings necessary to get you started operating the R S EB510 2 1 Front Panel Tour 2 1 1 EB510 with front control panel An overvie...

Страница 13: ...The function of each softkey is dependent on the softkey bar on the display 5 Receiver Control Keys BW selects the demodulation bandwidth between 100 Hz and 5 MHz AFC switches automatic frequency cont...

Страница 14: ...ing knob In certain menus the main rollkey serves as up down key Pressing the rollkey confirms an entry equivalent to the ENT key 9 Data Entry Keys The 0 9 keys allow entry of the corresponding number...

Страница 15: ...tereo headphones with a 3 5 mm stereo plug to be connected GUI for remote access A GUI for remote access is available for the Windows XP platform and is particularly useful for the EB510 without front...

Страница 16: ...bels in the figure above 1 X1 Power Supply Standard Speakon NL4FX socket for DC power input Socket accepts 10 32 VDC on pin 1 and ground on pin 1 of connector Power requirement as indicated 2 Antenna...

Страница 17: ...I Q baseband or AM and FM demodulated signal for further processing These outputs also can be switched to output controlled analog intermediate frequency IF in two channels with an adjustable carrier...

Страница 18: ...iption of the graphical user interface of the R S EB510 2 3 1 GUI Layout Following is an overview of the layout and individual elements of the graphical user interface In the table below follows the d...

Страница 19: ...ient Access is not possible The R S EB510 is locked Only the current operator can make changes exclusive write access A critical error occurred in the receiver The Test Points dialog will provide more...

Страница 20: ...etc Softkeys can be related to hardkeys they can e g provide selection options in case one of the Utility keys is pressed or in case DET or MARK is pressed Softkeys can also provide the option for sel...

Страница 21: ...a field is in the edit mode When a field is in edit mode whether it is minutes seconds hours etc it will not be updated The R S EB510 time will be set to the new time once the field gets out of edit m...

Страница 22: ...Press the MENU key to open the Menu softkey bar 2 Select the More 1 2 softkey to open page 2 2 3 Select the Tests softkey to open the Tests softkey menu 4 Select the Short Test softkey to run the sho...

Страница 23: ...Receiver softkey 3 The Receiver Configuration dialog box will appear Check that RF Mode Normal Reference Mode Internal Refer to the R S EB510 Operating Man ual for the detailed description of this di...

Страница 24: ...uning the Mid Frequency can be performed via a ROTARY KNOB the tuning step is defined in the STEP softkey menu b CURSOR LEFT CURSOR RIGHT Key the tuning step is half the SPAN width defined in the soft...

Страница 25: ...M the maximum of the FFT trace over time is displayed c AVERAGE the average of the FFT trace over time is displayed d CLRWRITE the instantaneous FFT is displayed without averaging 3 The Demodulation F...

Страница 26: ...th the softkey in 3a highlighted follow procedure 1 to change the demodulation frequency within the IF span c The Mid Frequency will not change 4 The Receiver Control Keys chapter 2 1 Front Panel Tour...

Страница 27: ...of the RF amplitude envelope d The DEMOD key changes the demodulation mode CW LSB USB ISB AM FM Pulse PM IQ CW USB and LSB demodulation modes are only available with demodulation bandwidths 4a of 9 kH...

Страница 28: ...gain control for amplitude modulated modes Pressing the SELECT rollkey 5g toggles between automatic and manual gain control When in manual gain control mode turning the SELECT rollkey 5h allows the m...

Страница 29: ...tion R S EB510 29 Getting Started 4091 7338 02 01 a Select the More 1 4 followed by More 2 4 and More 3 4 softkeys until page 4 4 of the menu b Select the CONFIG IF PAN softkey Graphical User Interfac...

Страница 30: ...t Lowest Level sets the maximum and minimum of the vertical scale respectively This changes the scale of the displayed trace and hence also the waterfall color mapping because the color is mapped rela...

Страница 31: ...nd STEP softkeys to define the range and frequency step of the scan In this example start and stop frequencies are set to 1 MHz and 2 MHz respectively with a step of 10 kHz 5 The time it takes to acqu...

Страница 32: ...ey 2 3 3 Online Help All the information from the operating manual can be shown on the display of the R S EB510 after pressing the HELP key or F1 for users of an external GUI This key is used to open...

Страница 33: ...et active it has a normal blue border To activate the browser press the ENTER key the ROLLKEY or click the mouse wheel An active browser is indicated by a thin blue frame Use the ROLLKEY to scroll up...

Страница 34: ...d alphabetically as shown in the figure below In Index mode the Look For field can be activated by entering the first few char acters of a index term as shown above you can speed up the search If Sear...

Страница 35: ...r the ROTARY KNOB the browser will show the page that was selected The Zoom key provides 5 different zoom levels by repeatedly pressing the Zoom key the browser will display the content from minimum t...

Страница 36: ...the browser from one hyperlink to another hyperlink The focus will immediately switch to the browser once Next Link key is pressed By pressing ENTER or ROTARY KNOB you can browse into the hyperlink j...

Страница 37: ...When it is stored for a longer period of time the R S EB510 should be protected against dust The original pack ing should be used particularly the protective caps at the front and rear when the R S E...

Страница 38: ...nce R S EB510 38 Getting Started 4091 7338 02 01 Test points The test points are mainly for diagnostic purposes and their interpretation should be left to qualified Rohde Schwarz service personnel Tes...

Страница 39: ...ceiver The GUI Version refers to the GUI software in use If the menu is obtained from the EB510 with front control panel it refers to the Front Panel GUI If the menu is obtained from Remote Access it...

Страница 40: ...e time of shipment The latest versions can be down loaded from GLORIS The CD ROM will autostart and launch the opening menu where the various options are available If the CD ROM does not autostart or...

Страница 41: ...SB port of the PC or Notebook Take note of the drive letter assigned to this USB flash drive Execute the installation by clicking on Receiver Firmware and GUI Installation Allow access if there are se...

Страница 42: ...ost system which will result in a unusable host After double checking the drive letter and clicking OK the SFX image will self extract to the USB flash drive This process will take less than one minut...

Страница 43: ...Update Procedure Power off the R S EB510 plug in the USB flash drive into the USB port on the R S EB510 front panel and restart Wait for the R S logo to appear and press ESC to go into the boot menu...

Страница 44: ...Cards and press ENT to enable booting from the USB flash drive The first boot device which starts with Ch2 S is the internal drive of the R S EB510 If this is selected by mistake the R S EB510 will st...

Страница 45: ...s to be updated FPC2 firmware will only be updated when the version on the USB flash drive is newer than the version currently installed FPC2 Update Do not interrupt the updating of the FPC2 firmware...

Страница 46: ...e you installed an older ver sion of the firmware just copy again the update installation file to the USB flash drive following the steps explained in chapter 4 2 1 Prepara tions on page 41 This will...

Страница 47: ...ill be updated The GUI runs on a dedi cated processor IPS1 and has its own operating system This processor also needs to reboot once the update completed At the end of the process when the dialog belo...

Страница 48: ...using the Update32 Tool see Updating the EB510 with front control panel on page 53 there is a chance that the R S EB510 cannot reboot Follow the steps described in If the R S EB510 cannot reboot on p...

Страница 49: ...B510 as the bootprog is still available for subsequent firmware update of the system 4 3 1 Preparations Checking the R S EB510 firmware version number Refer to the section chapter 4 1 Retrieve Firmwar...

Страница 50: ...ect Network Adapter in the Config menu of the Update32 tool 4 3 2 Firmware Update Using Update32 Tool First steps Power off the R S EB510 It has to be switched on later in the update procedure Make su...

Страница 51: ...figuration file has to be selected Click on the following button to open the corresponding dialog Navigate to the folder that contains the configuration files under the Look in field Next select the d...

Страница 52: ...target to be updated After a short period a new entry will be shown in the list of targets as shown in figure below Select the desired target and click the Start button Updating process The following...

Страница 53: ...he update procedure Updating the EB510 with front control panel The EB510 with front control panel can also be updated using the method with the Update32 tool Please take note that this method cannot...

Страница 54: ...or use on a notebook or desk top PC Internal installation If you want to install the GUI on the R S EB510 follow the procedure descri bed in chapter 4 2 Receiver Firmware and GUI Update for EB510 with...

Страница 55: ...he GUI exists it must be uninstalled before the installation of a new GUI can proceed A dialog will appear first which requests to uninstall this earlier version Click OK and wait for the uninstall to...

Страница 56: ...er e g 100001 002 the DHCP name will be rs eb510 100001 002 In the next step choose the display resolution Note that the resolution refers to the panel resolution When the emulated front panel buttons...

Страница 57: ...additional Redistributable package distrib uted by Microsoft for the deployment of certain software built for the Windows oper ating system It is included in the installation file as well so there is...

Страница 58: ...llow the traffic to from the R S EB510 As a last step you may have to change the Windows Firewall settings to enable the network traffic of the R S EB510 GUI For this reason start the GUI via Start Pr...

Страница 59: ...w access if there are security warnings If a configuration is not loaded previously refer to Selecting the configuration file under chapter 4 3 Receiver Firmware Update for EB510 without front control...

Страница 60: ...ess Make the desired changes in the LAN settings dialog as shown below Select DHCP if the R S EB510 is to be connected to a DHCP server Address conflict The IP address should NOT be set to 192 168 255...

Страница 61: ...ate of program firmware code as defined in the configuration file Refer to chapter 4 3 Receiver Firmware Update for EB510 without front control panel on page 48 for details 4 5 2 Using GUI EB510 with...

Отзывы: