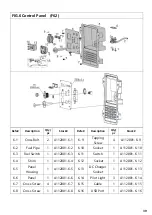
28
1. Remove the cover
①
2. Remove spark plug boot
②
. Be careful
not to tear insula�on or wir
e and Insert
the tool
④
through the hole from the
outside of the cover.
Fig62
Fig.63
3. Insert the handlebar
③
into the tool
④
,Unscrew the spark plug
counterclockwise from the engine using
the spark plug wrench provided. There is
limited space for the wrench to turn. Use
both rows o
�oles in the spark plug
wrench to gain leverage to loosen the
plug.
4. Visually inspect the spark plug for
cracks or excessive electrode wear.
Replace as necessary.Remove the carbon.
The porcelain insulator around the center
electrode of spark plug should be a
medium-to-light tan color.
5. Measure the plug gap with a wire
thickness gauge. The gap should be
0.6-0.7 mm (0.024-
0.028 in).
Fig.64
Standard Spark Plug: E6TC/E6RTC
Spark Plug Gap: 0.6-0.7mm
(0.024-
0.028in)
6. If re-using the spark plug, use a wire
brush to clean any dirt from around the
spark plug base then re-gap the spark
plug.
7. Install the spark plug: Screw the spark
plug back into the spark plug hole using
the spark plug wrench. Do not
over-
�ghten spark pl
ug. Recommended
�ghtening o
f spark plug is1/2 to 3/4of a
turn a�er spark plug gasket contacts
spark plug hole.
Spark Plug Torque: 20.0 N*m
(2.0kgf*m, 14.8
lbf*�)
NOTE:
If a torque wrench is not
available when installing a spark plug, a
good es�mate of the correct torque is
1/4-1/2 turn past
finger �ght. However,
the spark
plug should be �ghtened to the
specified torque as soon as pos
sible.
8. Reinstall the spark plug boot and spark
plug cover.
CARBURETOR ADJUSTMENT
WARNING
The carburetor is a vital part of the
engine. Adjus�ng shoul
d
be le� t
o our
company authorized dealer with the
professional knowledge, specialized date,
and equipment to do so properly.
Содержание R2000i
Страница 35: ...35 WIRING DIAGRAM...

