background image

2

Dear Customer,
Congratulations on your purchase of the world’s finest brand of 

audio products. At Rockford Fosgate we are fanatics about musical 

reproduction at its best, and we are pleased you chose our product. 

Through years of engineering expertise, hand craftsmanship and 

critical testing procedures, we have created a wide range of products 

that reproduce music with all the clarity and richness you deserve.
For maximum performance we recommend you have your new 

Rockford Fosgate product installed by an Authorized Rockford Fosgate 

Dealer, as we provide specialized training through Rockford Technical 

Training Institute (RTTI). Please read your warranty and retain your 

receipt and original carton for possible future use.
Great product and competent installations are only a piece of the 

puzzle when it comes to your system. Make sure that your installer is 

using 100% authentic installation accessories from Rockford Fosgate 

in your installation. Rockford Fosgate has everything from RCA cables 

and speaker wire to power wire and battery connectors. Insist on it! 

After all, your new system deserves nothing but the best.
To add the finishing touch to your new Rockford Fosgate image, order 

your Rockford accessories, which include everything from T-shirts 

to hats.
Visit our web site for the latest information on all Rockford products;


www.rockfordfosgate.com 


or, in the U.S. call 1-800-669-9899 or FAX 1-800-398-3985. For all other 

countries, call +001-480-967-3565 or FAX +001-480-966-3983.

Table of Contents

If, after reading your manual, you still have questions regarding this product, 

we recommend that you see your Rockford Fosgate dealer. If you need further 

assistance, you can call us direct at 1-800-669-9899. Be sure to have your 

serial number, model number and date of purchase available when you call.

Safety

This symbol with “WARNING” is intended 

to alert the user to the presence of important 

instructions. Failure to heed the instructions 

will result in severe injury or death.
This symbol with “CAUTION” is intended to 

alert the user to the presence of important 

instructions. Failure to heed the instructions 

can result in injury or unit damage.
To prevent injury and damage to the unit, 

please read and follow the instructions in this manual. We want you to enjoy 

this system, not get a headache.
If you feel unsure about installing this system yourself, have it installed by a 

qualified Rockford Fosgate technician.
Before installation, disconnect the battery negative (-) terminal to prevent 

damage to the unit, fire and/or possible injury.

FCC Compliance Statement

This equipment has been tested and found to comply with the limits for a 

Class B digital device, pursuant to part 15 of the FCC Rules. These limits are 

designed to provide more reasonable protection against harmful interference 

in a residential installation.
Operation is subjected to the following two conditions: (1) This device 

may not cause harmful interference, and (2) the device must accept any 

interference received, including interference that may cause undesired 

operation.
This equipment generates, uses, and can radiate radio frequency energy 

and, if not installed and used in accordance with the instructions, may 

cause harmful interference to radio communications.  However, there is 

no guarantee that interference will not occur in a particular installation.  

If this equipment does cause harmful interference to radio or television 

reception, which can be determined by turning the equipment off and on, 

you are encouraged to try to correct the interference by one of the following 

measures:
•  Reorient or relocate the receiving antenna.
•  Increase the separation between the equipment and receiver.
•  Connect the equipment into an outlet on a circuit different from that to 

which the receiver is connected.

•  Consult the dealer or an experienced radio/TV technician for help

Introduction

PRACTICE SAFE SOUND

Continuous exposure to sound pressure levels over 100dB 

may cause permanent hearing loss. High powered auto sound 

systems may produce sound pressure levels well over 130dB. 

Use common sense and practice safe sound.

2 Introduction
3 Specifications
4 Design Features and Functions
5 Battery Installation and Mounting Options
6 Troubleshooting

7-22 French, Spanish, German and Italian

23 Limited Warranty Information

©2018 Rockford Corporation. All Rights Reserved. PUNCH® and associated logos where applicable, are registered trademarks of Rockford Corporation in the United States and/or 
other countries. The Bluetooth

®

 word mark and logos are registered trademarks owned by Bluetooth SIG, Inc. and any use of such marks by Rockford Corporation is under license. All 

other trademarks are the property of their respective owners. Specifications subject to change without notice.

Содержание PUNCH PMX-BTUR

Страница 1: ... REMOTE R O C K F O R D F O S G A T E C O M 600 South Rockford Drive Tempe Arizona 85281 United States Direct 480 967 3565 Toll Free 800 669 9899 Printed In China 092517 1230 61814 01 A Installation assistance available at www rockfordfosgate com rftech ...

Страница 2: ...joy this system not get a headache If you feel unsure about installing this system yourself have it installed by a qualified Rockford Fosgate technician Before installation disconnect the battery negative terminal to prevent damage to the unit fire and or possible injury FCC Compliance Statement This equipment has been tested and found to comply with the limits for a Class B digital device pursuan...

Страница 3: ... Home Vol Vol Play Pause within 3 seconds If successful the LED will illuminate yellow then green The remotes history is now cleared so it can be paired to a new device Follow pairing instructions above on new device Home Button LEDs Green LED The green LED will illuminate green for 1 5 seconds when a new battery has been installed Green LED The green LED will blink three 3 times right before the ...

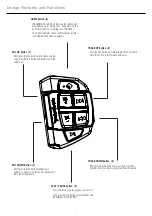
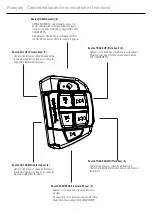
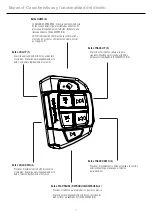
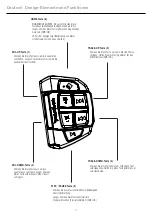
Страница 4: ... status see Home Button LEDs on page 3 VOL UP button 1 Short pressing this button will increase volume Long pressing this button will quickly ramp the volume up TRACK DOWN button 4 Short pressing this button once will go back to the previous track Long pressing this button will rewind PLAY PAUSE button 3 Press this button to play or pause your music Long pressing this button activates hands free s...

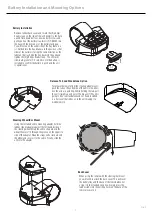
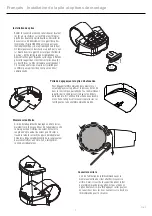
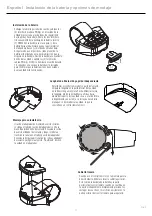
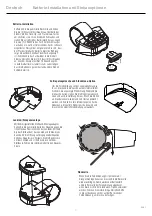
Страница 5: ...dapter hold the rubber side of adapter against the left hand inside of the steering wheel Wrap the velcro strap around the wheel then insert it through the groove on the opposite side of the adapter Wrap the straps extra slack around the wheel and secure it to the velcro Finally slide the unit into the adapter Release Tab and Standalone Option To release the remote from the steering wheel mount pu...

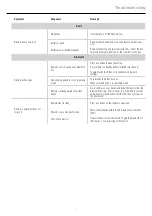
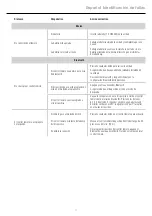
Страница 6: ...on in the devices bluetooth settings Device being paired to is not in pairing mode Turn bluetooth off then back on Make sure the device is in searching mode Remote is already paired to another device Go to settings on your device and forget the remote from the bluetooths history Press buttons 6 1 2 3 within 3 seconds and wait for 3 green flashes from the LED then press pair on the new device Remot...

Страница 7: ...6 1 2 3 Home Vol Vol Play Pause dans les 3 secondes En cas de succès la DEL s allumera en jaune puis en vert L historique de la télécommande étant désormais effacé elle peut être appairée à un nouveau périphérique Suivre les instructions d appairage ci dessus sur le nouveau périphérique DEL du bouton d accueil DEL verte La DEL verte s allumera en vert pendant 1 5 seconde lors de l installation d u...

Страница 8: ...outon Home Accueil à la page 3 Bouton VOL UP Volume haut 1 Une pression brève sur ce bouton augmentera le volume Une pression longue sur ce bouton augmentera rapidement le volume Bouton TRACK DOWN Piste bas 4 Une pression brève sur ce bouton de revenir à la chanson précédente Maintenir ce bouton enfoncé pour rembobiner Bouton PLAY PAUSE Lecture Pause 3 Appuyer sur ce bouton pour jouer ou pauser la...

Страница 9: ...e côté en caoutchouc de l adaptateur contre la main gauche à l intérieur du volant Enrouler la sangle en Velcro autour du volant puis l insérer à travers la rainure sur la côté opposé de l adaptateur Enrouler la longueur additionnelle de la sangle autour du volant et la fixer au Velcro Enfin faire glisser l unité dans l adaptateur Patte de dégagement et option d autonomie Pour dégager la télécomma...

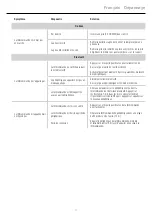
Страница 10: ...ppairer n est pas en mode appairage Éteindre et rallumer bluetooth S assurer que le périphérique est en mode recherche La télécommande est déjà appairée avec un autre périphérique Aller aux paramètres sur le périphérique et oublier la télécommande de l historique bluetooth Appuyer sur les boutons 6 1 2 3 dans les 3 secondes et attendre 3 clignotements verts de la DEL puis appuyer sur appairer sur ...

Страница 11: ...dos Si tiene éxito el LED se iluminará en amarillo y luego en verde El historial de controles remotos ahora se borra para que pueda acoplarse a un nuevo dispositivo Siga las instrucciones de acoplamiento anteriores en un dispositivo nuevo LED del botón Home origen LED verde El LED verde se iluminará color verde durante 1 5 segundos cuando se ha instalado una batería nueva LED verde El LED verde pa...

Страница 12: ...sulte los LED del botón Home inicio en la página 3 Botón VOL UP 1 Si presiona brevemente este botón aumentará el volumen Si presiona prolongadamente este botón aumentará rápidamente el volumen Botón TRACK DOWN 4 Presionar brevemente este botón volverán a la canción anterior Mantenga presionado este botón para rebobinar Botón PLAY PAUSE REPRODUCCIÓN PAUSA 3 Presione este botón para reproducir o pau...

Страница 13: ...ga el lado de caucho del adaptador contra la mano izquierda dentro del volante Envuelva la correa de velcro alrededor del volante y luego insértela a través de la ranura en el lado opuesto del adaptador Envuelva la holgura adicional de las correas alrededor del volante y asegúrela al velcro Finalmente deslice la unidad en el adaptador Lengüeta de liberación y opción independiente Para liberar el c...

Страница 14: ...lando no está en el modo de acoplamiento Apague y vuelva a encender Bluetooth Asegúrese de que el dispositivo esté en el modo de búsqueda El control remoto ya está acoplado a otro dispositivo Vaya a la configuración en su dispositivo y olvide el control remoto del historial de bluetooths Presione los botones 6 1 2 3 dentro de 3 segundos y espere a que aparezcan 3 destellos verdes en el LED luego p...

Страница 15: ...lb von 3 Sekunden Bei erfolgreicher Ausführung leuchtet die LED Anzeige zuerst gelb und dann grün Der Verlauf der Fernbedienung ist jetzt gelöscht so dass diese mit einem neuen Gerät gekoppelt werden kann Folgen Sie den Anleitungen zum Koppeln oben auf dem neuen Gerät Home Taste LEDs Grüne LED Die grüne LED Anzeige leuchtet grün fur 1 5 Sekunden wenn ein neues Akku eingesetzt wurde Grüne LED Die g...

Страница 16: ... Taste LEDs auf Seite 3 VOL UP Taste 1 Drücken Sie diese Taste kurz um die Lautstärke zu erhöhen Langes Drücken dieser Taste wird die Lautstärke schnell erhöht TRACK DOWN Taste 4 Drücken Sie diese Taste kurz zum vorherigen Titel zurückzugehen Halten Sie diese Taste gedrückt um zurückzuspulen PLAY PAUSE Taste 3 Drücken Sie diese Taste für die Musik Wiedergabe oder Unterbrechung Langes Drücken diese...

Страница 17: ...nd auf der Innenseite des Lenkrads Wickeln Sie das Klettband um das Lenkrad und führen Sie es dann durch die Öffnung auf die gegenüberliegende Seite des Adapters ein Wickeln Sie die Bänder lose um das Lenkrad und sichern Sie diese mit dem Klettband Führen Sie jetzt die Einheit in den Adapter hinein Entriegelungslasche und Standalone Option Um die Fernbedienung von der Lenkradhalterung zu lösen drü...

Страница 18: ...wird Ist nicht im Kopplungs Modus Schalten Sie Bluetooth aus und dann wieder ein Vergewissern Sie sich dass sich das Gerät im Suchmodus befindet Die Fernbedienung ist schon mit einem anderen Gerät gekoppelt Gehen Sie zu den Einstellungen in Ihrem Gerät und wählen Sie Fernbedienung vergessen im Bluetooth Verlauf Drücken Sie die Tasten 6 1 2 3 innerhalb von 3 Sekunden warten Sie bis die LED Anzeige ...

Страница 19: ...3 Home Vol Vol Play Pause entro 3 secondi A operazione riuscita il LED si illumina in giallo e poi in verde La cronologia del telecomando adesso è cancellata e quindi il telecomando può essere abbinato con un nuovo dispositivo Seguire le istruzioni di abbinamento sopra con il nuovo dispositivo LED pulsante Home LED verde Il LED verde si illumina in verde per 1 5 secondi dopo che è stata installata...

Страница 20: ...vedi LED pulsante Home a pagina 3 Pulsante VOL UP 1 Premere brevemente questo pulsante per aumentare il volume Premere a lungo questo pulsante per aumentare il volume velocemente Pulsante TRACK DOWN 4 Premere brevemente questo pulsante per si riavvia il brano precedente Tenere premuto questo pulsante per riavvolgere Pulsante PLAY PAUSE 3 Premere questo pulsante per riprodurre o sospendere la music...

Страница 21: ...la parte gommata dell adattatore contro la mano sinistra nella parte interna dello sterzo Avvolgere la fascetta in velcro intorno allo sterzo e quindi inserirla nell apertura sulla parte opposta dell adattatore Avvolgere le fascette in modo allentato intorno allo sterzo e fissarlo con il velcro Infine inserire l unità nell adattatore Linguetta di sgancio e opzione standalone Per sganciare il telec...

Страница 22: ...l quale si desidera abbinare non è nella modalità di abbinamento Spegnere Bluetooth e riaccenderlo Accertarsi che il dispositivo sia nella modalità di rilevamento Telecomando già abbinato con un altro dispositivo Andare alle impostazioni del dispositivo e cancellare il telecomando dalla cronologia Bluetooth Premere i pulsanti 6 1 2 3 entro 3 secondi e aspettare 3 flash verdi del LED quindi premere...

Страница 23: ... Rockford s discretion What is Not Covered 1 Damage caused by accident abuse improper installation operations theft water on non Element Ready products 2 Any cost or expense related to the removal or reinstallation of product 3 Service performed by anyone other than Rockford or an authorized Rockford Fosgate service center 4 Any product which has had the serial number defaced altered or removed 5 ...

Страница 24: ...24 Endnotes ...
Отзывы: