


19
Dati tecnici
CEA 2006
La potenza nominale delle unità di fonte Rockford Fosgate è conforme agli standard del settore CEA-
2006. Queste linee guida significano che la potenza nominale in uscita dell’unità di fonte è un numero di
POTENZA REALE, e non una valutazione esagerata a scopi di marketing.
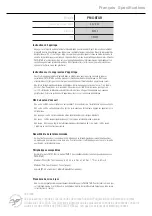
Modello
PMX-BTUR
Tensione operativa
2.4V-3.3V
Bluetooth
BLE4.2
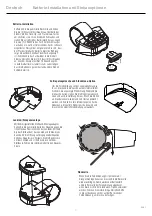
Batteria
CR2032
Istruzioni di abbinamento (pairing)
Premere un pulsante qualsiasi sul telecomando per riattivarlo. Aprire il menu per le impostazioni
Bluetooth sul dispositivo che si desidera abbinare. Attivare il Bluetooth del dispositivo se non è già
attivato. Assicurarsi che il dispositivo sia in modalità di rilevamento e stia rilevando i dispositivi con cui
abbinarsi. Nel menu dei dispositivi disponibili cercare PMX-BTUR e selezionarlo. Quando il dispositivo
ha trovato il telecomando verrà chiesto se si desidera associarlo con il telecomando. Il LED lampeggia
in verde con una sequenza di tre (3) flash. Quindi selezionare “Associa” (Pair) e uscire dal menu delle
impostazioni. .
Istruzioni per l’annullamento dell’abbinamento (un-pairing)
Aprire il menu per le impostazioni Bluetooth sul dispositivo con il quale si desidera annullare
l’abbinamento. Selezionare PMX-BTUR dal menu e quindi “Ignora dispositivo”. Il LED lampeggia in
rosso con una sequenza di due (2) flash confermando che il dispositivo non è più abbinato.
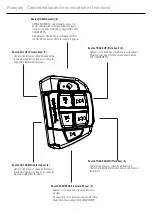
Dopo che il telecomando è ignorato sul dispositivo originale, premere i pulsanti 6-1-2-3 (Home Vol+
Vol- Play/Pause) entro 3 secondi. A operazione riuscita il LED si illumina in giallo e poi in verde. La
cronologia del telecomando adesso è cancellata, e quindi il telecomando può essere abbinato con un
nuovo dispositivo. Seguire le istruzioni di abbinamento sopra con il nuovo dispositivo.
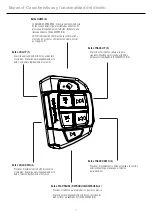
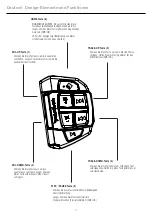
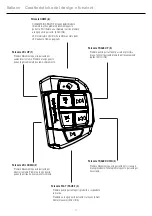
LED pulsante Home
LED verde Il LED verde si illumina in verde per 1,5 secondi dopo che è stata installata una nuova batteria.
LED verde Il LED lampeggia in verde per tre (3) volte appena prima che l’utente preme “Abbina” sul
dispositivo.
LED in giallo e poi in verde: La cronologia Bluetooth è stata cancellata dal telecomando.
LED rosso: Il LED lampeggia in rosso per due (2) volte quando il telecomando è cancellato dalla
cronologia.
LED rosso: Quando la batteria si è esaurita sotto il 35%, il LED rosso passa a luce fissa e rimane acceso.
Dispositivi compatibili
Rockford Fosgate PMX-1 (vedi manuale PMX-1 per la funzionalità impostata quando abbinato
direttamente con PMX-BTUR).
Modelli iPhone (IOS 10 e successive): 5, 5C, 5S, 6, 6 Plus, 6S, 6S Plus, 7, 7 Plus, 8, 8 Plus, X.
Modelli iPod: Touch (5a gen.), Touch (6a gen.)
Android (BT 5.0 e successive): Solo Bluetooth® Media.
Attivazione/Sospensione del telecomando
Se non si premono pulsanti, il telecomando andrà automaticamente in sospensione dopo 15 secondi
per preservare la durata della batteria. Per riattivarlo semplicemente premere qualsiasi pulsante sul
dispositivo una volta.
Procedure per l’aggiornamento
Di tanto in tanto sarà disponibile un aggiornamento per PMX-BTUR. Per installare l’aggiornamento nel
telecomando semplicemente aprire il dispositivo mobile, andare alla app Rockford Fosgate e seguire le
istruzioni sullo schermo.
Deutsch
Italiano
Содержание PUNCH PMX-BTUR
Страница 24: ...24 Endnotes ...


