background image

106

Build a wing by using

frames and rivets~

Hey, friends~

What were you doing?

I was in the middle of building my 

own robot. Actually, I was thinking 

of a windmill robot.

Yes. windmill uses wind power and 

draws water.

Windmill can draw water?

A-ha! That's great! ^^

You have to be careful when you 

develop a new robot.

People from Netherlands developed a 

windmill to draw water from a hole.

Then, they filled the hole to avoid

water disaster.

You have to think enough about its 

purpose, shape and functions.

Good! I should survey about 

windmill first!

pre-scanning step

design

revise&
improvement

You can draw 

water if you use 

a string and a 

paper cup.

Connect the wing to the rotation

motor and make it rotate...

6. Imagine Robot.

My own robot PART 1

Содержание RQ PLUS 110

Страница 1: ......

Страница 2: ...List BASICS Punching Bot Cultivator Swing Bot Fish Bot Rolling Bot 06 20 40 58 74 90 ...

Страница 3: ... Imagine Robot 1 Bumper Car Bowling Bot Puppy Bot Fencing Bot Helicopter Imagine Robot 2 106 110 126 144 160 178 194 ...

Страница 4: ...06 LED1 LED2 LED3 LED1 LED2 LED3 LED1 LED2 LED3 LED1 LED2 LED3 LED1 LED2 LED3 Ch1 Punching Bot Ch3 Swing Bot Ch5 Rolling Bot Ch2 Cultivator Ch4 Fish Bot Ch6 My own Robot 1 RQ 110 Robot ...

Страница 5: ...07 LED1 LED2 LED3 LED1 LED2 LED3 LED1 LED2 LED3 LED1 LED2 LED3 LED1 LED2 LED3 Ch7 Bumper Car Ch9 Puppy Bot Ch11 Helicopter Ch8 Bowling Bot Ch10 Fencing Bot Ch12 My own Robot 2 ...

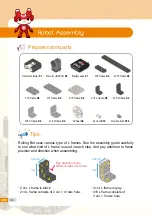
Страница 6: ... 3 3 frame X2 1 5 frame X4 2 7 frame X4 3 5 frame X4 5 5 frame X2 2 4 L frame X4 2 5 L frame X4 3 5 L frame X4 3 6 L frame X4 1 8 frame X4 2 9 frame X4 3 7 frame X4 1 12 frame X4 2 15 frame X4 3 9 frame X4 3 8 slide frame X2 RQ 110 Part ...

Страница 7: ...nd others Ball frame X2 Smart controller X1 LED X1 Rivet tool X1 Hinge A X3 Hinge B X3 Front horn X2 Rubber ring X3 2s rivet 3s rivet Double rivet Touch sensor X1 Wheel X4 Battery case X1 Rubber ring X2 Rotation motor X2 Spacer X4 IR remote controller X1 ...

Страница 8: ...ttached to a piece of machinery and which you push or pull in order to operate the machinery Point of action fulcrum and point of force are required to operate this principle Do not take out rivets as below Rivet tool uses the principle of lever 3 points power point support point action point exist in rivet tools like lever Lean the rivet tool backward to take out rivets except for double rivet ea...

Страница 9: ...nect three frames in a row Take out rivets Lean rivet tool backward to take out as you insert rivets into the U shaped part in the rivet tool Take out rivets Use the longer axis of rivet tool to push out rivets from rivet hole Insert rivets Use the shorter axis of rivet tool to insert rivets into frames Take out rivets Use the fork part of rivet tool to pull out rivets from frames A B C D 2s rivet...

Страница 10: ... 1 clack Applicable rivet types 2s rivet 3s rivet Double rivet 5 5 frame 3 5 frame Prepare two frames Match holes of the two frames Insert rivets where the red circles are Insert 2s rivet one by one 01 03 02 04 clack Done 5 5 frame 3 5 frame ...

Страница 11: ...to connect two frames Insert 4 rivets in one frame Match holes of the two frames 03 05 04 06 clack clack clack Done 02 Prepare two frames Insert 4 rivets Match holes of the two frames Push and connect clack 5 5 frame clack 5 5 frame 01 clack 5 5 frame ...

Страница 12: ...e the U shaped part of rivet tool Use the longer axis of rivet tool Take out double rivet Applicable rivet type Applicable rivet type Applicable rivet type Be careful not to bounce off 2s rivet 3s rivet Double rivet Double rivet clack clack 2s rivet 3s rivet ...

Страница 13: ...t Take out 4 rivets Use your thumb to fix the rivet Separate two frames 01 03 02 04 Fix rivet with your thumb clack Push the end part of rivet tool with your thumb Take out the rivet as you push the frame with your thumb Lean rivet tool backward as pushing with your thumb ...

Страница 14: ...ton of IR remote controller LED2 green blue red blinks 3 times and it s done How to register IR remote controller Button 2 IR receiver STOP Power S W OFF ON NOTE Unregistered IR remote controller cannot control a RQ robot 1 IR remote controller can be registered in smart controller at a time If a new IR remote controller is registered a previously registered IR remote controller is deleted Start f...

Страница 15: ...tion turn Right wheel moves while left wheel does not Speeds up from speed 1 to 3 as you press this button direction turn Left wheel moves while right wheel does not Speeds up from speed 1 to 3 as you press this button direction turn Right wheel moves while left wheel does not Speeds up from speed 1 to 3 as you press this button direction turn Left wheel moves while right wheel does not Speeds up ...

Страница 16: ...n motion 1 Run motion 2 Run motion 3 Run motion 4 Run motion 5 Run motion 6 Run motion 7 Run motion 8 Run motion 9 Run motion 10 Play Run coding 1 Run coding 2 Run coding 3 Run coding 4 Run coding 5 Run coding 6 Run coding 7 Run coding 8 Run coding 9 Run coding 10 Play Ten Little Indians Hello For Elise Minuet Bach Congratulations Happy Birthday to You Arirang STOP melody Twinkle Twinkle Little St...

Страница 17: ...ller when the robot is not in use Place the robot parts away from baby or toddler In any case of swallowing parts contact doctor immediately Do not operate the robot near you or facing you Do not use a peeled off battery or damaged battery as it may lead to fire or burn skin Clean up all RQ parts after you build or play with your robot Power S W is built in the smart controller Insert power device...

Страница 18: ... and Kungfu or kendo also belong to this kind of sports Hi friends Before the match why don t you show respect first Make a bow Oh ok Let s make a bow to each other Why don t you play a punch game with me OK I accept your challenge Starting at three One two three Huh Is it a robot game Fighting sports Head waist I beat anyone using the bamboo sword 1 Punching Bot Play a robot fight ...

Страница 19: ...t opposite robot punch and indicates hit numbers by LED light Real Steel is a movie depicting the year 2020 with robot fighters Robot is controlled by wireless controller and follows human motions to fight in the robot fights ⓒ DreamWorks Ⅱ Distribution Co LLC All Rights Reserved LED Indicates number of hit Touch sensor detects opposite robot s punch Rotation motor makes movement and punch possibl...

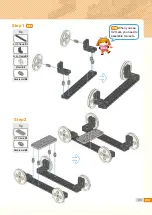
Страница 20: ...5 frame X4 R motor ID29 30 X2 Battery case X1 LED X1 Touch sensor X1 ID30 Connect to the bottom port and is used as left wheel ID29 Connect to the upper port and is used as right wheel Robot Assembly Prepare robot parts Tips Punching Bot uses two rotation motors to go forward backward and rotate Rotation motor ID29 is connected to the upper port while ID30 is connected to the bottom ID29 is connec...

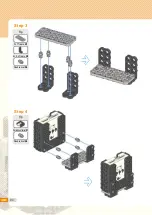
Страница 21: ...23 Step 2 Tip Tip R motor ID29 X1 Wheel X1 Rubber ring X1 Double rivet X2 3 7 frame X2 Double rivet X12 Assemble rotation motor ID30 same as ID29 R motor ID29 R motor ID30 Step 1 X2 ...

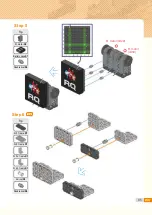
Страница 22: ...24 Step 4 Step 3 Tip Tip 2 4 L frame X2 3 5 L frame X1 Ball frame X1 Double rivet X6 1 8 frame X1 3 7 frame X1 Ball frame X1 Double rivet X8 ...

Страница 23: ...25 Step3 Step 6 Step 5 Tip Tip 3 5 frame X1 2 5 L frame X1 3 6 L frame X1 Double rivet X6 Double rivet X4 ...

Страница 24: ...26 Step 7 Step 8 Tip Tip Smart controller X1 Battery case X1 Double rivet X6 3 5 frame X1 2 5 L frame X1 3 6 L frame X1 Double rivet X6 ...

Страница 25: ...27 Step7 Step8 Step 9 Step 10 Tip Tip Double rivet X2 Double rivet X8 ...

Страница 26: ...28 Step10 Step 11 Tip 1 8 frame X1 2 5 frame X1 5 5 frame X1 3 8 slide frame X1 2 4 L frame X1 3 5 L frame X1 3 6 L frame X1 2s rivet X3 Double rivet X10 Step 12 Tip Double rivet X2 ...

Страница 27: ...29 Step12 Step 13 Tip 1 8 frame X1 2 5 frame X1 5 5 frame X1 3 8 slide frame X1 2 4 L frame X1 3 5 L frame X1 3 6 L frame X1 2s rivet X3 Double rivet X10 Step 14 Tip Double rivet X2 ...

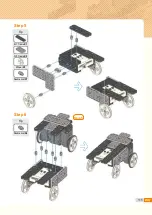
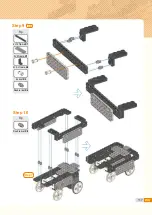
Страница 28: ...30 Step 15 Step 16 Tip Tip 1 5 frame X2 1 12 frame X1 Spacer X1 2s rivet X4 3s rivet X1 1 5 frame X2 1 12 frame X1 Spacer X1 2s rivet X4 3s rivet X1 ...

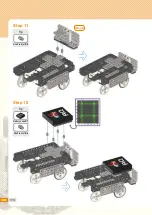
Страница 29: ...31 Step 17 Step 18 Tip Tip LED X1 Touch sensor X1 3 7 frame X1 3 5 L frame X1 2s rivet X2 Double rivet X4 3 5 frame X2 3 9 frame X1 Double rivet X6 ...

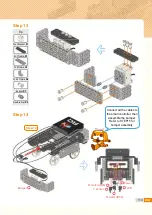
Страница 30: ...32 Step 20 Step18 Be careful with the position and direction of each cable when connecting Step 18 Touch sensor R motor ID29 R motor ID30 Power device LED Step 18 Tip Double rivet X2 Step16 Step 19 ...

Страница 31: ...33 Punching Bot ready completion ...

Страница 32: ...smart controller to set up Punching Bot robot model Third Press button P on smart controller to enter standby mode LED1 LED2 LED3 When robot is not working properly check the following 1 When Punching Bot is not working well Check the power device battery case power S W and Punching Bot LED set up 2 When rotation motor touch sensor and LED are not working well Check the electronic parts and cables...

Страница 33: ... left and right movement ⓒ Go backward with left and right movement 1 button 2 button ⓐ Go forward when touch sensor is pressed ⓐ Go forward when touch sensor is pressed ⓑ Go forward slowly and stop slowly ⓑ Go forward slowly and stop slowly ⓒ Go backward when touch sensor is pressed ⓒ Go backward when touch sensor is pressed Check movement and assembly Example 1 button 2 button 3 button ...

Страница 34: ...t falls or goes outside the ring Designate the game time and rules through discussion LED basic value blue red light on Detect hit one time blue light on Detect hit two times red light on Detect hit three times All LED light off and STOP You should respect opposite player and have careful concern when you do games Punch Punch Describe your Punching Bot Robot level What was the most fun about it Wh...

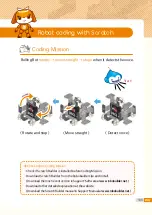
Страница 35: ... Mission Check before Coding Mission Check if Scratch Builder is installed before Coding Mission Download Scratch Builder from the Robobuilder site and install Download the most recent version in Support Software at www robobuilder net Download other detailed explanation at the website Download the Scratch Builder manual in Support Manual at www robobuilder net ...

Страница 36: ...atch Builder to run without the communication cable press 4 button on the remote to run the uploaded code Any questions about Coding Mission For any questions about robot coding mission visit Support Technical support at www robobuilder net Download the Scratch Builder manual on the website Download the Scratch Builder manual in Support Manual at www robobuilder net ...

Страница 37: ...39 0 02 ...

Страница 38: ...ic and potential energy Wow surprising Also energy can transform into another type Ho freezing Rub your hand and your hands get warm This means kinectic energy has changed into heat energy RQ robot uses battery and makes robot move This means electric energy has changed into kinetic energy Twinkling light is also energy It s all about energy how Mong jumps and how the roller coaster moves so fast ...

Страница 39: ... to kinetic energy makes the cultivator robot go forward and backward like a real cultivator Let s build a cultivator robot and check out its movements Clap Batabata Cultivator is very important machinery in farm village It is not fast but it cultivates farmland transports things and more Batabata Let s wake up the morning of farm village Today s Robot Class ...

Страница 40: ...me X2 3 9 frame X4 5 5 frame X1 2 4 L frame X4 R motor ID30 X1 Battery case X1 1 5 frame X2 2 5 frame X3 Check the rotation motor ID30 before start assembling Match home marks of the front horns Check out the cable of rotation motor First Second You can see how to connect front horn with the motor The front side has the ID mark Robot Assembly Prepare robot parts Tips ...

Страница 41: ...43 Use an ID30 rotation motor Step 1 Step 2 Tip Tip R motor ID30 X1 Wheel X1 Rubber ring X1 Double rivet X2 Wheel X1 Rubber ring X1 Front horn X1 Double rivet X2 ...

Страница 42: ...44 Step2 Step 3 Step 4 Tip Tip Battery case X1 3 9 frame X1 3 6 L frame X1 Double rivet X8 3 6 L frame X1 3s rivet X3 Double rivet X2 ...

Страница 43: ...45 Step 5 Step 6 Tip Tip 2 5 frame X1 2 7 frame X1 2 4 L frame X3 2s rivet X2 Double rivet X6 1 5 frame X1 2 5 frame X1 2s rivet X2 Double rivet X2 ...

Страница 44: ...46 Step 7 Step 8 Tip Tip 2 7 frame X1 2 4 L frame X1 2s rivet X2 Double rivet X2 1 5 frame X1 2 5 frame X1 2s rivet X2 Double rivet X2 ...

Страница 45: ...47 Step 9 Step 10 Tip Tip Smart controller X1 3 5 frame X1 3 9 frame X1 Double rivet X6 2 5 L frame X2 3 5 L frame X1 Double rivet X7 ...

Страница 46: ...48 Insert rivets in the correct position Step 11 Step 12 Tip Tip 2 7 frame X1 3 5 L frame X1 Double rivet X4 3 9 frame X1 3 5 L frame X1 3 6 L frame X1 Wheel X1 2s rivet X2 Double rivet X3 ...

Страница 47: ...49 Step 13 Step 14 Tip Tip Double rivet X2 3 9 frame X1 3 5 L frame X1 3 6 L frame X1 Wheel X1 2s rivet X2 Double rivet X3 ...

Страница 48: ...50 Step 15 Step 16 Tip Tip Double rivet X2 3 5 frame X1 5 5 frame X1 3s rivet X4 Double rivet X4 ...

Страница 49: ...51 Check the cable position and direction Power device R motor ID30 Step8 Step4 Step 17 Step 18 Tip Double rivet X6 ...

Страница 50: ...52 Cultivator robot ready completion ...

Страница 51: ...rogram the robot for proper operation Third Press button P on smart controller to enter standby mode Button P LED1 LED2 LED3 from left side Button 1 2 3 from left side LED1 LED2 LED3 Program for Cultivator robot model set up Robot Experience When robot is not working properly check the following 1 When Cultivator robot is not working well Check the assembly status and Cultivator robot LED set up 2...

Страница 52: ...elow Batabata go forward Batabata go backward Stop slowly Batabata go backward when sound is detected Batabata go forward when sound is detected Go forward slowly and then go backward slowly Check movement and assembly Examples Clap Clap 1 button 2 button 3 button 4 button 5 button 6 button ...

Страница 53: ...You can only press STOP once Whoever comes closer to this frame wins Do not let the 3 7 frames fall or move away from the game zone Change your Cultivator robot speed Who comes closer Robot Play Describe your Cultivator robot Robot level What was the most fun about it What was the most difficult thing Check your robot with your teacher Very easy Easy Average Difficult Very difficult ...

Страница 54: ... installed before Coding Mission Download Scratch Builder from the Robobuilder site and install Download the most recent version in Support Software at www robobuilder net Download other detailed explanation at the website Download the Scratch Builder manual in Support Manual at www robobuilder net Coding Mission Detect voice Move straight and stop ...

Страница 55: ...atch Builder to run without the communication cable press 4 button on the remote to run the uploaded code Any questions about Coding Mission For any questions about robot coding mission visit Support Technical support at www robobuilder net Download the Scratch Builder manual on the website Download the Scratch Builder manual in Support Manual at www robobuilder net ...

Страница 56: ...s down That means pendulum gets potential energy again as it is lifted up The higher pendulum position the larger potential energy And lifted pendulum comes down because of gravity Correct It goes up and down by the law of inertia As kinectic energy switches into potential energy it can go up potential energy Kinetic energy potential energy Come and go it makes me feel like I m riding a viking shi...

Страница 57: ... build a twin Swing Bot in this chapter RQ rotation motor has two axes to allow two different motions at once Furthermore we can enjoy a fun board game by using this twin Swing Bot A swing is a seat hanging with two ropes or chains from a metal frame or from the branch of a tree You can sit on the seat and swing front and back through the air Mmm This is like a rocking chair for twins Today s Robo...

Страница 58: ... X4 5 5 frame X2 2 4 L frame X4 2 5 L frame X4 2 7 frame X3 2 9 frame X3 2 15 frame X4 3 5 frame X2 R motor ID30 X1 Battery case X1 Touch sensor X1 1 8 frame X2 Connect the touch sensor to sensor port 1 of smart controller Connect the touch sensor carefully as you check the cable position and direction Sensor port 1 Connect Touch sensor Robot Assembly Prepare robot parts Tips ...

Страница 59: ...61 Use ID30 rotation motor Match two home marks of both side of rotation motor ID30 Step 1 Step 2 Tip Tip R motor ID30 X1 2 7 frame X1 Front horn X1 Double rivet X2 2 9 frame X1 Double rivet X2 ...

Страница 60: ...62 Step 3 Step 4 Tip Tip 2 9 frame X2 3 9 frame X4 5 5 frame X2 Double rivet X10 3 7 frame X1 3 5 L frame X1 3 6 L frame X1 Double rivet X8 ...

Страница 61: ...63 Step2 Step 5 Step 6 Tip Tip Smart controller X1 Battery case X1 Touch sensor X1 Double rivet X10 Double rivet X4 ...

Страница 62: ...and Step 8 Hinge A and Hinge B are different Be careful Hinge A Hinge B 90 90 Tip Tip 2 7 frame X1 2 4 L frame X2 Double rivet X4 1 12 frame X2 3 5 frame X1 3 6 L frame X1 Hinge A X1 Hinge B X1 Double rivet X8 Step 7 X2 Step 8 X2 ...

Страница 63: ...65 Step7 Step8 Tip Tip 1 8 frame X1 2 15 frame X2 2 5 L frame X2 Spacer X2 3s rivet X2 Double rivet X5 2s rivet X4 Step 9 Step 10 ...

Страница 64: ...66 Step8 Step7 Tip Tip 1 8 frame X1 2 15 frame X2 2 5 L frame X2 Spacer X2 3s rivet X2 Double rivet X5 2s rivet X4 Step 11 Step 12 ...

Страница 65: ...67 Step 14 Tip Double rivet X2 Step12 Step10 Step6 See carefully for double rivet insert position Tip Double rivet X8 Step 13 ...

Страница 66: ...68 Be careful for the cable position and direction Touch sensor Power device R motor ID30 Swing Bot ready Step 15 completion ...

Страница 67: ...o set up Swing Bot robot model The buttons work as a keyboard for PC Program the robot for proper operation Third Press button P on smart controller to enter standby mode Button P LED1 LED2 LED3 from left side Button 1 2 3 from left side When robot is not working properly check the following 1 When Swing Bot is not working well Check the power device battery case power S W and set up platform 2 Wh...

Страница 68: ...sed Swing moves slowly and then stops slowly Swing moves slowly when touch sensor is pressed 1 Press button 1 2 or 3 and then write your answer on how a robot moves 2 Connect lines for corresponding motions and actions with the IR remote controller buttons button button button ...

Страница 69: ...f both swings stay in center Move three steps Swing board game Robot Play START Bonus Move forward 2 spaces Bad day Move back 1 space Let s take an airplane Bonus Move forward 2 spaces Bonus Move forward 1 space Let s take a break Loose a turn Special bonus Move forward 3 spaces Bad day Move back 1 space Bonus Move forward 2 spaces Let s take a break Loose a turn Come too far Go down the slide Bon...

Страница 70: ... before Coding Mission Download Scratch Builder from the Robobuilder site and install Download the most recent version in Support Software at www robobuilder net Download other detailed explanation at the website Download the Scratch Builder manual in Support Manual at www robobuilder net Coding Mission Swing motion Detect with touch sensor ON OFF ON OFF ...

Страница 71: ...oad the Scratch Builder manual on the website Download the Scratch Builder manual in Support Manual at www robobuilder net Create a Scratch block as below and run by pressing the spacebar on the keyboard Save the block on Scratch and upload to the robot using Scratch Builder to run without the communication cable press 4 button on the remote to run the uploaded code ...

Страница 72: ...74 Living under water fish 4 Fish Bot ...

Страница 73: ... fish in such habitats which survive the retreat of the tide by hiding under wet seaweed or in tidal pools Fish Bot looks like a mudskipper and moves likes one too Fish robot that looks like carp swims as it finds polluted place or toxins in water Not just that it returns to recharge itself when needed Water is precious Hey friends save your water Today s Robot Class ...

Страница 74: ...X71 5 5 frame X2 2 4 L frame X3 3 5 L frame X4 3 6 L frame X1 2 7 frame X1 3 3 frame X2 3 5 frame X4 3 7 frame X3 R motor ID30 X1 Battery case X1 1 3 frame X3 1 8 frame X2 Hinge A and Hinge B parts look quite similar It can be distinguished by its colors and letter A or B written on Hinge A Hinge B Robot Assembly Prepare robot parts Tips ...

Страница 75: ...77 Smart controller X1 1 3 frame X1 3 9 frame X2 Ball frame X1 Double rivet X8 3 3 frame X1 3 5 frame X1 5 5 frame X1 2s rivet X1 Double rivet X9 Tip Tip Step 1 Step 2 ...

Страница 76: ...78 3 3 frame X1 3 5 frame X1 5 5 frame X1 2s rivet X1 Double rivet X9 3 9 frame X1 2 4 L frame X2 3 5 L frame X1 2s rivet X6 Tip Tip Step 3 Step 4 ...

Страница 77: ...79 Step3 3 7 frame X3 3 9 frame X1 2s rivet X2 Double rivet X10 Double rivet X1 Tip Tip Step 5 Step 6 ...

Страница 78: ...80 Step6 Match home marks on both side of ID30 R motor ID30 X1 Battery case X1 3 5 frame X1 3 6 L frame X1 Front horn X1 2s rivet X2 Double rivet X6 3s rivet X2 Tip Tip Step 7 Step 8 ...

Страница 79: ...81 Hinge B Hinge A 1 3 frame X1 2 5 frame X2 2 4 L frame X1 3 5 L frame X1 3s rivet X1 Double rivet X10 1 8 frame X1 Hinge A X1 Hinge B X1 3s rivet X1 Double rivet X3 Tip Tip Step 9 Step 10 ...

Страница 80: ...82 Hinge B Hinge A 1 3 frame X1 2 5 frame X1 2 7 frame X1 3 5 L frame X1 3s rivet X1 Double rivet X8 1 8 frame X1 Hinge A X1 Hinge B X1 3s rivet X1 Double rivet X3 Tip Tip Step 11 Step 12 ...

Страница 81: ...83 See the position and direction carefully when you connect cables Power device R motor ID30 3 5 frame X1 3 5 L frame X1 2s rivet X1 Double rivet X4 Tip Step 13 Step 14 ...

Страница 82: ...84 Fish Bot ready Tip The head part of Fish Bot is detachable so that you can operate power S W or connect cables easily completion ...

Страница 83: ...et up Fish Bot robot model The buttons work as a keyboard for PC Program the robot for proper operation Third Press button P on smart controller to enter standby mode Button P LED1 LED2 LED3 from left side Button 1 2 3 from left side When robot is not working properly check the following 1 When Fish Bot robot s fin is not moving well Check the assembling status of fin part and motor ID30 cable 2 W...

Страница 84: ... goes pit a pat and stop Fish Bot stops slowly Fish Bot moves slowly Fish Bot goes pit a pat and stops when sound is detected Fish Bot moves slowly and stops slowly 1 Press button 1 2 or 3 of IR remote controller and then draw a line to the corresponding motion of Fish Bot button button button button button button ...

Страница 85: ...or 1 minute Different score is written for each color sections are for adding or subtracting scores Discuss with your friend to assign new rules game time or scores Let s say you stay on green 5 Your total is 45 3cm 25cm 3cm 3cm Escape game Robot Play Describe your Fish Bot Robot level What was the most fun about it What was the most difficult thing Check your robot with your teacher Very easy Eas...

Страница 86: ...lder is installed before Coding Mission Download Scratch Builder from the Robobuilder site and install Download the most recent version in Support Software at www robobuilder net Download other detailed explanation at the website Download the Scratch Builder manual in Support Manual at www robobuilder net Coding Mission Detect voice and stop Detect voice and move straight ...

Страница 87: ...atch Builder to run without the communication cable press 4 button on the remote to run the uploaded code Any questions about Coding Mission For any questions about robot coding mission visit Support Technical support at www robobuilder net Download the Scratch Builder manual on the website Download the Scratch Builder manual in Support Manual at www robobuilder net ...

Страница 88: ...re round So I experimented Huh Triangular and rectangular wheels cannot roll well Why is that The reason is so simple Balls for baseball pingpong and soccer are round Ball is round so it can roll down the stairs Friction force Hoop and hula hoop roll so well because they are round A ball only touches the floor lightly while a triangle and a rectangle touch the floor with its wide side So the frict...

Страница 89: ...luggage wheel chair vacuum cleaner and more In this chapter we will build a Rolling Bot and learn about wheels Later play a game with friends with the assembled robot Monster truck has very huge wheels that enables it to move with no issue on rough and rugged roads safely Even rugged mountain and gravelly field is not a problem to pass by Today s Robot Class ...

Страница 90: ...lling Bot uses various type of L frames See the assembly guide carefully to see what kind of L frame is used in each step And pay attention to frame position and direction when assembling 2 col L frame is black 2 4 L frame consists of 2 col 4 rows hole 3 col L frame is gray 3 5 L frame consists of 3 col 5 rows hole Pay attention to two different sides of L frame column column row row Robot Assembl...

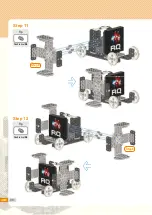
Страница 91: ...93 X2 When you see X2 mark you need to assemble two sets Tip Tip 2 15 frame X1 2 4 L frame X2 Wheel X2 Double rivet X6 3 7 frame X1 Double rivet X4 Step 1 X2 Step 2 ...

Страница 92: ...94 Tip Tip 3 7 frame X1 2 5 L frame X2 Double rivet X4 Smart controller X1 Double rivet X4 Step 3 Step 4 ...

Страница 93: ...95 R motor ID29 R motor ID30 Tip R motor X2 Battery case X1 Double rivet X4 Step 5 Tip 2 5 frame X1 3 5 frame X1 3 5 L frame X1 3 6 L frame X1 2s rivet X2 Double rivet X2 Step 6 X2 ...

Страница 94: ...96 Tip 5 5 frame X1 Double rivet X8 Step 7 X2 Tip 2s rivet X4 Step 8 X2 ...

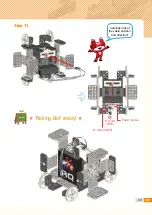
Страница 95: ...97 Step5 Check ID29 ID30 connection position Tip Tip Double rivet X6 Double rivet X4 Step 9 Step 10 Step2 Step4 ...

Страница 96: ...98 Tip Tip Double rivet X4 Double rivet X4 Step 11 Step 12 Step8 Step8 ...

Страница 97: ...99 Carefully look at the cable position and direction Power device R motor ID30 R motor ID29 Rolling Bot ready Step 13 completion ...

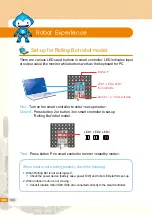
Страница 98: ...model Third Press button P on smart controller to enter standby mode Set up for Rolling Bot robot model When robot is not working properly check the following 1 When Rolling Bot is not working well Check the power device battery case power S W and robot LED platform set up 2 When rotation motor is not moving Check if rotation motor ID29 ID30 are connected correctly to the smart controller Button P...

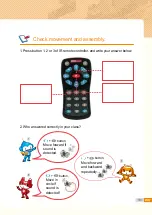
Страница 99: ...ess button 1 2 or 3 of IR remote controller and write your answer below 2 Who answered correctly in your class button Move forward if sound is detected button Move in circle if sound is detected button Move forward and backward repeatedly ...

Страница 100: ...move to END point Whoever finishes faster wins the game Robot stops for 5 seconds when it finishes the track Zigzag track game Robot Play You can add hurdles to make it more fun Track 1 Track 2 Describe your Rolling Bot Robot level What was the most fun about it What was the most difficult thing Check your robot with your teacher Very easy Easy Average Difficult Very difficult ...

Страница 101: ...e Coding Mission Check if Scratch Builder is installed before Coding Mission Download Scratch Builder from the Robobuilder site and install Download the most recent version in Support Software at www robobuilder net Download other detailed explanation at the website Download the Scratch Builder manual in Support Manual at www robobuilder net Coding Mission ...

Страница 102: ...atch Builder to run without the communication cable press 4 button on the remote to run the uploaded code Any questions about Coding Mission For any questions about robot coding mission visit Support Technical support at www robobuilder net Download the Scratch Builder manual on the website Download the Scratch Builder manual in Support Manual at www robobuilder net ...

Страница 103: ...105 0 02 ...

Страница 104: ... to be careful when you develop a new robot People from Netherlands developed a windmill to draw water from a hole Then they filled the hole to avoid water disaster You have to think enough about its purpose shape and functions Good I should survey about windmill first pre scanning step design revise improvement You can draw water if you use a string and a paper cup Connect the wing to the rotatio...

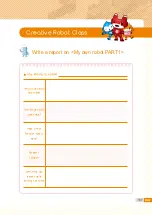
Страница 105: ... on My own robot PART1 My robot is called Why did you build this robot How did you build your robot What kind of function does it have Problem Solution Something you learned while building the robot Creative Robot Class ...

Страница 106: ...picture of your own robot below Describe your own robot Robot level What was the most fun about it What was the most difficult thing Check your robot with your teacher Very easy Easy Average Difficult Very difficult ...

Страница 107: ...109 0 02 ...

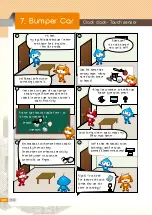
Страница 108: ...nsor to detect Things like computer tv and fan use button type touch sensor Ouch During winter static makes my life so much harder Button type detects outside force so it detects whether it is Electrostatic touch sensor detects static electicity from our body Smart phone screen detects electricity from body when we touch the screen with our fingers Cool Is that electostatic touch technology used f...

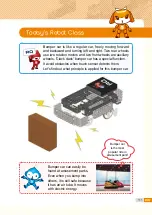
Страница 109: ...lack clack bumper car has a special function It avoid obstacles when touch sensor detects them Let s find out what principle is applied for this bumper car Bumper car can easily be found at amusement parks Even when you bump into others it is still safe because it has an air tube It moves with electric energy Bumper car is the most popular ride in amusement park Today s Robot Class ...

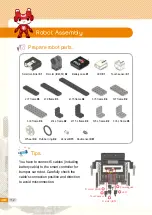
Страница 110: ...ar robot Carefully check the cable s connection position and direction to avoid misconnection Smart controller X1 R motor ID29 30 X2 Battery case X1 LED X1 Touch sensor X1 2 7 frame X3 2 9 frame X3 2 15 frame X2 3 5 frame X4 3 7 frame X2 3 9 frame X4 Wheel X4 Rubber ring X2 2s rivet X15 Double rivet X81 2 4 L frame X2 2 15 L frame X4 3 5 L frame X2 3 6 L frame X3 R motor ID29 Power device ...

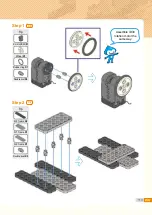
Страница 111: ...113 第十步 Assemble ID30 rotation motor the same way Tip Tip R motor ID29 X1 Wheel X1 Rubber ring X1 Double rivet X2 2 9 frame X2 3 7 frame X1 3 9 frame X1 Double rivet X5 Step 1 Step 2 X2 X2 ...

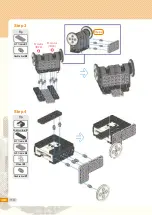
Страница 112: ...114 R motor ID29 R motor ID30 Step2 Tip Tip 3 7 frame X1 Double rivet X2 Smart controller X1 2 7 frame X1 3 5 frame X2 Wheel X1 Double rivet X7 Step 3 Step 4 ...

Страница 113: ...115 Step5 Tip Tip 2 7 frame X1 3 5 frame X2 Wheel X1 Double rivet X7 Double rivet X6 Step 5 Step 6 ...

Страница 114: ...116 Tip Tip 2 4 L frame X2 2s rivet X4 Double rivet X2 LED X1 2 9 frame X1 3 5 L frame X2 3 6 L frame X1 Double rivet X10 Step 7 Step 8 ...

Страница 115: ...117 Step7 Tip Tip 2 15 frame X1 3 9 frame X1 2 5 L frame X2 2s rivet X2 Double rivet X4 Double rivet X8 Step 9 Step 10 X2 ...

Страница 116: ...118 Step8 Tip Double rivet X2 Step 11 Tip Battery case X1 Double rivet X4 Step 12 ...

Страница 117: ...the smart controller then assemble the bumper Refer to STEP15 for bumper assembly Bumper R motor ID29 T sensor R motor ID30 Power LED Step 14 Tip Touch sensor X1 2 7 frame X1 3 9 frame X1 3 6 L frame X2 2s rivet X7 Double rivet X2 Step 13 ...

Страница 118: ...120 Cable connection status Bumper car ready Tip Double rivet X4 Step 15 completion ...

Страница 119: ...tton 2 or button 3 on smart controller to set up Bumper car robot model The buttons work as a keyboard for PC Program the robot for proper operation Button P LED1 LED2 LED3 from left side Button 1 2 3 from left side Third Press button P on smart controller to enter standby mode When robot is not working properly check the following 1 When rotation motor is not moving Check if rotation motor ID29 I...

Страница 120: ...2 button Move forward fast and stop fast 3 button Move forward towards the right 3 button Move forward backward if touch sensor detects an object 5 button Move forward slowly and stop slowly 6 button Move forward and stop when sensor detects an object Check movement and assembly ...

Страница 121: ... wins game If the bumper car gets out of the road stop for 2 seconds Game panel Obstacle Rule for robot control Robot stop time Make your own rules Avoid obstacles Robot Play Describe your Bumper Car robot Robot level What was the most fun about it What was the most difficult thing Check your robot with your teacher Very easy Easy Average Difficult Very difficult ...

Страница 122: ...e straight and stop Check before Coding Mission Check if Scratch Builder is installed before Coding Mission Download Scratch Builder from the Robobuilder site and install Download the most recent version in Support Software at www robobuilder net Download other detailed explanation at the website Download the Scratch Builder manual in Support Manual at www robobuilder net ...

Страница 123: ...atch Builder to run without the communication cable press 4 button on the remote to run the uploaded code Any questions about Coding Mission For any questions about robot coding mission visit Support Technical support at www robobuilder net Download the Scratch Builder manual on the website Download the Scratch Builder manual in Support Manual at www robobuilder net ...

Страница 124: ...ber band stretches out when we pull out and gets shorter when we release it Exactly Spring and rubber band have large elastic force Hey There is elastic force in our body too Pull your cheek and release it Geez you are such a ㅜ ㅜ Elastic force The characteristic to go back to its original position is called elastic force Let s see who jumps higher I guess a jumper who has the better elastic force ...

Страница 125: ...pring ballpoint pen scales and bows Bowling Bot can fire objects by utilizing elastic force Let s bowl after we build a Bowling Bot robot I can shoot out a curve ball slide or down ball Wheel Pitching machine is used for baseball practice It throws balls automatically with the rotating wheel s turning force and rubber elastic force Today s Robot Classs ...

Страница 126: ...ot Press button 2 on the IR remote controller to bring 3 8 slide frame down 2s rivet X5 3s rivet X10 Double rivet X75 Rubber ring X1 3 7 frame X4 3 9 frame X3 5 5 frame X1 3 8 slide frame X1 2 7 frame X2 2 9 frame X2 2 15 frame X4 3 3 frame X1 R motor ID29 30 X2 Battery case X1 Touch sensor X1 1 3 frame X2 Tips Check below when you attach wheels to Bowling Bot Enter standby mode for Bowling Bot 3 ...

Страница 127: ...129 Tip Tip 2 9 frame X2 3 9 frame X1 5 5 frame X1 Double rivet X6 2 15 frame X3 Double rivet X10 Step 1 Step 2 ...

Страница 128: ...130 3 6 L frame has two different sides Use a rotation motor Tip Tip 2 15 frame X1 Double rivet X10 R motor ID30 X1 Touch sensor X1 3 6 L frame X1 Double rivet X6 Step 3 Step 4 ...

Страница 129: ...131 Step4 Tip Tip 3 7 frame X1 3 9 frame X1 3 5 L frame X1 Double rivet X4 3 7 frame X1 3s rivet X2 Step 5 Step 6 ...

Страница 130: ...132 Step6 Tip Tip 3 7 frame X1 3 9 frame X1 3 5 L frame X1 Double rivet X4 3 7 frame X1 3s rivet X2 Step 7 Step 8 ...

Страница 131: ...tor ID29 Use 2s rivet for 2 7 frame connection Hang rubber ring in STEP17 Tip Tip R motor ID29 X1 3 5 frame X3 Double rivet X8 1 5 frame X2 2 7 frame X2 2 5 L frame X2 2s rivet X2 3s rivet X4 Double rivet X4 Step 9 Step 10 ...

Страница 132: ...134 Insert 2s rivet to slide frame Step8 Step10 Tip Tip 1 3 frame X2 3 3 frame X1 3 5 frame X1 3 8 slide frame X1 2s rivet X3 Double rivet X4 Double rivet X4 Step 11 Step 12 ...

Страница 133: ...135 Tip Tip Battery case X1 3s rivet X1 Double rivet X4 Smart controller X1 3s rivet X1 Double rivet X2 Step 13 Step 14 ...

Страница 134: ...136 Check out the cable position and direction Step11 R motor ID29 Touch sensor Power device R motor ID30 Tip Double rivet X5 Step 15 Step 16 ...

Страница 135: ...137 Rubber ring should be placed as below Step3 Tip Tip Rubber ring X1 Double rivet X4 Step 17 Step 18 ...

Страница 136: ... mode B to mode A turn off and on the RQC then press button and button A together Do Re Mi sound is played when it switches into mode A Tips When you control the other robot models select mode B based on page 17 Select mode A when you control the Bowling Bot ...

Страница 137: ... set up Bowling Bot robot model The buttons work as a keyboard for PC Program the robot for proper operation Button P LED1 LED2 LED3 from left side Button 1 2 3 from left side Third Press button P on smart controller to enter standby mode When robot is not working properly check the following 1 When Bowling Bot is not working well Check the power device battery case power S W and other electronic ...

Страница 138: ...e Bowling Bot Which button should I press Check movement and assembly 1 Bowling Bot turns right 2 Bowling Bot turns left 3 Bowling Bot turns round slowly and stops slowly 4 Shoot wheel when sound is detected 5 Shoot wheel when touch sensor is pressed button button button button button ...

Страница 139: ...ling pins Shoot wheel two times towards the 2 5 L frames Whoever strikes more 2 5 frames wins game Discuss with friends to decide on the number of frames and the distance between the bowl and the pins Extend distance by 1m from robot to the target 1m Set 2 5 L frames as below Mini bowling game Robot Play Describe your Bowling Bot Robot level What was the most fun about it What was the most difficu...

Страница 140: ...ting or loading Check before Coding Mission Check if Scratch Builder is installed before Coding Mission Download Scratch Builder from the Robobuilder site and install Download the most recent version in Support Software at www robobuilder net Download other detailed explanation at the website Download the Scratch Builder manual in Support Manual at www robobuilder net ...

Страница 141: ...atch Builder to run without the communication cable press 4 button on the remote to run the uploaded code Any questions about Coding Mission For any questions about robot coding mission visit Support Technical support at www robobuilder net Download the Scratch Builder manual on the website Download the Scratch Builder manual in Support Manual at www robobuilder net ...

Страница 142: ...things that uses link structure The link structure makes it possible Haha it s so cute to see your robot waddle Link structure changes rotation motor spin force into straight line force On the contrary straight line force is changed to spin force by link structure When we ride bicycle our legs move up and down but bicycle wheel rotates Straight line force Spin force Spin force Straight line force ...

Страница 143: ...pin power to walk device such as bicycle sewing machine and wiper for cars 4 legs walking walk with four legs AIBO developed by SONY Japan is world s first intelligent puppy robot This robot can express various feelings like happy sad and angry It sometimes entertains people happy with other functions Today s Robot Class Look at the wagging tail Means feel so good ...

Страница 144: ...1 12 frame X2 2 7 frame X3 2 9 frame X4 3 5 frame X4 Tips Puppy Bot uses a link structure that enables it to walk with four legs The rotation motor spin power is changed into straight line motion to have the robot walk on four legs Refer to the STEP12 and STEP14 for rotation motor and frame connection Smart controller X1 R motor ID29 30 X2 Battery case X1 LED X1 1 3 frame X4 ...

Страница 145: ...147 R motor ID30 R motor ID29 Tip Tip R motor X2 3 5 frame X1 Double rivet X2 2 7 frame X2 3 7 frame X1 2 4 L frame X2 Double rivet X12 Step 1 Step 2 ...

Страница 146: ...148 Tip Smart controller X1 Battery case X1 Double rivet X4 Step 3 Tip 2 7 frame X1 3 5 L frame X1 3 6 L frame X1 2s rivet X3 Step 4 ...

Страница 147: ...149 Hinge A Hinge B Step4 Step5 Tip Tip Tip 1 3 frame X4 3 5 frame X1 3s rivet X2 LED X1 Hinge A X1 Hinge B X1 Double rivet X2 3s rivet X2 Step 5 Step 6 Step 7 ...

Страница 148: ...150 Build two sets Step3 Step2 Tip 1 5 frame X1 Hinge A X1 Double rivet X10 Step 8 Tip 3 5 frame X1 3 5 L frame X1 Double rivet X4 Step 9 X2 ...

Страница 149: ...151 Step8 Tip Tip 2 4 L frame X2 3s rivet X8 1 5 frame X1 1 12 frame X1 2 9 frame X2 2s rivet X2 Double rivet X1 Step 10 Step 11 ...

Страница 150: ...152 Step10 Tip Tip 2s rivet X3 1 5 frame X1 1 12 frame X1 2 9 frame X2 2s rivet X2 Double rivet X1 Step 12 Step 13 ...

Страница 151: ...153 Carefully look at the cable insert position and direction R motor ID29 R motor ID30 Power LED Step12 Tip 2s rivet X3 Step 14 Step 15 ...

Страница 152: ...154 Puppy Bot ready completion ...

Страница 153: ...smart controller to set up Puppy Bot robot model The buttons work as a keyboard for PC Program the robot for proper operation Button P LED1 LED2 LED3 from left side Button 1 2 3 from left side Third Press button P on smart controller to enter standby mode When robot is not working properly check the following 1 When rotation motor is not moving Check whether the rotation motors ID29 ID30 are conne...

Страница 154: ...walks from left leg to right leg in order to go backward 2 Read below and mark O for correct answer 1 buttons 2 buttons 3 What happens when you press together Check movement and assembly ⓐ Go forward when sound is detected ⓐ Go forward when sound is detected ⓑ Move slowly and stop slowly ⓑ Move slowly and stop slowly ⓒ Go backward when sound is detected ⓒ Go backward when sound is detected ...

Страница 155: ... minutes long Whoever pushes out the opponent first wins Make rules with your friend How about we place obstacles inside of the board game panel If you touch it you can t play for 5 seconds Yo ho Yo ho Push it out Robot Play Describe your Puppy Bot Robot level What was the most fun about it What was the most difficult thing Check your robot with your teacher Very easy Easy Average Difficult Very d...

Страница 156: ...e Check before Coding Mission Check if Scratch Builder is installed before Coding Mission Download Scratch Builder from the Robobuilder site and install Download the most recent version in Support Software at www robobuilder net Download other detailed explanation at the website Download the Scratch Builder manual in Support Manual at www robobuilder net ...

Страница 157: ...atch Builder to run without the communication cable press 4 button on the remote to run the uploaded code Any questions about Coding Mission For any questions about robot coding mission visit Support Technical support at www robobuilder net Download the Scratch Builder manual on the website Download the Scratch Builder manual in Support Manual at www robobuilder net ...

Страница 158: ...a light source as well It emits light with electricity Oh It detects attack with its touch sensor LED lights up when robot gets attacked and it moves backward OK can we start the fencing game with our fencing bot See the link structure robot attack motion The moon does not emit light It only reflects the light from the sun So the moon is not a light source Oh great source of light Sun Help me Sour...

Страница 159: ... by using the link structure Fencing is a sport in which two competitors fight each other using very thin swords The ends of the swords are covered and the competitors wear protective clothes so that they do not hurt each other Jacket and helmet are made of steel to protect fencing player Fencing bot goes backward and the LED turns on when the touch sensor is pressed Today s Robot Class ...

Страница 160: ...straight line movement or the attack motion possible Robot Assembly Prepare robot parts Tips 1 3 frame X3 1 8 frame X3 1 12 frame X1 2 5 frame X1 2 7 frame X1 2s rivet X11 Front horn X1 Hinge A X1 Rubber ring X2 Wheel X2 3 8 slide frame X1 2 5 L frame X4 3 5 L frame X3 3 6 L frame X3 Ball frame X2 2 9 frame X1 3 5 frame X4 3 7 frame X3 3 9 frame X3 5 5 frame X1 Double rivet X89 Smart controller X1...

Страница 161: ...ID30 Insert a rubber ring into the wheel Tip R motor ID30 X1 3 5 frame X1 3 7 frame X1 Ball frame X1 Wheel X1 Rubber ring X1 Double rivet X10 Step 1 Tip 3 5 frame X1 Wheel X1 Rubber ring X1 Front horn X1 Double rivet X4 Step 2 ...

Страница 162: ...164 Insert 2s rivet into the slide frame Tip Tip 1 3 frame X2 3 9 frame X1 3 8 slide frame X1 2s rivet X2 Double rivet X4 1 12 frame X1 2 5 frame X1 Hinge A X1 Double rivet X6 Step 3 Step 4 ...

Страница 163: ...part s position and direction It becomes the sword for the Fencing Bot Step4 Tip Tip 1 3 frame X1 2 9 frame X1 3 5 frame X1 3 9 frame X1 2 5 L frame X1 3 5 L frame X1 2s rivet X4 Double rivet X6 1 8 frame X1 2s rivet X2 Step 5 Step 6 ...

Страница 164: ...166 Step6 Step2 Tip Tip Touch sensor X1 2 7 frame X1 3 5 frame X1 5 5 frame X1 2 5 L frame X1 Double rivet X12 Double rivet X8 Step 7 Step 8 ...

Страница 165: ...167 Tip Tip Battery case X1 LED X1 2 5 L frame X1 3 5 L frame X1 Double rivet X6 3 7 frame X1 3 6 L frame X2 Double rivet X8 Step 9 Step 10 ...

Страница 166: ...168 Step8 Tip Tip 2 5 L frame X1 3 5 L frame X1 Double rivet X4 Double rivet X2 Step 11 Step 12 ...

Страница 167: ...R motor ID29 Carefully look at the frame s direction Tip Smart controller X1 R motor ID29 X1 3 7 frame X1 3 9 frame X1 3 6 L frame X1 Ball frame X1 2s rivet X2 Double rivet X10 Step 13 Tip Double rivet X6 Step 14 ...

Страница 168: ...170 Step 16 Separate the 3 9 frame from the rotation motor ID29 Connect the cables of electronic parts to the smart controller Refer to STEP17 Tip 1 8 frame X2 2s rivet X1 Double rivet X3 Step 15 ...

Страница 169: ...1 Power LED R motor ID30 Touch sensor R motor ID29 Fencing Bot ready completion Refer to STEP16 after connecting all cables to the smart controller Carefully look at the cable connection position Step 17 ...

Страница 170: ...et up Fencing Bot robot model The buttons work as a keyboard for PC Program the robot for proper operation Button P LED1 LED2 LED3 from left side Button 1 2 3 from left side Third Press button P on smart controller to enter standby mode When robot is not working properly check the following 1 When Fencing Bot touch sensor is not working Check whether the rotation motors ID29 ID30 are connected to ...

Страница 171: ...what movement the robot makes when each button combination is pressed 1 button 1 button Press button for move forward Press button for move backward 1 What button on the IR remote controller should be pressed to make the Fencing Bot attack Check movement and assembly ...

Страница 172: ...uch sensor to get 1 point You can get 1 additional point when the opposite robot falls or goes out the boundary Place the robots back to START position whenever a robot earns a point LED lights on when touch sensor detects attack and the robot move backward START Point Recommended size for game panel is 1m X 25cm Fencing game Robot Play Describe your Fencing Bot Robot level What was the most fun a...

Страница 173: ...ed Coding Mission Check before Coding Mission Check if Scratch Builder is installed before Coding Mission Download Scratch Builder from the Robobuilder site and install Download the most recent version in Support Software at www robobuilder net Download other detailed explanation at the website Download the Scratch Builder manual in Support Manual at www robobuilder net ...

Страница 174: ...atch Builder to run without the communication cable press 4 button on the remote to run the uploaded code Any questions about Coding Mission For any questions about robot coding mission visit Support Technical support at www robobuilder net Download the Scratch Builder manual on the website Download the Scratch Builder manual in Support Manual at www robobuilder net ...

Страница 175: ...177 0 02 ...
Страница 176: ...brothers Hot air is lighter than cold air So it can rise in the air After that flight vehicle with two wings were developed That s a glider by Lilienthal otto It couldn t actually fly but Leonardo da vinci invented the concept of wing for the first time He made a great contribution to invention of glider and flyer But the glider does not have power to fly for a long time So wright burothers invent...

Страница 177: ... It can stay still in the air and move straight upwards or downwards And this makes it very useful for small place Helicopter is used for saving humans or fighting fires military purposes In addition it is used to spray agricultural pesticide or even film a movie Various types of helicopter are found in our life Today s Robot Class ...

Страница 178: ...tric current in set up or standby mode Tips Prepare robot parts Robot Assembly 1 5 frame X3 2 9 frame X4 5 5 frame X2 Hinge A X2 1 8 frame X2 2 15 frame X4 2 4 L frame X2 Hinge B X2 1 12 frame X2 3 5 frame X1 2 5 L frame X4 2s rivet X21 2 5 frame X2 3 7 frame X1 3 5 L frame X4 3s rivet X10 Double rivet X82 2 7 frame X3 3 9 frame X4 3 6 L frame X4 Smart controller X1 R motor ID29 30 X2 Battery case...

Страница 179: ...181 Use a rotation motor ID30 Tip Tip 2 15 frame X4 5 5 frame X1 Double rivet X4 R motor ID30 X1 3 5 L frame X1 2s rivet X3 3s rivet X4 Step 1 Step 2 ...

Страница 180: ...82 Use a rotation motor ID29 Tip Tip 2 7 frame X2 3 5 frame X1 3 7 frame X1 Double rivet X8 R motor ID29 X1 1 3 frame X2 1 5 frame X1 3 5 L frame X1 2s rivet X3 3s rivet X2 Double rivet X6 Step 3 Step 4 ...

Страница 181: ...183 Assemble two sets Tip 1 12 frame X1 2 5 L frame X2 Double rivet X4 Step 5 X2 Tip Smart controller X1 Battery case X1 3 9 frame X1 5 5 frame X1 2s rivet X5 Double rivet X6 Step 6 ...

Страница 182: ...184 Step5 Tip Tip LED X1 3 9 frame X1 2s rivet X2 Double rivet X4 2 9 frame X2 3 9 frame X1 2 4 L frame X1 3 6 L frame X2 2s rivet X4 3s rivet X1 Double rivet X4 Step 7 Step 8 ...

Страница 183: ...185 Step7 Tip Tip 2 9 frame X2 3 9 frame X1 2 4 L frame X1 3 6 L frame X2 2s rivet X4 3s rivet X1 Double rivet X4 1 5 frame X1 1 8 frame X1 2 5 frame X1 Double rivet X10 Step 9 Step 10 ...

Страница 184: ...186 Step8 Tip Tip 1 5 frame X1 1 8 frame X1 2 5 frame X1 Double rivet X10 2 7 frame X1 3 5 L frame X2 Double rivet X4 Step 11 Step 12 ...

Страница 185: ...187 Hinge B Hinge B Hinge A Hinge A Step12 Step11 Step2 Step4 Tip Tip Hinge A X2 Hinge B X2 Double rivet X10 3s rivet X2 Double rivet X4 Step 13 Step 14 ...

Страница 186: ...188 Carefully look at the cable position and direction Power LED R motor ID30 R motor ID29 Helicopter ready completion Step 15 ...

Страница 187: ...on smart controller to set up Helicopter robot model The buttons work as a keyboard for PC Program the robot for proper operation Button P LED1 LED2 LED3 from left side Button 1 2 3 from left side Third Press button P on smart controller to enter standby mode When robot is not working properly check the following 1 When rotation motor is not moving Check whether the rotation motors ID29 ID30 are c...

Страница 188: ...2 Match the buttons on the IR remote controller to corresponding motions Helicopter wing rotates to the right and the left repeatedly Helicopter wing rotates and stops slowly Helicopter wing rotates when the touch sensor detects sound Clap Check movement and assembly 1 Similarity 2 Difference ...

Страница 189: ... land on 2 fire two missiles to the opposite player Put arrow mark on wing Game panel ex Helicopter game Robot Play 1 Shoot a missile 2 Avoid 2 missiles Stand by Chance Earn double points at the next turn 2 Shoot 2 missiles 1 Avoid 1 missile 1 Shoot a missile 2 Avoid 2 missiles Stand by Chance Earn double points at the next turn 2 Shoot 2 missiles 1 Avoid 1 missile 1 Shoot a missile 2 Avoid 2 miss...

Страница 190: ... installed before Coding Mission Download Scratch Builder from the Robobuilder site and install Download the most recent version in Support Software at www robobuilder net Download other detailed explanation at the website Download the Scratch Builder manual in Support Manual at www robobuilder net Coding Mission Detect voice Rotate and stop ...

Страница 191: ...atch Builder to run without the communication cable press 4 button on the remote to run the uploaded code Any questions about Coding Mission For any questions about robot coding mission visit Support Technical support at www robobuilder net Download the Scratch Builder manual on the website Download the Scratch Builder manual in Support Manual at www robobuilder net ...

Страница 192: ...Most importantly there is a photophore on the bottom of its tummy I can make the LED light up and use link structure for rotation motor to build wings In the head part it has a pair of compound eyes and feelers In thorax part it has two pairs of wings and three pairs of legs head thorax abdo men compound eye front wing rear wing photophore Place that emits light Firefly is a bug and moves and ligh...

Страница 193: ... Class Write a report on My own robot PART 2 My robot is called Why did you build this robot How did you build your robot What kind of function does it have Problem Solution Something you learned while building the robot ...

Страница 194: ...picture of your own robot below Describe your own robot Robot level What was the most fun about it What was the most difficult thing Check your robot with your teacher Very easy Easy Average Difficult Very difficult ...

Страница 195: ...D blinks in standby mode Button P Mode set up standby selection and save Power S W OFF ON Set levels Set robot models Symbol means LED is blinking Number 1 2 and 3 are written from left to right These indicate LED1 LED2 LED3 and Button 1 Button 2 Button 3 accordingly Ch1 Ch2 Ch3 Ch4 Ch5 Ch6 Ch7 Ch8 Ch9 Ch10 Ch11 Ch12 Punching Bot Cultivator Swing Bot Fish Bot Rolling Bot My own Robot 1 Bumper Car ...

Страница 196: ...ity ON High sensitivity ON Highest sensitivity OFF ON Lowest sensitivity ON Low sensitivity ON Medium sensitivity ON High sensitivity ON Highest sensitivity LED off LED off Touch sensor Touch sensor IR sensor Mic Sound sensor Light sensor Distance sensor IR sensor Mic Sound sensor Light sensor Distance sensor Each LED light color Each LED light color Sensor port 2 Sensor port 1 Sensor port 2 Micro...

Страница 197: ...Highest sensitivity OFF ON Lowest sensitivity ON Low sensitivity ON Medium sensitivity ON High sensitivity ON Highest sensitivity LED off LED off LED off Touch sensor Touch sensor Touch sensor IRsensor Mic Soundsensor Light sensor Distance sensor IRsensor Mic Soundsensor Light sensor Distance sensor IRsensor Mic Soundsensor Light sensor Distance sensor Each LED light color Each LED light color Eac...

Страница 198: ...erse direction Stop Speed 0 Speed level 1 forwad direction Speed level 2 forwad direction Speed level 3 forwad direction Speed level 1 reverse direction Speed level 2 reverse direction Speed level 3 reverse direction LED off LED off When ID29 rotation motor is used as a right wheel When ID30 rotation motor is used as a left wheel forward go forward forward go backward reverse go backward reverse g...

Страница 199: ...ED red ON LED blue ON LED red and blue ON Melody OFF Ten Little lndians Hello Twinkle twinkle little stars Head Shoulder Knee and Foot For Elise Minuet Bach Congratulations Happy birthday to you Arirang LED off LED off LED off Each LED light color Each LED light color Each LED light color ...

Страница 200: ...er electric goods The electronic parts may be damaged Do not pull out the cables or throw the assembled robot as the parts frames electronics parts may break Do not take out batteries or cables while robot is operating or moving to prevent damages Electric current flows in set up standby mode Power off the smart controller when the robot is not in use Place the robot parts away from baby or toddle...

Отзывы: