background image

34

NL

 BEDIENIEG

Содержание EVASION MURALE

Страница 1: ...uso e l installazione Cappa Instrucciones de instalacion e utilizacion Campana Bedienungsanleitung und Einrichtung Dunstabzugshaube GB IT E DE Instructies voor het gebruik en installeren Dampkap NL M...

Страница 2: ...TALACION DEL APARATO FUNCIONAMIENTO CONSEJOS DE UTILIZACION MANTENIMIENTO GARANTIA Y ASSISTENCIA TECNICA NOTA GB CONTENTS ELECTRICAL WIRING INSTALLATION ADVICE FITTING THE APPLIANCE OPERATION USEFUL H...

Страница 3: ...toute hotte ou groupe d aspiration une distance inf rieure 0 65 m du plan de travail risque d inflammation des filtres La fum e doit monter naturellement vers la zone de captation Respecter le diam tr...

Страница 4: ...la hotte La hotte peut avoir une excursion maximum de 16 mm Cr dence Option La hauteur de la hotte par rapport au plan de cuisson est d termin e dans ce cas par la hauteur de la cr dence Rep B et par...

Страница 5: ...urer que le connecteur du cable d alimentation soit bien branch dans la prise du moteur Fig 4 Raccorder lectriquement la hotte Voir paragraphe Raccordement Electrique et v rifier le bon fonctionnement...

Страница 6: ...4 4 FONCTIONNEMENT F...

Страница 7: ...isez aucun objet ni les mains dans l ouverture servant l vacuation de l air Conduit d vacuation V rifier tous les 6 mois le bon coulement de l air vici Observer les prescriptions r glementaires locale...

Страница 8: ...at riaux et des composants de haute qualit qui peuvent tre recycl s et utilis s de nouveau Veuillez vous informer du syst me local de s paration des d chets lectriques et lectroniques Veuillez agir se...

Страница 9: ...of the room sealed or balanced flue type If other types of flue or appliances are fitted ensure that there is an adequate supply of fresh air to the room Ensure the kitchen is fitted with an airbrick...

Страница 10: ...ight of the splashback 315 mm Measurement with splashback The distance H is the minimum height in mm from the cooking appliances to the bottom edge item 3 of the front panel of the hood At the point m...

Страница 11: ...ed IN THE RECIRCULATION MODE a Fit the recirculation spigot bracket item 4 onto the upper chimney wall bracket using the same fixing screws Fig 7 item 2 Put the spigot item R into the spigot bracket i...

Страница 12: ...10 4 OPERATION GB...

Страница 13: ...ore frequently if the hood is used for more than 3 hours per day To remove and replace the metal grease filters Remove the metal grease filters one at a time by releasing the catches on the filters th...

Страница 14: ...proper use or neglect the replacement of any light bulbs or filters or removable parts of glass or plastic These items are considered to be consumable under the terms of this guarantee 8 REMARKS This...

Страница 15: ...DerAu endurchmesser am Gebl seabgang des Ger tes ist f r die Wahl desAbluft Rohrsystems zu ber cksichtigen Die Dunstesse darf keinesfalls an eine Entl ftungsleitung mit Unterdruck angeschlossen werden...

Страница 16: ...benk rpers erfolgen Die maxi male Haubenweg betr gt 16 mm R ckwand Optional Der Abstand der Haube von der Kochmulde wird in diesem Fall von der H he der R ckwand B und des eventuell anzubringenden Auf...

Страница 17: ...teckdosedes Gebl ses einwandfrei eingesteckt wird Abb 4 Den Netzanschluss der Haube vollziehen siehe Abschnitt Netzanschluss und den guten Betrieb der Beleuchtung des Motors sowie als die Ver nderung...

Страница 18: ...16 4 BETRIEB DES GERATES D...

Страница 19: ...N Diese Ma nahmen vermindern die Brandgefahr starke Fettr ckst nde sind leicht brennbar Geh use Keine nassen T cher f r die Reinigung der Oberfl chen der Dunstesse verwenden Es sollen nur milde Reinig...

Страница 20: ...keit und den Richtlinien 93 68 EWG zur CE Kennzeichnung Das Symbol auf dem Produkt oder seiner Verpackung weist darauf hin dass dieses Produkt nicht als normaler Haushaltsabfall zu behandeln ist sonde...

Страница 21: ...io la cappa non deve in alcun caso essere collegata ad un condotto di ventilazione meccanica controllata V M C Qualora l aria viziata fosse scaricata in un condotto d evacuazione verificare che quest...

Страница 22: ...nstallatore della cucina o da personale competente che conosca tutte le dimensioni finali dei mobili 4 Montaggio del corpo cappa Prima di iniziare l installazione necessario regolare le staffe di sup...

Страница 23: ...eserci tando una pressione sulle linguette A Fig 4 e Camino superiore Allargare leggermente le due falde laterali del camino Fig 7 Rif 7a aggan ciarle dietro le Staffe 2 e richiuderle fino a battuta F...

Страница 24: ...22 4 FUNZIONAMENTO I...

Страница 25: ...re mai spugne o panni bagnati Non introdurre alcun oggetto e tanto meno le mani nell apertura d evacuazione dell aria Condotto d evacuazione Verificare ogni 6 mesi la buona evacuazione dell aria vizia...

Страница 26: ...che il prodotto tutelato dalla Directiva Europea 2003 96 EC Questo prodotto stato progettato e fabbricato con materiali e componenti di alta qualit che posssono esere riciclati e riutilizzati Si preg...

Страница 27: ...rmalmente prohibida la instalaci n de cualquier campana o grupo de aspiraci n a una distancia inferior a 0 65 m del plano de cocci n entonces existir a riesgo de incendio del filtro Los humos deben sa...

Страница 28: ...rados 3 Realizaci n agujeros de sujeci n Fig 1 2 Rep 1 Marcar un punto en la l nea vertical a una distancia del plano de cocci n de d 965 mm sin panel d altura del panel 315 mm con panel La medida H c...

Страница 29: ...de las rejillas laterales situadas en la chimenea superior 7a Unir un tubo a la salida redonda del difusor apretando hacia abajo y colocar de la misma manera el empalme R asegurarse de que en el empal...

Страница 30: ...28 E 4 FUNCIONAMIENTO...

Страница 31: ...le proceder a una LIMPIEZA REGULAR de los filtros a mano con un detergente l quido con agua templada y aclarado o en el lavavajillas cada dos meses m s o menos para una utilizaci n normal Carcasa Limp...

Страница 32: ...ensi n 2006 95 CE de la securidad electrica y a las normas europeas 2004 108 CE en relati n con la compatibilad electroma gnetica y C E E 93 68 en relaci n con la marcaci n CE Cuando vea este s mbolo...

Страница 33: ...is van groot belang dat de afvoerdiameter in acht wordt genomen Een apparaat met motor mag nooit worden aangesloten op een centraal ventilatiesysteem De kookdampen mogen niet door een afvoerbuis gelei...

Страница 34: ...ine bijstellingen zijn mogelijk met de stels chroeven van de wasemkap zie Montage van de wasemkap De wasemkap mag een maximale uitslag hebben van 16 mm Spatscherm optie De hoogte van de wasemkap boven...

Страница 35: ...nderhoud en verzeker u ervan dat de stekker van de voedings kabel goed in de contactdoos van de afzuigkap is gestoken Fig 4 Voordat de schachten op de afzuigkap worden bevestigd dienen eerst de elektr...

Страница 36: ...34 NL 4 BEDIENIEG...

Страница 37: ...de afwasmachine Deze maatregel voorkomt het gevaar van brand Behuizing Gebruik geen natte doeken om de behuizing te reinigen Het gebruik van een milde zeep in combinatie met een vochtige doek wordt a...

Страница 38: ...t product conform is de Europese Richtlijn 2002 96 EC Uw apparaat werd ontworpen met en vervaardigd uit onderdelen en materialen van superieure kwaliteit die gerecycleerd en opnieuw gebruikt kunnen wo...

Страница 39: ...37...

Страница 40: ...nnection Unit to BS 1363 Part 4 fitted with a 3 Amp fuse is a recommendedmains supply connectionaccessoryto ensure compliance with the Safety Requirements applicable to fixed wiring instructions The w...

Страница 41: ...LUE BLEU BLAU Br BROWN BRUN BRAUN G Y GREEN YELLOW VERT JAUNE GR N GELB Gr GREY GRIS GRAU L B LIGHT BLUE BLEU CLAIR HELL BLAU P PINK ROSE ROSA V PURPLE MAUVE MALVER FARBIG R RED ROUGE ROT W WHITE BLAN...

Страница 42: ...40 min 675 Max 1025 898 496 400 456 303 150 30 314 108 37 265 63 126 41 81 700 650 min 110...

Страница 43: ...2 1 1 7a 7b 1 6 2 2 3 5 232 1 1 7a 7b 1 6 2 2 3 5 232 1 1 7a 7b 1 6 2 2 3 5 232 1 1 7a 7b 1 6 2 2 3 5 232 1 1 7a 7b 1 6 2 2 3 5 232 1 1 7a 7b 1 6 2 2 3 5 232 1 1 7a 7b 1 6 2 2 3 5 232 1 1 7a 7b 1 6 2...

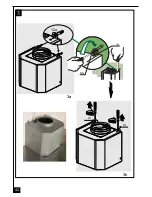
Страница 44: ...42 3 3a 3b Vr Vr 12a...

Страница 45: ...43 4 5 7a 7b...

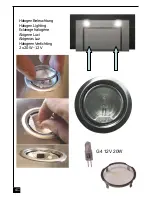
Страница 46: ...4 Halogen Beleuchtung Halogen Lighting Eclairage halog ne Alogene Luci Al genas Luz Halogeen Verlichting 2 x 20 W 12 V G4 12V 20W...

Страница 47: ...45 6 7 A 2 965 115 7a R G 4 7b...

Страница 48: ...ACCESSOIRES ACCESSORI ACCESSORIES ACCESORIA ZUBEH RE ACCESSOIRES 46...

Страница 49: ...47 900...

Страница 50: ...rie Numero de serie Serienummer Mod le Model Modell Modello Modelo Model Plaque Signal tique de la hotte Rating plate of the cookerhood Typenschild im Inneren der Dunstesse Etichetta all interno della...

Страница 51: ...49 Charni re Hinge Scharnier Cerniera Bisagra Scharnier...

Страница 52: ...25 Rue des Rosiers Sainte C cile B P 56 50800 VILLEDIEU LES PO LES France T l 02 33 91 26 50 Fax 02 33 51 54 79 e mail com france roblin fr For outside France Tel 33 0 2 33 91 26 57 Fax 33 0 2 33 51...

Отзывы: