ROBINHOOD RWD3CL6SS Скачать руководство пользователя страница 8


Operating Instructions 

Before operating the hood, make sure that it has been installed by a suitably qualified person, as per the information 

contained in installation instructions. 

Controls 


Lights 

The light can be operated independently from the fan. Press the fan button once and the LED lights will turn on. Press a 

second time and they will turn off. 

Fan speed 

The exhaust fan is operated by the three fan speed buttons. Pressing the button once will turn on the fan (low, medium 

and high speeds) and pressing a second time will turn the fan off. When active, the button will light up. 


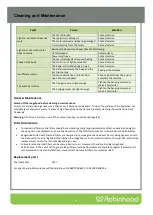
Keeping the filters clean will improve the efficiency of the rangehood. To remove the filter, press in the handle of the 

filter to release the fixing tabs and rotate the filter down. Pull the filter out. 

To replace the filter, fit in the opposite order as above. 


Содержание RWD3CL6SS

Страница 1: ...Installation and Operating Instructions Model Numbers RWD3CL6SS and RWD3CL9SS Description Robinhood Wall Canopy Rangehood Pictured RWD3CL6SS...

Страница 2: ...purchase along with any other important documents about this product for future reference Due to continual product development Robinhood reserves the right to alter specifications or appearances with...

Страница 3: ...1 Appliance Details RWD3CL6SS RWD3CL9SS Voltage 220 240V 50Hz 220 240V 50Hz Rated Power Input 193W 193W Lamp 2 x 1 5W LED 2 x 1 5W LED RWD3CL6SS RWD3CL9SS...

Страница 4: ...ing 13 It is recommended to leave the range hood in operation for 15 minutes after cooking is terminated in order to completely eliminate cooking vapours and odours 14 Turn off the range hood when not...

Страница 5: ...ood The guide below recommends the ducting components to use for all common ducting configurations through the top of the home for the roof and soffit and through the rear of the home 150mm round duct...

Страница 6: ...r chimney piece Assemble the lower chimney bracket onto the lower chimney using two ST4x8mm screws and ensure the bracket holds both chimney pieces Do not fully tighten the screws as some adjustment i...

Страница 7: ...e the power cord is accessible not trapped by the chimney Fix the lower chimney to the wall using two ST4x40mm screws 9 Extend the upper chimney to the ceiling and secure in place with two ST4x8mm scr...

Страница 8: ...cond time and they will turn off Fan speed The exhaust fan is operated by the three fan speed buttons Pressing the button once will turn on the fan low medium and high speeds and pressing a second tim...

Страница 9: ...e To prevent surface damage never use abrasive or oil based liquid cleaners To clean the surfaces of the appliance use mild detergent and warm water In areas of high humidity and coastal environments...

Страница 10: ...lights to cool before handling Remove the grease filter Press the spring on either side of the light until it drops out Pic 1 Gently pull the connecting wire out and disconnect the terminals Pic 2 Re...

Страница 11: ...products such as abrasive cream or powder cleansers furniture polish bleach mentholated spirits drain cleaners sugar soap metal pads and strongly alkaline or acidic cleaners Heat damage including from...

Страница 12: ...d com au www robinhood com au Attention Customer Services Manager Warranty exclusions 1 The warranty does not apply where in Shriro s opinion The defect is caused by misuse wear and tear dirt fire or...

Отзывы: