


3
Pre-Installation
Contents of Packaging
•
1 x Rangehood
•
2 x One‐way outlet flaps
•
9 x Wall plugs
•
7 x ST4x40mm screws
•
2 x ST4x30mm screws
•
4 x ST4x8mm screws
•
2 x Chimney pieces (upper and lower)
•
2 x Chimney bracket
•
1 x Fixing bracket
Typical Equipment Required
•
Electric drill
•
Screwdriver
•
Tape measure
•
Spirit level
•
Duct tape
(if ducting)
•
Jig saw and ladder
(if ducting)
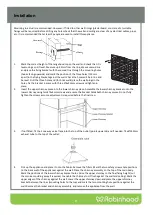
Installation Position
Minimum
height from the cooktop surface to the underside face of the
rangehood is 650mm.
Note
: If the instructions for the cooktop specify a greater distance, this has to
be taken into account.
Any installation above 750mm will compromise performance.
Ducting Options
The method of ducting should be carefully considered before installing the
rangehood. The guide below recommends the ducting components to use for
all common ducting configurations ‐ through the top of the home (for the
roof and soffit) and through the rear of the home. 150mm round ducting should be used in conjunction with this model
rangehood. Alternatively, this rangehood can be operated in recirculation mode.
The highlighted area in the table below gives the recommended Uniduct item numbers for different mounting and
outlet options.
Duct Mounting Options
Rear
Top (roof)
Top (Eave)
150mm diameter round
outlet
Uniduct Item Numbers
1688
1634 and 1635
1634 and 1688
Extra lengths and/or bends may be required, depending on the length required and whether there is any structural
material in the run e.g. rafters.
Please note that this chart is designed as a guide. Please consult Robinhood customer services if unsure.
For NZ phone (09) 415 6000 or www.robinhood.co.nz. For AUS phone 1800 648 556 or www.robinhood.com.au.


