


Installation Instructions
Any adjacent furniture must be able to withstand a minimum temperature rise of 85°C
above the ambient temperature of the room it is located in, during periods of use. The
power supply to the appliance must be switched off before any adjustments or
maintenance work is done on it.
Preparation for Installation and Use
The information given below contains rules that are necessary for correct positioning and service
operations. They should be read without fail, especially by the technician who will position the
appliance.
Installation of Freestanding Cooker
The Freestanding Cooker can be placed close to other furniture on the condition that the
freestanding cooker is at least 10mm higher than the level of the surrounding furniture. Do not place
the freestanding cooker near a refrigerator.
When choosing a place for the freestanding cooker, ensure that there are no flammable or
combustible materials in close vicinity, such as curtains, oil, cloth etc. These can quickly catch fire.
There must be at least a 2 centimetre clear space between the back cover of freestanding cooker
and any wall for air circulation.
Furniture surrounding the freestanding cooker must be made of materials resistant to temperatures
85°C above ambient temperature or more.
The freestanding cooker is designed to fit between kitchen cabinets spaced over 550mm apart. The
space either side of the freestanding cooker needs only be sufficient to allow withdrawal of the
freestanding cooker for servicing. It can be used with cabinets on one side or both sides as well as
in a corner setting. It can also be used free-standing.
NOTE:
The appliance must not be installed in a corner. It must be installed at least 100 mm from
side wall.
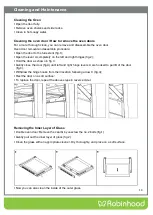
Installation Steps
Determine the position for the freestanding cooker and anti-tilt plate.
Securely fix the anti-tilt plate to the floor with the appropriate fasteners.
Fasten the stability bolt bracket to the front frame with the two screws supplied.
Position the freestanding cooker into the anti-tilt plate and mark the position of the stability
bolt hole.
Remove the freestanding cooker and drill the bolt hole at the marked location. Use a 10mm
masonry or wood drill bit. When drilling into concrete, ensure a minimum hole depth of
30mm.
Reposition the freestanding cooker back into the anti-tilt plate, aligning the stability bolt
bracket with the 10mm drilled hole. Slide the bolt through the bracket into the hole.
Slide the freestanding cooker back into the anti-tilt plate until there is a 2cm gap between the
rear of the freestanding cooker and the wall.
Check the height and level of the freestanding cooker. If required, pull the freestanding
cooker back out and adjust the leveling feet.
Connect the electricity supply but do not turn on until installation is complete.
NOTE
: Only a qualified person should install the appliance, according to the instructions provided.
The manufacturer and supplier deny all responsibility for improper installation, which may cause
harm to people and animals and damage to property.
7


