background image

10

Operating your sound system - DAB

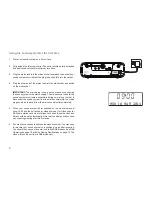
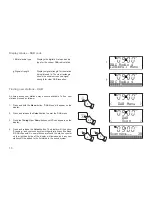
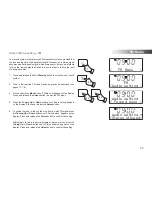
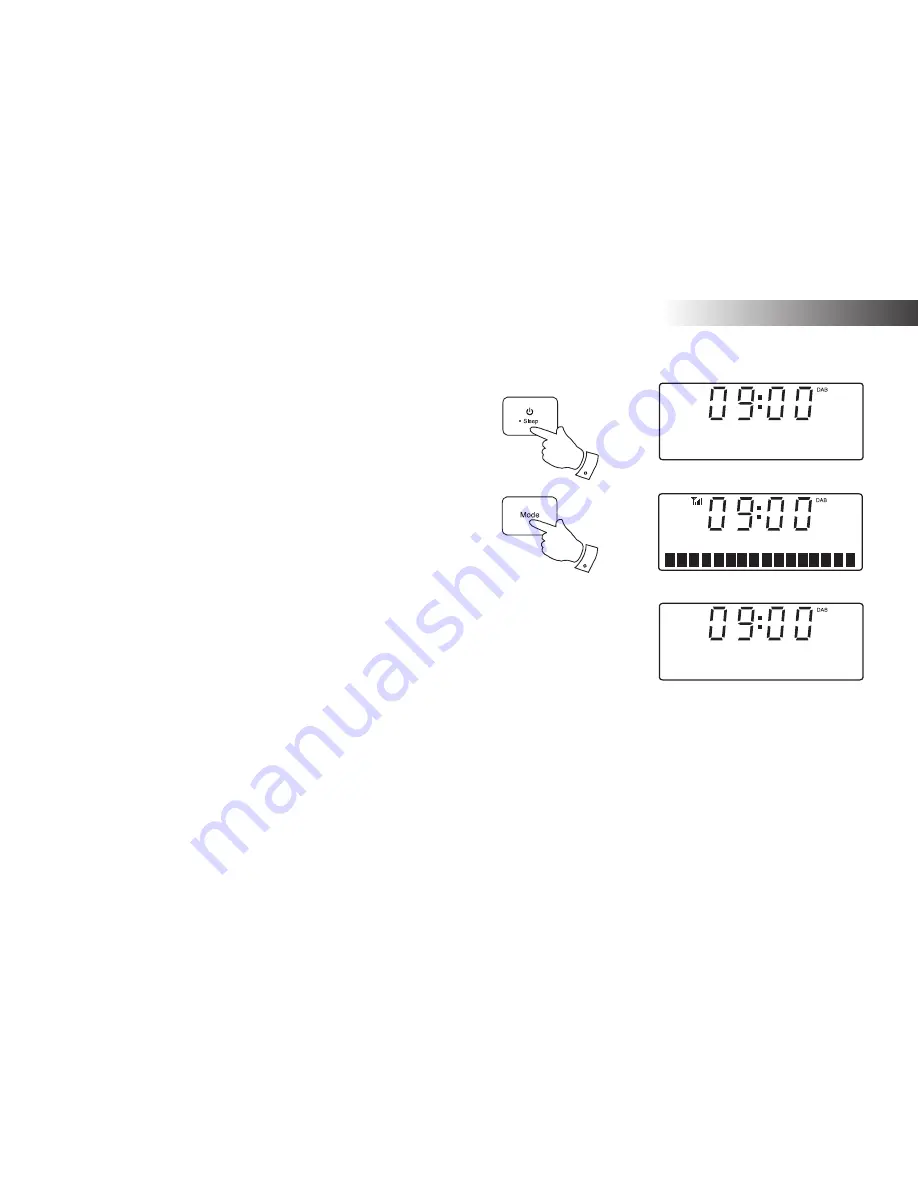
1.  Fully extend the telescopic aerial.

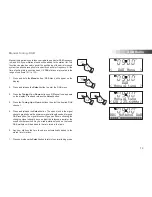
2.  If your sound system is in standby mode, press and release the 

On / Standby 

button


to switch it on.

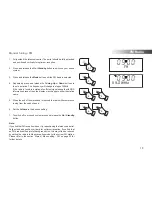
3.  Press and release the 

Mode 

button until the DAB mode is selected. 

The display will show 'DAB' for a few seconds.

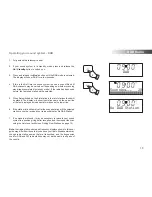
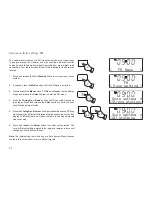
4.  If this is the 

fi

 rst time the sound system is used a scan of Band III 

DAB channels may be carried out (depending on whether scanning 
was already completed in standby mode). If the radio has been used 
before, the last used station will be selected. 

5. When 

fi

 rst switched on, the 

fi

 rst station in the list of stations found will 

be played. The display will show the station name on the upper line 
of the text display and broadcast information on the lower line.

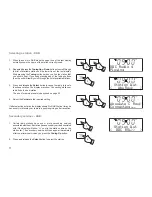
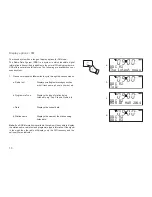
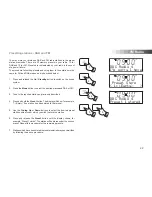
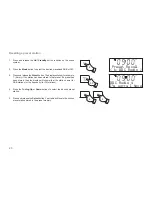
6.  If the station list is still empty after the scan operation or if the selected 

station cannot be received your radio will display 'No DAB Station'.

7.  If no signals are found it may be necessary to relocate your sound 

system to a position giving better reception, and then repeat the scan 
using the Auto-tune facility (see Finding New Stations on page 13).

Note:

 that radio station name and frequency displays shown in this user 

guide may differ from those that you see on your radio. Broadcasters may 
change radio station names that are transmitted, and the frequencies 
used for DAB and FM radio stations may not be the same in all parts of 
the country.

2

3

DAB

Scanning...   28

No DAB Station

DAB Radio           

Содержание Blutune 100

Страница 1: ...DAB DAB FM CD Bluetooth Sound System Please read this manual before use ROBERTS ...

Страница 2: ...FM 24 Bluetooth mode 25 28 Connecting Bluetooth devices 26 Playing audio files in Bluetooth mode 27 Connecting and reconnecting a Bluetooth device 28 CD MP3 WMA 29 36 Contents Compact discs 29 Playing a CD 30 31 Repeat and shuffle options 32 33 MP3 WMA CD mode 34 MP3 WMA file and folder selection 35 36 Clock and Alarms 37 43 Alarms 37 40 Cancelling alarms 39 Snooze 40 Sleep function 41 Setting the...

Страница 3: ...our Blutune 100 to play audio files or video soundtracks directly from your smart phone tablet or similar devices The section for CD MP3 WMA player describes how to play digital audio CDs or MP3 WMA files which have previously been recorded to CD R or CD RW The section titled Clock and Alarms describes setting the clock as well as explaining the use of the alarms snooze and sleep timer features Th...

Страница 4: ... either buzzer radio or CD with humane wake system on buzzer alarm Adjustable sleep timer which can be set to turn the sound system off after between 15 and 120 minutes Note 8cm mini CDs cannot be played Transparent or partly transparent CDs cannot be played Unusually thin Eco CDs cannot be played Some copy protected CDs may not be playable Easy to read 2 line text display with large clock display...

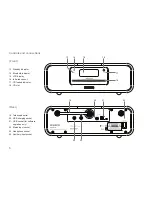
Страница 5: ...de button 3 Tuning Down Rewind button 4 Info Menu button 5 Folder Up button 6 Select Preset CD Stop button Top 7 CD eject button 8 Tuning Up Fast forward button 9 Play Pause button 10 Volume Up button 11 Volume Down button 12 Folder Down button 1 2 3 4 5 10 9 8 7 11 6 12 ...

Страница 6: ...D display 16 Infra red sensor 17 CD loaded indicator 18 CD slot 19 Telescopic aerial 20 USB charging socket 21 USB socket for software upgrades only 22 Mains input socket 23 Headphone socket 24 Auxiliary input socket CD 15 DAB DAB BAND III 5A 13F Rear 16 18 19 24 23 21 22 17 14 13 20 ...

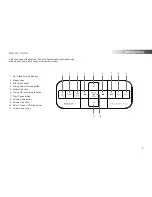
Страница 7: ... 5 Folder Up button 6 Tuning Up Fast forward button 7 Play Pause button 8 Volume Down button 9 Volume Up button 10 Select Preset CD Stop button 11 Folder Down button 1 2 3 4 6 5 7 8 9 11 10 All the functions of the Blutune 100 Sound System can be controlled using either the sound system buttons or the remote control ...

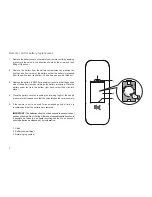
Страница 8: ...ble as the battery is inserted Place the battery under the lip in the bottom right hand corner then click into place 4 Close the battery cover by inserting the retaining lug first then apply pressure to the free end such that the catch latches the cover securely 5 If the remote is not to be used for an extended period of time it is recommended that the batteries are removed IMPORTANT The batteries...

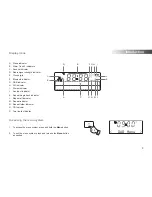
Страница 9: ...M indicator I Stereo indicator J Aux input indicator K Repeat single track indicator L Repeat all indicator M Repeat indicator N Repeat folder indicator O CD indicator P Two line text display A B C D E G H I J L M N O P Accessing the menu system 1 To access the menu system press and hold the Menu button 2 To exit the menu system press and release the Menu button as needed 1 2 DAB Menu K F ...

Страница 10: ...use In order to disconnect the sound system from the mains completely the mains plug should be removed from the mains socket outlet completely 5 When your sound system is first switched on the clock display will show 12 00 and the unit will enter standby mode It will then scan for DAB radio stations and when stations have been found the clock and date should be set automatically Note that the disp...

Страница 11: ...ed The display will show the station name on the upper line of the text display and broadcast information on the lower line 6 If the station list is still empty after the scan operation or if the selected station cannot be received your radio will display No DAB Station 7 If no signals are found it may be necessary to relocate your sound system to a position giving better reception and then repeat...

Страница 12: ...ow Connecting while your radio finds the new station The use of memory presets is described on page 22 4 Adjust the Volume to the required setting If after selecting a station the display shows No DAB Station it may be necessary to relocate your radio to a position giving better reception Secondary services DAB 1 Certain radio stations have one or more secondary services associatedwiththem Ifastat...

Страница 13: ... etc b Programme type Displays the type of station being listened to e g Pop Classic News etc c Multiplex Name Displays the name of the DAB multiplex to which the current station belongs d Date Displays the current date e Channel frequency Displays the channel number and frequency for the current DAB radio station 1 BBC Radio 4 Talk BBC Radio 4 BBC National DAB a b c BBC Radio 4 I m sorry I have B...

Страница 14: ...ows 1 Press and hold the Menu button DAB Menu will appear on the display 2 Press and release the Select button to enter the DAB menu 3 Press the Tuning Up or Down buttons until Scan appears on the display 4 Press and release the Select button The display will then show Scanning and your sound system will perform a scan of the Band III DAB channels As new stations are found the station counter on t...

Страница 15: ...ons until Manual tune appears on the display Press and release the Select button 4 Press the Tuning Up or Down buttons to select the desired DAB channel 5 Press and release the Select button The open block in the signal strength graph shows the minimum signal strength needed for good DAB reception The signal blocks will go up and down showing the changing signal strength as you adjust the telescop...

Страница 16: ...theMenubutton DABMenu willappearonthedisplay Press and release the Select button to enter the DAB menu 3 Press the Tuning Up or Down buttons until the display shows DRC 4 Press and release the Select button to enter the DRC adjustment menu 5 Press the Tuning Up or Down buttons to select the required DRC setting the default is Off 6 Press and release the Select button to confirm the setting The dis...

Страница 17: ...the DAB menu 3 Press the Tuning Up or Down buttons until Station order appears on the display Press and release the Select button to enter the station order selection menu 4 PresstheTuningUporDownbuttonstochoosebetweenalphanumeric or ensemble The chosen station order setting will be marked with an asterisk Alphanumeric sorts the station list alpha numerically 0 9 A Z Ensemble organises the station...

Страница 18: ...To find other stations press and hold the Tuning Up button as before 7 Press and hold down the Tuning Down button for 2 3 seconds to cause your radio to search from high frequency to low frequency and to stop automatically when it finds a station of sufficient strength 8 When the end of the waveband is reached your radio will recommence tuning from the opposite end of the waveband 9 Adjust the Vol...

Страница 19: ...formation present then the display may change to show the station name 5 When the end of the waveband is reached the radio will recommence tuning from the opposite end 6 Set the Volume to the desired setting 7 To switch off your sound system press and release the On Standby button 2 7 3 4 4 Note If you find that FM reception is poor try repositioning the telescopic aerial Fully extend and position...

Страница 20: ... Displaysscrollingtextmessagessuchas artist track name phone in number etc b Programme Type Displays the type of station being listened to e g Pop Classic News etc c Date Displays the current date d Station name Displays the name of the station being listened to Note If no RDS information is available the radio will be unable to display the station name radio text and programme type information If...

Страница 21: ...d the Menu button FM Menu will appear on the display Press and release the Select button to enter the FM menu 4 Press the Tuning Up or Down buttons until Audio setting appears on the display Press and release the Select button 5 To switch to mono to reduce the hiss from a weak FM signal press the Tuning Up or Down buttons until Forced mono appears on the display Press and release the Select button...

Страница 22: ...he FM menu 4 Press the Tuning Up or Down buttons until Scan setting shows on the display Press and release the Select button to enter the scan sensitivity adjustment mode 5 PresstheTuningUporDownbuttonstoswitchbetweenLocal Strong stations only and Distant All stations options on the lower line of the display The Distant option will allow the radio to find weaker signals when scanning 6 Press and r...

Страница 23: ...esired waveband DAB or FM 3 Tune to the required station as previously described 4 Press and hold the Preset button The display will show for example 1 Empty if no station has been stored to that preset 5 Use the Tuning Up or Down buttons to select the desired preset station number under which you wish to store the station 6 Press and release the Preset button until the display shows for example P...

Страница 24: ...mpty if no station has been stored to that preset If a preset has been stored then the display will show either the station name for DAB stations or the frequency for FM stations 4 Press the Tuning Up or Down buttons to select the desired preset station 5 Press and release the Select button Your radio will tune to the chosen preset station stored in the preset memory 2 4 4 3 5 1 BBC Radio Preset R...

Страница 25: ...splay Press and release the Select button to enter the menu 4 Press the Tuning Up or Down buttons until Language shows on the display Press and release the Select button to enter the language adjustment menu 5 Press the Tuning Up or Down buttons until your desired language appears on the display The current language setting will be marked with an asterisk 6 PressandreleasetheSelectbuttontoconfirmy...

Страница 26: ...eatly depend upon the construction of the building Bluetooth communication range may be substantially reduced if the signal passes through a solid object Human bodies brick and concrete walls heavy furniture or bookcases will all reduce the operational range of your Bluetooth devices to a greater or lesser extent Glass dry wall or wood paneled walls and office partitions may have a less severe but...

Страница 27: ...u should see a device named Blutune 100 Just occasionally it may take longer for the sound system to be found by your device 5 Select Blutune 100 to cause your phone tablet or PC to pair with your sound system and to establish a connection 6 Once the connection is established the Bluetooth indicator on the front panel will stop flashing and will remain lit A message will be displayed briefly confi...

Страница 28: ...spluggedintoyoursoundsystem we strongly recommend that the sound system s volume control is used as the means of adjusting the audio volume You will then need to set the volume on the connected Bluetooth device to a higher level The purpose here is to prevent unexpectedly loud noises in the headphones when changing audio sources in the sound system or when switching on and off 3 The audio player i...

Страница 29: ...able the connection from your device s Bluetooth settings The sound system will then connect to the device 3 To connect to a new device press and release the Tuning up or Down button until PAIRING is displayed then pess the Select button The sound system will become discoverable by other devices The Bluetooth indicator on the front panel will flash and Bluetooth Pairing will be shown The sound sys...

Страница 30: ...t free cloth in a straight line from the centre towards the edge Cleaning agents may damage the CD Do not expose the CD to rain moisture sand or to excessive heat e g from heating equipment or in motor cars parked in the sun CD R CD RW discs Your Blutune 100 sound system can playback CD DAformat audio CD R CD RW discs that have been finalised upon completion of recording Finalising enables a CD R ...

Страница 31: ...e Eject button a second time 4 Insert a disc with printed side facing up into the CD slot The disc will be loaded automatically The unit will check the CD type and load its track list The display will show LOADING and then READING as the information is read 5 If you load a disc containing MP3 or WMA files your sound system will enter the MP3 WMA mode see page 34 Playing a CD 1 Press the Play Pause...

Страница 32: ...tect the presence of an inserted CD as may happen if the CD has a large area of transparency Selecting a track 1 While the CD is playing press either the Fast forward or Rewind buttons to change to the desired track The updated track number is shown in the display 2 You can also skip tracks when the player is paused or stopped Skip to the desired track using the Fast forward or Rewind buttons rele...

Страница 33: ...Off The repeat function will be disabled One 1 The current track a single track will be repeated All All tracks on the CD will be played repeatedly Dir Alltracksinthecurrentfolderwillbeplayedrepeatedly Selecting a repeat option will cancel the shuffle setting if previously applied When the repeat function is On the repeat symbol is shown along with one of the repeat option symbols above Note The f...

Страница 34: ...ing Up or Down buttons until the required shuffle option shows on the display and then press the Select button to confirm the setting Off The shuffle function will be disabled On All tracks will be played in random order Selecting the shuffle option will cancel any repeat setting if previously applied Pressing Stop or ejecting the CD will cancel any repeat or shuffle setting 2 3 2 3 2 3 1 04 01 44...

Страница 35: ...or by the hardware settings of the PC s CD writer or by the CD being used Should such problems arise contact the customer services of your CD writer or software manufacturer or look in their product documentation for relevant information When you are making audio CDs take care to observe all legal requirements and ensure that the copyright of third parties is not infringed 1 To select the CD mode ...

Страница 36: ...removed the unit will reload the disc after 10 seconds and then enter standby mode To reloadaCDthathasjustbeenejected presstheEjectbuttonasecond time Selecting a file 1 While the CD is playing press either the Fast forward or Rewind buttons to change to the desired file the file number is updated in the display If there is more than one folder when all files in the current folder have been played ...

Страница 37: ...stop or play mode press and release either the Up or Down Folder buttons The first file of the next or previous folder will be played Repeat and shuffle options The sound system allows you to use the same playback options for files as can be used for conventional CDs see pages 30 33 In addition to repeat a single file and repeat all options there is also a repeat folder facility 1 1 1 1 02 001 01 ...

Страница 38: ...splay Press and release the Select button to enter the alarm setup menu 3 Press the Tuning Up or Down buttons to display the required alarm 1 or 2 Press and release the Select button Alarm Setting will show on the display 4 Press and release the Select button to choose alarm setting Alarm On Off will show on the upper line of the text display 5 Press the Tuning Up or Down buttons to choose whether...

Страница 39: ...ng modes BUZZER will wake you with a buzzer alarm DAB will wake you with DAB radio FM will wake you with FM radio CD will wake you playing a CD 10 Press and release the Select button to select the alarm mode Alarm Day will show on the upper line of the text display 11 Press the Tuning Up or Down buttons to select the required day option for the alarm Your alarm can be set to the following options ...

Страница 40: ...ct to the specified radio station the buzzer will be used instead Note If the radio is switched on because of a radio alarm you can only use the volume and on off controls See Snooze function on the next page When the buzzer alarm activates it will start softly and gradually increase in level The alarm icon will flash on the screen and the radio will automatically switch back to standby mode when ...

Страница 41: ...tton 4 PresstheTuningUporDownbuttonsuntil View showsonthedisplay 5 Press and release the Select button to cycle through each of the settings for the chosen alarm Alarm 1 Alarm 1 View Set alarm 1 2 5 2 4 2 4 Snooze function 1 When the radio CD or buzzer alarm sounds pressing any button other than the On Standby or Volume buttons will silence the alarm for 5 minutes The Snooze symbol ZZZ will flash ...

Страница 42: ...function 3 Press and release the Select button The display will exit the sleep options The sleep symbol will show on the display 4 Your sound system will switch off after the preset sleep time has elapsed 5 To cancel the sleep timer and switch off your sound system before the chosen sleep time has elapsed press and release the On Standby button To cancel the sleep timer without switching off your ...

Страница 43: ...ppears on the display Press and release the Select button 3 Press the Tuning Up or Down buttons until Manual appears on the display 4 Press and release the Select button The hour digits will then flash on the display 5 Press the Tuning Up or Down buttons to set the desired hour 6 Press and release the Select button to enter the hour setting The minute digits will then flash on the display 7 Press ...

Страница 44: ...onfirm the clock setting The sound system will exit the menu 10 14 9 13 9 13 Set month 10 MAR 2014 Set date 10 MAR 2014 To return to auto clock set mode The auto clock set mode may be set while the unit is in standby or while playing 1 Press and hold the Menu button 2 Press the Tuning Up or Down buttons until Set clock appears on the display Press and release the Select button 3 Press the Tuning U...

Страница 45: ...ound system 2 Press and hold the Menu button 3 Press the Tuning Up or Down buttons until Set Equalizer appears on the display 4 Press and release the Select button to enter the equalizer menu 5 Press the Tuning Up or Down buttons to cycle through the various options until the desired option is displayed Press and release the Select button to confirm your choice a Flat no tone modification is appli...

Страница 46: ...ed level is displayed 5 Press and release the Select button to confirm the setting Bass control 1 Follow steps 1 4 on the proceeding page to enter the Equalizer setup menu 2 Press the Tuning Up or Down buttons to cycle through the options until Bass appears on the display 3 Press and release the Select button The current Bass setting will be displayed 4 To adjust the Bass setting press the Tuning ...

Страница 47: ...function Pressing the Play Pause button will mute the output from the loudspeakers 1 Press and release the Play Pause button to mute the sound output The speaker volume symbol on the display will disappear 2 Press and release the Play Pause button again or one of the Volume buttons to un mute the sound output 1 2 46 ...

Страница 48: ...ure an adequate signal level and then use the Volume Up or Down buttons on the sound system as needed for comfortable listening 1 AUX IN Headphone socket A3 5mm stereo Headphone Socket is provided on the rear of your sound system for use with headphones Inserting a plug automatically mutes the internal loudspeakers Please be aware that the sensitivity of headphones can vary widely We therefore rec...

Страница 49: ...e Tuning Up or Down buttons until the display shows Set Brightness on the lower line of the text display 3 Press and release the Select button to show the current setting 4 PresstheTuningUporDownbuttonstochangethestandbybrightness level The backlight level will change at the same time so that you can see the effect of the change when the unit is in standby mode 5 Press and release the Select butto...

Страница 50: ...listandpresetswillbeerased Alarmswillbecancelled audioequaliseranddisplaybrightnesssettings will have been set to their default values The clock will be reset and the unit will behave as when first switched on see page 9 In case of malfunction due to electrostatic discharge reset the product usingtheaboveprocedure Insomecircumstancesitmaybenecessary to disconnect and then reconnect the mains power...

Страница 51: ...DAB mode press and hold the Menu button DAB Menu will appear on the display Press and release the Select button to enter the DAB menu 2 Press the Tuning Up or Down button until the SW Version option is displayed Press and release the Select button to display the software version information for a few seconds 3 Pess and release the Menu button to cancel the display To display the CD MP3 WMA softwar...

Страница 52: ...telescopic aerial is suitable for most applications In some locations if reception conditions are poor an external antenna may be more suitable For this purpose the telescopic aerial may be removed to allow connection to an external aerial using a coaxial cable First remove the two small screws holding the antenna connector cover in place using a small cross head screw driver Then using a suitable...

Страница 53: ...d quality and freedom from interference than will often be obtained on the FM band The name plate is located on the rear of your sound system The sound system shall not be exposed to dripping or splashing and that no objects filled with liquids such as vases shall be placed on the sound system It is recommended to operate the product such that there is a minimum distance 10cm recommended to adjace...

Страница 54: ...If nonetheless the mains plug is cut off remove the fuse and dispose of the plug immediately to avoid a possible shock hazard by inadvertent connection to the mains supply If this product is not supplied with a mains plug or one has to be fitted then follow the instructions given below IMPORTANT DO NOT make any connection to the larger terminal which is marked with the letter E or by the safety ea...

Страница 55: ...under guarantee Procedure Any claim under this guarantee should be made through the dealer from whom the product was purchased It is likely that your Roberts dealer will be able to attend to any defect quickly and efficiently but should it be necessary the dealer will return the product to the company s service department for attention In the event that it is not possible to return the product to ...

Страница 56: ...Issue 2 ROBERTS RADIO LIMITED PO Box 130 Mexborough South Yorkshire S64 8YT Website http www robertsradio com 2014 Roberts Radio Limited ...

Отзывы: