Robe Flare CB Series Скачать руководство пользователя страница 5

5

3. Description of the device
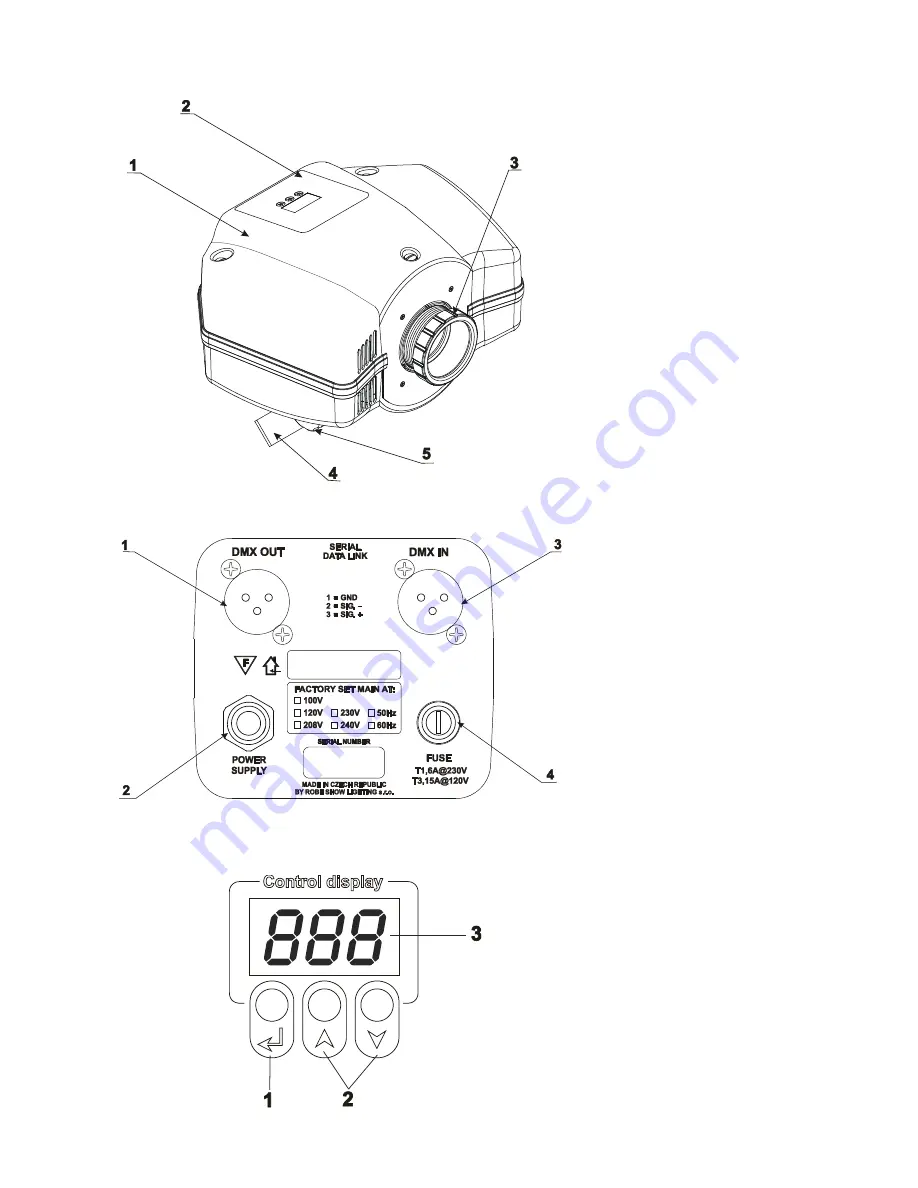
 

Rear panel:

  1

 - DMX output

  2

 - Powercord

  3

 - DMX input

  4

 - Fuseholder


Control board:

  1

 - Enter button

  2

 - Up,Down buttons

  3

 - Display


1

 - Top cover

- Control board

- Objective

4

 - Mounting bracket

5

 - Adjusting screw

Содержание Flare CB Series

Страница 1: ...Version 1 0 ...

Страница 2: ...ter Slave connection 9 5 Flare DMX PROTOCOL version 1 0 10 6 Controller mode 12 6 1 DMX addressing 12 7 Control menu map 13 8 Functions of the control panel 14 8 1 Fixture Address 14 8 2 Microphone sensitivity 14 8 3 Lamp On Off 14 8 4 Lamp preseting 14 8 5 Demo test sequences 15 8 6 Stand alone setting 15 8 7 Reset fixture 15 8 8 Special functions 15 9 Stand alone mode 17 10 Error and information...

Страница 3: ...th other cables Handle the power cord and all connections with the mains with particular caution Always plug in the power plug least The power plug has to be accessable after installing the device Make sure that the power cord is never crimped or damaged by sharp edges Check the device and the power cord from time to time Always disconnect from the mains when the device is not in use or before cle...

Страница 4: ...opriate safety rope Fix the safety rope at the correct holes only Only operate the fixture after having checked that the housing is firmly closed and all screws are tightly fas tened The lamp must never be ignited if the objective lens or any housing cover is open The maximum ambient temperature 40 C must never be exceeded CAUTION The lens has to be replaced when it is obviously damaged so that it...

Страница 5: ...ion of the device Rear panel 1 DMX output 2 Powercord 3 DMX input 4 Fuseholder Control board 1 Enter button 2 Up Down buttons 3 Display 1 Top cover 2 Control board 3 Objective 4 Mounting bracket 5 Adjusting screw ...

Страница 6: ...3 quarter turn fasteners on the top cover 3 Remove a lamp cover by unscrewing 2 retaining screws 4 Grasp the lamp by the reflector and pull it out of the lamp holder 5 Pull the socket off the lamp 6 Push socket fully onto the pins of the new lamp 7 Place the lamp into the lamp holder 8 Fasten the lamp cover back 9 Replace the fixture cover and tighten the 3 quarter turn fasteners Do not operate th...

Страница 7: ... the transformer primary connection block to the position according to the desired volt age 5 Put the top cover back before applying AC power 4 3 Rigging the fixture The installation of the projector has to be built and constructed in a way that it can hold 10 times the weight for 1 hour without any harming deformation The installation must always be secured with a secondary safety attachment e g ...

Страница 8: ...severe injuries when crashing down If you have doubts concerning the safety of a possible installation do not install the projector Before rigging make sure that the installation area can hold a minimum point load of 10 times the projector s weight Danger of fire When installing the device make sure there is no highly inflammable material decoration articles etc within a distance of min 0 4 m Moun...

Страница 9: ... fixture in the DMX chain with the DMX input of the next fixture Always connect one output with the input of the next fixture until all fixtures are connected Caution At the last fixture the DMX cable has to be terminated with a terminator Solder a 120 Ohm resistor between Signal and Signal into a 3 pin XLR plug and plug it in the DMX output of the last fixture Building a master slave chain Connec...

Страница 10: ...d Cyan Cyan Light green Light green Magenta Magenta Light blue Light blue Yellow Yellow Green Green Pink Pink Blue Blue Orange Orange UV step step step step step step step step step step step step step step step step proportional proportional proportional proportional proportional proportional proportional proportional proportional proportional proportional proportional proportional proportional p...

Страница 11: ...ed Dimmer from closed to open Dimmer full open Strobe effect from slow to fast Reset Program time trigger program runs by time control Program audio trigger program runs by audio control Random Audio trigger random effects by audio control step proportional step proportional step step step step ...

Страница 12: ...re on the DMX data link If two three or more Flare are addressed similarly they will work similarly For address setting please refer to the instructions under Fixture address menu 001 Note After switching on the Flare will automatically detect whether DMX 512 data is received or not If there is no data received at the DMX input the display will start to flash 001 with actually set address This sit...

Страница 13: ... 001 001 511 MI S 01 10 20 LMP OFF On LA P LA A OFF On d OF OFF On tSt St A run St M OFF MSt SLA Aut OFF On C S A tiM Au P Au r Pr E E 01 E 30 Col 0 255 diM 0 127 tiM 0 0 25 5s COP End SPE VEr UPd No YES Adj Col 0 255 diM 0 255 CAL Col 0 255 A rE rES ...

Страница 14: ...r For address setting follow this procedure 1 Switch On the fixture and wait until the fixture reset has finished rES is flashing at the display 2 Browse through the menu by pressing the UP and DOWN keys until the display shows current addres 001 Confirm by pressing ENTER key and 001 will start to flash frequently 3 Use the UP and Down keys to select the desired address 4 Confirm by pressing ENTER...

Страница 15: ...gram Select this menu to edit the program The fixture has one editable program Each step has a step time the time during which effects last in the current step Programming procedure 1 Press UP or DOWN to select the desired program step E 01 E 30 and press ENTER 2 Press UP or DOWN to select the desired item and press ENTER button Now you can edit by UP or DOWN buttons the DMX value 0 255 for select...

Страница 16: ...ll processors will be updated including processors with the same software version If you wish to update only later versions of processors enable the Incremental Update check box Avoid interrupting the process Update status is being displayed in the list window When the update is finished the line with the text The fixture is successfuly updated will appear in this window and the fixture will reset...

Страница 17: ...ng point when playing back their programs Every fixture runs its program repeatedly starting the program step No 1 when requested by the master For example If the slave fixture has a shorter program length it will continously repeat its program until the master fixture finishes its own program and restarts its program running slave 1 prog step 3 will not be finished If the slave fixture has a long...

Страница 18: ...lour wheel is not located in the default position after the reset M Er Master error The message informs you that the fixture was addressed as a master and DMX signal is connected to its input Disconnect the DMX controller from fixture s input and reset the fixture F Er This message will appear if the frequency of the main is not standard 50 or 60 Hz This message can appear as a result of the inter...

Страница 19: ...e fan and air vents periodically Remove dust from the fan and air vents with a soft brush vacuum cleaner or compressed air The cleaning period depends on the ambient operating conditions but first inspection of the fixture interior shoud be made after one month of its operating and according to these inspection results select suitable clean ing period There are no serviceable parts inside the devi...

Отзывы: