


15
The RoadHog uses a high tension Kevlar back-
banded double V belt. Proper tensioning is criti-
cal to milling performance and belt life. It should
never be replaced with a standard V belt.
The belt tensioning should be checked after the
first 15 hours of operation and every 100 hours
after that. These same guidelines should be fol-
lowed if a new belt is installed. The tension be
checked and reset any time the belt is removed
and reinstalled.
There are two methods of checking the belt ten-
sion. One is with a sonic tension meter and the
other is with a double barreled hand tension me-
ter. The hand tester is shipped with the roadhog.
The sonic tension meter is available for purchase
from your RoadHog dealer.
Part number is SO-0249
Procedure with Gates 507C Sonic tension
Meter, part number SO-0249, purchased from
your dealer
1. Remove both upper and lower portions of the
belt shroud.
2. Loosen 4 bolts that hold the engine cradle to
the milling head chassis. 2 bolts are pivot
bolts and 2 are in slots on the front of the cra-
dle.
3. Loosen 2 jam nuts on engine cradle adjusting
bolts.
4. Connect Microphone to meter and press
POWER to turn meter on.
5. Press Hz to switch readout to Hertz.
6. Press MEASURE. Display should change to
a horizontal line.
7. Hold the microphone about ½ inch away from
belt at the midpoint of the front span of the
belt. Strike the belt with hand.
8. Horizontal line on meter will change to a wavy
line and read out the belt frequency in Hertz.
9. Meter will not read a frequency less than 15
Hz, so belt has to be fairly tight before the
meter can read the frequency. Also, high
ambient noise levels can prevent the meter
from reading the frequency.
10. Adjust two adjustment bolts on engine cradle
to adjust belt tension.
11. Repeat steps 6 through 9 until belt tension is
42-44 Hz for a new belt and 39-41 Hz for a
used belt ( more than 15 hours ).
12. Tighten 4 engine cradle bolts and tighten jam
nuts on adjusting bolts.
Procedure with non-Sonic tension tester, part
number 106-3842, shipped with your RoadHog.
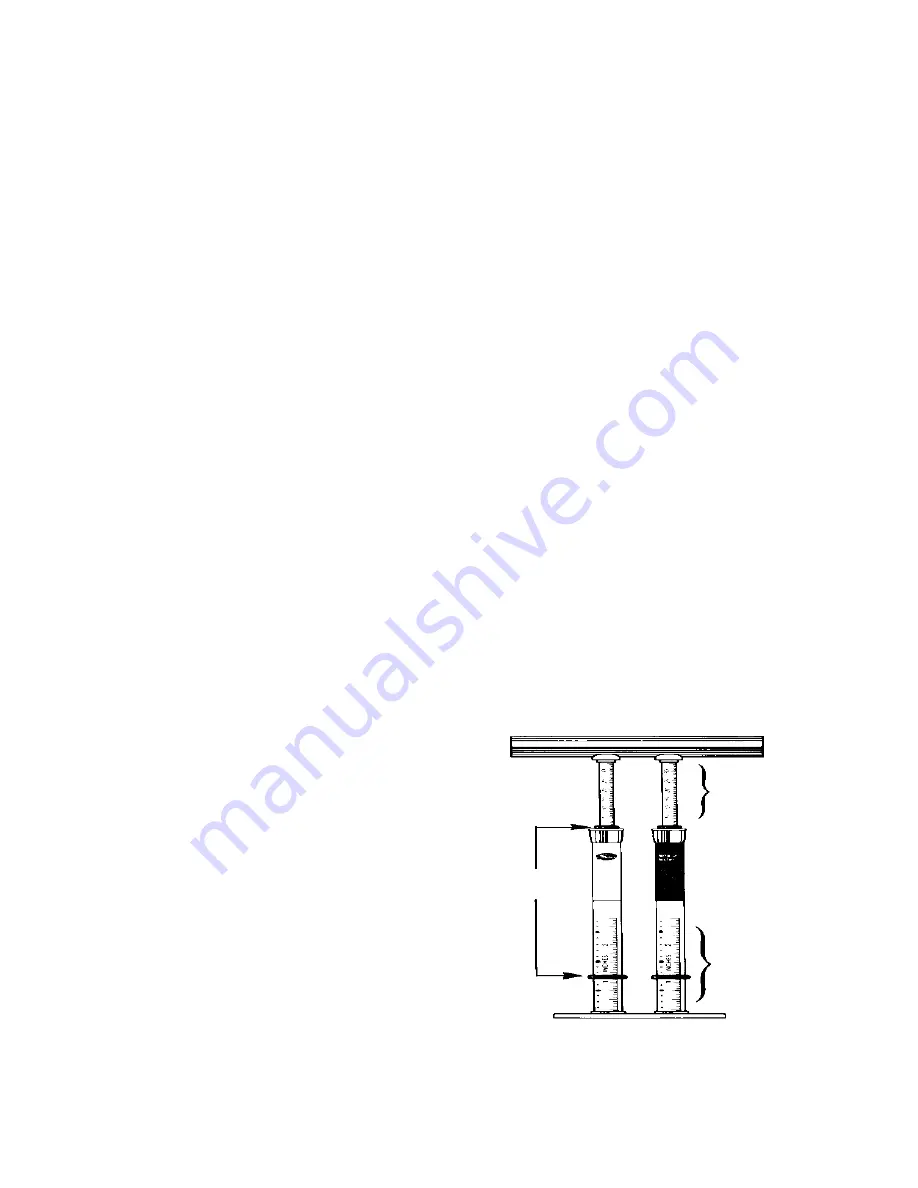
1. Remove the outer shroud of the belt guard and
measure the distance from the top of the belt to
the notch cut out in the belt shroud.
2. On the scale reading “Inches of Span Length”,
set the “O”-rings to show the measurement just
taken in step one plus 0.39” of deflection.
3. At the center of the span between the pulleys
which is identified by the notch cut out in the
belt shroud, apply force, with the tension tester
perpendicular to the span, enough to deflect the
belt until the bottom edge of the “O” Rings are
even with the top of the back belt shroud.
4. Find the amount of deflection force on the up-
per scales of the tension tester, The total force
will be the sum of the readings on each of the
two scales. The sliding Rubber “O” Rings slide
up scale as the tool compresses—and stay up
for accurate reading of pounds of force. Read
the bottom edge of the rings (Slide rings down
before reusing).
5. Compare the total deflection force, it should be
between
33 to 36 lbs
on a new belt (
28 to 30
lbs
on a used belt ). If
less
than
minimum
rec-
ommended deflection force, belt should be
tightened. If
more
that
maximum
recommend-
ed deflection force, drive is tighter than neces-
sary and can damage the bearing in the drive
system.
NOTE: There normally will be a rapid drop in
tension during the “break-in period” for V-belt
drives. Check tension frequently during the first
day of operations.
Def lection
Force Scale
(Read Up)
Def lection
Distance Scale
(Read Up)
Sliding
Rubber
“O” Rings
Read the scales at the bottom edge of
the “O” Ring. Leave the upper “O”
Ring in maximum “down” position


