


HLA 305
10
nicians. Before removing the cover from the amplifier, it is essential that
the DC power cable, coaxial cables to the antennas and the transceiver
are disconnected.
If during operation it is noticed an abnormal noise or odour, switch off
the amplifier immediately and check all of the connecting cables and if
necessary return to a authorised service centre for testing. Do not sub-
ject the amplifier to physical shock, high humidity, dusty environments
or excessive heat. Periodically clean any accumulated dust from the
amplifier especially around ventilation grilles with a soft dry antistatic
cloth.
Do not exceed more than 25W on the input to the amplifier. Excessive
drive on the input may cause damage and invalidate the warranty.
This amplifier features several protection circuits however using the
amplifier in a manner other than that described in the operating instruc-
tions may be dangerous to the user and may cause permanent damage
to the amplifier.
Using the amplifier with the wrong band filter selected or without a
suitable antenna connected at maximum power may cause damage to
the amplifier.
The internal set-up parameters of the amplifier are adjusted on an indi-
vidual basis for each amplifier during a calibration and test procedure at
the factory. Modification of these parameters will invalidate the warran-
ty.
17.
OPERATION
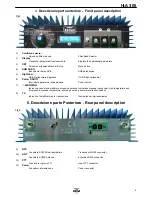
Before use verify that the voltage of the power supply corresponds
to that written on the rear of the amplifier. (
!
Fig.2
. Verify also
that there is a suitable antenna, correctly adjusted connected to
the ANT Connector of the amplifier (
Fig.2
).
17.1
CW Operation
Due to the switching time of the amplifiers TX RX relays it is not possi-
ble to use Full / Semi Break-in mode when the amplifier is in use.
The optimum method for sending CW with the amplifier is to put the
transceiver into TX mode manually, either with the MOX switch on the
front panel of the transceiver or an external foot switch PTT to the trans-
ceiver. This allows the PTT relay on the amplifier to close before send-
ing any characters so that first dot / dash of the first character is ampli-
fied.
17.2
Initial Settings
If it is necessary to tune the transceiver/antenna before use, this may be
carried out with the amplifier used in
OFF
mode. Power Switch
(Fig.1) set to
OFF
.
Set the front panel controls in the following positions, (with reference to
paragraph 4):
Power/ON
on ON
SSB/ON
on OFF
Band Selector on AUTO
High/Low
on Low
17.3
MENU
When the amplifier is switched on in receive mode (
Fig.1 ON) (
Fig.1 OFF)
,
and the band selector set to
‘Auto’,
it is possible to access
the settings menu. Press the button
SET
trough the hole (
Fig.1) using
a non metallic object. In this mode it is possible to change the amplifiers
parameters to suit the operators requirements.
After entering the settings menu, it is possible to access all of the sub
menus by repeatedly pressing
SET
. To change a menu parameter ro-
tate the band selector (
Fig.1) . To exit a sub menu without changing
any data press the
SET
key (
), repeatedly to cycle through the set-
tings menu until
Exit
and press
SET
without moving the Band Selector
position. To save any modifications change position of Band Selector on
Exit
menu, when
SAVE
is displayed press
SET
and any modification
will be saved.
17.3.1
SSB Delay
This feature is only enabled when the Int. VOX is enabled. Otherwise
RTX switching is controlled directly from the transceiver regardless of
the switch setting. It possible to change the delay time from TX to RX
when SSB Delay is enabled, (
Fig.1 ). Between 50ms a 1,5s (default
500ms)
17.3.2
Backlight High/Low
It is possible to adjust the brightness of the LCD back light between two
levels.
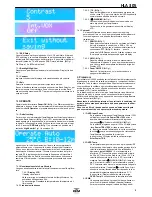
17.3.3
Contrast
It is possible to adjust the contrast of the display.
17.3.4
Int. VOX
Activate the internal VOX switch if no PTT input is available
17.3.5
Exit
Allows you to save any changed parameters by rotating the band se-
lector until SAVE is displayed and then pressing the SET button. This
will also exit the menu system. If you do not want to save anything do
not rotate the band selector and press set to exit
17.4
OPERATE
Switching the
Power/ON
(
Fig.1) switch to
ON
enters the mode
Oper-
ate,
the amplifier completes a brief self test and is then ready to use.
17.4.1
Default setting
To use the amplifier immediately it is sufficient to position the Band
Selector (
to Auto, (Automatic). Ensuring that the antenna is connect-
ed to the ANT (
) connector and that it is suitable for the desired fre-
quency of operation and power rating. Insert
PTT connector
from the
transceiver, set
High/Low
to Low. The input drive power must also be
set to the correct level 10W.
In this mode all of the functions of the amplifier are completely automat-
ic and no operator intervention is required.
If all menus remain at their default settings when operating the trans-
ceiver in TX the amplifier will automatically measure the input frequency
and select the correct band filter. If the operator changes the transmit
frequency the microprocessor will automatically change to the correct
band filter if necessary.
17.4.2
Monitoring the Amplifiers operation


