Ritchie Draft Pro 3 Скачать руководство пользователя страница 3


Preparation for Use 

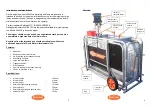
Locate the indicator post. slide the post onto the stub, on top of the weigher, 
and orientate the indicator post to the desired angle. Tighten the thumb screw 
on the indicator post against the stub (fig 2). 


Unpack the ezi-weigh indicator and 

read the included instructions for ezi-

weigh indicator set up. Charge fully before use. 

The indicator simply slides 

on to the indicator post using the bracket on the back of the indicator (fig 3). 


Indicator 
post

Thumb 
screw 

fig 2

Indicator 
post 

fig 3

Indicator 


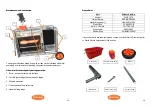
Unscrew the caps on the indicator and the amphenol plugs. Screw on a plug to 
each load cell / bar port (fig 4). Screw the dust caps together to keep out dirt 
and moisture. 

Dust caps should be used on the indicator and plugs, when not in use. 
To keep out dirt and moisture. 


Check to see that all opening and closing mechanisms are working smoothly, 
oil / grease if required (see maintenance and lubrication section). 

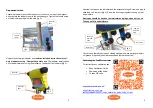
Calibrating the DraftPro indicator 

For instructions on calibration see 

  Span Calibration Guide 

  Download at link below 

  Or scan QR code. 


https://www.ritchie-d.co.uk/


https://ritchie-d.co.uk/wp-
content/uploads/2020/11/span_calibration_guide_3664_5G.pdf

fig 4

Load cell 
port and 
plug 

Dust caps 

Load cell 
port and 
plug 

Dust caps

Содержание Draft Pro 3

Страница 1: ...gher is an experienced stock person who can maintain a high standard of animal welfare Ensure that there is sufficient space in the area designated for the weigher to allow the operator to work safely...

Страница 2: ...ard of animal welfare Deviations from the intended use should not take place without the notice and approval of David Ritchie Implements Ltd Features Mesh floor Designed to be built into a race 3 way...

Страница 3: ...nscrew the caps on the indicator and the amphenol plugs Screw on a plug to each load cell bar port fig 4 Screw the dust caps together to keep out dirt and moisture Dust caps should be used on the indi...

Страница 4: ...test indicator is reading zero see Tru test indicator instructions on how to do this To admit an animal Lift the guillotine gate up and over to allow the animal to enter the weigh cage fig 7 Then low...

Страница 5: ...ide should be pulled towards the entrance fig 15 to release the locking pin fig 16 17 and swung outwards to open the gate fig 18 Once the animal has exited swing the gate closed against the stops and...

Страница 6: ...o that they are horizontal and against the stops fig 21 Lift the handles further to lift that end off the ground It can now be easily moved around on the wheels Move the weigher to the new location an...

Страница 7: ...nges 3 Wheels and axles 4 Transport handles pivot points 5 Handle sliding tubes 1 3 2 4 1 5 5 14 Spare Parts Part Ritchie Part No Wheel WHPL275 Helper Spring SPRINGDR1000 Handle knob only HANDLE121062...

Страница 8: ...15 Notes 16 David Ritchie Implements Ltd Carseview Road Forfar Scotland DD8 3BT Tel 01307 462271 Fax 01307 464081 e mail agrisales ritchie uk com WWW ritchie uk com...

Отзывы: