


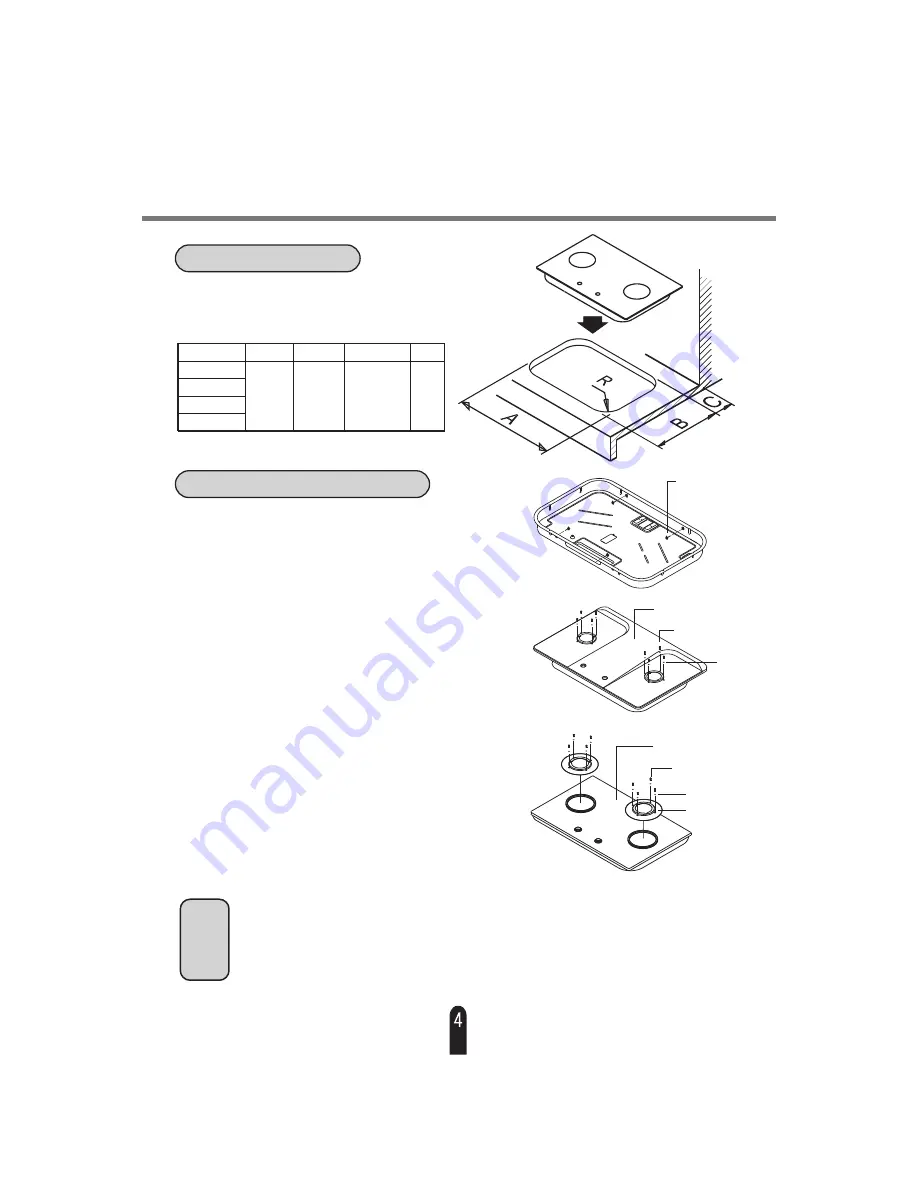
Kitchen counter opening dimension
Model no.
Diagram 4
1. Place built in hob into opening (see diagram 4).
2. Adjust position of
, and fix with adjusting
screws(see diagram 5).
3. Place stainless steel top plate on top of main body,
adjust position, and fix with screws and packing
(enclosed in screw pack, see diagram 6).
4. Place burner ring, cover, burner support, switch
knob accordingly into correct position.
5.Battery: install from bottom of main body. Battery
must be installed correctly to enable ignition
discharge.
1. Place
into opening (see diagram 4).
2. Adjust position of
, and fix with adjusting
screws (see diagram 5).
3. Place glass top plate on top of main body, adjust
position, and place drip pan. Then, fix with screws
and packing (see diagram 7).
4. Place burner ring, cover, burner support, switch
knob accordingly into correct position.
5. Battery: install from bottom of main body. Battery
must be installed correctly to enable ignition
discharge.
built in hob
built in hob
built in hob
Glass built in hob assembling method
Adjusting
screw
(4 pcs)
Diagram 5
Stainless
steel
top plate
Screw
Packing
Diagram 6
Glass top plate
Fixing screw
Packing
Drip pan
Diagram 7
Top plate: must be fixed onto main body with screws, otherwise may result in
instability.
Burner support: if not placed correctly into opening on top plate during
assembly, may result in instability.
Burner heads: if not assembled correctly, will cause abnormal flame
combustion and reverse spark.
China wok auxiliary support: optional to provide stability.
Notes
b. Opening dimension
c. Assembling method and notes
RB-27F
RB-37F
RB-27GF
RB-37GF
A
B
C(min)
R
725
465
75
85
Stainless steel gas built in hob
assembling method