33
WARTUNG
Verbrennung
Die Abgase der Verbrennung analysieren.
Bemerkenswerte Abweichungen im Vergleich
zur vorherigen Überprüfung zeigen die Stelle
an, wo die Wartung aufmerksamer ausgeführt
werden soll.
Gasundichtigkeiten
Die Zähler-Brenner-Leitung auf Gasundichtig-
keiten kontrollieren.
Gasfilter
Verschmutzten Gasfilter austauschen.
Flammkopf
Den Brenner öffnen und überprüfen, ob alle
Flammkopfteile unversehrt, nicht durch hohe
Temperatur verformt, ohne Schmutzteile aus der
Umgebung und richtig positioniert sind.
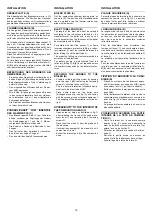
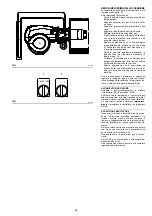
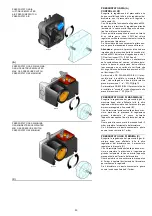
FLAMMENÜBERWACHUNG (A)
Der Brenner ist mit einem Ionisationsgerät zur
Flammenüberwachung ausgerüstet. Der erfor-
derliche Mindeststrom beträgt 6 µA. Da der
Brenner einen weitaus höheren Strom erreicht,
sind normalerweise keine Kontrollen nötig. Will
man den Ionisationsstrom messen, muß der
Steckanschluß am Kabel der Ionisationssonde
ausgeschaltet und ein Gleichstrom-Mikroam-
peremeter, Meßbereich 100 µA, eingeschaltet
werden.
Auf richtige Polung achten!
Brenner
Es ist zu überprüfen, ob ungewöhnlicher Ver-
schleiß oder die Lockerung der Schrauben vor-
liegen.
Den Brenner von außen reinigen.
Verbrennung
Sollten die am Anfang des Eingriffs angetroffe-
nen Verbrennungswerte nicht mit den gültigen
Vorschriften übereinstimmen oder einer guten
Verbrennung nicht entsprechen, so wenden Sie
sich zur Durchführung der notwendigen Einstel-
lungen bitte an den Technischen Kundendienst.
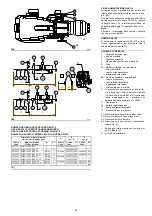
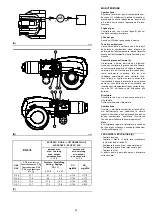
Anmerkung
Es wird empfohlen, den Brenner je nach benutz-
tem Gastyp gemäß den Angaben in der Tabelle
(C) einzustellen.
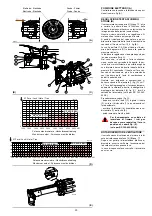
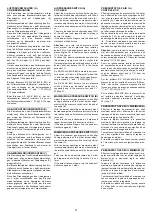
ÖFFNUNG DES BRENNERS (B):
- Spannung unterbrechen.
- Die Zugstange 1) des Hebels zur Kopfbewe-
gung durch Lockern der Mutter 2) entfernen.
- Den Steckanschluss 3) des Gasstellantriebs
abtrennen.
- Den Steckanschluss 4) des Gasdruckwächters
abtrennen.
- Die Schrauben 5) abnehmen.
Nun kann der Brenner am Scharnier geöffnet
werden.
MAINTENANCE
Combustion
The optimum calibration of the burner requires
an analysis of the flue gases. Significant differ-
ences with respect to the previous measure-
ments indicate the points where more care
should be exercised during maintenance.
Gas leaks
Make sure that there are no gas leaks on the
pipework between the gas meter and the burner.
Gas filter
Change the gas filter when it is dirty.
Combustion head
Open the burner and make sure that all compo-
nents of the combustion head are in good condi-
tion, not deformed by the high temperatures,
free of impurities from the surroundings and cor-
rectly positioned.
Flame present check (A)
The burner is fitted with an ionisation system
which ensures that a flame is present. The mini-
mum current for plant operation is 6 µA. The
burner provides a much higher current, so that
controls are not normally required. However, if it
is necessary to measure the ionisation current,
disconnect the plug-socket on the ionisation
probe cable and insert a direct current microam-
perometer with a base scale of 100 µA. Care-
fully check polarities!
Burner
Check for excess wear or loose screws.
Clean the outside of the burner.
Combustion
In case the combustion values found at the
beginning of the intervention do not respect the
standards in force or, in any case, do not corre-
spond to a proper combustion, contact the
Technical Assistant and have him carry out the
necessary adjustments.
Note
We recommend calibrating the burner - depend-
ing on the type of gas utilised - according to the
indications given in table (C).
TO OPEN THE BURNER (B):
- Switch off the electrical power.
- Remove the tie rod 1) of the head movement
lever, loosening nut 2).
- Disconnect the gas servomotor test point 3).
- Disconnect the gas pressure switch test point 4).
- Remove screws 5).
At this point it is possible to open the burner at
the hinge.
ENTRETIEN
Combustion
Pour obtenir un réglage optimal du brûleur, il
faut effectuer l'analyse des gaz d'échappement
de la combustion à la sortie de la chaudière. Les
différences significatives par rapport au contrôle
précédent indiqueront les points où l'opération
d'entretien devra être plus approfondie.
Fuites de gaz
Contrôler l'absence de fuites de gaz sur le con-
duit compteur-brûleur.
Filtre du gaz
Remplacer le filtre du gaz lorsqu'il est encrassé.
Tête de combustion
Ouvrir le brûleur et contrôler si toutes les parties
de la tête de combustion sont intactes, ne sont
pas déformées par les températures élevées,
sont exemptes d'impuretés provenant du milieu
ambiant et positionnées correctement.
Controle presence flamme (A)
Le brûleur est muni d'un système à ionisation
pour contrôler la présence de la flamme. Pour
faire fonctionner le boîtier de contrôle le courant
minimum est de 6 µA. Le brûleur produit un cou-
rant nettement supérieur qui ne nécessite nor-
malement d'aucun contrôle. Toutefois, si on veut
mesurer le courant d'ionisation, il faut décon-
necter la fiche-prise placée sur le câble de la
sonde d'ionisation et connecter un microam-
pèremètre pour courant continu de 100 µA bas
d'échelle.
Attention à la polarité!
Brûleur
Vérifier qu'il n'y ait pas d'usure anormale ou de
vis desserrées.
Nettoyer extérieurement le brûleur.
Combustion
Si les valeurs de la combustion relevées au
début de l’intervention ne satisfont pas aux nor-
mes en vigueur ou ne permettent pas une
bonne combustion, contacter le Service après-
vente pour qu’il effectue les réglages qui s’impo-
sent.
Note
Il est conseillé de régler le brûleur selon le type
de gaz utilisé, voir les indications fournies dans
le tableau (C).
POUR OUVRIR LE BRULEUR (B):
- Couper la tension.
- Enlever le tirant 1) du levier du mouvement de
la tête, en desserrant l’écrou 2).
- Débrancher la prise 3) du servomoteur gaz.
- Débrancher la prise 4) du pressostat gaz.
- Retirer les vis 5).
On peut alors ouvrir le brûleur sur la charnière.
Содержание RS 300/E BLU
Страница 2: ......
Страница 39: ...39 ...
Страница 40: ...40 ...
Страница 41: ...41 ...
Страница 42: ...42 ...
Страница 43: ...43 ...
Страница 44: ...44 ...
Страница 45: ...45 ...
Страница 46: ...46 ...
Страница 47: ...47 ...
Страница 48: ...48 ...
Страница 49: ...49 ...
Страница 50: ...50 ...
Страница 51: ...51 ...
Страница 52: ...52 ...
Страница 53: ...53 ...

