background image

17

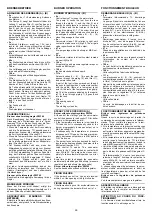
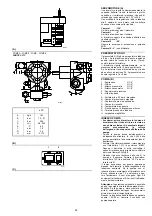
HYDRAULIKANLAGE

BRENNSTOFFZUFÜHRUNG

Zweistrangsystem (A)

Der Brenner verfügt über eine selbstansau-
gende Pumpe und kann sich daher, innerhalb
der Grenzen der seitlich abgebildeten Tabelle,
selbst versorgen. 
Tank höher als der Brenner 

A

Die Strecke P sollte nicht höher als  10 m sein,
damit das Dichtungsorgan der Pumpe nicht
überlastet wird, und die Strecke V sollte 4 m
nicht überschreiten, damit die Selbstein-
schaltung der Pumpe auch bei fast leerem Tank
möglich ist.
Tank niedriger 

B

Der Pumpenunterdruck von  0,45 bar (35 cm
Hg) darf nicht überschritten werden. Bei
höheren Unterdruckwerten werden Gase des
Brennstoffs befreit; die Pumpe entwickelt mehr
Geräusche und ihre Haltbarkeit wird bee-
inträchtigt.
Es empfiehlt sich, die Rücklaufleitung auf
derselben Höhe wie die Ansaugleitung ankom-
men zu lassen; das Abkuppeln der Ansauglei-
tung ist schwieriger.

Kreisschaltung

Sie besteht aus einer Leitung, die von und zum
Tank führt, in der eine Hilfspumpe den Brennst-
off unter Druck fließen läßt. Eine Abzweigung
des Kreises speist den Brenner. Diese
Schaltung ist nützlich, wenn die Brennerpumpe
sich nicht selbst speisen kann, weil Abstand
und/oder Höhe vom Tank größer sind als die in
der Tabelle aufgeführten Werte.

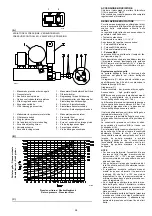
Zeichenerklärung

H = Höhenunterschied Pumpe/Bodenventil
L = Leitungslänge
Æ = Innendurchmesser Leitung
1 = Brenner
2 = Pumpe
3 = Filter
4 = Manuelles Sperrventil
5 = Ansaugleitung
6 = Bodenventil
7 = Manuelles Schnellschließventil mit Ferns-

teuerung (nur Italien)

8 = Sperrmagnetventil (nur Italien)
9 = Rücklaufleitung
10 = Rückschlagventil (nur Italien)

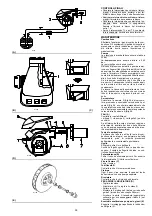
HYDRAULIKANSCHLÜSSE (B)

Die Pumpen verfügen über einen Bypass, der
Rücklauf und Ansaugung miteinander verbindet.
Sie sind am Brenner installiert und der Bypass
ist mit der Schraube 6)(B)S.22 verschlossen.
Beide Schläuche sind demnach an die Pumpe
anzuschließen.
Wird die Pumpe bei geschlossenem Rücklauf
betrieben und die Bypass-Schraube eingesetzt,
wird sie sofort beschädigt.
Die Verschlußschrauben von den Saug- und
Rücklaufanschlüssen der Pumpe abnehmen.
An deren Stelle die Schläuche mit den beig-
epackten Dichtungen einbauen. 
Beim Einbau dürfen diese Schläuche nicht ver-
bogen werden.
Die Schläuche sind so zu führen, daß sie weder
Trittbelastungen noch warmen Kesselteilen aus-
gesetzt werden.
Anschließend das andere Schlauchende mit
den Ansaug - und Rücklaufleitungen durch die
mitgelieferten Nippeln verbinden.

HYDRAULIC SYSTEM

FUEL SUPPLY

Double-pipe circuit (A)

The burner is equipped with a self-priming pump
which is capable of feeding itself within the limits
listed in the table at the side.  
The tank higher than the burner 

A

Distance "P" must not exceed 10 meters in
order to avoid subjecting the pump's seal to
excessive strain; distance "V" must not exceed
4 meters in order to permit pump self-priming
even when the tank is almost completely empty.
The tank lower than the burner 

B

Pump depression values higher than 0.45 bar
(35 cm Hg) must not be exceeded because at
higher levels gas is released from the fuel, the
pump starts making noise and its working life-
span decreases.
It is good practice to ensure that the return and
suction lines enter the burner from the same
height; in this way it will be less probable that
the suction line fails to prime or stops priming.

The loop circuit

A loop circuit consists of a loop of piping depart-
ing from and returning to the tank with an auxil-
iary pump that circulates the fuel under
pressure. A branch connection from the loop
goes to feed the burner. This circuit is extremely
useful whenever the burner pump does not suc-
ceed in self-priming because the tank distance
and/or height difference are higher than the val-
ues listed in the Table.

Key

H = Pump/foot valve height difference
L = Piping length
Æ = Inside pipe diameter
1 = Burner
2 = Pump
3 = Filter
4 = Manual on/off valve
5 = Suction line
6 = Foot valve
7 = Rapid closing manual valve remote con-

trolled (only Italy)

8 = On/off solenoid valve (only Italy)
9 = Return line
10 = Check valve (only Italy)

HYDRAULIC CONNECTIONS (B)

The pumps are equipped with a by-pass that
connects return line with suction line. The
pumps are installed on the burner with the by-
pass closed by screw 6)(B)p.22.
It is therefore necessary to connect both hoses
to the pump.
The pump will break down immediately if it is run
with the return line closed and the by-pass
screw inserted.
Remove the plugs from the suction and return
connections of the pump.
Insert the hose connections with the supplied
seals into the connections and screw them
down. 
Take care that the hoses are not stretched or
twisted during installation.
Install the hoses where they cannot be stepped
on or come into contact with hot surfaces of the
boiler.
Now connect the other end of the hoses to the
suction and return lines by using the supplied
nipples.

INSTALLATION HYDRAULIQUE

ALIMENTATION COMBUSTIBLE

Circuit à double tuyau (A)

Le brûleur est muni d'une pompe à aspiration
automatique et par conséquent, dans les limites
indiquées dans le tableau ci-contre, il est en
mesure de s'alimenter tout seul. 
Cuve située plus haut que le brûleur 

A

Il faut que que la cote P ne dépasse pas 10 m
pour ne pas trop solliciter l'organe d'étanchéité
de la pompe et que la cote V ne dépasse pas 4
m pour permettre l'auto-amorçage de la pompe
même avec la cuve presque vide.
Cuve située plus bas que le brûleur 

B

On ne doit pas dépasser une dépression de
0,45 bar (35 cm Hg) dans la pompe. Avec une
dépression plus grande, des gaz se dégagent
du combustible; la pompe devient bruyante et
elle dure moins longtemps.
Nous conseillons de faire arriver le tuyau de
retour à la même hauteur que le tuyau d'aspira-
tion;   le désamorçage du tuyau d'aspiration est
plus difficile.

Circuit en anneau

Il est constitué d'un conduit partant de la cuve et
y revenant dans lequel une pompe auxiliaire fait
circuler le combustible sous pression. Une déri-
vation de l'anneau alimente le brûleur. Ce circuit
est utile quand la pompe du brûleur ne parvient
pas à s'auto-alimenter parce que la distance et/
ou la différence de niveau avec la cuve sont
supérieures aux valeurs données dans le tab-
leau.

Légende

H = Diff. niveau pompe-clapet de pied
L = Longueur tuyau
Æ = Diamètre interne tuyau
1 = Brûleur
2 = Pompe
3 = Filtre
4 = Soupape manuelle d'arrêt
5 = Conduit d'aspiration
6 = Clapet de pied
7 = Vanne manuelle à fermeture rapide avec

commande à distance (uniquement pour
l'Italie)

8 = Electrovanne d'arrêt (uniquement pour

l'Italie)

9 = Conduit de retour
10 = Vanne de retenue (uniquement pour

l'Italie)

RACCORDEMENTS HYDRAULIQUES
(B)

Les pompes ont un by-pass qui met en commu-
nication le retour avec l'aspiration. Elles sont
installées sur le brûleur avec le by-pass fermé
par la vis 6)(B)p.22.
Il faut donc raccorder les deux flexibles à la
pompe.
Si on fait fonctionner la pompe avec le retour
fermé et la vis de by-pass insérée, la pompe
tombe en panne immédiatement.
Retirer les bouchons des raccords d'aspiration
et de retour de la pompe.
A leur place, visser les flexibles avec les joints.
Lors du montage, ne pas tordre les flexibles.
Disposer les flexibles de manière à éviter de les
écraser avec le pied ou qu»ils soient en contact
avec les parties chaudes de la chaudière.
Enfin, raccorder l»autre extrémité des flexibles
aux conduits d'aspiration et de retour à l»aide
des nipples de série.

Содержание 3477012

Страница 1: ...Funzionamento bistadio progressivo o modulante Zweistufig gleitender oder modulierender Betrieb Progressive two stage or modulating operation Fonctionnement deux allures progressives ou modulant 2915...

Страница 2: ......
Страница 3: ...olgenderma en bezeichnet 1 A Detail 1 der Zeichnung A auf der gleichen Textseite 1 A p 4 Detail 1 der Zeichnung A auf Seite 4 D CONTENTS TECHNICAL DATA page 6 Variants 6 Output modulation regulator ki...

Страница 4: ...con l appar ecchiatura Landis LOK 16 250 A27 intercambiabile con l apparecchiat ura Landis LAL 1 25 del bruciatore Due stadi progressivi modulante con kit UGELLO numero 1 ugello con ritorno IMPIEGO ST...

Страница 5: ...stattet ist ist er auch f r den Dauerbetrieb geeignet mit dem Steuerger t Landis LAL 1 25 austauschbar Gleitend zweistufig modulierend mit Kit D SE Nummer 1 R cklaufd se STANDARDEINSATZ Heizkessel mit...

Страница 6: ...x LANDIS type LOK 16 250 A27 interchangeable with the burner control box LAN DIS LAL 1 25 Progressive two stage modulating by Kit NOZZLE number 1 nozzle with return STANDARD APPLICATIONS Boilers water...

Страница 7: ...manent si sont quipes avec le bo tier LANDIS LOK 16 250 A27 interchangeable avec le bo tier LANDIS LAL 1 25 du br leur 2 allures progressives modulant avec kit GICLEUR nombre 1 gicleur avec retour EMP...

Страница 8: ...26 Gruppo valvole con variatore pressione ritorno ugello Vi sono due possibilit di blocco del bruciatore Blocco apparecchiatura l accensione del pul sante dell apparecchiatura 24 A avverte che il bruc...

Страница 9: ...out pilot light and lock out reset button 25 Flame inspection window 26 Valve assembly with pressure regulator on nozzle return Two types of burner failure may occur Control Box Lock out if the contr...

Страница 10: ...le dalla pressione corrispondente in camera di combustione Il punto di incontro delle due rette il punto di lavoro che deve rimanere entro l area A per la potenza MINIMA ed entro l area B per la poten...

Страница 11: ...er The intersection of these two lines is the work point which must lie within area A for MIN output and within area B for MAX output In order to utilize also area C RL 130 M it is necessary to perfor...

Страница 12: ...re della caldaia FISSAGGIO DEL BRUCIATORE ALLA CALDAIA B Smontare il boccaglio 9 dal bruciatore 6 Allentare le 4 viti 3 e togliere il cofano 1 Togliere le viti 2 dalle due guide 5 Togliere le due viti...

Страница 13: ...ving a water cooled front the refractory fettling 10 11 B is not required unless it is expressly requested by the boiler manufacturer SECURING THE BURNER TO THE BOILER B Disassemble the blast tube 9 f...

Страница 14: ...he il disco di stabilit fiamma entri in contrasto con il boc caglio Avvitare le viti 1 sulle guide 2 e le viti 4 che fissano il bruciatore alla flangia Qualora fosse necessario sostituire l ugello con...

Страница 15: ...e electrodes are positioned as shown in Figure B Finally remount the burner 3 C on the slide bars 2 and slide it up to the flange 5 keeping it slightly raised to prevent the flame stability disk from...

Страница 16: ...i ori ai valori riportati in tabella Legenda H Dislivello pompa valvola di fondo L Lunghezza tubazione Diametro interno tubo 1 Bruciatore 2 Pompa 3 Filtro 4 Valvola manuale intercettazione 5 Condotto...

Страница 17: ...ner pump does not suc ceed in self priming because the tank distance and or height difference are higher than the val ues listed in the Table Key H Pump foot valve height difference L Piping length In...

Страница 18: ...l ritorno VU Valvola nel ritorno ugello COLLEGAMENTI ELETTRICI eseguiti dall installatore Usare cavi flessibili secondo norma EN 60 335 1 se sotto guaina di PVC almeno tipo H05 VV F se sotto guaina di...

Страница 19: ...afety valve VS1 Safety valve on return VU Valve on nozzle return ELECTRICAL CONNECTIONS set by installer Use flexible cables according to regulation EN 60 335 1 if in PVC boot use at least HO5 VV F if...

Страница 20: ...del rel termico non comprende l assorbimento di targa del motore a 400 V la protezione assicurata lo stesso NOTE I bruciatori RL 70 M RL 100 M RL 130 M lasciano la fabbrica previsti per alimentazione...

Страница 21: ...increase in power absorp tion caused by a missing phase If the motor is star powered 400 V the cursor should be positioned on MIN If the motor is delta powered 230 V the cur sor should be positioned...

Страница 22: ...ghezza maglia filtro INNESCO POMPA Accertarsi prima di mettere in funzione il bruciatore che il tubo di ritorno in cisterna non abbia occlusioni Un eventuale impedi mento provocherebbe la rottura dell...

Страница 23: ...eturn pressure G Pressure calibration in the factory H Filter mesh width PUMP PRIMING Before starting the burner make sure that the tank return line is not clogged Obstruc tions in the line could caus...

Страница 24: ...if ferenza tra portata massima e minima dell ugello girando la vite 5 verso sinistra l eccentricit diminuisce riducendo cos la dif ferenza tra portata massima e minima dell ugello NOTE Per una corrett...

Страница 25: ...positioned on 130 The fine adjustment of the pressure in the return line may be carried out by changing the setting of the eccentric 6 B of the nut and lock nut 4 B The eccentric setting should be ca...

Страница 26: ...za impuntamenti Vincolare nuovamente la camma 2 al servomo tore spostando verso sinistra il pulsante 2 B Per quanto possibile fare attenzione di non spostare le viti alle estremit della camma prec ede...

Страница 27: ...re that the cam profile variation is pro gressive Switch the burner off with switch 1 A p 22 at the OFF position disengage the cam 2 A from the servomotor by pressing the button 3 B and moving it to t...

Страница 28: ...rna in cisterna 116 s Si spegne la scintilla 126 s Termina il ciclo di avviamento FUNZIONAMENTO A REGIME A Bruciatore senza il regolatore di potenza RWF40 Terminato il ciclo di avviamento il comando d...

Страница 29: ...he regula tor 13 then through piping 7 it goes back into the tank 116 s The spark goes out 126 s The starting cycle ends STEADY STATE OPERATION A Burner without output regulator RWF40 At the end of th...

Страница 30: ...la camma 2 A p 26 dal servomo tore premendo e spostando verso destra il pul sante 3 B p 26 e controllare manualmente che la sua rotazione avanti ed indietro sia scorrev ole Vincolare nuovamente la cam...

Страница 31: ...the servo motor by pressing and moving button 3 B p 26 towards the right and turn it backwards and for wards by hand to make sure it moves freely Now engage the cam again by moving the but ton 2 B p...

Страница 32: ...motore pompa rotto Sostituirlo 31 Aspirazione pompa collegata al tubo di ritorno Correggere collegamento 32 Valvole a monte della pompa chiuse Aprirle 33 Filtri sporchi di linea in pompa all ugello P...

Страница 33: ...R cklaufleitung verbunden Verbindung korrigieren 32 Ventile oberhalb der Pumpe geschlossen ffnen 33 Filter verschmutzt Linie Pumpe D se Reinigen 34 Falsche Motordrehung Elektroanschl sse zum Motor we...

Страница 34: ...ck 28 Defective control box Replace 29 Pump unprimed Prime pump and see Pump unprimes 53 54 30 Pump motor coupling broken Replace 31 Pump suction line connected to return line Correct connection 32 Va...

Страница 35: ...ompe cass Le remplacer 31 Aspiration pompe reli e au tuyau de retour Modifier le raccordement 32 Vannes en amont de la pompe ferm es Les ouvrir 33 Filtre sales de ligne sur pompe au gicleur Les nettoy...

Страница 36: ...S p A Via degli Alpini 1 I 37045 Legnago VR Tel 39 0442 630111 Fax 39 0442 630375 http www rielloburners com Con riserva di modifiche nderungen vorbehalten Subject modifications Sous r serve de modifi...

Отзывы: