RIDGID SeeSnake CS6 Скачать руководство пользователя страница 7

English   –   7

Keypad Overview

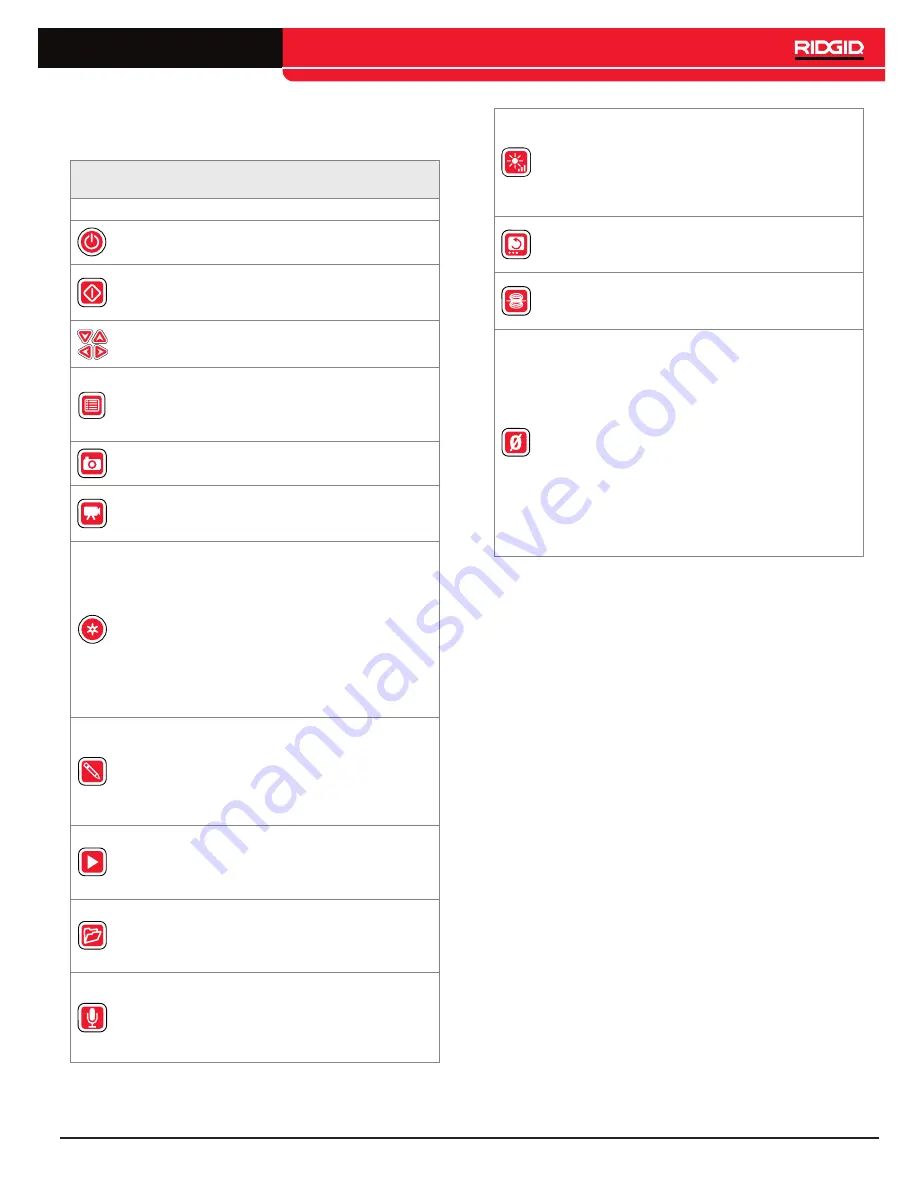
CS6 Keys and Functions

Icon

Name

Function

Power Key

Power on or off.

Select Key

Select menu items, pause 
and resume video, Autolog, 
and audio recording. 

Arrow Keys

Navigate menus and screens. 

Menu/Back Key

Settings, display, language, 
and Media Menu. Press 
to exit out of menus and 
screens.

Photo Key

Take a photo.

Video Key

Start and stop video record-
ing. When recording, the LED 
below the key is lit.

Autolog Key

Start and stop Autolog video 
recording. When recording, 
the LED below the key is lit. 
The CS6 can be powered on 
by pressing the Autolog Key. 
Powering on with the Autolog 
Key, automatically starts 
Autolog video recording, if 
USB is present. Press the 
Power Key to power off.

Text Key

Open a dialog box for on-
screen text and report notes. 
Use on-screen keyboard to 
create overlay text. Over-
lay text appears on captured 
media until deleted. 

Job Review Key

Open the Job Review Menu. 
View captured media, play-
back videos, and add report 
notes. 

Job Manager Key

Open the Job Manager Menu 
and create a new job, select a 
job for preview, or format USB 
drive.

Microphone Mute 
Key

Toggle the microphone on 
and off. Audio records by 
default. When on, the LED 
below the key is lit.

LED Brightness 
Key

Control the brightness of the 
LEDs in the camera. Press to 
step up or down through vari-
ous brightness levels or press 
once and use the Arrow Keys 
to adjust brightness. 

Image Flip Key

During live feed, the Image 
Flip Key flips image upside 
down.

Sonde Key

Toggle the Sonde on or off. 
When on, the LED below the 
key is lit.

Zero Key

Press and hold the Zero Key 
for 3 seconds to set the sys-
tem zero point at the begin-
ning of an inspection. Mea-
sure a temporary segment 
of the overall inspection by 
briefly pressing the Zero Key 
again. The segment measure-
ment appears in brackets on-
screen. Press the Zero Key 
again to stop temporary mea-
surement and return to sys-
tem measurement.

Содержание SeeSnake CS6

Страница 1: ...sh 1 WARNING Read this Operator s Manual carefully before using this tool Failure to understand and follow the contents of this manual may result in electrical shock fire and or serious personal injury Serial No Operator s Manual ...

Страница 2: ...rd Equipment 5 Description Standard Equipment Components 6 Keypad Overview Pre Operation Inspection 8 Work Area and Equipment Set Up 8 Connecting to your SeeSnake Reel Powering the CS6 Operating Instructions 9 Performing an Inspection Settings 11 Reports 11 Job Manager Menu Previewing Reports Delivering Reports SeeSnake HQ Software Maintenance Instructions 12 Software Updates Cleaning Accessories ...

Страница 3: ...y Rules Read all safety warnings and instructions Failure to fol low the warnings and instructions may result in electric shock fire and or serious injury SAVE THESE INSTRUCTIONS Work Area Safety Keep your work area clean and well lit Cluttered or dark areas invite accidents Do not operate equipment in explosive atmospheres such as in the presence of flammable liquids gases or dust Equipment can c...

Страница 4: ...arts exposed to drain contents parts Loose clothes jewelry and long hair can be caught in moving parts Equipment Use and Care Do not force equipment Use the correct equipment for your application The correct equipment will do the job better and safer at the rate for which it is designed Do not use equipment if the Power Key does not turn it on and off Any equipment that cannot be controlled with t...

Страница 5: ... and Standard Equipment Description The CS6 is a compact portable CCU designed to connect to the SeeSnake Max rM200 reel While it can connect to any SeeSnake camera reel the CS6 conveniently docks onto the rM200 for ease of transport and storage The CS6 can capture audio video and still images to a USB flash drive and automatically generate a professional looking report for customers to view in an...

Страница 6: ...SB Port Cover Figure 2 Front View Microphone USB Port Speaker Figure 3 Connections Zero Key Text Key LED Brightness Key Photo Key Video Key Sonde Key Job Review Key Arrow Keys Power Key Image Flip Key Select Key Job Manager Key Microphone Key Autolog Key Main Menu Key Figure 4 CS6 keypad Connection Icons Icon Definition Transmitter Clip on Terminal USB Port ...

Страница 7: ...red media until deleted Job Review Key Open the Job Review Menu View captured media play back videos and add report notes Job Manager Key Open the Job Manager Menu and create a new job select a job for preview or format USB drive Microphone Mute Key Toggle the microphone on and off Audio records by default When on the LED below the key is lit LED Brightness Key Control the brightness of the LEDs i...

Страница 8: ...roof Electrical connections can cause sparks Clear a level stable dry place for operator Do not use the machine while standing in water 2 Inspect the work and determine the correct equipment for the task 3 Ensure the equipment has been inspected as specified by the operator s manual 4 Evaluate the work area and erect barriers as necessary to keep bystanders away Bystanders can distract the operato...

Страница 9: ...tors to prevent burns and infection Do not operate equipment if operator or equipment is standing in water Operating the CS6 in water increas es the risk of electrical shock Rubber soled non slip shoes can help prevent slipping and electric shock es pecially on wet surfaces Performing an Inspection 1 Set up all equipment and connect the CS6 to the SeeSnake reel Press the Power Key to power on the ...

Страница 10: ...ff During play back press the Up or Down Arrow Keys to increase and decrease the volume of the recorded audio When recording is paused audio is also paused To resume recording press the Select Key Taking Photos Press the Photo Key to take a photo The photo icon ap pears on the screen briefly and the photo is automatically saved onto the USB drive in the Active Job Measuring the Inspection The Zero...

Страница 11: ... On screen Text on Media and Reports Display notes using the on screen keyboard during an in spection and after the job is complete Burn text into the video layer while video recording Press the Text Key on the unit to open a text box and insert text using the Arrow Keys and the Select Key On screen Text Icons Icon Name Purpose Move Position text box in live feed Check Mark Prints to screen and wi...

Страница 12: ...reports To learn more about RIDGID Connect visit ridgidconnect com Maintenance Instructions Software Updates If Auto launcher is enabled on the SeeSnake HQ and if software updates for the CS6 are available an update no tification will automatically appear on the computer If Au to launcher is not enabled manually check for software up dates by selecting Check for Update in the Help Menu Insert a US...

Страница 13: ...D Independent Service Center or any service or repair questions Contact your local RIDGID distributor Visit RIDGID com or RIDGID eu to find your local Ridge Tool contact point Contact Ridge Tool Technical Service Department at rtctechservices emerson com or in the U S and Can ada call 800 519 3456 Disposal Parts of the unit contain valuable materials that can be re cycled There are companies that ...

Страница 14: ...orrect for the SeeSnake cable length cable diameter and SeeSnake reel Counting from the wrong ze ro point Confirm measurement from the intended zero point Reset zero point using the Zero key Integrated counter low battery warning appears on screen Integrated counter battery dead or near dead Replace 3 V battery in the integrated counter The symbol appears after the on screen distance mea surement ...

Страница 15: ...English 15 Notes ...

Страница 16: ...dgid com for current updates and supplemental information pertaining to this product Due to product development the photos and other presentations specified in this manual may differ from the actual product RIDGID and the RIDGID logo are trademarks of Ridge Tool Company registered in the U S A and other countries All other regis tered and unregistered trademarks and logos mentioned herein are the ...

Отзывы: