RIDGID K-2000 Скачать руководство пользователя страница 5

K-2000 Municipal Sewer Cleaning Machine

Ridge Tool Company • Elyria, Ohio • U.S.A.

3

Read and follow safety labels on machine! 

Know the location and functions 

of all controls before using this tool.

Machine Safety

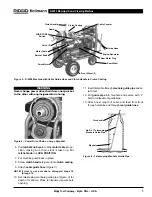
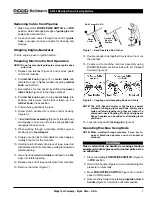
1. Wear leather mitt provided with the machine.

Never grasp a rotating rod or cable with a rag or
loose fitting cloth glove. 
It could become wrapped
around the rod and cause serious injury.

2. Never operate machine with guards removed.

Fingers can be caught in rotating parts.

3. Do not operate machine in REV (reverse).

Operating machine in reverse can result in rod or
cable damage and is used only to back tool out of an
obstruction.

4. Do not overstress cables. Keep one hand on the

cable for control when the machine is running.
Overstressing cables may cause twisting or kinking
and result in serious injury.

5. When using cables, position machine within two

feet of inlet. Use front end guide hose when it is
difficult to locate the machine near the access

or clean out. Greater distances can result in cable
twisting or kinking.

6. Use rear guide hose. Prevents cable from whipping

and picking up debris.

7. Operate machine from the side with the

FOR/OFF/REV SWITCH. Allows for better control of
the machine.

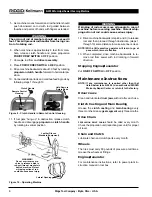
8. Disconnect spark plug wire. Spark plug wire should

be removed when working on machine or engine to
prevent accidental starting.

9. Operate rodder properly. Do not operate with more

than 20 feet of rod between machine and manhole.
This will minimize the possibility of kinking rods. The
arcing of rod at manhole should not exceed 3 feet.
When striking an obstacle that causes the tool to
“hang-up”, do not attempt to “force” the machine by
manually pushing on the exposed rods. This will cause
kinking and whipping of the rods which could cause se-
rious injury. Do not uncouple rods that are in a stressed
condition. Read operating instructions carefully.

10. Do not overstress rods. Overstressing rods be-

cause of obstruction can be dangerous to operators,
as rods may twist or kink. Do not use badly worn or
bent rods.

11. Use caution when handling gasoline. Refuel in

well-ventilated area. Do not overfill fuel tank and
do not spill fuel. Make sure tank cap is closed
properly. 
Gasoline is extremely flammable and is
explosive under certain conditions.

12. Never run the engine in an enclosed or confined

area. Exhaust contains poisonous carbon monoxide
gas; exposure may cause loss of consciousness and
may lead to death. Exhaust also contains chemicals
that the state of California believes may cause cancer
or reproductive harm.

13. Be careful not to touch the muffler while it is hot.

To avoid severe burns or fire hazards, let the en-
gine cool before transporting or storing it indoors.
The muffler becomes very hot during operation and re-
mains hot for a while after stopping the engine.

14. Be careful when cleaning drains where cleaning

compounds have been used. Avoid direct contact
with skin and eyes. 
Serious burns can result from
some drain cleaning compounds.

15. Machine is made to clean drain lines. Follow in-

structions in operator’s manual on machine uses.
Other uses may increase the risk of injury.

SAVE THESE INSTRUCTIONS!

▲ 

WARNING

Rods and cables may twist or kink. Fingers, hands,
or other body parts can be crushed or broken.
Carbon monoxide poisoning can occur if operated
in a confined area.

• Wear mitts with rivets

• Keep sleeves and jackets buttoned

• Keep guards in place

• Wear safety glasses

• Use caution. Gas is extremely flammable and ex-

plosive under certain conditions

• Never run engine in enclosed or confined area

READ ABOVE WARNING CAREFULLY!

Содержание K-2000

Страница 1: ...n ais voire page 11 Para ver el castellano vea la pagin 23 K 2000 IMPORTANT For your own safety before assembling and operating this unit read this Operator s Manual carefully and com pletely Learn th...

Страница 2: ...ng Instructions Preparing Machine for Cable Operation 4 Starting Engine Generator 6 Operating Machine Using Cables 6 Removing Cable from Pipeline 7 Stopping Engine Generator 7 Preparing Machine for Ro...

Страница 3: ...ber which is located on nameplate Serial No K 2000 Municipal Sewer Cleaning Machine IMPORTANT For your own safety before as sembling and operating this unit read this Operator s Man ual carefully and...

Страница 4: ...d situations 5 Use safety equipment Always wear eye protec tion Dust mask non skid safety shoes hard hat or hearing protection must be used for appropriate con ditions Tool Use and Care 1 Store idle t...

Страница 5: ...ods This will cause kinking and whipping of the rods which could cause se rious injury Do not uncouple rods that are in a stressed condition Read operating instructions carefully 10 Do not overstress...

Страница 6: ...pecifications and Standard Equipment Description The RIDGID Kollmann K 2000 Municipal Sewer Cleaning Machine is a completely self powered machine for clean ing lines and sewer mains of small communiti...

Страница 7: ...0 through 12 10 Set telescoping manhole guide pipe Figure 4 for depth of manhole Place turnbuckle into manhole opening 11 Insert first cable through manhole guide pipe and at tach tool 12 Put guide pi...

Страница 8: ...e while feeding cable 3 If tool meets heavy obstruction release clutch handle and place switch handle in OFF position 4 When cable rotation stops place switch handle in REV position and push firmly on...

Страница 9: ...out of the manhole 10 Holding onto both ends of a piece of rope lower rod with attached tool into manhole guiding tool towards lateral opening 11 Use a hand operated rod turner and feed rod a little...

Страница 10: ...d then proceed through obstruction steps 1 through 10 some distance to make sure line is clear NOTE With a little practice operator will learn to go at pace which is most effective 13 When completed d...

Страница 11: ...K 2000 Municipal Sewer Cleaning Machine Ridge Tool Company Elyria Ohio U S A 9 Wiring Diagram 115V 60 Hz Wiring Diagram 230V 50 Hz...

Страница 12: ...K 2000 Municipal Sewer Cleaning Machine Ridge Tool Company Elyria Ohio U S A 10...

Страница 13: ...roduit N de S rie IMPORTANT Assurez votre propre s curit en lisant soigneusement ce mode d emploi dans son int gralit avant d assembler ou d utiliser cet appareil Familiarisez vous avec le fonctionnem...

Страница 14: ...mploi Pr paration de la machine pour l utilisation des c bles 16 D marrage du moteur g n rateur 18 Utilisation de la machine avec c bles 18 Retrait des c bles de la canalisation 19 Arr t du moteur gro...

Страница 15: ...hine au moment de son d marrage risque de provoquer des blessures corporelles 4 Ne vous mettez pas en porte faux Maintenez une bonne assise et un bon quilibre tous mo ments Une bonne assise et un bon...

Страница 16: ...de la tige 2 Ne jamais utiliser la machine lorsque ses dis positifs de s curit ne sont pas en place Vos doigts risquent d tre pris dans le m canisme 3 Ne faites pas tourner la machine en marche arri r...

Страница 17: ...ou le pliage du c ble 6 Servez vous du fourreau guide c bles arri re Celui ci emp che le fouettement du c ble ainsi que son encrassement 7 Tenez vous du c t interrupteur FOR OFF REV de la machine lors...

Страница 18: ...te outils Comprend 1 levier d em brayage et 1 quart d huile moteur A 3 Gant main gauche A 1 Gant main droite A 2 Cl tringles R 0 Accessoires Consultez le catalogue g n ral de Ridge pour les ac cessoi...

Страница 19: ...ondeur du regard Installez le tendeur dans le cadre du couvercle du regard 11 Enfilez la premi re longueur de c ble travers le guide t lescopique puis installez l outil de curage 12 Introduisez le gui...

Страница 20: ...ue l outil de curage rencontre un obstacle l chez le levier d embrayage puis mettez l interrupteur en po sition OFF 4 Lorsque le c ble s arr te mettez l interrupteur en po sition REV puis appuyez s ch...

Страница 21: ...Assurez vous que la goupille ressort se soit bien engag e dans l embout conique 8 Lorsque vous passez par un regard montez la tari re ou la sonde sur l adaptateur outils 9 Ajoutez suffisamment de tri...

Страница 22: ...er d embrayage du syst me de propulsion vers l horizontale 10 Ajoutez des tringles et continuez les faire avancer en suivant les tapes 1 10 11 Si l outil s enchev tre dans un obstacle l chez le levier...

Страница 23: ...ayage et palier principal Graissez le bo tier d embrayage et le palier principal tous les trois mois Graissez les pignons tous les trois mois Cha ne d entra nement La cha ne d entra nement du syst me...

Страница 24: ...ert Bo te de d rivation G n rateur C ble d alimentation A 2803 Blanc Rouge Vert Rouge Jaune Blanc Orange Bleu Noir Entra nement pignons Harnais B 3052 Interrupteur Corps Tube vinylique A 2927 Bleu Mot...

Страница 25: ...ra en la placa de caracter sticas No de Serie IMPORTANTE Para su propia seguridad antes de ensamblar y hacer funcionar esta unidad lea el Manual del Operador completa y detenidamente Comprenda el func...

Страница 26: ...ionamiento con Cable 28 Arranque del Motor Generador 30 El Funcionamiento de la M quina Usando Cables 30 Extracci n del Cable de La Tuber a 31 Detener el Motor Generador 31 Preparaci n de la M quina p...

Страница 27: ...e la herramienta puede causar le siones graves 4 No se extienda demasiado Siempre mantenga los pies firmes y un buen equilibrio El equilibrio debido hace posible disponer de un mejor control sobre la...

Страница 28: ...le queda suelto Se puede envolver en la varilla caus ndole lesiones graves 2 Nunca haga funcionar la m quina sin las vallas de seguridad Se le pueden enganchar los dedos en la piezas en giro 3 No hag...

Страница 29: ...Adelante Apagado Atr s Esto permite disponer de un mejor control sobre la m quina 8 Desconecte el alambre de la buj a Para evitar la puesta en marcha por casualidad al efectuarse tra bajos en la m qui...

Страница 30: ...0 Accesorios Referente a los accesorios vea el Catalogo Principal de Productos Ridgid Instrucciones para el Funcionamiento Preparaci n de la M quina para su Funcionamiento con Cable 1 Coloque la m qui...

Страница 31: ...n Figura 4 a la profundidad de la c mara de inspecci n Coloque el acoplamiento en la abertura 11 IIntroduzca el primer cable a trav s del tubo gu a y acople la herramienta 12 Coloque el tubo gu a en l...

Страница 32: ...i n firme sobre el mismo mientras alimenta el cable 3 Si la herramienta se topa con una obstrucci n pesada suelte el mango del embrague y coloque el interrup tor en la posici n de OFF Apagado 4 Al det...

Страница 33: ...del cuerpo y eng nchelo en el cono delantero del accionamiento Aseg rese de que el pasador cargado a resorte se enclave en el cono delantero 8 Al trabajar a trav s de la m quina acople el sinf n o la...

Страница 34: ...r de FOR OFF REV en la posi ci n de REV Atr s 9 Girando el mango del embrague de propulsi n hacia adelante hacia la posici n horizontal mueva la m quina hacia atr s en aproximadamente 10 pies 10 Conec...

Страница 35: ...ceite Pieza Fundida y Cojinete Principal del Embrague Engrase la pieza fundida del embrague y el cojinete principal cada tres meses Cada tres meses engrase el segmento de engranajes Cadena de Accionam...

Страница 36: ...n de Linea A 2804 Interruptor Noir Blanco Rouge Vert Conjunto de Cableado B 3052 Caja de Distribuci n Motor a Engranajes Rojo Amarillo Blanco Anaranjado Azul Negro Conducto A 288 Interruptor Cuerpo T...

Страница 37: ...K 2000 M quina para la Limpieza de Desag es Municipales Ridge Tool Company Elyria Ohio U S A 35...

Страница 38: ...K 2000 M quina para la Limpieza de Desag es Municipales Ridge Tool Company Elyria Ohio U S A 36...

Страница 39: ...un SERVICE D ENTRETIEN AGREE de RIDGID Les cl s griffe et autres outils doivent tre renvoy s leur point d achat Les produits garantis seront soit r par s ou remplac s gratuitement la discr tion de RI...

Отзывы: