Istruzioni per l’installazione / Installation instructions / Instructions d’installation
/ Installationshinweise
3
•
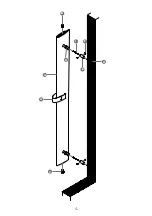
Lo sfiato
(B)
, il portasalviette
(G)
ed il raccordo
(C)
sono già installati sul radiatore
(A)
.
•
Anche i due perni di fissaggio
(D)
sono già installati sul retro del radiatore.
•
Segnare accuratamente i fori delle bussole di chiusura a muro con il metro a nastro e la livella.
(Altezza del radiatore da terra minimo 10 cm).
•
Praticare i fori di diametro 8mm, con profondità minima di 65mm, e inserire i tasselli
(H)
nel muro.
•
Avvitare le bussole di chiusura
(E)
nei tasselli a muro
(H)
con le viti
(I)
.
•
Appendere il radiatore
(A)
sui supporti così assemblati, garantendosi che i perni di fissaggio
(D)
posti
sulla faccia posteriore del radiatore, si incastrino negli appositi alloggiamenti delle bussole
(E)
posizionate a muro.
•
Fissare il tutto avvitando i quattro grani filettati M5
(F)
nelle bussole
(E)
con l’ausilio di una chiave a
brugola con esagono da 2,5mm.
•
The vent
(B)
, the towel holder
(G)
and the connection
(C)
are already mounted on the radiator
(A)
.
•
Also the two fixing pins
(D)
are already mounted on the back side of the radiator.
•
Accurately mark bracket holes on wall using tape measure and spirit level. (Height of the radiator
from floor minimum 10 cm).
•
Drill 8mm diameter holes to a minimum depth of 65mm and insert wall plugs
(H)
.
•
Screw brackets
(E)
into wall plugs
(H)
with screws
(I)
.
•
Hang radiator
(A)
on brackets, pay attention that the locking pins
(D),
placed on the backside, fitted
into the slots of the brackets.
(E)
•
Screw the four set screws M5
(F)
in the brackets
(E)
with an allen key - Hexagon 2,5 mm. con
esagono da 2,5mm.
•
Le purgeur
(B)
, le porte-serviettes
(G)
et le raccord
(C)
sont déjà monté sur le radiateur
(A)
.
•
Les deux goupilles de fixation
(D)
sont déjà montées à l’arrière du radiateur.
•
Marquez soigneusement les trous trous des buissons de blocage à mur avec un ruban à mesurer et un
niveau à bulle. (Hauteur du radiateur à partir du sol minimum 10 cm).
•
Pratiquer des trous d’un diamètre de 8 mm et d’un profondeur minimale de 65 mm et insérer les
goupille murales
(H)
.
•
Serrex les buissons de blocage
(E)
dans les gujons à mur
(H)
à l’aide de vis
(I)
.
•
Accrocher le radiateur
(A)
aux supports, en veillant à ce que les goupilles de verrouillage
(D)
, placées
à l'arrière, soient dans les fentes des supports.
(E)
•
Sécurizez le toute en serrant les quatre vis de fixation M5
(F)
dans les supports
(E)
à l’aide d’une clé
Allen - Hexagon 2,5 mm.
•
Das Ventil
(B)
, der Handtuchhalter
(G)
und die Anschlüsse sind im Heizkörper bereits vormontiert.
Ebenso die beiden Befestigungen
(D)
sind auf der Rückseite des Radiators vormontiert.
Markieren Sie die Befestigungslöcher an der Wand genau mit Maßband und Wasserwaage.
(Höhe des Heizkörpers vom Boden mindestens 10 cm).
Bohren Sie 8mm Löcher mit einer Mindesttiefe von 65mm und bringen die Dübel
H
ein.
Schrauben Sie die Befestigungen in die Löcher mit den vorhandenen Schrauben.
Hängen Sie den Radiator
(A)
an die Halterungen und achten Sie darauf, dass die auf der Rückseite
angebrachten Sicherungsstifte
(D)
in die Schlitze der Halterungen passen.
(E)
Schrauben Sie die vier Stellschrauben M5
(F)
mit einem Inbusschlüssel - Sechskant 2,5 mm in die
Halterungen
(E).
•
•
•
•
•
•
Содержание Living Othello Mono Slim
Страница 5: ...4 B A I D E H C F G ...


