StreamPunch
TM
Pro, Pro EX & MP
6. PUNCHING OPERATIONS
After installing the correct die set in your StreamPunch, you are ready to
start punching. The following sections indicate how to activate the machine.
Carefully read these sections completely to become familiar with the various
components of the machine and the Die Set.
The
POWER
LED should be illuminated. If not, turn on power with the
Power On/Off (I/O) switch located at the front of the StreamPunch module.
PUNCH ENABLED:
Punch mode is selected using the Printer
Operation screen. The LED will be illuminated while a punch
job is running
CLOSE DOOR and PAPER JAM:
If either of these LEDs is
illuminated, no bypass and no punch function can occur until
these areas have been checked and corrected.
CHIP TRAY FULL/OUT and CHECK DIE SET:
If either of
these LEDs is on, you can run in bypass mode, but not punch
mode.
CHIP TRAY FULL/OUT:
If this LED is flashing the Chip Tray is
FULL. If this LED is on and not flashing, the Chip Tray is OUT.
POWER:
If this LED is not on, paper can not run through the
StreamPunch in either bypass or punch mode. The paper will
jam when entering the StreamPunch.
Your StreamPunch offers the convenience of interchangeable die sets,
allowing you to economically punch documents for a wide variety of binding
styles. Changing the machine's die sets is both quick and easy, as the
following instructions illustrate:
Removing Die Sets from the Machine:
The inter-changeable die set
slot of the StreamPunch is located on the right front side of the machine.
If a die set is already installed in your StreamPunch, you can easily
remove the die set by following these instructions:
Step 1:
Stop the printer/copier.
Step 2:
Open the StreamPunch access door panel.
Step 3:
Securely grasp the handle and pull firmly. This firm pull
disengages the Automatic Latching Mechanism and allows the die set
to slide out.
Step 4:
Continue to pull the handle until the Die Set is fully removed,
supporting it with both hands.
Step 5:
Properly store the removed Die Set in the Die Set storage area at
the top of the StreamPunch (keep away from dust, dirt, accidental falls
from the edge of counters, etc.).
Step 6:
Select the desired Die Set for your new job and slide it into the
Die Set slot. Push Die Set in firmly until it latches.
WARNING: POSSIBLE PINCH POINT HAZARD. WHEN
INSTALLING DIE SETS IN YOUR STREAMPUNCH,
ALWAYS KEEP FINGERS AND OTHER BODY PARTS OUT
OF THE MACHINE’S DIE SET SLOT AND AWAY FROM
ALL AREAS OF THE DIE SET, EXCEPT FOR THE FINGER
HOLE IN THE DIE SET. FAILURE TO FOLLOW THESE
PRECAUTIONS MAY RESULT IN INJURY.
Step 7:
Close the Access Door Panel.
Step 8:
Enable punch and proceed with your printing and punching job.
5. CHANGING THE INTERCHANGEABLE DIE SETS
Area
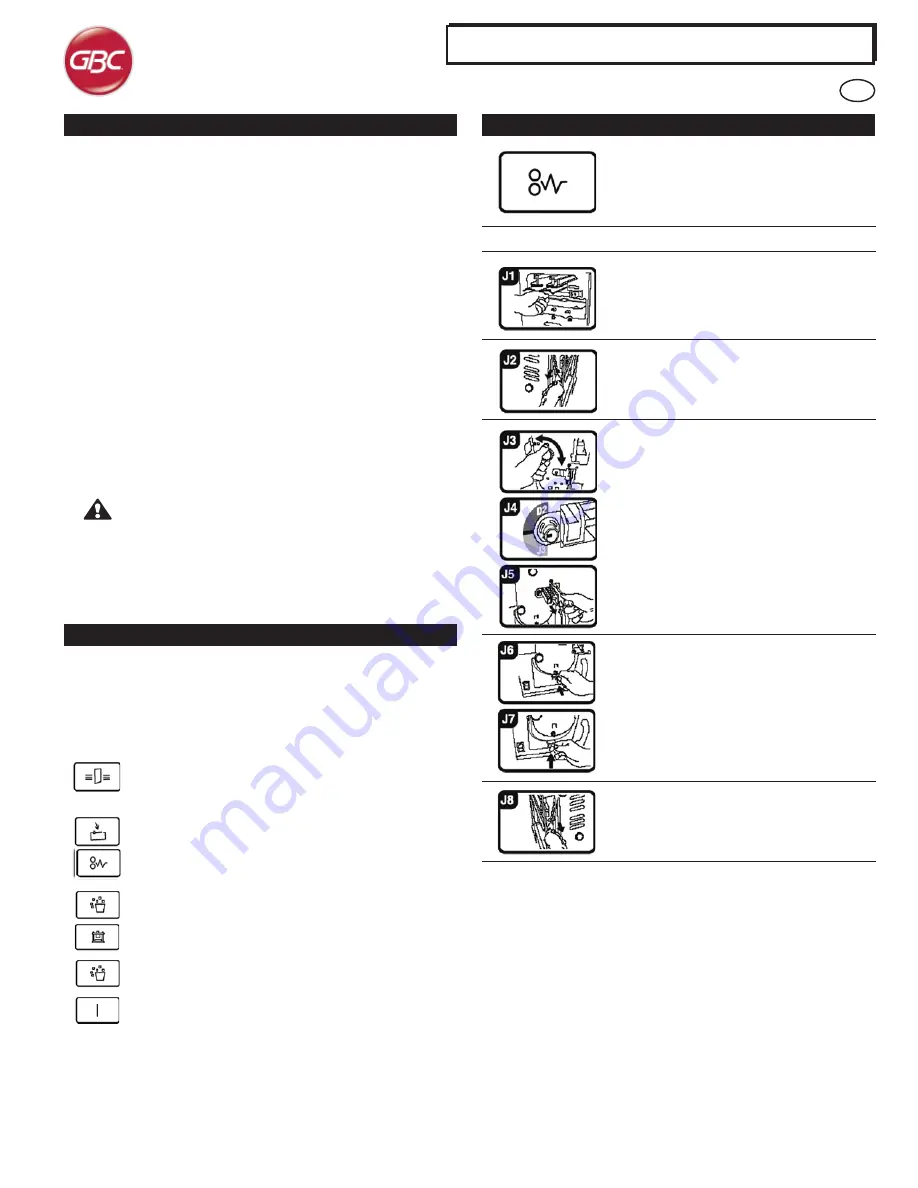
If paper is jammed in the Punch Bypass, lift the
paper guide plate located just inside, reach in and
remove the jammed paper.
If paper is jammed in the downward paper path
chute, move the door to the right, reach in and
remove the jammed paper.
If paper is jammed or the Die Set is jammed, turn
Knob J3 to the HOME position, (arrows line up)
slide the Die Set out and remove paper.
If paper is jammed in the bottom chute of the Punch
Paper path, press the bottom chute latch, reach in
and remove any jammed paper.
If paper is jammed in the upward paper path chute,
move the door to the left, reach in and remove the
jammed paper.
7. PAPER JAMS
This symbol indicates a paper jam. To assist in
clearing paper jams in any of the following areas,
turn one or more of the small knobs to advance the
paper.
Description
GB
6


