background image

9. [Energy Saver] key

Press to switch to and from Sleep mode. See page 27 "Saving Energy". When the printer is in Sleep mode,
the [Energy Saver] key flashes slowly.

10. [Login/Logout] key

Press to log in or log out.

11. [User Tools] key

Press to change the default settings as needed. See page 30 "Configuring Printer Settings from the [User
Tools] key".

12. [Simple Screen] key

Press to switch to the simple screen. See "Switching screen patterns", Operating Instructions.

13. Media slots

Insert an SD card or a USB flash memory device.

14. Media access lamp

Lights up when a memory storage device is inserted in the media slot or is being accessed.

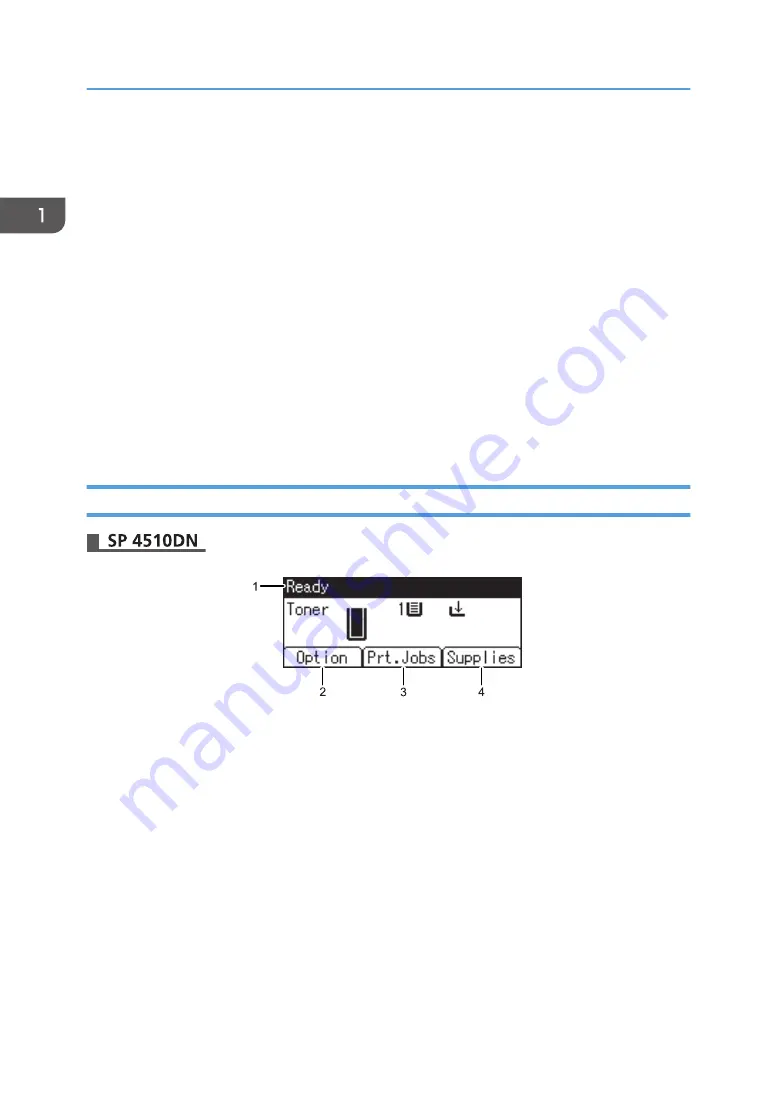
Guide to the Names and Functions of the Control Panel Screen

CYN901

1. Operational Status or Messages

Displays the printer status and messages.

2. [Option]

Press to display the following items:

• Form Feed
• Error Log

3. [Prt.Jobs]

Press to display print jobs sent from a computer.
[Prt.Jobs] is displayed only when the optional hard disk is installed in the printer.

4. [Supplies]

Press to display the information about printer supplies.

1. Getting Started

20

Содержание SP 4510 DN

Страница 1: ...be sure to read the Safety Information in Read This First before using the machine For information not in this manual refer to the HTML PDF les on the supplied CD ROM Troubleshooting Loading Paper Ge...

Страница 2: ......

Страница 3: ...Printer Configuration Screens Using the Control Panel 30 Configuring Printer Settings from the Menu key 30 Configuring Printer Settings from the User Tools key 30 Using Web Image Monitor 32 Displaying...

Страница 4: ...essages 71 Alert Messages Displayed on the Control Panel 72 Alert Messages Printed on Error Logs and Reports 83 When You Cannot Print 98 When the Data In Indicator Does Not Light Up or Flash 101 Other...

Страница 5: ...the regulations and environmental conformance Quick Installation Guide Describes procedures from unpacking the machine to connecting it to a computer Operating Instructions Provides detailed informati...

Страница 6: ...ng This Printer Security Guide Be sure to read this manual when configuring the enhanced security functions or user and administrator authentication Driver Installation Guide Explains how to install a...

Страница 7: ...Guide No Yes No Read This First Yes No No Quick Installation Guide Yes No No Operating Instructions No No Yes Security Guide No Yes No Driver Installation Guide No Yes No Operating Instructions and Dr...

Страница 8: ...6...

Страница 9: ...ions on resolving user errors This symbol is located at the end of sections It indicates where you can find further relevant information Indicates the names of keys on the machine s display or control...

Страница 10: ...data executed by you Notes The manufacturer shall not be responsible for any damage or expense that might result from the use of parts other than genuine parts from the manufacturer with your office p...

Страница 11: ...he metric units If your printer is a Region B model refer to the imperial units List of Options This section provides a list of options for this printer and the names commonly used in this manual Opti...

Страница 12: ...The browser unit is available for SP 4520DN only 1 Getting Started 10...

Страница 13: ...g so risks fire caused by overheated internal components Exterior Front view 2 3 1 4 5 6 7 8 15 14 13 12 11 9 10 CYN001 1 Front cover Open to access the inside of the printer and remove jammed paper O...

Страница 14: ...ont cover 8 Paper size dial Use this dial to specify the paper size To use a paper size that is not indicated on the paper size dial set the dial to If this is the case set the paper size using the co...

Страница 15: ...Push this lever to open the bypass tray Exterior Rear view CYN003 1 3 4 5 6 7 8 9 10 2 1 Ventilation holes Prevent overheating 2 Power connector Connect the power cord to the printer Insert the other...

Страница 16: ...be replaced or a new cartridge needs to be prepared For details about the messages that appear on the screen when consumables need to be replaced see Replenishing and Replacing Consumables Operating I...

Страница 17: ...appear on the screen when consumables need to be replaced see Replenishing and Replacing Consumables Operating Instructions The fusing unit is included in Maintenance Kit Guide to functions of the pri...

Страница 18: ...an IEEE 1284 cable To attach this option see Installing the Interface Units Operating Instructions 3 SDRAM module You can add the SDRAM up to 1 0 GB To attach this option see Installing the SDRAM modu...

Страница 19: ...manual instructs you to press Option press the selection key on the left below the initial screen 3 Switch Functions key Press this key to switch between the operation screen of the printer function...

Страница 20: ...n a printer error occurs Steady red printing is not possible or is possible but print quality cannot be ensured Flashing yellow the printer will soon require maintenance or a replacement consumable su...

Страница 21: ...tatus of each function and current jobs You can also display the job history and the printer s maintenance information 6 Data In indicator Flashes when the printer is receiving print jobs from a compu...

Страница 22: ...g Instructions 13 Media slots Insert an SD card or a USB flash memory device 14 Media access lamp Lights up when a memory storage device is inserted in the media slot or is being accessed Guide to the...

Страница 23: ...lt setting under Function Priority See System Settings Operating Instructions 2 Printer screen Displays operation status messages and function menus For details see page 23 Using the Printer screen 3...

Страница 24: ...rtcut icons Do not apply strong impact or force to the screen Doing so will damage the screen Maximum force allowable is approx 30 N approx 3 kgf N Newton kgf Kilogram force 1 kgf 9 8 N CYN903 5 1 2 3...

Страница 25: ...the display panel it is highlighted such as Keys appearing as cannot be used Do not apply strong impact or force to the screen Doing so will damage the screen Maximum force allowable is approx 30N ap...

Страница 26: ...vironmental awareness you can configure the printer to show users the amount of paper saved by using the various paper saving functions of the printer When user authentication is enabled the screen is...

Страница 27: ...umber of prints 4 Count periods Displays the current and previous count periods 5 Exit Press this to close the Information screen and return to operation Depending on the printer settings the Informat...

Страница 28: ...he Power When disconnecting the power cord from the wall outlet always pull the plug not the cord Pulling the cord can damage the power cord Use of damaged power cords could result in fire or electric...

Страница 29: ...Fusing Unit Off mode the display is on but the fusing unit heater is off to save energy In this mode you can change the printer settings on the control panel However the printer must exit this mode to...

Страница 30: ...etect darkness and automatically turn off this product s power If ECO Night Sensor is enabled and detects darkness in a room after the lights are turned off the sensor automatically turns the power of...

Страница 31: ...tings screen is displayed Fixed warm up is in progress Data is being processed Operations are suspended during printing The Data In indicator is on or flashing The sample print locked print hold print...

Страница 32: ...nt to change Press the or key to select the next or previous items 3 Press the OK key Any changes you make with configuration screens remain in effect even if the main power switch is turned off To ca...

Страница 33: ...page 3 Change the settings by following the instructions on the display and then press OK 4 Press the User Tools key Any changes you make with the configuration screens remain in effect even if the ma...

Страница 34: ...or TCP IP is required After the printer is configured to use TCP IP operations from Web Image Monitor become available Recommended Web browser Windows Internet Explorer 6 0 or higher Firefox 10 and 15...

Страница 35: ...s menu and register the printer s URL as a trusted site and then disable SmartScreen filter for trusted sites For details about these settings see the Internet Explorer Help files You can access Web I...

Страница 36: ...and password appears 4 Enter your login user name and password and then click Login For details about the login user name and password contact your administrator Depending on the configuration of you...

Страница 37: ...4 Basic Information area Displays the basic information of the printer 5 Work area Displays the contents of the item selected in the menu area Using Web Image Monitor 35...

Страница 38: ...1 Getting Started 36...

Страница 39: ...ze type and weight of the paper you want to use for printing For details about available paper trays for each paper size and type see page 38 Paper Size Specifications and page 41 Paper Type Specifica...

Страница 40: ...the paper size with the control panel You can print on both sides of paper Not supported Metric sizes Paper size name Actual size Two sided Bypass tray Tray 1 Trays 2 3 A4 210 297 mm A B B A5 148 210...

Страница 41: ...ted paper If this happens set the paper horizontally and print again Use the bypass tray when printing on paper that is set horizontally Custom Size Specifications You can also load custom size paper...

Страница 42: ...One sided Vertical size One sided Horizontal size Two sided Vertical size Two sided Bypass tray 2 37 to 8 50 5 00 to 35 43 3 94 to 8 50 5 83 to 14 01 Trays 1 3 3 94 to 8 50 5 83 to 14 01 3 94 to 8 50...

Страница 43: ...llowing A Supported You can print on both sides of paper Not supported Paper type Paper weight No Two sided Bypass tray Tray 1 Trays 2 3 Thin Paper 1 A A A Plain Paper 2 A A A Plain Paper 2 3 A A A Mi...

Страница 44: ...lb BOND 3 75 90 g m2 20 24 lb BOND 4 91 105 g m2 24 28 lb BOND 5 106 130 g m2 28 35 lb BOND 6 131 162 g m2 35 lb BOND 90 lb INDEX 1 It is not necessary to specify the paper weight for this paper type...

Страница 45: ...a rustling noise from paper moving through the printer This noise does not indicate a malfunction Unusable Paper To prevent errors and misfeeds do not use Paper for inkjet printers thermal fax paper a...

Страница 46: ...printer language and printer driver settings Depending on the printer driver settings you may be able to print outside the recommended print area However the actual output may not come out as desired...

Страница 47: ...t exceed the upper limit mark inside the paper tray Excessive stacking can cause paper jams If paper jams occur frequently flip the paper stack in the tray Do not mix different types of paper in the s...

Страница 48: ...ction of paper in the paper tray CYN027 2 Pull the tray carefully until it stops lift the front side of the tray and then pull it out of the printer CYN028 Place the tray on a flat surface 3 Squeeze t...

Страница 49: ...is not stacked higher than the upper limit upper line marked inside the tray CXC666 7 Adjust the paper guides to close any gaps Do not move paper loaded in the tray more than a few millimeters Moving...

Страница 50: ...tation For details see page 52 Loading Orientation Fixed Paper or Two Sided Paper You can load envelopes into Tray 1 Envelopes must be loaded in a specific orientation For details see page 54 Loading...

Страница 51: ...3 Return the catches to the positions where they lock CXC608 When loading A4 81 2 11 or smaller paper do not extend the tray Otherwise a paper jam may occur Loading Paper into Paper Trays 49...

Страница 52: ...s Do not mix different types of paper After loading paper specify the paper size and type using the control panel When printing a document specify the same paper size and type in the printer driver as...

Страница 53: ...using the bypass tray it is recommended that you set the paper direction to Letterhead paper must be loaded in a specific orientation For details see page 52 Loading Orientation Fixed Paper or Two Sid...

Страница 54: ...etterhead Setting to Auto Detect or On Always and then place the paper as shown in the table below For details about Letterhead Setting see Machine Modes Operating Instructions for SP 4510DN System Op...

Страница 55: ...output after the first copy may be printed facing a different direction To ensure all paper is output facing the same direction specify different input trays for one sided and two sided printing Note...

Страница 56: ...Otherwise an injury might occur Some of this machine s internal components get very hot For this reason take care when removing misfed paper Not doing so could result in burns When using the envelope...

Страница 57: ...opes still stick together load them one by one For the envelope types that can be used with this printer see page 38 Paper Size Specifications and page 41 Paper Type Specifications Misfeeds might occu...

Страница 58: ...load them For details see page 38 Paper Size Specifications Load only one size and type of envelope at a time The duplex function cannot be used with envelopes Straighten any curls within 2 mm 0 1 inc...

Страница 59: ...size 4 In the Menu box click the Paper icon and then configure the following settings Input Tray Select the paper tray where the envelopes are loaded Paper Type Select Envelope Change any other print...

Страница 60: ...settings using the control panel see page 62 Configuring Envelope Settings Using the Control Panel Envelopes must be loaded in a specific orientation For details see page 55 Specifications of Envelop...

Страница 61: ...application s Print dialog box Configure the paper settings appropriately using both the printer driver and the control panel For details about settings using the control panel see page 62 Configuring...

Страница 62: ...and set the paper size using the control panel To use custom size paper be sure to specify the paper size using the control panel and the printer driver The printer cannot print on custom size paper i...

Страница 63: ...Tray Paper Settings 2 Specify the paper size and feed direction Tray Paper Size tray name Custom Size Vertical Enter the vertical dimension of the paper OK Horizontal Enter the horizontal dimension o...

Страница 64: ...1 Press the User Tools key and then display the Tray Paper Settings screen System Settings Tray Paper Settings 2 Press Paper Type tray name and then specify the paper type and thickness Paper Type Sel...

Страница 65: ...the paper size Select the envelope size OK 3 Press Paper Type tray name and then specify the paper type and thickness Paper Type Envelope OK Paper Thickness Plain Paper 2 or Thick Paper 2 OK For deta...

Страница 66: ...2 Loading Paper 64...

Страница 67: ...ady for use Five long beeps repeated four times Soft alert An error message appears on the control panel if there is no tray for the selected paper size or the tray is empty Five short beeps repeated...

Страница 68: ...ading Paper Add Toner indicator Appears when toner runs out For details about adding toner see Replacing the Print Cartridge Operating Instructions Service Call indicator Appears when the printer is m...

Страница 69: ...ress Displays the printer s IPv6 address 1 Press the Check Status key and then check the contents Maintnc MacInfo tab Each key Check the contents Exit Paper Misfeed Output Tray Full and Cover Open app...

Страница 70: ...k the error message displayed on the printer screen and take the appropriate action For details about error messages and their solutions see page 71 When Messages Are Displayed The following table des...

Страница 71: ...Check that the printer is correctly connected to the network and that the printer is correctly set For details about how to connect the network see Interface Settings Operating Instructions For detai...

Страница 72: ...ly booted up reconnect the USB cable Windows has already configured the USB settings Check whether or not the computer has identified the printer as an unsupported device Open Windows Device Manager a...

Страница 73: ...ne and cannot print Please wait This message may appear for a few seconds It means the printer is initializing replenishing toner or performing maintenance operations Wait a while Printing The printer...

Страница 74: ...the print job Wait until Ready appears on the display panel Setting change The printer is changing settings You cannot use the control panel while this message is displayed Wait a while Suspended job...

Страница 75: ...ils see page 119 Removing Jammed Paper Y2 Remove misfeed in Tray 3 Opn cls Frt Cov Open Tray 3 and remove the jammed paper To reset the error open the front cover and then close it For details see pag...

Страница 76: ...administrator Cannot connect with NetWare server 106 206 No connection with the NetWare print server is available Contact your network administrator Cannot print The printer cannot print the sent data...

Страница 77: ...ive Exceeded max No of files While printing a Sample Print Locked Print Hold Print or Stored Print file the maximum file capacity was exceeded Delete unneeded files stored in the printer Exceeded max...

Страница 78: ...rivileges to use funct The logged in user does not have the privileges to register programs or change the paper tray settings For details about how to set permissions see Security Guide Option RAM Err...

Страница 79: ...will need to replace the drum unit soon Contact your sales or service representative to obtain a new unit SD Card authenticatn failed Error recurs call service Authentication from the SD card failed...

Страница 80: ...eleted This message might appear if you print or delete a job from Web Image Monitor Press Exit on the message screen USB has a problem Please call service The printer has detected a USB board failure...

Страница 81: ...the same paper tray Press Job Reset to cancel the job The tray selected for other pages is the same as the one for slip sheets Reset the job Be sure the tray you select for slip sheets is not providi...

Страница 82: ...ss LAN interface board can be accessed but an error was detected Turn off the main power switch and then confirm the wireless LAN interface board is inserted correctly For details about installing the...

Страница 83: ...er Replacement of Drum Unit is now necessary Please call service You need to replace the drum unit Contact your sales or service representative to obtain a new unit Replacement of Drum Unit will soon...

Страница 84: ...w to select the tray manually or cancel a print job see If an Error Occurs with the Specified Paper Size and Type Operating Instructions Failed to update Remote certificate Please call service Updatin...

Страница 85: ...groups of files larger than 1 GB cannot be printed When the total size of the multiple files that are selected exceeds 1 GB select files separately When the size of the selected file exceeds 1 GB pri...

Страница 86: ...ion or Windows Authentication failed because the Address Book is full For details about the automatic registration of user information see Security Guide Cannot print You have no privileges to print t...

Страница 87: ...Check the print settings Excd Prt Vol Use max count Printing was canceled because the print maximum number was reached Contact your user administrator Excd Prt Vol Use max count Maximum number of user...

Страница 88: ...t file Delete unnecessary files stored in the printer Reduce the data size of the Sample Print Locked Print Hold Print or Stored Print file When printing with the PostScript 3 printer driver the hard...

Страница 89: ...t 3 Select a lower resolution on the printer driver For details about how to change the resolution setting see the printer driver Help Memory Retrieval Error A memory allocation error occurred Turn of...

Страница 90: ...heck that the PDF file is valid Print overrun Printing images was aborted Select a lower resolution on the printer driver For details about how to change the resolution setting see the printer driver...

Страница 91: ...install the optional SDRAM module For details about installing SDRAM module contact your service representative 86 Error Parameters of the control code are invalid Check the print settings 91 Error Pr...

Страница 92: ...correct classification code Classification Code is incorrect The classification code is not supported by the printer driver Select Optional for the classification code For details about how to specif...

Страница 93: ...setting Apply 2 sided see Tray Paper Settings Operating Instructions Error has occurred A syntax error etc occurred Check that the PDF file is valid Error occurred Either job was printed with setting...

Страница 94: ...itted to print has been exceeded For details about Print Volum Use Limit see Security Guide Failed to obtain file system PDF direct printing could not be performed because the file system could not be...

Страница 95: ...Memory Usage in System In I O Buffer under the Host Interface menu set the maximum buffer size to a larger value Reduce the number of files being sent to the printer Information for user authenticatio...

Страница 96: ...elect Raster in the Vector Raster list In some cases it will take a long time to complete a print job Install the optional SDRAM module For details about installing SDRAM module contact your service r...

Страница 97: ...command to stop transmission from the printer driver Check that the computer is working correctly The print job has been cancelled because capture file s could not be stored Exceeded max memory The h...

Страница 98: ...ord is not correct Check that the Login User Name and Login Password are correct You do not have a privilege to use this function This job has been cancelled The logged in user is not allowed to use t...

Страница 99: ...tive The contents of errors may be printed on the Configuration Page Check the Configuration Page in conjunction with the error log For details about how to print the Configuration Page see Test Print...

Страница 100: ...s not start The interface cable is not connected correctly For details about how to connect interface cables correctly see Connecting the Printer Operating Instructions Printing does not start The cor...

Страница 101: ...ting does not start If the printer is using wireless LAN when there is a microwave oven mobile phone industrial machine scientific instrument or medical instrument which uses the same frequency range...

Страница 102: ...ng does not start The wireless LAN interface is not working Make sure the orange LED is lit and the green LED is lit or flashing during transmission Printing does not start The Login User Name Login P...

Страница 103: ...tative When the Data In Indicator Does Not Light Up or Flash When the Data In indicator does not light up or flash after a print job starts data is not being sent to the printer When the printer is co...

Страница 104: ...printer driver s Detailed Settings tab click Paper in Menu and then select Bypass Tray in the Input Tray list Then in the Paper Type list select a proper paper type Printed images contain blots or are...

Страница 105: ...r see page 38 Paper Size Specifications and page 41 Paper Type Specifications The printed image is faded over the entire page If On is selected in the Toner Saving list in the printer driver settings...

Страница 106: ...uces print quality and can damage the printer s internal components Before printing on special paper check its surface carefully For details about special paper see page 43 Paper Precautions Image is...

Страница 107: ...heck whether there is failed or canceled data remaining For details about how to identify the cause of the error see Checking Error Logs Operating Instructions Characters differ from the display The l...

Страница 108: ...may be using paper smaller than the size selected in the application Use the same size paper as that selected in the application If you cannot load paper of the correct size use the reduction functio...

Страница 109: ...pear only partially colored The paper is damp Use paper that has been stored in the recommended temperature and humidity conditions For details about the proper way to store paper see page 43 Paper Pr...

Страница 110: ...d exceeds the capacity of the printer Load paper only as high as the upper limit markings on the side fences of the paper tray or the markings on the paper guides of the bypass tray Misfeeds occur fre...

Страница 111: ...tly Sheets are sticking together Fan the sheets thoroughly before loading them Alternatively feed the sheets into the printer one at a time Sheets are feeding in together resulting in jams Sheets are...

Страница 112: ...g You have selected a paper type that cannot be used for duplex printing In Tray Paper Settings select a paper type that can be used for duplex printing For details about the paper types that can be u...

Страница 113: ...in the printer driver s option setup might not be the same Set the printer s feed orientation and the printer driver s feed orientation accordingly For details about settings for printer driver see t...

Страница 114: ...rinter driver s Detailed Settings tab click Print Quality in Menu and then select Quality in the Print Priority list On the printer driver s Detailed Settings tab click Print Quality in Menu and then...

Страница 115: ...u and then select Raster in the Vector Raster list PostScript 3 On the printer driver s Detailed Settings tab click Print Quality in Menu and then select Text in the Dithering list For details about t...

Страница 116: ...Fonts were not embedded Embed fonts in the PDF file you want to print and then print Resetting job appears and printing is suspended Memory is insufficient In System select Memory Usage to Font Priori...

Страница 117: ...ruments that use the same frequency range and then try printing again If printing is successful move the devices to a location where they do not interfere with the printer The Printed Image is Differe...

Страница 118: ...characters are missing or misshapen Before printing embed the font in the PDF file to be printed The paper size appears on the control panel and printing is not performed with PDF Direct Print When P...

Страница 119: ...he print job Photographs and other data intensive pages take a long time for the printer to process so wait when printing such data Changing the settings with printer driver may help to speed up print...

Страница 120: ...of paper error If a paper tray is opened and closed while the printer is in Energy Saver mode the printer will initialize the tray upon recovery but the tray will not be selectable by Auto Tray Select...

Страница 121: ...care when removing misfed paper Not doing so could result in burns When removing jammed paper make sure not to trap or injure your fingers To prevent misfeeds do not leave any torn scraps of paper ins...

Страница 122: ...jammed paper carefully CYN055 3 Close the paper tray carefully CYN056 4 Open the front cover by pushing the front cover release button and then close it to reset the misfeed condition CYN005 3 Troubl...

Страница 123: ...closing the cover check that the paper jam is cleared Paper Misfeed Message A2 The paper misfeed message A2 appears when a paper misfeed occurs in the bypass tray 1 Remove paper loaded in the bypass t...

Страница 124: ...mly After closing the cover check that the paper jam is cleared Paper Misfeed Message B The paper misfeed message B appears when a paper misfeed occurs in the internal paper feed path The inside of th...

Страница 125: ...t side of the printer and then open the front cover with both hands carefully CYN005 2 Hold the print cartridge s front handle to lift and pull it out CYN050 3 Pull out the jammed paper carefully CYN0...

Страница 126: ...annot see the jammed paper or remove it lift B and remove the jammed paper CYN060 CYN061 5 Hold the handle of the print cartridge and then insert it into the printer until it stops CYN052 3 Troublesho...

Страница 127: ...er misfeed message B C appears when a paper misfeed occurs in the internal paper feed path The inside of this printer becomes very hot Before removing paper around the fusing unit wait until the tempe...

Страница 128: ...cartridge s front handle to lift and pull it out CYN050 3 Pull out the jammed paper carefully CYN059 4 If you cannot see the jammed paper or remove it lift B and remove the jammed paper CYN060 3 Trou...

Страница 129: ...CYN061 5 If you cannot remove the jammed paper open the rear cover CYN062 6 Lift the lock levers of the fusing unit CYN063 Removing Jammed Paper 127...

Страница 130: ...he fusing unit out CYN064 8 Hold the tab and then remove the jammed paper CYN065 9 If the paper is not jammed in the fusing unit remove the jammed paper from inside of the printer CYN066 3 Troubleshoo...

Страница 131: ...CYN067 10 Push the fusing unit until it stops CYN068 11 Push the lock levers of the fusing unit down until they click CYN069 Removing Jammed Paper 129...

Страница 132: ...52 14 Close the front cover with both hands carefully CYN053 When closing the front cover push the upper side of the cover firmly After closing the cover check that the paper jam is cleared Paper Misf...

Страница 133: ...r jam that occurs in Tray 2 with the Y1 message displayed is explained as an example 1 Pull out the paper tray until it stops CYN071 2 Pull out the jammed paper carefully CYN072 3 Hold the tray with b...

Страница 134: ...ver release button and then close it to reset the misfeed condition CYN005 CYN053 Paper Misfeed Message Z1 The paper misfeed message Z1 appears when a paper misfeed occurs inside the duplex unit 1 Ope...

Страница 135: ...aper carefully CYN074 3 If you can see the jammed paper in the output tray keep the rear cover opened and remove the paper CYN075 4 If you cannot see the jammed paper lift the Z1 guide board CYN076 Re...

Страница 136: ...N077 6 Close the rear cover CYN070 Paper Misfeed Message Z2 The paper misfeed message Z2 appears when a paper misfeed occurs in the internal paper feed path of duplex printing 1 Pull out the paper tra...

Страница 137: ...2 Pull down Z2 CYN079 3 Pull out the jammed paper carefully CYN080 4 Return Z2 to its original position CYN081 Removing Jammed Paper 135...

Страница 138: ...the tray and then slide it into the printer carefully until it stops CYN029 6 Open the front cover by pushing the front cover release button and then close it to reset the misfeed condition CYN005 CYN...

Страница 139: ...her registered trademarks or trademarks of Novell Inc PCL is a registered trademark of Hewlett Packard Company The proper name of Internet Explorer 6 is Microsoft Internet Explorer 6 The proper name o...

Страница 140: ...008 are as follows Microsoft Windows Server 2008 Standard Microsoft Windows Server 2008 Enterprise The product names of Windows Server 2008 R2 are as follows Microsoft Windows Server 2008 R2 Standard...

Страница 141: ...MEMO 139...

Страница 142: ...MEMO 140 EN GB EN US M158 7504B...

Страница 143: ...2013 2014...

Страница 144: ...M158 7504B AU EN GB EN...

Отзывы: