Ricoh Pro C9200 Скачать руководство пользователя страница 27

Condition to Stop Printing

You can specify whether or not to stop printing with [Number of continuous monitoring pages] and
[Number of defective pages].
If [Number of defective pages] in [Number of continuous monitoring pages] exceeds the specified
threshold value, printing stops.
If you do not wish to stop printing, check [Never Stop].

Non-detection range

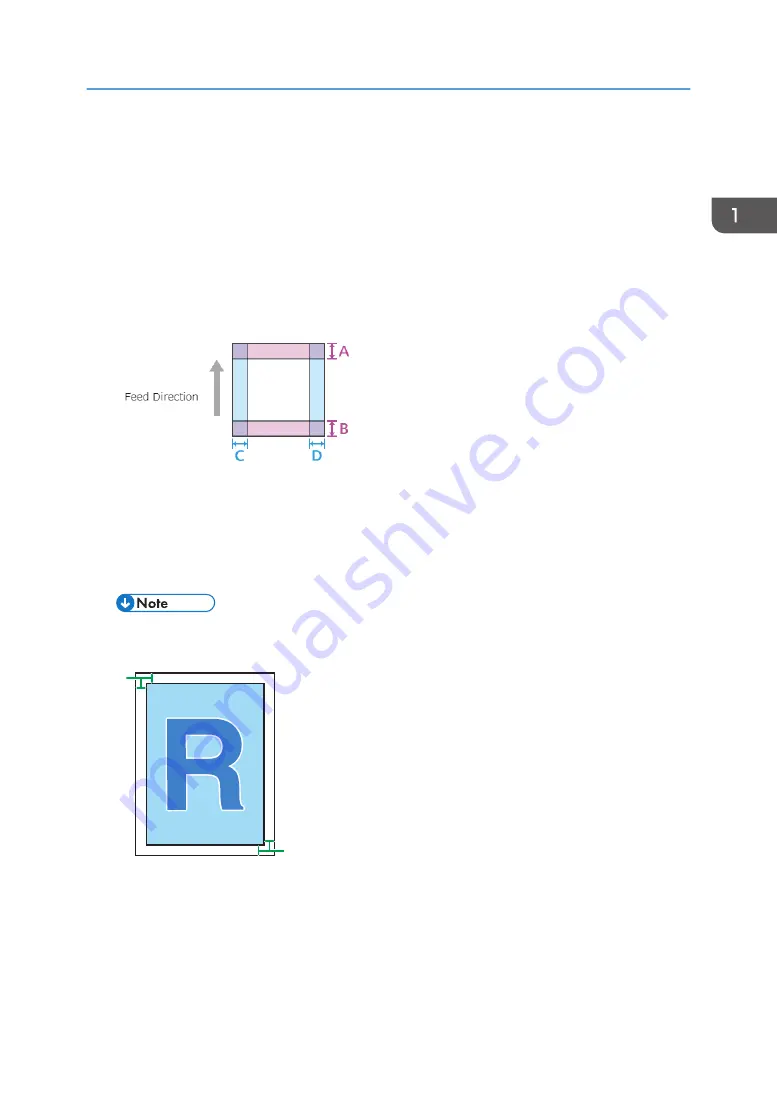
Specify the width from the edge of the paper of the area where you do not wish to monitor defects.

A/B/C/D : Non-detection range
However, you cannot specify a non-detection range smaller than the margins specified in the
machine's printer function. If you try to, the margins are automatically changed to fit within the non-
detection range. For details, see page 30 "Use the value of Erase Margin on the printer to set the
Minimum width of [Non-detection range]".

• The margins are those at the paper edges. The margins specified in the machine's printer

settings are applied.

M0B1IC0019

1

1

22

1. Margins
2. Image printed by the user

• If [Image Position Feedback Correction] is in operation, the areas near the detection marks

are not subject to detection in addition to the area specified by this setting.

• For details about [Image Position Feedback Correction], ask the machine administrator.

Threshold Setting

25

Содержание Pro C9200

Страница 1: ...For safe and correct use be sure to read Safety Information before using the machine Appendix Troubleshooting Operating and Settings Image Quality Monitor...

Страница 2: ......

Страница 3: ...Logging Out 13 Window Descriptions 14 Image Quality Monitor Console 14 Detection Result Menu 15 Threshold Settings Menu 18 Management Menu 19 Threshold Setting 21 Presets 21 Add 21 Edit 23 Delete 26...

Страница 4: ...anagement 34 Network Settings 36 Prohibit Transition to Energy Saver Mode 37 Backup Restore 37 2 Troubleshooting In Case of Trouble 39 How to Clean the Line Sensor 44 Cleaning the Contact Glass 46 3 A...

Страница 5: ...rors or malfunctions of the machine Also you are responsible for taking protective measures against computer viruses worms and other harmful software Notes Contents of this manual are subject to chang...

Страница 6: ...order to monitor printed images for defects such as dots white spots and streaks 4 4 3 2 2 1 1 4 5 M0B1IC0032 1 The Auto Color Diagnosis Unit creates a reference image from the RIP data original print...

Страница 7: ...or Diagnosis Unit Setting contact your service representative For details about Auto Color Diagnosis Unit Setting see Administrator Tools in Device Management Before you generate the Auto Color Diagno...

Страница 8: ...d DFP717 Streaks An elongated smudge or a white area within an image DFP755 Erroneous detection refers to a false positive wherein a non existent print defect is reported on the Image Quality Monitor...

Страница 9: ...during printing printing is suspended 5 Check the detected print defect on the Image Quality Monitor console For details see page 33 Checking Print Defects 6 According to the print defect report displ...

Страница 10: ...etection results for up to 1 000 000 pages are stored If these limits are exceeded log entries are deleted starting with the oldest If printing is suspended it is reported in a pop up window on the co...

Страница 11: ...he Ethernet cable to the Auto Color Diagnosis Unit contact your service representative Notes Do not connect the Auto Color Diagnosis unit to a network on the Internet You cannot connect the Auto Color...

Страница 12: ...0B1IC0020 2 Open the browser on your computer and enter 192 168 1 2 Image Quality Monitor Console appears 192 168 1 2 is the factory set value Configure a different IP address for the Auto Color Diagn...

Страница 13: ...page 9 How to Connect If you forget the changed IP address you cannot check it on the device In such a case contact your service representative 1 Click the Management tab 2 Click Network Settings M0B...

Страница 14: ...Monitor Console see page 9 How to Connect M0B1OC6000 2 Enter User name and Password The default setting is username admin and password password 3 From the Language drop down list select the language I...

Страница 15: ...Logging Out 1 Click the user icon in the upper right corner of the screen M0B1IC1011 Logging In Out 13...

Страница 16: ...ching the windows 2 IP Address Displays the IP address of the connected Auto Color Diagnosis Unit For details about how to change the IP address see page 11 Changing the IP Address 3 Devices Name Disp...

Страница 17: ...threshold preset names applied when printing the job Total Number of Pages Displays the total number of printed pages in the job Total Number of Defective Pages Displays the number of pages with defec...

Страница 18: ...s the items in the list Printed Date Time Date and time of printing the defective page Copy Number Number of printed copies of the defective page Defective Page Page number of the defective page Print...

Страница 19: ...nsition icon Select to move to the next previous first or last page 12 Preview You can display the defective page image by selecting the page data to display from the Defect Details list You can displ...

Страница 20: ...threshold preset from the local network Use to export the threshold preset to the local network Additional menus are displayed Add inspection patterns Add Print Result ID Number Use the value of Erase...

Страница 21: ...Displays details of the threshold preset selected from the list on the left For details see page 21 Threshold Setting Management Menu M0B1IC1005 1 2 3 4 5 1 Menus The Management menu appears For deta...

Страница 22: ...5 Page Move Icons Select to move to the next previous first or last page 1 Operating and Settings 20...

Страница 23: ...paper These settings are for preventing erroneously monitoring the printing on the back of thin paper Add Use to create a new threshold preset custom preset Detection Level Settings is a simple setti...

Страница 24: ...to Level 5 M0B1IC0028 Density of sub scan streak Specify the detectable density of the streaks in the sub scanning direction in the range Level 1 to Level 5 M0B1IC0029 Length of main scan streak Spec...

Страница 25: ...ervice representative Edit Use this to change the threshold preset Select the custom preset to edit from the list and then click its icon If you change the presets the monitoring result will change ev...

Страница 26: ...multiple dot stains or multiple streaks in the main scanning direction M0B1IC0006 To detect this print error as a streak configure the settings as follows M0B1IC6014 Set Length of main scan streak an...

Страница 27: ...ge smaller than the margins specified in the machine s printer function If you try to the margins are automatically changed to fit within the non detection range For details see page 30 Use the value...

Страница 28: ...If erroneous detection in the edge regions occurs frequently decrease the detection level To increase the detection sensitivity in the edge regions increase the detection level Note however that doing...

Страница 29: ...tion pattern is added to all paper Auto Follow the instructions for Image Position Feedback Correction For details ask the machine administrator The default setting is Auto If you select Off or select...

Страница 30: ...inches at each side M0B1IC0016 1 1 2 2 2 3 3 4 4 5 6 1 Margins vertical 4 0 mm 0 16 inches by default 2 Detection marks for Image Position Feedback Correction 3 1 3 mm 0 05 inches Margin for printing...

Страница 31: ...r adding the ID Number If the margins are set to the default a margin of 6 7 mm 0 3 inches is required at either the top or the bottom The margins required for adding identification numbers are as giv...

Страница 32: ...ing is Enable As shown below the areas within 0 5 mm 0 02 inches of the margins are not subject to detection M0B1IC0010 1 1 2 2 3 3 1 Margins 2 0 5 mm 0 02 inches 3 Areas not subject to detection Marg...

Страница 33: ...margin settings M0B1IC0014 1 1 2 2 2 4 4 3 3 1 Margins 2 Detection marks 3 1 3 mm 0 05 inches 4 Areas not subject to detection Margins mm inch 1 0 0 04 2 0 0 08 3 0 0 12 4 0 0 16 5 0 0 20 Areas not su...

Страница 34: ...or pages with print defects For details see page 28 Add Print Result ID Number 4 Click and then specify Use the value of Erase Margin on the printer to set the Minimum width of Non detection range fro...

Страница 35: ...m the job list When you select a job its Defect Details list appears at the right of the screen 3 Select the page to be checked from the Defect Details list When you select a page its image is display...

Страница 36: ...D Enter the name of the account to add using up to 128 characters Password Enter the password to use along with the added user ID using up to 32 characters Role Select the access privilege of the adde...

Страница 37: ...Number Settings Switching Use the value of Erase Margin on the printer to set the Minimum width of Non detection range ON OFF Account Management available only with your own account Network Settings...

Страница 38: ...work Settings You can change network settings and machine names For details about network settings see page 11 Changing the IP Address Change Machine Name You can change the name of the printer Enter...

Страница 39: ...e when there is no communication with the server Therefore operations such as sorting and account setting on the Image Quality Monitor console do not cause communication with the server so the migrati...

Страница 40: ...1 Operating and Settings 38...

Страница 41: ...For details see page 44 How to Clean the Line Sensor 2 Print a copy 3 If print defects keep occurring on the Image Quality Monitor console or if the message prompting you to clean appears even after...

Страница 42: ...nitor console check the area of the print defect 1 1 2 2 3 3 4 4 M0B1IC0009 1 Area within 50 mm 2 0 inches of the top edge of the paper 2 Area 150 to 200 mm 5 9 to 7 9 inches from the bottom edge of t...

Страница 43: ...istrator If defect is in area 4 1 Check whether the margin at the trailing edge of the paper is greater than or equal to 4 2mm 0 2 inches 2 In Custom Paper Settings set the value in Margin Trailing Ed...

Страница 44: ...uch as those consisting of text due to the minute dimensional deviation Therefore the detection level threshold for edge regions is lower than that applied to the white and solid fill background To de...

Страница 45: ...detected in the way you wish even after changing the setting contact your service representative An icon indicating that auto detection is unavailable keeps appearing Contact your service representati...

Страница 46: ...e print setting and paper type Cleaning procedure Use the cleaning cloth provided with the machine to wipe the glass surface bias roller of the revolver and shading correction plate If the stains on t...

Страница 47: ...volver Turn the gear on the front side to rotate the roller Be careful not to touch the contact glass Cover your fingers with the cloth as shown to prevent the contact glass from becoming soiled M0B1I...

Страница 48: ...cloth Do not use alcohol to wipe the glass surface because it will cause uneven wiping 1 Open the left front cover of the main unit EAE001 2 Raise the E3 lever EAE002 3 Remove the coin screw If the s...

Страница 49: ...0B1IC0022 5 Wipe both sides of the glass in one direction either from the back to front or from the front to back Wipe and make sure no fingerprints dust or paper dust remain To prevent deformation of...

Страница 50: ...cleaning the rollers on the revolver reattach the contact glass and tighten the coin screw In inserting the contact glass align the arrows M0B1IC0024 7 Close all covers that were opened 2 Troubleshoo...

Страница 51: ...per name of Internet Explorer 11 is Internet Explorer 11 The proper names of the Windows operating systems are as follows The product names of Windows 7 are as follows Microsoft Windows 7 Home Premium...

Страница 52: ...MEMO 50...

Страница 53: ...MEMO 51...

Страница 54: ...MEMO 52 EN GB EN US EN AU M0B2 1334C...

Страница 55: ...2019 2020 2021...

Страница 56: ...M0B2 1334C AU EN US EN GB EN...

Отзывы: