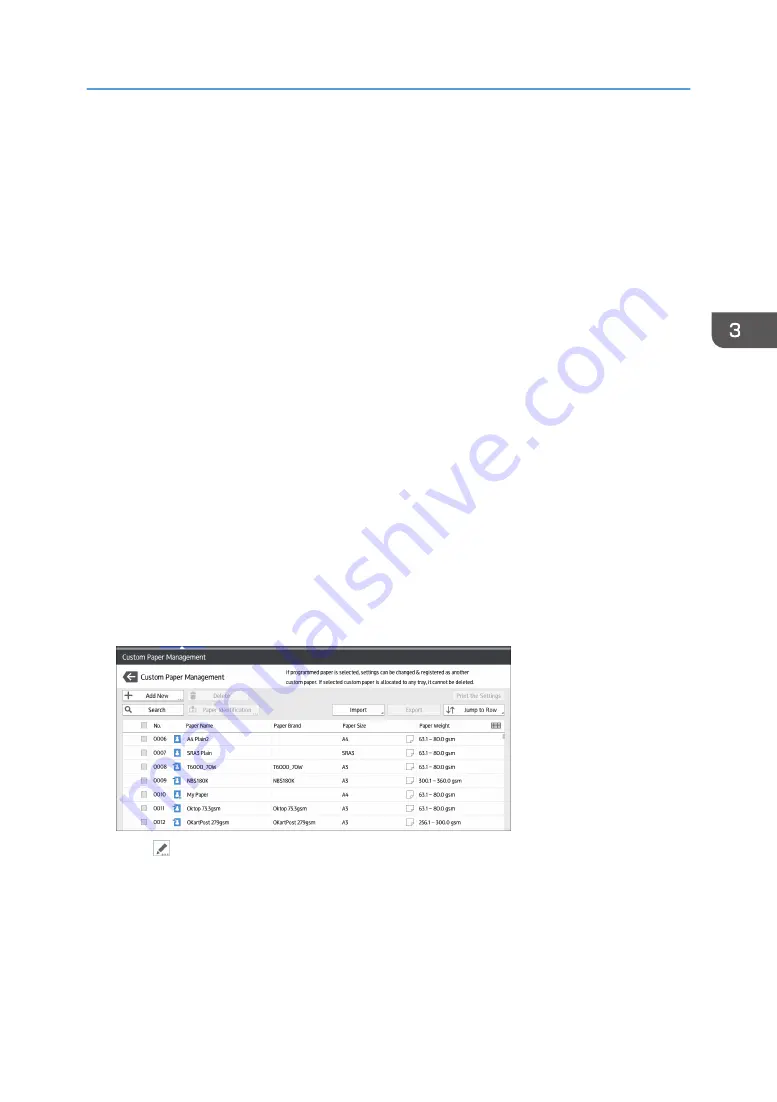
background image

This function is useful when registering paper that is the same type as an existing paper, but a different 
size.
Depending on which settings you modify, details of a newly registered custom paper will be as follows:

• When the settings of the selected custom paper are not changed:

All settings of the selected custom paper ([Paper Name], [Paper Size], [Paper Weight], and [Paper 
Type], including the attributes specific to the color controller) are copied to the newly registered 
custom paper.

• When the settings [Paper Name], [Paper Size], [Paper Thickness], [Apply Duplex], [Apply Auto 

Paper Select], or [Advanced Settings] of the selected custom paper are changed:
The changes are applied to the newly registered custom paper.

• When the settings [Paper Weight], [Paper Type], [Coated Paper Type], [Paper Color], 

[Prepunched], or [Textured] of the selected custom paper are changed:
The changes are applied to the newly registered custom paper and its advanced settings are reset 
to their default values according to the changes that are applied to the settings.

When modifying a custom paper that is registered from the master library, you can change its [Paper 
Name], [Paper Size], [Apply Duplex], and [Apply Auto Paper Select] settings. You can also confirm the 
brand name and the version of data from [Paper Brand].

1.

Press [Tray Paper Settings] in the upper left corner of the screen.

2.

Press [Paper Tray] tab.

3.

Press [CustomPaper Management].

4.

Select a type of custom paper to refer to.

5.

Press  .

6.

Change the settings for custom paper (such as paper's name, size, and type), as 
necessary.

7.

Press [Save Paper].

If you change the [Paper Weight], [Paper Type], [Coated Paper Type], [Paper Color], 
[Prepunched], or [Textured] and press [Save Paper], a message appears to notify you that the 

Registering Custom Paper

49

Содержание PRO C7200S

Страница 1: ...efore using the machine Maintenance Troubleshooting Document Server Scan Print Adjustment Settings for Operators Paper Specifications and Adding Paper Copy Getting Started Useful Functions Manuals Provided with This Machine How to Read the Manuals Operator s Guide ...

Страница 2: ......

Страница 3: ...Perfect Binding 26 Finishing to a regular size 27 Notes on Configuring the Perfect Binding 28 Ring Binding 30 Notes on Configuring the Ring Binding 30 Fold 32 Using the Multi Folding Unit 32 Using the Booklet Finisher 36 Registering Custom Paper 39 Overview of Paper Settings 39 Custom Paper Registration Workflow 41 How to Use the Custom Paper Management Screen 41 How to Use the Import From Master ...

Страница 4: ...4 Getting Started Guide to Names and Functions of Components 75 Guide to Functions of the Attention Light 79 Guide to Functions of the Machine s Options 81 Guide to Functions of the Machine s External Options 81 Guide to Functions of the Machine s Internal Options Option Controller 87 Guide to the Names and Functions of the Machine s Control Panel 88 Adjusting the Angle of the Control Panel 90 Tur...

Страница 5: ...layed 134 User Code Authentication Using the Control Panel 134 User Code Authentication Using a Printer Driver 135 Logging In Using the Control Panel 135 Logging Out Using the Control Panel 136 Logging In Using an IC Card 136 Logging Out Using an IC Card 138 Using a Smart Device to Log in to the MFP 138 Using a Smart Device to Log out from the MFP 139 Auto Logout Function 139 Logging In Using a Dr...

Страница 6: ...the A3 11 17 Tray Unit 174 Loading Paper into Tray 2 175 Loading Paper into the Multi Bypass Tray Tray A 176 Loading Paper into the Three tray Wide Large Capacity Tray 179 Loading Paper into the Two tray Wide Large Capacity Tray 180 Loading Paper into the Interposer 183 Loading Cover Sheets into the Interposer of the Perfect Binder 184 Loading Orientation fixed Paper or Two sided Paper 187 Changin...

Страница 7: ...and Setting Operations 272 Printing with Adjusted Settings 274 Menu Items and Functions 276 Setting Values 284 Machine Image Position 284 Machine Image Quality 290 Machine Paper Feed Output 293 Machine Maintenance 298 Finishing Finisher 303 Finishing Fold 320 Finishing Perfect Binder 337 Finishing Stacker 339 8 Print Quick Install 345 Displaying the Printer Driver Settings Screen 347 Displaying th...

Страница 8: ...o a Shared Network Folder 368 Entering the path to the destination manually 368 Specifying the path by browsing the network for destinations 370 Sending files to an FTP server 370 Basic Procedure for Sending Scan Files by E mail 373 Specifying the Destination or Recipient 375 Selecting the Destination from the Machine s Address Book 375 Entering an E mail Address Manually 378 Selecting the Destina...

Страница 9: ...nd the Machine Cannot Be Operated 425 Messages Displayed When You Use the Copy Document Server Function 427 Messages Displayed When You Use the Printer Function 431 Messages Displayed When You Use the Scanner Function 446 When Other Messages Appear 462 Troubleshooting When You Use the Copy Document Server Function 469 When You Cannot Make Clear Copies 469 When You Cannot Make Copies As Wanted 473 ...

Страница 10: ...ce General Requirements 519 Dos and Don ts 519 Saving Printouts 521 Backing Up Hard Disk Data 521 Replenishing and Replacing Consumables 522 Where to Put Your Machine 529 Optimum Environmental Conditions After Moving the Machine 529 Maintaining Your Machine 534 How to Clean the Machine 534 Cleaning the Exposure Glass and Scanning Glass 534 Cleaning the Auto Document Feeder 535 Cleaning the Power C...

Страница 11: ...er errors This symbol is located at the end of sections It indicates where you can find further relevant information Indicates the names of keys on the machine s display or control panels mainly Europe and Asia mainly Europe or mainly Asia mainly North America Differences in the functions of Region A and Region B models are indicated by two symbols Read the information indicated by the symbol that...

Страница 12: ...non use of this product and operation manuals provided with it Make sure that you always copy or have backups of the data registered in this machine Documents or data might be erased due to your operational errors or malfunctions of the machine In no event will the manufacturer be responsible for any documents created by you using this machine or any results from the data executed by you 1 How to ...

Страница 13: ...ny damage or expense that might result from the use of parts other than genuine parts from the manufacturer with your office products For good output quality the manufacturer recommends that you use genuine toner from the manufacturer Some illustrations in this manual might be slightly different from the machine Notes 11 ...

Страница 14: ...X Certain types might not be available in some countries For details please contact your local dealer Certain options might not be available in some countries For details please contact your local dealer Depending on which country you are in certain units may be optional For details please contact your local dealer 1 How to Read the Manuals 12 ...

Страница 15: ... LCT Vacuum Feed LCIT RT5120 Two tray wide Large Capacity Tray Two tray wide LCT Multi Folding Unit FD5020 Multi folding unit Decurl Unit DU5060 Decurl unit Buffer Pass Unit Type S9 Buffer pass unit Ring Binder RB5020 Ring binder High Capacity Stacker SK5040 High capacity stacker Trimmer Unit TR5040 Trimmer Cover Interposer Tray CI5030 Interposer Perfect Binder GB5010 Perfect binder Tab Sheet Hold...

Страница 16: ... the label contains the following your machine is a Region A model CODE XXXX 27 29 67 220 240 V mainly North America If the label contains the following your machine is a Region B model CODE XXXX 17 57 208 240 V Dimensions in this manual are given in two units of measure metric and inch If your machine is a Region A model refer to the metric units If your machine is a Region B model refer to the i...

Страница 17: ...s is required Tab sheet holder Multi bypass tray Tray A Three tray wide LCT Two tray wide LCT Shift Sort Stack One of the following options is required Finisher SR5050 Booklet Finisher SR5060 High capacity stacker Staple One of the following options is required Finisher SR5050 Booklet Finisher SR5060 Staple Center Booklet Finisher SR5060 Punch One of the following combinations of options is requir...

Страница 18: ...inisher SR5060 and trimmer Perfect Binding Perfect binder Ring Binding Ring binder Printer mode Function Option Printing from the multi bypass tray Tray A One of the following combinations of options is required Multi bypass tray Tray A and three tray wide LCT Multi bypass tray Tray A and two tray wide LCT Staple Shift Collate One of the following options is required Finisher SR5050 Booklet Finish...

Страница 19: ...ulti folding unit Booklet Finisher SR5060 and multi folding unit Half Fold One of the following combinations of options is required Booklet Finisher SR5060 Finisher SR5050 and multi folding unit Perfect Binding Perfect binder Ring Binding Ring binder Fore Edge Cut Booklet Finisher SR5060 and trimmer PostScript 3 Preventing unauthorized copies Data security for copying function PostScript 3 unit Sc...

Страница 20: ...1 How to Read the Manuals 18 ...

Страница 21: ... the explanation about Safety Information Be sure to read this manual before you start using the machine The manual also provides information about various regulations and environmental compatibility Preparation Explains the preparation procedure to use the machine and describes the control panel It also explains paper specifications and how to load paper It also explains how to use the Master Lib...

Страница 22: ...unctions available on the machine that allow you to prevent unauthorized use of the machine and changing and copying of the data For enhanced security it is recommended to perform the followings Install the Device Certificate Enable SSL Change the user name and password of the administrator For details see Before Using This Machine Security Guide Be sure to read this manual when configuring the en...

Страница 23: ...DHCP Option 204 Manuals for This Machine 21 ...

Страница 24: ...ering a keyword You can search through the HTML manuals This section explains how to search for duplex 1 Enter duplex in the search box on the top left of the top page 2 Click A list of titles or descriptions that include duplex appears A search result appears in the search result window In addition you can use the drop down menu to select a manual 3 Click a title to display the item you want to r...

Страница 25: ...Read the HTML manuals on the control panel You can also read the HTML manuals on the control panel For details see page 101 Main Icons on the Home Screen How to Use the Operating Instructions 23 ...

Страница 26: ...2 Manuals Provided with This Machine 24 ...

Страница 27: ...out Booklet menu on the Detailed Settings tab If the PCL 5c printer driver is used it can be specified in the Setup tab For printing methods see the printer driver Help If the information icon is displayed next to the Booklet list you cannot specify booklet printing Click the information icon to check why booklet printing is unavailable If the document contains pages with different original sizes ...

Страница 28: ...commended Paper Sizes and Types The paper types that can be used for Perfect Binding are as follows Plain Recycled Color Letterhead Preprinted Black Coated High Gloss Coated Glossy Coated Matte Metallic Pearl Synthetic Textured Guide to perfect bound booklets BZH095 1 Book block The bulk of the booklet enclosed by the cover sheet 2 Head edge The edge that forms the booklet s top end 3 Cover The sh...

Страница 29: ...of the paper used in the book block Perfect Binding can be applied to bind a book block with a spine thickness of 23 mm or less Collate is automatically enabled if the Perfect Binding is specified Finishing to a regular size Specify the size of the finished bound booklets and cut three edges to a regular size Book block paper and cover sheet compatibility If you specify finishing to a regular size...

Страница 30: ...rce tray Driver Command is selected in Tray Setting Priority for the specified source tray Cover Sheets is specified Slip Sheets is specified Separation Sheets is specified The staple function is specified The punch function is specified The fold function is specified Paper is ejected with its printed side facing up Ring Binding is specified Perfect binder is not attached Perfect Binding cannot be...

Страница 31: ...ding is applied to bind sheets of paper The following functions will be canceled when specified with Perfect Binding at the same time Stack Extended Auto Tray Switching Sub Paper Size 1 1 The setting is applied to inside pages only Perfect Binding 29 ...

Страница 32: ...inishing menu on the Detailed Settings tab If the PCL 5c printer driver is used it can be specified in the Setup tab For printing methods see the printer driver Help When binding output sheets with ring combs specify the number of sheets to be bound between 2 and 100 If there is only one sheet it will be punched with ring comb holes but not bound If you are using 50 sheet type ring combs you can b...

Страница 33: ...mber of printed sheets exceeds 50 when Ring Binding with 50 sheet type ring combs is specified The number of printed sheets exceeds 100 when Ring Binding with 100 sheet type ring combs is specified Sheets of paper to be bound with 50 sheet type ring combs are thicker than 50 sheets of plain paper Sheets of paper to be bound with 100 sheet type ring combs are thicker than 100 sheets of plain paper ...

Страница 34: ...ver is used Z fold can be specified in the Setup tab For printing methods see the printer driver Help Collate is automatically enabled if Half Fold or Multi sheet Fold is specified Using the Multi Folding Unit Printed documents can be folded using the optional Finisher and multi folding unit attached to the machine You can select the fold type from the following six types Z fold Half Fold Letter F...

Страница 35: ...oss Coated Glossy Coated Matte Textured The finished form may vary depending on the paper size The following table shows the examples of A3 size paper folded in each fold type For details see the printer driver Help Print Data Direction Fold Types Folding Position Print Inside Print Outside Not Specified Portrait Z fold Half Fold Letter Fold in Letter Fold out Double Parallel Gate Fold Fold 33 ...

Страница 36: ... sheet Fold function with letter fold in to B5 JIS size paper the folded sheets will be different in size to sheets folded without the Multi sheet Fold function 1 2 CNH002 1 Multi sheet Fold not applied 2 Multi sheet Fold applied When printing a large number of copies with the Z fold function it is recommended to attach the Z fold support tray to the finisher For details on attaching the Z fold su...

Страница 37: ...eset to occur when combined with the fold function Slip Sheets 1 Separation Sheets 1 Staple 2 Punch Ring Binding Perfect Binding Half Fold configured on the Booklet Finisher 1 Job reset occurs only when combined with Half Fold Letter Fold in Letter Fold out Double Parallel or Gate Fold 2 Job reset occurs only when combined with Half Fold Letter Fold in Letter Fold out Double Parallel or Gate Fold ...

Страница 38: ... out to B4 JIS A3 81 214 11 17 8K or larger sheets In some cases you may have to use A4 sheets or smaller when applying folds in combination with the reduction function Print quality over fold lines might be reduced This is due to cracking within the fused toner Loss of surface along fold lines can also occur with some types of paper To avoid possible wastage print a single test sheet before begin...

Страница 39: ...d type For details see the printer driver Help Print Data Direction Folding Position Print Inside Print Outside Multi sheet fold Portrait Landscape For details about which paper sizes are compatible with which Half Fold function see Specifications for Booklet Finisher SR5060 Specifications Notes on configuring the Half Fold function If Half Fold Multi sheet fold Finisher Booklet Tray is specified ...

Страница 40: ...ctioning Booklet Finisher is not attached Functions that will be canceled when combined with the Half fold function The following functions will be canceled when combined with the Half fold function Ejecting paper with the printed side facing up If the information icon is displayed next to the Fold list you cannot specify Half Fold function Click the information icon to check why Half Fold functio...

Страница 41: ...ghts and machine operating conditions for example paper feed toner transfer and toner fusing conditions that are customized for each major commercially available paper products and also for each major paper types To use the settings in the master library you must first select the name or type of your paper from the master library The paper settings will be registered to a custom paper The master l...

Страница 42: ...om paper again Relationships between functions Tray Paper Settings Paper tray information Paper Type Paper Weight Paper Size Other settings Media catalog information Machine Color controller DWP182 1 5 1 Master Library SD card 6 7 8 Paper Type Paper Weight Paper Size Other settings Custom Paper 4 3 2 1 You can import paper settings from the Master Library and register it as custom paper 2 You can ...

Страница 43: ...ibrary and register it as custom paper See page 45 Selecting paper to import from the Master Library or SD card See page 46 Registering a paper whose paper name is not displayed in the Master Library Register paper as custom paper by specifying a paper type weight and other settings as you want See page 46 Registering a paper whose paper name is not displayed in the Master Library 2 Select the reg...

Страница 44: ...aper from the list For details see page 64 Deleting a Custom Paper 4 Paper Identification Scans the paper using the Media Identification Unit and searches for a type of paper with the closest settings from the registered custom paper For details see page 50 Registering a Custom Paper with the Media Identification Unit 5 Item name Displays an item name in the custom paper list The items to be displ...

Страница 45: ...he parameters of the custom paper settings For details see page 63 Printing the Parameters of Custom Paper Settings 9 Jump to Row Press this key to scroll down the list of custom paper to the specified line You can specify the number in increments of 100 10 List of custom papers The list of registered custom papers is displayed A custom paper that is assigned to a paper tray is indicated by the ic...

Страница 46: ...ent screen are displayed Also you can sort the Master Library list by each displayed item Press the item to be used for the sorting 4 Import Select an item in the Master Library list and press Import to import the selected paper as custom paper For details see page 45 Selecting paper to import from the Master Library or SD card and page 46 Registering a paper whose paper name is not displayed in t...

Страница 47: ... and then try registering again For details see page 64 Deleting a Custom Paper Selecting paper to import from the Master Library or SD card 1 Press Tray Paper Settings in the upper left corner of the screen 2 Press Paper Tray tab 3 Press CustomPaper Management To import data from an SD card insert the SD card into the media For details about using an SD card see Inserting an SD Card Preparation 4...

Страница 48: ... paper as the custom paper by selecting a paper of the matching paper type and weight from the Master Library Manually specifying a paper s type and weight You can register a custom paper by manually specifying its type and weight Selecting the paper s type from the master library You can select the type of paper from the master library and register it as a custom paper Specify Paper Type and Pape...

Страница 49: ...f the registered custom paper such as the paper name setting on the Custom Paper Management screen For details about modifying the custom paper see page 56 Modifying a Custom Paper Manually specifying a paper s type and weight 1 Press Tray Paper Settings in the upper left corner of the screen 2 Press Paper Tray tab 3 Press CustomPaper Management 4 Press Add New 5 Press Paper Name Registering Custo...

Страница 50: ... the Advanced Settings will be initialized To apply the changes for those settings select Change To cancel the changes select Do not Change 15 Press Save 16 Press Program 17 Press Exit Custom paper is saved under the smallest unregistered number 18 Press 19 Press the Home icon at the center bottom of the screen If you want to use glossy paper select Coated Glossy or Coated High Gloss for Coated Pa...

Страница 51: ...r Color Prepunched or Textured of the selected custom paper are changed The changes are applied to the newly registered custom paper and its advanced settings are reset to their default values according to the changes that are applied to the settings When modifying a custom paper that is registered from the master library you can change its Paper Name Paper Size Apply Duplex and Apply Auto Paper S...

Страница 52: ...e center bottom of the screen For details about custom paper settings see page 57 Custom Paper Settings For details about Advanced Settings contact your machine administrator Registering a Custom Paper with the Media Identification Unit When you scan paper with the Media Identification Unit the Media Identification Unit searches custom paper in the master library When custom paper with configurati...

Страница 53: ...area Insert the paper you want to scan here Connect the Media Identification Unit 1 Connect the USB cable to the USB slot on the back of the control panel USB slot DWP055 How to register paper scanned by the Media Identification Unit as custom paper Registering a paper from the master library with the Media Identification Unit 1 Press Tray Paper Settings in the upper left corner of the screen 2 Pr...

Страница 54: ...ou want to use and then press Import 9 Press OK 10 Press Exit The selected custom paper is imported from the Master Library 11 Press 12 Press the Home icon at the center bottom of the screen The list displayed in Step 7 includes custom paper with configurations whose match rates are 80 or higher You can check and change the settings of the registered custom paper such as the paper size setting on ...

Страница 55: ...th both hands when inserting the paper Keep the paper flat as you pull it out DFZ009 7 Change the settings for custom paper such as paper s name size and type as necessary 8 Press Save Paper If you change the Paper Weight Paper Type Coated Paper Type Paper Color Prepunched or Textured and press Save Paper a message appears to notify you that the Advanced Settings will be initialized To apply the c...

Страница 56: ... details about Advanced Settings contact your machine administrator Modifying the registered custom paper settings using the Media Identification Unit 1 Press Tray Paper Settings in the upper left corner of the screen 2 Press Paper Tray tab 3 Press CustomPaper Management 4 Select the custom paper whose settings you want to modify If the paper you want to select is not displayed use Jump to Row or ...

Страница 57: ...ttings see page 57 Custom Paper Settings You cannot modify a custom paper that is assigned to a paper tray To modify it cancel the assignment For details about Advanced Settings contact your machine administrator Specifying a custom paper for paper trays with the Media Identification Unit 1 Press Tray Paper Settings in the upper left corner of the screen 2 Press Paper Tray tab 3 Select the tray to...

Страница 58: ...ange the Paper Name Paper Size Apply Duplex and Apply Auto Paper Select settings for a custom paper that is registered from the master library 1 Press Tray Paper Settings in the upper left corner of the screen 2 Press Paper Tray tab 3 Press CustomPaper Management 4 Select the custom paper whose settings you want to modify If the paper you want to select is not displayed use Jump to Row or scroll t...

Страница 59: ...Manufacturer Displays the manufacturer s name Paper Name Specify the name of the custom paper using up to 38 characters Paper Size Select the paper s size from the regular sizes or specify a Custom Size You can specify a custom size between 100 0 and 330 2 mm 3 94 and 13 00 inches vertically and between 139 7 and 700 0 mm 5 50 and 27 55 inches horizontally Paper Weight Specify the weight g m2 of t...

Страница 60: ...Registration or Front Back Registration Adjustment is performed by printing five sheets for adjusting the front side or 10 sheets for adjusting the front and back sides and one sheet for confirming the adjustment result 3 Check the adjustment result and press Apply The setting value that reflects the adjustment result is applied To check the print position only load a sheet of paper in the tray an...

Страница 61: ...tor You can change settings for Paper Name Paper Size Apply Duplex and Apply Auto Paper Select if a custom paper has already been registered using the master library Settings that you can change depend on the following Settings Custom papers that have been registered using the master library listed with an icon or Custom papers that have been registered by specifying paper types and weight Paper B...

Страница 62: ...er First print a template and measure the length of the specified area Next enter the length on the machine to adjust the position of the image Specify the size of each piece of paper you use Specified settings are saved as custom paper settings so that you can use the registered settings next time You need administrator privileges to adjust the image position Preparations Before adjusting image p...

Страница 63: ...k of the arrow Entering the value When you specify the lengths of the template after measuring them the values to adjust the image position are automatically calculated and applied 1 Press Tray Paper Settings in the upper left corner of the screen 2 Press Paper Tray tab 3 Press CustomPaper Management 4 Select the name of the paper that you want to register If the paper you want to select is not di...

Страница 64: ...ss Apply 11 Press Save 12 Press Save Paper 13 Press Overwrite 14 Press 15 Press the Home icon at the center bottom of the screen For details about how to register a custom paper see page 45 Registering a Custom Paper Searching for a Paper by Specifying the Conditions You can specify search parameters to search for types of paper from the lists of paper types such as custom types of paper and the m...

Страница 65: ...meters of Custom Paper Settings You can print the parameters for registered custom paper from the Custom Paper Management screen You can print 1000 custom paper settings at a time 1 Press Tray Paper Settings in the upper left corner of the screen 2 Press Paper Tray tab 3 Press CustomPaper Management 4 Select the custom paper whose settings you want to print If the paper you want to select is not d...

Страница 66: ...overwrites existing data if both the paper names and paper size settings are the same 1 Press Tray Paper Settings in the upper left corner of the screen 2 Press Paper Tray tab 3 Press CustomPaper Management 4 Insert an SD card into the media slot For details about using an SD card see Inserting an SD Card Preparation 5 Press Export 6 Press OK 7 Press Exit 8 Press 9 Press the Home icon at the cente...

Страница 67: ...e Home icon at the center bottom of the screen You cannot delete a custom paper that is currently assigned to a paper tray You cannot delete a custom paper that is being used with the color controller For details see the manual provided with the color controller Managing the Master Library To update the master library do the following To update the master library Contact your service representativ...

Страница 68: ...the type of DFE to be connected You can connect to only one computer or DFE at one time This function cannot be used while you are operating on the screen of the machine s control panel remotely see page 71 Allowing Remote Connection from a PC or Tablet to the Control Panel Up to six computers and only one DFE can be registered as the destinations Press the Enter key twice to confirm the input tex...

Страница 69: ...plays a software keyboard EFI Certification Edit the authentication information This item is displayed only when the connection destination is a DFE and the target device is Fiery Disconnect Terminate the remote connection The current remote connection session continues even when you press Home or other items and the remote desktop client app move to background Also the current remote connection s...

Страница 70: ...login password Domain Enter the domain name Settings Screen Colors Specify the display color of the screen You can select from the following High Color 16 Bit True Color 24 Bit Highest Quality 32 Bit Default Highest Quality 32 Bit Advanced Enable Gateway Specify whether or not to use the gateway Default OFF Gateway Settings Configure the gateway settings You can specify the following items Host En...

Страница 71: ... bottom of the screen Configuring the Connection App This section explains the setting items of the remote desktop client app and DFE connection app The configured settings are shared by the remote desktop client app and DFE connection app Configure the Connection App using the following procedure 1 Press the Home icon at the center bottom of the screen 2 Press 3 Press the APPS tab 4 Press the Rem...

Страница 72: ...pecify a value between 0 do not disconnect and 5 minutes in increments of one minutes Default 5 Security Accept all Certifications Specify whether or not to accept all certifications Default OFF Clear Certificate Cache Clears the certificate cache 7 Press the Home icon at the center bottom of the screen 3 Useful Functions 70 ...

Страница 73: ...ing depending on the operational situation To deny remote operations or monitoring by the administrator Press Prohibit To allow the administrator to only monitor the screen of the machine Press Allow Monitoring To allow the administrator to remotely operate the machine remotely Press Allow Remote Operation When a remote operation starts the status of remote operation is displayed in the system mes...

Страница 74: ... to the Control Panel Terminating a Remote Operation A remote operation can be terminated by the following procedure 1 Press the system message The system message dialog box is displayed 2 Press Disconnect The end message is displayed and the remote operation is terminated A remote operation may be terminated by the administrator When an operation on the machine screen is locked any remote operati...

Страница 75: ...the password Activate Remote Operation Password Select this check box to enable the password settings of the administrator to connect to the machine for remote operations Set Remote Operation Password Enter the password for operating the machine remotely You can enter up to 8 half width characters combining a z A Z and 0 9 You cannot operate the machine remotely unless specifying the password Set ...

Страница 76: ...3 Useful Functions 74 ...

Страница 77: ...caused by overheated internal components Front and left view DWP101 6 1 7 8 10 9 3 2 4 5 1 Main power switch To operate the machine the main power switch must be on If it is off open the main power switch s cover and turn the switch on 2 ADF Lower the ADF over originals placed on the exposure glass If you load a stack of originals in the ADF the ADF will automatically feed the originals one by one...

Страница 78: ...s 8 Paper trays Trays 1 2 Load paper here Tray 1 is a tandem tray where paper on the left side automatically moves to the right when paper there has run out An indicator on the front left side of the tray lights while paper is feeding 9 Front lower left cover Open to replace the waste toner bottle 10 AC power switch Press to completely turn off the power of the machine The AC power switch must be ...

Страница 79: ...nt and right view 2 1 DWP002 1 Attention light See page 79 Guide to Functions of the Attention Light 2 ADF s extender Pull this extender to support large paper Guide to Names and Functions of Components 77 ...

Страница 80: ...eaker see page 542 Checking the Earth Leakage Breakers If you perform a large amount of print jobs in a high temperature environment the print jobs may be suspended and the machine s inner fans near the vents continue running to cool the machine The fan inside the machine near the vents may continue running to cool the machine after a large print job 4 Getting Started 78 ...

Страница 81: ...er is left The colors of the lamp and their meanings are as follows Lamp Status The bottom lamp lights blue Printing The bottom lamp flashes blue Scanning Data in The top lamp lights red Error occurred Example When the service call message appears Paper jam Out of paper Out of toner Memory overflow Waste toner bottle full Read the message on the display panel and then take appropriate action For d...

Страница 82: ...flashes yellow Warning Example Toner has nearly run out Waste toner bottle is nearly full Read the message on the display panel and then take appropriate action For details see page 425 When Messages Appear 4 Getting Started 80 ...

Страница 83: ...he following paper trays Finisher upper tray Finisher shift tray Finisher booklet tray Copies can be punched if the optional punch unit is installed on the finisher 2 Trimmer Cuts the fore edge of the book block after the book block is saddle stitched 3 High capacity stacker Consists of the following paper trays Stacker upper tray Stacker tray The stacker upper tray can hold up to 250 sheets of pa...

Страница 84: ...large sized paper in the multi bypass tray Tray A 13 SR5000 series output tray for banner sheet Allows you to output paper that has a horizontal length of 487 8 mm 19 21 inches or longer on Finisher SR5050 or Booklet Finisher SR5060 14 Finisher SR5050 Sorts stacks and staples multiple sheets of paper Consists of the following paper trays Finisher upper tray Finisher shift tray Copies can be punche...

Страница 85: ...ing binder or the perfect binder only if one of the following options is installed Finisher SR5050 Booklet Finisher SR5060 or the high capacity stacker You can install the trimmer only if Booklet Finisher SR5060 is installed You can install the high capacity stacker only if the decurl unit is installed You cannot install the ring binder and perfect binder simultaneously The multi bypass tray Tray ...

Страница 86: ...nd copying or printing only when the finisher shift tray is selected as the output tray When using the Z fold function To use the Z fold function you must attach the Z fold support tray Finisher SR5050 and Booklet Finisher SR5060 Finisher shift tray Attach the Z fold support tray by inserting the two protrusions on its underside into the holes on the finisher shift tray 4 Getting Started 84 ...

Страница 87: ...support tray for multi folding unit lift it up and slide the tray to the left and then lower it CWR003 When using the Letter Fold out function To use the Letter Fold out function and the Multi sheet Fold function at the same time install the Z fold support tray for multi folding unit and the output holding unit for letter fold out Guide to Functions of the Machine s Options 85 ...

Страница 88: ...old support tray for multi folding unit to the right and then set it in place CWR002 2 Pull out the output holding unit for letter fold out CWR008 When you have finished using the Z fold support tray for multi folding unit and the output holding unit for letter fold out return each to their previous positions 4 Getting Started 86 ...

Страница 89: ... Functions of the Machine s Internal Options Option Controller OCR unit Allows you to use the searchable PDF function PostScript 3 unit Allows you to print by Adobe PostScript 3 printer driver Allows you to output documents using the PDF Direct Print function and store documents in PDF format using Print from Storage Device function Color controller You can print documents using the optional contr...

Страница 90: ...Guide to the Names and Functions of the Machine s Control Panel DWP109 2 3 4 5 6 1 13 7 8 9 10 16 11 12 15 14 17 4 Getting Started 88 ...

Страница 91: ...e the energy saver indicator is lit In Sleep mode the energy saver indicator flashes slowly 6 Main power indicator The main power indicator goes on when you turn on the main power switch 7 Data In indicator printer mode Flashes when the machine is receiving print jobs from a computer See Print 8 key Enter key Press to confirm values entered or items specified 9 Start key Press to start copying pri...

Страница 92: ... USB device To improve usability you can adjust the angle of the control panel Adjusting the Angle of the Control Panel To improve usability you can adjust the angle of the control panel 1 Position the control panel at the horizontal angle that you require DWP990 2 Position the control panel at the vertical angle that you require DWP991 4 Getting Started 90 ...

Страница 93: ... control panel lights up When this switch is turned off the main power turns off and the main power indicator on the right side of the control panel goes out When this is done machine power is off Confirm how much power the options draw and then plug them into an outlet that is nearby but separate from the outlet that the main machine is plugged into This machine automatically enters Fusing Unit O...

Страница 94: ...itch while turning off the main power Doing so forcibly turns off the machine s power and may damage the hard disk or memory and cause malfunctions 1 Open the main power switch cover and then push the main power switch The main power indicator goes out The main power turns off automatically when the machine shuts down If the screen on the control panel does not disappear contact your service repre...

Страница 95: ...or details see System Settings Device Management To exit Low Power mode do one of the following Lift the ADF Place an original in the ADF Press the Check Status key Sleep mode If the machine remains inactive for a specified period or the Energy Saver key is pressed it enters Sleep mode to further reduce the electricity it consumes For details see System Settings Device Management When the machine ...

Страница 96: ...hen the Add Toner message appears When toner is being replenished Machine Features Counter Inquiry Address Book Management Tray Paper Settings When data is being processed When a recipient is being registered in the address list When the Data In indicator is lit or flashing When the sample print locked print hold print or stored print screen is displayed When the screen of a document that was stor...

Страница 97: ...led when the Tray 1 is pulled out Turn these switches on if the humidity level becomes high and image quality is affected Turn the switches off at other times The left switch is for the paper tray heater and the right switch is for the transfer unit heater DER102 Turning On Off the Power 95 ...

Страница 98: ...tart or end display adjustment This button also selects or deselects the setting item when you are adjusting the display 2 Up button Press this button to move between the setting items or change the setting value The cursor moves to the item above when moving between the items The value increases when changing a setting value It is also used to enable the display adjustment function 3 Down button ...

Страница 99: ... setting 0 255 50 Filter Select the spatial filter setting Non 0 4 Non Gamma Specify the gamma value setting 0 1 3 0 1 0 Backlight Adjust the brightness 0 31 24 InputSelect Select an image source to display DVI RGB DVI OSD HPosition Adjust the horizontal position to display the display adjustment screen OSD 5 253 128 OSD VPosition Adjust the vertical position to display the display adjustment scre...

Страница 100: ...isplay adjustment screen OSD Non 5 60 1 30 Default Select to initialize the settings Save Data Select to save the data Cancel Select to cancel selection or hide the display adjustment screen OSD Status Select to display the status screen 1 Select the time from 5 10 15 20 30 40 50 and 60 4 Getting Started 98 ...

Страница 101: ...he optional units that are installed To display the Home screen press Home at the bottom of the screen in the center Do not apply strong impact or force to the screen or it may be damaged Maximum force allowable is approx 30N approx 3 kgf N Newton kgf Kilogram force 1 kgf 9 8N To switch between screens flick your finger to the right or left on the screen DWP019 6 7 15 1 4 3 2 5 8 9 10 13 12 11 14 ...

Страница 102: ...move the inserted SD card or USB flash memory device from the media slot For details see Removing an SD Card or Removing a USB Flash Memory Device Preparation 10 Remote operation message Displays the connection status when you are connected to the control panel from a computer or tablet For details about Remote Panel Operation see page 71 Allowing Remote Connection from a PC or Tablet to the Contr...

Страница 103: ...ory During interrupt copying The Home screen is set as the default screen when the machine is turned on You can change this default setting under Function Priority See Screen Features Device Management Main Icons on the Home Screen The following icons are displayed on the Home screen as a factory default Icon Description Copy Press to display the copier function s screen For details about how to u...

Страница 104: ...3 Printer Status Screen Tray Paper Settings Press to display the Tray Paper Settings screen For details see page 104 Tray Paper Settings Screen Adjustment Settings for Operators Press to display the Adjustment Settings for Operators screen For details see page 271 Adjustment Settings for Operators You can add icons to the Home screen to customize the machine For details about adding icons to the H...

Страница 105: ...he center 2 Press the User Tools icon 3 Press Screen Features 4 Press Screen Device Settings 5 Press Function Key Settings 6 Select the Function Key check box 7 Select from Function Key 1 Function Key 6 to which you want to assign a function 8 Press Allocated Function 9 Select a function you want to register from the list 10 Press Display Name 11 Enter the function name to display on the key 12 Pr...

Страница 106: ...o view the Paper Maintenance Info Data Storage Machine Address Info and inquiry information For details see Checking Machine Status and Settings Preparation 4 Machine Front View Shows the machine configuration the tray used for printing error status and other information Tray Paper Settings Screen Press Tray Paper Settings among the function keys to display the Tray Paper Settings screen In the Tr...

Страница 107: ... about the paper settings for the paper tray see page 241 Changing Tray Paper Settings 2 Cover Designation Slip Separation Sheet tab Displays the list of settings for front cover back cover designation slip and separation sheets When you select a functional paper the functional paper settings screen is displayed 3 The machine front view Displays information such as the machine configuration tray u...

Страница 108: ...per Reduction Shows the amount of paper saved by using the duplex and combine printing functions The figure indicates the percentage of paper saved from the total of all the paper used As the figures become greater the number of the trees increases If the paper reduction ratio exceeds a certain level the trees will bear fruit Press the balloon to display the following items Total Print Pages Total...

Страница 109: ... Image Monitor Help Under Eco friendly Counter Period Administrator Message in System Settings you can check Count Period Administrator Message Display Information Screen and Display Time Only the administrator can change the settings For details see Managing Eco friendly Counter Security Guide Web Browser Screen The machine has a web browser that allows you to view Web pages You must first config...

Страница 110: ...center to open this menu 4 Refresh Stop Press to refresh a Web page While a Web page is refreshing Stop appears 5 Forward Press to return to the previous Web page after pressing Return at the bottom of the screen in the center 6 New tab Press to open a new tab 7 New incognito tab Press to open a new tab that leaves no record in the browser history or search history 8 Share page Press to share Web ...

Страница 111: ...Preparation 15 Settings Press to specify security settings and other browser settings For details see Browser Settings Preparation For precautions on accessing external servers using the Web Browser see Checking the security of the browser function Preparation Possible Operations on the Application Screen This section describes the home screen and explains the operations that can be performed on t...

Страница 112: ...3 Long tap Place your finger on the screen and hold it there until the next screen appears You can display the menu screen of the application you are using DWP064 Drag Slide your finger while pressing the screen You can move an icon to where you want to place it on the screen 4 Getting Started 110 ...

Страница 113: ...e center You can specify which display languages are available in Select Switchable Languages For details see Screen Features Device Management System Reset After finishing a job the machine waits a specified length of time and then restores its settings to the default values specified under Function Priority This function is called System Reset For the procedure for specifying default settings un...

Страница 114: ...creen page 115 How to Use the Document Server Screen page 120 How to Use the Printer Screen and page 121 How to Use the Scanner Screen Other Application Screen Other functions and the application for configuring and adjusting the machine are shown on this screen Printer status tray paper settings operator adjustment other items are available on the other application screen Keys that Appear on the ...

Страница 115: ...s to customize the default settings of the machine system You can also customize the default settings of the copier Document Server printer and scanner function See System Settings Device Management Copier Document Server Features Printer Features or Scanner Features Preparation Counter Press to check or print the counter value See Counter Maintenance and Management Inquiry Press to find out where...

Страница 116: ... frequently used settings or to recall registered settings See Registering Frequently Used Functions Preparation 3 Interrupt Press to make interrupt copies See Interrupt Copy Basic Operations 4 Sample Copy Press to make a single set of copies or prints to check print quality before making multiple sets See Sample Copy Sort Basic Operations 4 Getting Started 114 ...

Страница 117: ...Check Modes Press the key to confirm the current settings 6 Sort Stack Staple Punch and Fold functions Displays settings that can be selected for sorting stacking stapling punching and folding copies You can register frequently used staple punch and fold functions under Input Output in the User Tools menu For details see Input Output Preparation 7 Available functions Press a function to display it...

Страница 118: ...atus and messages Displays operational status and messages 2 No Folder Name and Created Date Time Press the item to sort the folders Select the same item once more for a reverse sort 3 Page Quantity and Print Displays the number of originals stored in memory number of sets to be printed and prints made 4 New Folder Press to create a new folder 4 Getting Started 116 ...

Страница 119: ...o select is not displayed in the list press or to scroll the screen 11 Icons Displays an icon that indicates the function and color mode used to store the document If a password has been specified for a file a lock icon appears to the left of the user name for the file The following icons appear in the list of the Document Server to indicate the function and color mode used to store a document On ...

Страница 120: ...e scanner function Preview screen under the Document Server function This section explains the items that appear on the Preview screen and how to preview stored documents The Preview screen denotes the screen that allows confirming contents of the scanned documents To preview stored documents select the documents you want to preview on the file list screen and then press Preview 4 Getting Started ...

Страница 121: ...he displayed preview image when the image is enlarged 6 Moves the display area in the direction indicated by the arrow 7 Zoom Out and Zoom In Scales the displayed page down or up 8 Preview image Displays a preview of scanned documents Double tapping the image allows you to enlarge and display it at the original magnification The position where you tapped the image is displayed in the center of the...

Страница 122: ...r ID and document name appears in this section 2 Paper tray status indicators Displays paper tray settings 3 Print from Memory Storage Device Press to display the screen for printing files stored on memory storage devices directly 4 Job Reset Press to cancel the current print job If you press it when the Hex Dump is selected Hex Dump is canceled 5 Job Operation Press to suspend a job being process...

Страница 123: ... specify the destination using a five digit registration number 2 Operational status and messages Displays operational status and messages 3 Email Folder Press these tabs to switch between the Email screen and Scan to Folder screen When Email is selected you can specify e mail destinations When Folder is selected you can specify folder destinations Switch the screen also when sending the same file...

Страница 124: ...press or to scroll through the destinations 10 Destination list The list of destinations registered in the machine appears If all of the destinations cannot be displayed press or to switch the screen The symbol indicates a group destination The or symbol indicates a destination that can receive encrypted e mail 11 Text Subject Security Sender Name and Recept Notice Enter the message and specify th...

Страница 125: ...can to Folder icon Shows that the Scan to Folder screen is displayed 5 Manual Entry To specify destinations not registered in the address book specify Scan to Folder destinations on the screen displayed by pressing this key 6 Recent Press this key to select destinations that have been recently specified using Manual Entry If there is more than one recent destination press or to scroll through them...

Страница 126: ... Message Disposition Notification The entries will be used for e mail transmission when sending files simultaneously by Scan to Folder and e mail For details see Sending Scanned Documents to a Client Computer Basic Operations 12 Select Stored File Allows you to send the documents stored in the Document Server 13 Send File Type Name Press to specify settings such as file format and file name 14 Ori...

Страница 127: ... displayed here If all of the destinations cannot be displayed press or to move through the list 7 Original and scanning settings Allows you to specify scan settings and original feed types DSM scanner screen This section explains the layout of the screen that allows you to send scan files using DSM 1 2 3 4 5 6 DWP136 1 DSM This tab is highlighted whenever the machine is used as a DSM scanner 2 DS...

Страница 128: ...riginal and scanning settings Allows you to specify scan settings and original feed types Select Stored File screen under the scanner function This section describes how the list of stored files is displayed To display stored files press Select Stored File on the initial scanner display You can organize files stored in folders You can view a list of the files in a folder by touching the folder key...

Страница 129: ...ecified for a folder a lock icon appears to the left of the folder name 5 List Thumbnails You can select whether to display stored files as a list or as thumbnails 6 Send Press this to send a stored file by e mail or Scan to Folder 7 Manage Delete File Press this to delete stored files or change the file data 8 User Name File Name and Date Press to sort the files using the selected item Select the...

Страница 130: ...er name for the file 12 Keys for searching for files Press to switch to the screens for searching for a file by user name or file name or to the screen for displaying all files Depending on the security setting some files may not appear in the list Files stored under functions other than the scanner function do not appear on this screen Check Modes screen under the scanner function Use the Check M...

Страница 131: ...mission settings such as sender and subject You can also check the security settings encryption and signature 4 Store File Setting Displays settings for storing documents selected in Store File 5 Expand Group Dest Press to display the members of the group when a group is specified as the destination 6 Original Displays Scan Settings Original Feed Type and other scanning settings While this machine...

Страница 132: ...t or cancel sending the files after checking the preview and the scan settings used for scanning 9 1 2 3 4 5 7 8 DWP140 6 1 Cancel Sending Press to close a preview and interrupt a transmission 2 Send Press to close a preview and continue a transmission 3 Display File Displays a file s name and size 4 Display Page Displays the number of the currently displayed page total number of pages page size a...

Страница 133: ... screen displayed from the list of stored files For details about viewing a stored file see Checking a Stored File Selected from the List Basic Operations Preview is not available if you select High Compression PDF as the file type Preview might not be displayed if scanning failed or the image file is corrupted If this is the case scan the original again Scanned Files Status screen under the scann...

Страница 134: ...ed multiple destinations the first selected destination is displayed Other destinations appear as X X indicates the number of destinations when sending files by e mail 4 Sender Displays the sender name 5 File Name Displays the stored file name of files that are simultaneously sent and stored or of stored files that are sent 6 Errors Descriptions Press to display likely causes of the scanner functi...

Страница 135: ...ission results might not be displayed Switching Screen Patterns This section explains how to switch to the simple screen and the keys that are displayed Only the main functions can be used Letters and keys are displayed at a larger size making operations easier 1 Press Simple Scrn This illustration shows the copier function s simple screen DWP142 1 1 Key Color To return to the initial display pres...

Страница 136: ...og out of it to prevent unauthorized usage Ask the user administrator for the Login User Name Login Password and User Code For details about user authentication see Configuring User Authentication Security Guide User Code to enter on User Code Authentication is the numerical value registered in the Address Book as User Code If authentication fails the Authentication has failed message appears Chec...

Страница 137: ...hrough User Code Authentication you do not have to log out Logging In Using the Control Panel This section explains the procedure for logging in to the machine when Basic Authentication Windows Authentication or LDAP Authentication is set 1 Press the logged in user icon on the top right on the screen 2 Press User Name 3 Enter a Login User Name 4 Press Password 5 Enter a Login Password Logging In t...

Страница 138: ...rol Panel This section explains the procedure for logging out the machine when Basic Authentication Windows Authentication or LDAP Authentication is set To prevent use of the machine by unauthorized persons always log out when you have finished using the machine 1 Press the logged in user icon on the top right on the screen 2 Press OK Logging In Using an IC Card Log in to the machine by waving an ...

Страница 139: ... name and password 1 Wave it over the NFC card reader DWP047 The registration screen is displayed 2 Enter the login user name and password registered to the machine s address book 3 Press Register 4 Press Exit 5 Wave the card over the NFC card reader You will log in to the machine If a user waves an IC card over a machine another user is logged in to the user who logged in previously is logged out...

Страница 140: ...in to the MFP When operating a machine for which user authentication is specified you can log in to the machine without entering a user name and password by holding your smart device near its operation panel For details about RICOH Smart Device Connector see the manuals for RICOH Smart Device Connector To use this function enable the Quick Card Authentication function and Bluetooth Authentication ...

Страница 141: ...e MFP is in Sleep mode If a user waves a smart device over a machine another user is logged in to the user who logged in previously is logged out and the newer user logs in Using a Smart Device to Log out from the MFP If the machine s Bluetooth setting is enabled and Quick Card Authentication is set to Bluetooth you can log out from the machine by holding the smart device over the operation panel ...

Страница 142: ... 6 printer driver click the Detailed Settings tab click Job Setup and then click Authentication in the Job Setup area 9 Enter a login user name and login password already set on the machine or the server for user authentication Be sure to enter the same login user name and login password that is registered on the machine or the server If you do not enter a valid login user name and login password ...

Страница 143: ...User Lockout function If an incorrect password is entered the number of times specified by the administrator the User Lockout function prevents further login attempts under the same user name Even if the locked out user enters the correct password later authentication will fail and it will not be possible to use the machine For details about releasing a locked out user see User Lockout Function Se...

Страница 144: ...assword using the control panel 1 Press Home at the bottom of the screen in the center 2 Press the User Tools icon 3 Press Machine Features 4 Press Login twice 5 Enter a Login User Name and then press OK 6 Enter a Login Password and then press OK 7 Press Exit 8 Press Address Book Management 9 Select the user 10 Press Auth Info 11 Press Change for Login Password 12 Enter a new login password and th...

Страница 145: ...s dialog box 2 Specify the user authentication setting If you are using the PCL 5e printer driver click the Valid Access tab and then click Authentications If you are using the PCL 6 printer driver click the Detailed Settings tab click Job Setup and then click Authentication in the Job Setup area 3 Enter a login password already set on the machine or the server for user authentication Be sure to e...

Страница 146: ...4 Getting Started 144 ...

Страница 147: ...size originals to the same size paper If the orientation in which your original is placed is different from that of the paper you are copying onto the machine rotates the original image by 90 degrees and fits it on the copy paper Rotate Copy For example to reduce A3 11 17 originals to fit onto A4 81 2 11 paper select a paper tray containing A4 81 2 11 paper and then press Auto Reduce Enlarge The i...

Страница 148: ...2 132 5 1 81 2 11 51 2 81 2 81 2 101 2 10 14 A3 A4 1 You can switch the initial setting to determine whether the machine detects either 81 2 14 or 81 2 132 5 1 Press Auto Reduce Enlarge 2 Select the paper size 3 Place the originals and then press the Start key For details about the base point see Reducing or Enlarging Originals Basic Operations 5 Copy 146 ...

Страница 149: ...page 2 Sided 2 Sided Copies one 2 sided page on one 2 sided page The resulting copy image will differ according to the orientation in which you place your originals or Original orientation and completed copies To copy on both sides of the paper select the original and copy orientation according to how you want the printout to appear Original Placing originals Original Orientation Orientation Copy ...

Страница 150: ... selected press Duplex 3 Select 1 Sided 2 Sided or 2 Sided 2 Sided according to how you want the document to be output To change the original or copy orientation press Orientation For details about the setting see page 149 Specifying the Original and Copy Orientation 4 Press Original Orientation 5 Select the original orientation and then press OK 6 Press OK 5 Copy 148 ...

Страница 151: ...paper is blank For details about the sizes orientations and weights of paper that can be used in the Duplex function see Specifications for the Main Unit Specifications You can specify the margins under Edit in User Tools For details see Edit Preparation Specifying the Original and Copy Orientation Select the orientation of the originals and copies if the original is two sided or if you want to co...

Страница 152: ...ect Top to Top or Top to Bottom for Copy 4 Press OK The default is Top to Top You can change the default orientation under Original Orientation in Duplex Mode and Copy Orientation in Duplex Mode in User Tools For details about these settings see General Features Preparation 5 Copy 150 ...

Страница 153: ...age by 90 degrees to make copies properly Orientation of the original and image position of Combine The image position of Combine differs according to original orientation and the number of originals to be combined Portrait originals CKN015 Landscape originals CKN016 Placing originals originals placed in the ADF The default value for the copy order in the Combine function is From Left to Right To ...

Страница 154: ...f this happens with some ratios parts of the image might not be copied If the number of originals placed is less than the number specified for combining the last page is left blank as shown CKN013 You can change the order of combined images under Copy Order in Combine in User Tools For details see Edit Preparation You can change the type of separation line under Separation Line in Combine in User ...

Страница 155: ... Combine 1 Sided 2 Originals Combine 1 Side Copies two 1 sided originals to one side of a sheet 1 Sided 4 Originals Combine 1 Side Copies four 1 sided originals to one side of a sheet 1 Sided 8 Originals Combine 1 Side Copies eight 1 sided originals to one side of a sheet 2 Sided 2 Pages Combine 1 Side Copies one 2 sided original to one side of a sheet 2 Sided 4 Pages Combine 1 Side Copies two 2 s...

Страница 156: ...ke sure that Combine 1 Side is selected 5 Select the number of originals to combine 6 Press Original Orientation 7 Select the original orientation and then press OK 8 Press OK 9 Select the paper size 10 Place the originals and then press the Start key Two sided Combine Combines various pages of originals onto two sides of one sheet 5 Copy 154 ...

Страница 157: ... Sided 16 Originals Combine 2 Sides Copies 16 1 sided originals to one sheet with 8 pages per side 2 Sided 4 Pages Combine 2 Sides Copies two 2 sided originals to one sheet with 2 pages per side 2 Sided 8 Pages Combine 2 Sides Copies four 2 sided originals to one sheet with 4 pages per side 2 Sided 16 Pages Combine 2 Sides Copies eight 2 sided originals to one sheet with 8 pages per side 1 Press D...

Страница 158: ...Original if the original is two sided 7 Select Top to Top or Top to Bottom for Copy and then press OK 8 Select the number of originals to combine 9 Press Original Orientation 10 Select the original orientation and then press OK 11 Press OK 12 Select the paper size 13 Place the originals and then press the Start key 5 Copy 156 ...

Страница 159: ...e 207 Recommended Paper Sizes and Types About handling envelopes supported envelope types and how to load envelopes see page 235 Envelopes The Duplex function cannot be used with envelopes If the Duplex function is specified cancel the setting To copy onto custom size envelopes you must specify the envelope s dimensions Specify the horizontal and vertical length of the envelope DFX003 Horizontal V...

Страница 160: ...to Envelopes Copying onto Envelopes from the Wide Large Capacity Tray Before using this function specify the paper size and type under Tray Paper Settings For the paper type select Envelope For details see page 241 Changing Tray Paper Settings 1 Select the paper tray where the envelopes are loaded 2 Place the originals and then press the Start key For details about using envelopes see page 157 Cop...

Страница 161: ...sets during copying This function can be used only when the Sort function is selected 1 While Copying is displayed press the Stop key 2 Enter the number of copy sets with the number keys 3 Press Continue Copying starts again The number of sets you can enter in Step 2 differs depending on when the Stop key is pressed Sort 159 ...

Страница 162: ...akes one set of copies If you want to store another document do so after copying is complete To stop scanning press the Stop key To resume a paused scanning job press Continue in the confirmation screen To delete scanned images and cancel the job press Cancel Copying The originals placed in the ADF will be ejected Press Job List to display the Job List screen For details see Types of Screens to Ma...

Страница 163: ...panese Industrial Standard 11 17 51 2 81 2 1 40 0 128 0 g m2 10 7 lb Bond 47 3 lb Cover ADF Two sided originals A3 A5 11 17 51 2 81 2 1 52 0 128 0 g m2 14 0 lb Bond 47 3 lb Cover ADF Mixed Sizes mode A3 B4 JIS A4 B5 JIS 11 17 81 2 13 81 2 11 81 2 14 52 3 81 4 g m2 14 0 21 7 lb Bond 1 51 2 81 2 can be used only in the scanner function mainly North America Original location Original size Original we...

Страница 164: ...s section explains the size of the area the machine can scan and detect When placing an original on the exposure glass This section explains the maximum scan area when the original is placed on the exposure glass Maximum scan area of the exposure glass CJV619 1 1 3 3 2 2 1 Positioning mark 2 Vertical size 297 mm 11 7 inches 3 Horizontal size 432 mm 17 1 inches Maximum standard original size for th...

Страница 165: ...rgins of a few millimeters on all four sides of the original might not be copied Missing Image Area CVA089 1 1 2 2 3 3 4 4 1 Leading edge When you use paper other than coated paper 5 0 0 5 mm 0 20 0 02 inches Paper Weight 1 Paper Weight 3 4 0 0 5 mm 0 16 0 02 inches Paper Weight 4 Paper Weight 8 When you use coated paper 7 0 0 5 mm 0 28 0 02 inches Paper Weight 2 5 0 0 5mm 0 20 0 02 inches Paper W...

Страница 166: ...er library the missing image area for the leading edge is set to approximately 5 mm Depending on the paper s condition the reverse side s missing image area and its registered values may be different Sizes Detectable with Auto Paper Select The following sizes and orientations of originals are detected automatically mainly Europe and Asia Original location A3 B4 JIS A4 B5 JIS A5 A5 B6 JIS Exposure ...

Страница 167: ...service representative 2 Default is 81 2 14 If you want to switch the detectable size from 81 2 14 to 81 2 13 contact your service representative 3 Default is 81 2 11 If you want to switch the detectable size from 81 2 11 to A4 contact your service representative 4 Default is 81 2 11 If you want to switch the detectable size from 81 2 11 to 71 4 101 2 contact your service representative 5 Default ...

Страница 168: ...th a lot of text and drawings Originals which partially contain a solid image Originals which have solid images at their edges Originals with glossy surfaces Bound originals of more than 10 mm 0 4 inches in thickness such as books Placing Originals on the Exposure Glass Keep your hands away from the hinges and exposure glass when lowering the ADF Not doing so may result in an injury if your hands ...

Страница 169: ... marks on the exposure glass that will be scanned For details about how to specify the size of the originals see Specifying Original Sizes Basic Operations or page 402 Specifying Scan Settings For details about the sizes of originals that can be used see page 161 Recommended Original Sizes and Weights Left original beeper The beeper sounds and an error message is displayed when you leave your orig...

Страница 170: ... the original guide to the original size 2 Place the aligned originals squarely face up in the ADF Do not stack originals beyond the limit mark The first page should be on the top DWP060 1 1 Limit mark For information on using the ADF see Specifying the Settings for Originals Basic Operations Straighten curls in the originals before placing them in the ADF To prevent multiple sheets from being fed...

Страница 171: ...eeds or black lines or result in damage to the originals Place the following types of originals on the exposure glass instead Stapled or clipped originals Perforated or torn originals Curled folded or creased originals Pasted originals Originals with adhesive tape glue or paste stuck to them Originals with any kind of coating such as thermal fax paper art paper aluminum foil carbon paper or conduc...

Страница 172: ...l not be possible depending on the paper type When loading 52 3 g m2 14 0 lb Bond paper into paper trays or loading translucent paper into the wide LCT or the multi bypass tray Tray A always use long grain paper Prints might be noticeably curled Flatten out prints if they are creased or curled For details about settings for flattening out curled paper see page 294 0304 Correct Output Paper Curl To...

Страница 173: ...sizes and types that can be used see page 207 Recommended Paper Sizes and Types You might at times hear a rustling noise from paper moving through the machine This noise does not indicate a malfunction Fanning the paper If you load coated paper label paper or thick paper of 163 1 360 0 g m2 60 1 lb Cover 198 0 lb Index in the three tray wide LCT it is important that you fan the sheets thoroughly M...

Страница 174: ... Tray 1 runs out paper on the left is automatically shifted to the right Do not pull out Tray 1 while the tray is moving paper wait until sounds stop coming from the tray If Tray 1 is closed too quickly the paper in the tray may force the right tray s side fence to slip out of place If the paper misfeeds because of this open the tray adjust the fence and close the tray slowly For the right stack a...

Страница 175: ...t side down Do not stack paper over the limit mark Whole tray pulled out DER056 Left half of the tray pulled out DER057 3 Carefully push the paper tray fully in You can load paper even if Tray 1 is in use It is okay to pull out the left half of the tray while Tray 1 is in use Loading Paper 173 ...

Страница 176: ...11 17 paper only If you want to print on A3 A4 B4 JIS 81 2 14 or 81 2 11 contact your service representative Check the paper edges are aligned at the right side 1 Check that paper in the paper tray is not being used and then pull the tray carefully out until it stops DER058 2 Square the paper and load it print side down Do not stack paper over the limit mark DER059 3 Carefully push the paper tray ...

Страница 177: ...the paper the edges may crease the paper may misfeed or if it weighs between 52 3 63 0g m2 14 0 16 9 lb Bond it may wrinkle 1 Check that paper in the paper tray is not being used and then pull the tray carefully out until it stops DER060 2 Square the paper and load it print side down Do not stack paper over the limit mark DER061 3 Carefully push the paper tray fully in Various sizes of paper can b...

Страница 178: ...t cannot be loaded in the paper trays The maximum number of sheets you can load at the same time depends on paper type Do not stack paper over the limit mark For the maximum number of sheets you can load see page 207 Recommended Paper Sizes and Types Check the paper edges are aligned at the left side When loading a low number of sheets be sure not to squeeze the side fences in too tightly If the s...

Страница 179: ...n square the paper and load it print side up Do not stack paper over the limit mark DER069 2 Set the end fence 2 2 2 DER070 1 1 End fence 2 Extender To remove the end fence slide it to the right by pressing the stopper down CWW312 Loading Paper 177 ...

Страница 180: ...d envelopes into the multi bypass tray Tray A Envelopes must be loaded in a specific orientation For details see page 235 Envelopes Specify the sizes of paper that are not automatically detected For details about the sizes that can be detected automatically see page 207 Recommended Paper Sizes and Types For details about how to specify sizes see page 205 Changing to a Size That Is Not Automaticall...

Страница 181: ...dges are aligned with the left side If a paper tray is pushed vigorously when putting it back into place the position of the tray s side fences may slip out of place 1 Check that paper in the paper tray is not being used and then pull the tray carefully out until it stops DER074 2 Load paper into the paper tray with print side up Do not stack paper over the limit mark Loading Paper 179 ...

Страница 182: ...ing envelopes place them in the correct orientation For details see page 235 Envelopes Loading Paper into the Two tray Wide Large Capacity Tray The two tray wide LCT is identified as Tray 3 Tray 4 Tray 5 Tray 6 Tray 7 and Tray 8 Check the paper edges are aligned at the left side When you use paper of Paper Weight 7 with a convex curl greater than 5 mm or paper of Paper Weight 8 with a convex curl ...

Страница 183: ...ng the Paper Size in the Two tray Wide Large Capacity Tray You can load envelopes in the two tray wide LCT When loading envelopes place them in the correct orientation For details see page 235 Envelopes When you are using a special printing feature such as banner printing cover page and separation sheets the indicator on the front side of the tray remains lit until printing is completed You cannot...

Страница 184: ... fence from the pocket on the right hand side of the paper source tray DWP662 3 Set the side fences to the size of the paper to be loaded and then load paper into the tray 4 Attach the small tab end fence and then align the end fence gently against the paper you loaded while pressing the release button of the end fence DSC098 5 Push the paper tray fully in until it clicks Replace the small tab end...

Страница 185: ...gainst the paper you loaded if necessary DER100 1 1 Paper extender Load paper with its printed side up the front side If you are using the booklet finisher load sheets print side down Load paper in the interposer in the same orientation as paper in the paper tray The staple position or punch hole position will be on the left side of the paper when you are facing the machine When loading paper larg...

Страница 186: ...the book block spine The following list shows examples for A4 or 81 2 11 size 80 0 g m2 20 0 lb Bond paper 10 sheet book block 1 mm 0 04 inches 30 sheet book block 3 mm 0 12 inches 50 sheet book block 5 mm 0 20 inches 80 sheet book block 8 mm 0 32 inches 100 sheet book block 10 mm 0 40 inches 200 sheet book block 20 mm 0 80 inches Specify the cover sheet size based on the thickness of the book blo...

Страница 187: ...lains the orientation and binding positions of covers and originals Place covers and originals in the orientation in which they are read Placing the cover in the interposer Placing the book block sheet in the ADF Binding position Left binding Top binding 1 Right binding 1 Select unreadable orientation in Original Orientation and then select top binding Loading Paper 185 ...

Страница 188: ...e Depending on your machine the procedure for selecting the orientation of covers and originals might be slightly different For details refer to the procedure for your machine When loading thick paper of 251 0 g m2 138 8 lb Index or heavier in the interposer trays of the perfect binder make sure the grain of the paper is perpendicular to the feed direction If you are loading sheets that are likely...

Страница 189: ...d then place the original and paper as shown below Printer mode Specify Auto Detect or On Always for Letterhead Setting in System under the Printer Features menu and then place the paper as shown below For details about the letterhead settings see Input Output or System Preparation Original orientation and paper orientation The meanings of the icons are as follows Icon Meaning Place or load paper ...

Страница 190: ...er orientation Copier mode Copy side Tray 1 Tray 2 or A3 11 17 tray unit Multi bypass tray Tray A or wide LCT One sided Two sided Printer mode Print side Tray 1 Tray 2 or A3 11 17 tray unit Multi bypass tray Tray A or wide LCT One sided 6 Paper Specifications and Adding Paper 188 ...

Страница 191: ... the printer driver s settings If a print job is changed partway through printing from one sided to two sided printing one sided output after the first copy may be printed facing a different direction To ensure all paper is output facing the same direction specify different input trays for one sided and two sided printing Note also that two sided printing must be disabled for the tray specified fo...

Страница 192: ... other paper sizes from A3 11 17 tray unit contact your service representative mainly North America A3 11 17 tray unit can hold 11 17 paper only If you want to print on other paper sizes from A3 11 17 tray unit contact your service representative After loading paper whose sizes are not detected automatically be sure to specify the appropriate paper size in Tray Paper Settings If you do not misfeed...

Страница 193: ...es in too tightly If the side fences are squeezed too tightly against the paper the edges may crease the paper may misfeed or if it weighs between 52 3 63 0g m2 14 0 16 9 lb Bond it may wrinkle 1 Check that paper in the paper tray is not being used and then pull the tray carefully out until it stops DER060 2 Remove paper if loaded 3 Release the lock on the side fences DER062 Changing the Paper Siz...

Страница 194: ...wn on both sides of the end fence slide it until it is aligned with the size of paper to you want to load DER064 6 Square the paper and load it print side down Do not stack paper over the limit mark DER065 7 Re lock the side fences Make sure there are no gaps between the paper and side fences or end fence 6 Paper Specifications and Adding Paper 192 ...

Страница 195: ... the Printer icon Changing the Paper Size in the Three tray Wide Large Capacity Tray Check that the paper edges are aligned with the left side If a paper tray is pushed vigorously when putting it back into place the position of the tray s side fences may slip out of place 1 Check that paper in the paper tray is not being used and then pull the tray carefully out until it stops DER074 2 Remove pape...

Страница 196: ...porting plate large in place by hooking its edge on the side fence DWP843 6 Load paper by aligning the paper with the left side of the paper tray Place paper with print side up Load a stack of paper about 5 10 mm 0 2 0 4 inches high Make sure the paper rest on top of the supporting plates on both sides 6 Paper Specifications and Adding Paper 194 ...

Страница 197: ...tom of the inner side fence Check that the scale numbers on the top of the side fences are roughly the same DER079 8 Hold the grip of the side fence at the back of the paper tray then turn the screws slowly to fasten it in place Fasten the front side fence in the same way CWW341 9 Load additional sheets if necessary Do not stack paper over the limit mark Changing the Paper Size 195 ...

Страница 198: ...aper size is changed correctly on the printer s initial screen To display the printer s initial screen display the Home screen and press the Printer icon You can load envelopes into the three tray wide LCT When loading envelopes place them in the correct orientation For details see page 235 Envelopes Attaching the tab fence in the three tray wide Large Capacity Tray When loading tab stock attach t...

Страница 199: ...pull the tray carefully out until it stops DER074 4 Set the side fences to the size of the tab stock to be loaded and then load it 5 Attach the tab fence and then align the end fence gently against the paper you loaded while pressing the release button of the end fence CWW345 6 Carefully slide the paper tray fully in Replace the tab fence after use Changing the Paper Size 197 ...

Страница 200: ...r of the three tray wide LCT and then pull the postcard side fences and screws out DER085 2 Close the front cover 3 Check that paper in the paper tray is not being used and then pull the tray carefully out until it stops CWW372 4 Fit the indentation on the bottom of the postcard side fence with the limit mark into the head of the screw on the bottom of the inner side fence 5 Fit the hole on the to...

Страница 201: ...y slide the paper tray fully in Replace the postcard side fences after use Changing the Paper Size in the Two tray Wide Large Capacity Tray Check that the paper edges are aligned with the left side 1 Check that paper in the paper tray is not being used and then pull the tray carefully out until it stops DWP072 2 Remove paper if loaded Changing the Paper Size 199 ...

Страница 202: ...ray Place paper with print side up Load a stack of paper about 5 10 mm 0 2 0 4 inches high Make sure the paper rest on top of the supporting plates on both sides DWP076 When you load paper that is 204 mm 8 04 inches or smaller remove the supporting plates from the bottom of the paper tray 6 Paper Specifications and Adding Paper 200 ...

Страница 203: ...he bottom of the inner side fence Check that the scale numbers on the top of the side fences are roughly the same DWP078 7 Load additional sheets if necessary Do not stack paper over the limit mark DWP079 8 Tightly fit the end fence to the loaded paper and then re lock the end fence again Make sure there are no gaps between the paper and end fence Changing the Paper Size 201 ...

Страница 204: ...he Home screen and press the Printer icon You can load envelopes into the two tray wide LCT When loading envelopes place them in the correct orientation For details see page 235 Envelopes When you load paper that is 420 0 mm 16 54 inches or wider in the banner sheet tray of the two tray wide LCT load it as follows Press the elevator switch to move the bottom plate down until the lamp goes out and ...

Страница 205: ...1 2 2 3 3 1 Side fence extension 2 Side fence 3 Long end fences When you load paper load the paper and set the auxiliary side fence Align the auxiliary side fence against the side of the paper that is higher than the side fence extension Attaching the tab fence in the two tray wide Large Capacity Tray When loading tab stock attach the tab fence Changing the Paper Size 203 ...

Страница 206: ...side of the paper tray DWP081 3 Set the side fences to the size of the tab stock to be loaded and then load it 4 Attach the tab fence and then align the end fence gently against the paper you loaded while pressing the release button of the end fence DER098 5 Carefully slide the paper tray fully in Replace the tab fence after use 6 Paper Specifications and Adding Paper 204 ...

Страница 207: ...d then press Save Paper 8 Press 9 Press Home at the bottom of the screen in the center For details about paper sizes selected automatically see page 207 Recommended Paper Sizes and Types If you want to print on paper that is selected automatically after printing on a paper size that is not selected automatically you must return the setting to Auto Detect Reload the paper and select Auto Detect in ...

Страница 208: ... 7 Press Custom Size 8 Press the setting value next to A 9 Enter the horizontal size using the number keys and then press Enter 10 Press the setting value next to B 11 Enter the vertical size using the number keys and then press Enter 12 Press OK 13 Press Save Paper 14 Press 15 Press Home at the bottom of the screen in the center 6 Paper Specifications and Adding Paper 206 ...

Страница 209: ...heets and place them correctly or a misfeed might occur Tray 1 Paper type and weight Paper size Paper capacity 52 3 300 0g m2 14 0 lb Bond 165 0 lb Index Paper Weight 1 Paper Weight 7 A4 81 2 11 1 000 sheets 2 52 3 300 0g m2 14 0 lb Bond 165 0 lb Index Paper Weight 1 Paper Weight 7 1 81 2 11 A4 1 000 sheets 2 1 To load paper any of the sizes specified above contact your service representative Tray...

Страница 210: ...00 inches Horizontal 8 27 17 28 inches 1 000 sheets 1 To load paper any of the sizes specified above contact your service representative 2 For details about how to load custom size paper contact your service representative Tray 2 Paper type and weight Paper size Paper capacity 52 3 256 0g m2 14 0 lb Bond 141 0 lb Index Paper Weight 1 Paper Weight 6 Paper sizes that can be detected automatically A3...

Страница 211: ... 2 mm Horizontal 139 7 457 2 mm Vertical 5 50 13 00 inches Horizontal 5 50 18 00 inches 500 sheets Translucent paper 52 3 63 0 g m2 14 0 16 9 lb Bond Paper Weight 1 A3 A4 B4 JIS B5 JIS 1 Transparencies 163 1 220 0 g m2 60 1 80 9 lb Cover Paper Weight 5 A4 1 Tab stock 2 A4 81 2 14 81 2 11 200 sheets 80 0 199 0 g m2 21 0 lb Bond 110 0 lb Index 1 Do not stack paper over the limit mark The maximum num...

Страница 212: ...g m2 14 0 lb Bond 79 9 lb Cover Paper Weight 1 Paper Weight 5 Paper sizes that can be detected automatically A3 A4 A5 A6 B4 JIS B5 JIS 11 17 81 2 11 8 13 51 2 81 2 12 18 A3 A4 A5 A6 B4 JIS B5 JIS 11 17 81 2 11 8 13 51 2 81 2 12 18 500 sheets 6 Paper Specifications and Adding Paper 210 ...

Страница 213: ...23 5 181 2 13 18 SRA3 SRA4 81 2 132 5 41 5 51 2 A4 A5 B5 JIS B6 JIS 81 2 14 81 2 13 81 4 14 81 4 13 8 10 71 4 101 2 8K 16K 11 15 11 14 10 15 10 14 13 191 5 13 19 123 5 191 5 123 5 181 2 13 18 SRA3 SRA4 81 2 132 5 41 5 51 2 500 sheets 52 3 216 0 g m2 14 0 lb Bond 79 9 lb Cover Paper Weight 1 Paper Weight 5 Custom size 2 Vertical 100 0 330 2 mm Horizontal 139 7 487 7 mm 3 Vertical 3 94 13 00 inches ...

Страница 214: ...er Weight 5 Vertical 100 0 330 2 mm Horizontal 139 7 487 7 mm Vertical 3 94 13 00 inches Horizontal 5 50 19 20 inches 10 sheets 1 Select the paper size For details see page 241 Changing Tray Paper Settings 2 Enter the paper size For details see page 241 Changing Tray Paper Settings 3 When the banner sheet tray is installed the maximum horizontal length of custom size paper is 700 0 mm 27 55 inches...

Страница 215: ...acity 52 3 256 0 g m2 14 0 lb Bond 141 0 lb Index Paper Weight 1 Paper Weight 6 Paper sizes that can be detected automatically A3 A4 A5 B4 JIS B5 JIS 11 17 81 2 11 8 13 51 2 81 2 12 18 A3 A4 A5 B4 JIS B5 JIS 11 17 81 2 11 8 13 51 2 81 2 12 18 1 000 sheets Recommended Paper 213 ...

Страница 216: ...19 123 5 191 5 123 5 181 2 13 18 SRA3 SRA4 81 2 132 5 41 5 51 2 A4 A5 A6 1 B5 JIS B6 JIS 1 81 2 14 81 2 13 81 4 14 81 4 13 8 10 71 4 101 2 8K 16K 11 15 11 14 10 15 10 14 13 191 5 13 19 123 5 191 5 123 5 181 2 13 18 SRA3 SRA4 81 2 132 5 41 5 51 2 1 000 sheets 52 3 256 0 g m2 14 0 lb Bond 141 0 lb Index Paper Weight 1 Paper Weight 6 Custom size Vertical 100 0 330 2 mm 1 Horizontal 139 7 487 7 mm Ver...

Страница 217: ...ed Matte 63 1 256 0 g m2 17 0 lb Bond 141 0 lb Index Paper Weight 2 Paper Weight 6 Paper sizes that can be detected automatically A3 A4 A5 B4 JIS B5 JIS 11 17 81 2 11 8 13 51 2 81 2 12 18 A3 A4 A5 B4 JIS B5 JIS 11 17 81 2 11 8 13 51 2 81 2 12 18 Recommended Paper 215 ...

Страница 218: ... 10 15 10 14 13 191 5 13 19 123 5 191 5 123 5 181 2 13 18 SRA3 SRA4 81 2 132 5 A4 A5 B5 JIS 81 2 14 81 2 13 81 4 14 81 4 13 8 10 71 4 101 2 8K 16K 11 15 11 14 10 15 10 14 13 191 5 13 19 123 5 191 5 123 5 181 2 13 18 SRA3 SRA4 81 2 132 5 Coated Glossy Coated Matte 63 1 256 0 g m2 17 0 lb Bond 141 0 lb Index Paper Weight 2 Paper Weight 6 Custom size Vertical 139 7 330 2 mm Horizontal 139 7 487 7 mm ...

Страница 219: ...b Cover 141 0 lb Index Thickness of overlapping part of the envelope 1 4 5 6 240 332 mm 235 120mm 120 235 mm 105 241 mm 110 220 mm 10 sheets 1 The postcard side fences are required to load paper that is between 100 0 and 139 2 mm 3 94 and 5 49 inches 2 The maximum number of sheets you can set at once depends on the paper s thickness and condition 3 The tab fence is required 4 Open the flaps and lo...

Страница 220: ... 0 g m2 14 0 lb Bond 198 0 lb Index Paper Weight 1 Paper Weight 8 Paper sizes that can be detected automatically A3 A4 A5 B4 JIS B5 JIS 11 17 81 2 11 8 13 51 2 81 2 12 18 A3 A4 A5 B4 JIS B5 JIS 11 17 81 2 11 8 13 51 2 81 2 12 18 2 000 sheets 6 Paper Specifications and Adding Paper 218 ...

Страница 221: ...3 191 5 13 19 123 5 191 5 123 5 181 2 13 18 SRA3 SRA4 81 2 132 5 41 5 51 2 A4 A5 A6 1 B5 JIS B6 JIS 1 81 2 14 81 2 13 81 4 14 81 4 13 8 10 71 4 101 2 8K 16K 11 15 11 14 10 15 10 14 13 191 5 13 19 123 5 191 5 123 5 181 2 13 18 SRA3 SRA4 81 2 132 5 41 5 51 2 2 000 sheets 52 3 360 0 g m2 14 0 lb Bond 198 0 lb Index Paper Weight 1 Paper Weight 8 Custom size Vertical 100 0 330 2 mm 1 Horizontal 139 7 4...

Страница 222: ... 1 360 0 g m2 17 0 lb Bond 198 0 lb Index Paper Weight 2 Paper Weight 8 Paper sizes that can be detected automatically A3 A4 A5 B4 JIS B5 JIS 11 17 81 2 11 8 13 51 2 81 2 12 18 A3 A4 A5 B4 JIS B5 JIS 11 17 81 2 11 8 13 51 2 81 2 12 18 6 Paper Specifications and Adding Paper 220 ...

Страница 223: ...11 15 11 14 10 15 10 14 13 191 5 13 19 123 5 191 5 123 5 181 2 13 18 SRA3 SRA4 81 2 132 5 A4 A5 B5 JIS 81 2 14 81 2 13 81 4 14 81 4 13 8 10 71 4 101 2 8K 16K 11 15 11 14 10 15 10 14 13 191 5 13 19 123 5 191 5 123 5 181 2 13 18 SRA3 SRA4 81 2 132 5 Coated Glossy Coated Matte 63 1 360 0 g m2 17 0 lb Bond 198 0 lb Index Paper Weight 2 Paper Weight 8 Custom size Vertical 139 7 330 2 mm Horizontal 139 ...

Страница 224: ...per Weight 8 A4 81 2 11 Envelopes Envelopes Coated Glossy Envelopes Coated Matte 163 1 300 0 g m2 60 1 lb Cover 165 0 lb Index Thickness of overlapping part of the envelope 1 4 5 6 240 332 mm 235 120 mm 120 235 mm 105 241 mm 110 220 mm 10 sheets 1 The postcard side fences are required to load paper that is between 100 0 and 139 2 mm 3 94 and 5 49 inches 2 The maximum number of sheets you can set a...

Страница 225: ... type and weight Paper size Paper capacity 52 3 360 0 g m2 14 0 lb Bond 198 0 lb Index Paper Weight 1 Paper Weight 8 2 Paper sizes that can be detected automatically 3 A3 A4 A5 B4 JIS 11 17 81 2 14 81 2 11 8 13 71 4 101 2 51 2 81 2 12 18 13 191 5 SRA3 SRA4 A3 A4 A5 B4 JIS 11 17 81 2 14 81 2 11 8 13 71 4 101 2 51 2 81 2 12 18 13 191 5 SRA3 SRA4 2 400 sheets Recommended Paper 223 ...

Страница 226: ...14 13 19 123 5 191 5 123 5 181 2 13 18 SRA4 81 2 132 5 41 5 51 2 A4 A5 A6 B5 JIS B6 JIS 81 2 13 81 4 14 81 4 13 8 10 71 4 101 2 8K 16K 11 15 11 14 10 15 10 14 13 19 123 5 191 5 123 5 181 2 13 18 SRA4 81 2 132 5 41 5 51 2 2 400 sheets 52 3 360 0 g m2 14 0 lb Bond 198 0 lb Index Paper Weight 1 Paper Weight 8 2 Custom size 5 Vertical 100 0 330 2 mm Horizontal 139 7 487 7 mm Vertical 3 94 13 00 inches...

Страница 227: ...d Matte 63 1 360 0 g m2 17 0 lb Bond 198 0 lb Index Paper Weight 2 Paper Weight 8 2 Paper sizes that can be detected automatically A3 A4 A5 B4 JIS B5 JIS 11 17 81 2 11 8 13 51 2 81 2 12 18 A3 A4 A5 B4 JIS B5 JIS 11 17 81 2 11 8 13 51 2 81 2 12 18 Recommended Paper 225 ...

Страница 228: ... 10 15 10 14 13 191 5 13 19 123 5 191 5 123 5 181 2 13 18 SRA3 SRA4 81 2 132 5 A4 A5 B5 JIS 81 2 14 81 2 13 81 4 14 81 4 13 8 10 71 4 101 2 8K 16K 11 15 11 14 10 15 10 14 13 191 5 13 19 123 5 191 5 123 5 181 2 13 18 SRA3 SRA4 81 2 132 5 Coated Glossy Coated Matte 63 1 360 0 g m2 17 0 lb Bond 198 0 lb Index Paper Weight 2 Paper Weight 8 2 Custom size Vertical 139 7 330 2 mm Horizontal 139 7 487 7 m...

Страница 229: ...ab stock Coated Matte 7 9 52 3 360 0 g m2 14 0 lb Bond 198 0 lb Index Paper Weight 1 Paper Weight 8 A4 81 2 11 Label paper 7 52 3 360 0 g m2 14 0 lb Bond 198 0 lb Index Paper Weight 1 Paper Weight 8 A4 81 2 11 Envelopes 7 Envelopes Coated Glossy 7 Envelopes Coated Matte 7 163 1 300 0 g m2 60 1 lb Cover 165 0 lb Index Thickness of overlapping part of the envelope 1 0 1 1 1 2 240 332 mm 235 120 mm 1...

Страница 230: ...Index Paper Weight 1 Paper Weight 8 2 Paper sizes that can be detected automatically 3 A3 A4 A5 B4 JIS 11 17 81 2 14 81 2 11 8 13 71 4 101 2 51 2 81 2 12 18 13 191 5 SRA3 SRA4 A3 A4 A5 B4 JIS 11 17 81 2 14 81 2 11 8 13 71 4 101 2 51 2 81 2 12 18 13 191 5 SRA3 SRA4 6 Paper Specifications and Adding Paper 228 ...

Страница 231: ... 71 4 101 2 8K 16K 11 15 11 14 10 15 10 14 13 19 123 5 191 5 123 5 181 2 13 18 SRA4 81 2 132 5 41 5 51 2 Carbonless paper 1 5 52 3 360 0 g m2 14 0 lb Bond 198 0 lb Index Paper Weight 1 Paper Weight 8 2 Custom size 5 Vertical 100 0 330 2 mm Horizontal 139 7 487 7 mm Vertical 3 94 13 00 inches Horizontal 5 50 19 20 inches 1 You can install the banner sheet tray for Tray 3 5 or 7 2 When paper whose h...

Страница 232: ...he envelopes including their flap sizes using the Tray Paper Settings function 12 Sizes do not include flap sizes 13 Flatten curls so that they fit within the following guidelines 52 3 299 9 g m2 paper Curl height 5 mm 0 2 inches or below R over 100 mm 3 94 inches 300 400 g m2 paper Curl height 3 mm 0 12 inches or below R over 100 mm 3 94 inches 14 Flatten the curl on the envelope then set the dif...

Страница 233: ...0 15 10 14 13 191 5 13 19 123 5 191 5 123 5 181 2 13 18 SRA3 SRA4 81 2 132 5 A4 A5 B5 JIS 81 2 14 81 2 13 81 4 14 81 4 13 8 10 71 4 101 2 8K 16K 11 15 11 14 10 15 10 14 13 191 5 13 19 123 5 191 5 123 5 181 2 13 18 SRA3 SRA4 81 2 132 5 200 sheets 2 64 0 216 0 g m2 17 1 lb Bond 79 9 lb Cover Paper Weight 2 Paper Weight 5 Custom size Vertical 139 7 330 2 mm Horizontal 139 7 487 7 mm Vertical 5 50 13 ...

Страница 234: ...per Weight 7 Select the paper size using the Tray Paper Settings menu B4 JIS 11 17 8K 12 18 11 15 13 191 5 123 5 191 5 123 5 181 2 13 18 SRA3 A3 B4 JIS 8K 12 18 11 15 13 191 5 123 5 191 5 123 5 181 2 13 18 SRA3 200 sheets or up to 24 mm in height 2 90 0 300 0 g m2 24 1 lb Bond 165 0 lb Index Paper Weight 3 Paper Weight 7 Custom size Vertical 257 0 330 2 mm Horizontal 364 0 487 7 mm Vertical 10 12 ...

Страница 235: ...is close to the minimum or maximum weight Change the paper weight setting to thinner or thicker 2 When loading paper of 52 3 63 0 g m2 14 0 16 9 lb Bond the edges may crease or the paper misfeed depending on the paper type Certain types of paper such as translucent paper or transparencies may produce noise when delivered This noise does not indicate a problem and print quality is unaffected The pa...

Страница 236: ...ber of copies You can specify the paper type of the paper trays under Paper Type tab For details see page 207 Recommended Paper Sizes and Types For the setting procedure of the Auto Tray Switching function see General Features Preparation The paper types you can select in Tray Paper Settings are only general classifications Print quality for every kind of paper in a classification is not guarantee...

Страница 237: ...Paper Weight Depending on the color of the paper the paper s position may not be detected correctly causing the paper to jam When using light colored paper specify the paper type as Color in Tray Paper Settings When using black or dark colored paper or when specifying the paper type as Color in Tray Paper Settings does not clear paper jams specify the paper type as Black When using carbonless pape...

Страница 238: ...nvelopes be sure to unfold their flaps and set them in the orientation with print side face up Flaps must be at the right side of the Wide LCT or multi bypass tray Tray A CDL081 Recommended envelopes For information about recommended envelopes contact your local dealer Storage of envelopes Keep envelopes stored in sealed plastic bags and remove only the quantity needed Do not add envelopes during ...

Страница 239: ...pe make it thicker If the horizontal size of the envelope is 297 mm 11 7 inches or less a paper misfeed might occur If this happens turn off Skew Detection For details see page 296 0307 Detect Control JAM097 098 When printing on envelopes thicker than 127 0 g m2 47 0 lb Cover do not use Curl Correction Level Large or Curl Correction Level Large for Correct Output Paper Curl of Adjustment Settings ...

Страница 240: ...9 58 108 29 73 40 60 118 31 80 44 65 120 32 81 45 67 135 36 90 50 75 148 39 100 55 82 162 43 110 60 90 176 47 120 65 97 199 53 135 74 110 216 58 146 80 120 244 65 165 90 135 253 67 171 94 140 256 68 173 95 142 270 72 183 100 150 297 79 201 110 165 307 82 208 114 170 325 87 220 120 180 351 94 237 130 194 398 106 269 147 220 6 Paper Specifications and Adding Paper 238 ...

Страница 241: ...Paper with perforated lines Hemmed edge paper If you use metallic pearl paper or black paper the conductivity of the paper may affect the machine Use only paper that has been verified If any problem occurs stop feeding the paper immediately and contact your service representative Faults can occur if you copy or print onto sides that are already printed Take care to copy or print onto unprinted sid...

Страница 242: ...Some kinds of colored paper cannot be used depending on the color of the paper For details contact your local dealer or service representative Paper Storage When storing paper the following precautions should always be followed Do not store paper where it will be exposed to direct sunlight Store all your thick paper in the same environment a room where the temperature is 20 25 C 68 77 F and the hu...

Страница 243: ...ght not fuse properly or the print quality might be reduced Specifying a custom paper 1 Press Tray Paper Settings in the upper left corner of the screen 2 Press Paper Tray tab 3 Select the tray to specify the paper settings 4 Select Allocate from Media Catalog The custom papers that can be used in the selected tray appear The Master Library information is indicated by the icon If the paper you wan...

Страница 244: ... Select Manual Setting 5 Press Edit the Settings 6 Change the paper settings and then press Save Paper You can configure the following items Paper Size Paper Weight Paper Type Apply Duplex Apply Auto Paper Select 7 Press Save 8 Press Cover Designation Slip Separation Sheet tab 9 Change the settings for the copy function such as front cover sheet and designation sheet if necessary 10 Press Home at ...

Страница 245: ... This section explains the paper tray settings for Tray 1 to 8 the multi bypass tray Tray A interposer trays and perfect binder interposer trays When you assign a custom paper to a paper tray Auto Tray Switching is used for automatically switching between trays for custom papers that have the same configured registration number Changing Tray Paper Settings 243 ...

Страница 246: ... paper tray a misfeed might occur because the correct paper size is not detected If you want to use preprinted paper contact your service representative Paper Tray This section explains the paper tray settings in the Paper Tray menu under Tray Paper Settings Tray 1 This section explains the paper tray settings for Tray 1 Paper Type Plain Paper Recycled Paper Black Color Letterhead Preprinted Paper...

Страница 247: ...ntact your service representative mainly North America The paper guide in the tray is fixed If you need to change the paper size to A4 contact your service representative The lock mark is displayed next to the paper tray if Apply Auto Paper Select is not enabled Tray 1 when using the A3 11 17 tray unit This section explains the paper tray settings for Tray 1 when using the A3 11 17 tray unit Paper...

Страница 248: ...Yes No Default Yes Paper Size mainly Europe and Asia A3 mainly North America 11 17 mainly Europe and Asia The paper guide in the tray is fixed If you need to change the paper size to A4 B4 JIS 11 17 81 2 14 or 81 2 11 contact your service representative mainly North America The paper guide in the tray is fixed If you need to change the paper size to A3 A4 B4 JIS 81 2 14 or 81 2 11 contact your ser...

Страница 249: ...must configure the detailed settings Paper Weight Paper Weight 1 52 3 63 0g m2 Paper Weight 2 63 1 80 0g m2 Paper Weight 3 80 1 105 0g m2 Paper Weight 4 105 1 163 0g m2 Paper Weight 5 163 1 220 0g m2 Paper Weight 6 220 1 256 0g m2 Default Paper Weight 2 63 1 80 0g m2 Apply Duplex Yes No Default Yes Duplex printing is automatically disabled if you select Tab Stock or Translucent Paper for Paper Typ...

Страница 250: ... detectable paper sizes see page 207 Recommended Paper Sizes and Types The lock mark is displayed next to the paper tray if Apply Auto Paper Select is not enabled Trays 3 and 5 when the three tray wide Large Capacity Tray is installed This section explains the paper tray settings for Trays 3 and 5 when the three tray wide LCT is installed Paper Type Plain Paper Recycled Paper Black Color Letterhea...

Страница 251: ...Weight 5 163 1 220 0g m2 Paper Weight 6 220 1 256 0g m2 Default Paper Weight 2 63 1 80 0g m2 Apply Duplex Yes No Default Yes Duplex printing is automatically disabled if you select Translucent Paper Envelope Tab Stock Tab Stock High Gloss Tab Stock Glossy Tab Stock Matte Envelope High Gloss Envelope Glossy or Envelope Matte for Paper Type Apply Auto Paper Select Yes No Default Yes Paper Size Auto ...

Страница 252: ... want to use glossy paper select Coated Glossy for Paper Type If you want to use matte paper including silk dull and satin paper select Coated Matte for Paper Type The lock mark is displayed next to the paper tray if Apply Auto Paper Select is not enabled Tray 4 when the three tray wide Large Capacity Tray is installed This section explains the paper tray settings for Tray 4 when the three tray wi...

Страница 253: ...ight 4 105 1 163 0g m2 Paper Weight 5 163 1 220 0g m2 Paper Weight 6 220 1 256 0g m2 Paper Weight 7 256 1 300 0g m2 Paper Weight 8 300 1 360 0g m2 Default Paper Weight 2 63 1 80 0g m2 Apply Duplex Yes No Default Yes Duplex printing is automatically disabled if you select Label Paper Translucent Paper Envelope Tab Stock Magnet Paper Clear File Folder Tab Stock High Gloss Tab Stock Glossy Tab Stock ...

Страница 254: ...tcard side fences For details about auto detectable paper sizes see page 207 Recommended Paper Sizes and Types If you want to use glossy paper select Coated Glossy for Paper Type If you want to use matte paper including silk dull and satin paper select Coated Matte for Paper Type The lock mark is displayed next to the paper tray if Apply Auto Paper Select is not enabled Tray 3 to 8 when the two tr...

Страница 255: ...igh Gloss Default Plain Paper If you select Tab Stock you must configure the detailed settings Paper Weight Paper Weight 1 52 3 63 0g m2 Paper Weight 2 63 1 80 0g m2 Paper Weight 3 80 1 105 0g m2 Paper Weight 4 105 1 163 0g m2 Paper Weight 5 163 1 220 0g m2 Paper Weight 6 220 1 256 0g m2 Paper Weight 7 256 1 300 0g m2 Paper Weight 8 300 1 360 0g m2 Default Paper Weight 2 63 1 80 0g m2 Apply Duplex...

Страница 256: ...an be used differ depending on the machine s configuration When the banner sheet tray of two tray wide LCT is not installed Vertical 100 0 330 2 mm 3 94 13 00 inches Horizontal 139 7 487 7 mm 5 50 19 20 inches When the banner sheet tray of two tray wide LCT is installed Tray 3 5 or 7 Vertical 210 0 330 2 mm 8 27 13 00 inches Horizontal 420 0 700 0 mm 16 54 27 55 inches For details about auto detec...

Страница 257: ...r Weight 1 52 3 63 0g m2 Paper Weight 2 63 1 80 0g m2 Paper Weight 3 80 1 105 0g m2 Paper Weight 4 105 1 163 0g m2 Paper Weight 5 163 1 220 0g m2 Default Paper Weight 2 63 1 80 0g m2 Apply Duplex Yes No Default Yes Duplex printing is automatically disabled if you select Translucent Paper Envelope or Tab Stock for Paper Type Apply Auto Paper Select Yes No Default Yes Paper Size Auto Detect A3 A4 A5...

Страница 258: ...7 Recommended Paper Sizes and Types The lock mark is displayed next to the paper tray if Apply Auto Paper Select is not enabled The maximum weight of paper that can be loaded into the multi bypass tray Tray A is 216 0 g m2 79 9 lb Cover Interposer Upper and Lower Tray when the interposer is installed This section explains the paper tray settings for the upper and lower trays of the interposer Pape...

Страница 259: ...or details about auto detectable paper sizes see page 207 Recommended Paper Sizes and Types Cover Designation Slip Separation Sheet This section explains the paper tray settings in the Cover Designation Slip Separation Sheet menu under Tray Paper Settings Front Cover Front Cover Sheet Tray You can specify and display the paper tray in which to load front cover sheets You can also specify the displ...

Страница 260: ...ed is selected for Display Time The lock mark is displayed next to the paper tray when Full Time is selected for Display Time Back Cover Back Cover Sheet Tray You can specify and display the paper tray in which to load back cover sheets You can also specify the display time and copying method for duplex copying Tray to Program Tray 1 Tray 2 Tray 3 Tray 4 Tray 5 Tray 6 Tray 7 Tray 8 Tray A Intpsr U...

Страница 261: ...the Apply Duplex settings only when At Mode Selected is selected for Display Time The lock mark is displayed next to the paper tray when Full Time is selected for Display Time Slip Sheet Slip Sheet Tray You can specify and display the paper tray in which to load slip sheets You can also specify the display time Tray to Program Tray 1 Tray 2 Tray 3 Tray 4 Tray 5 Tray 6 Tray 7 Tray 8 Tray A Default ...

Страница 262: ...d Intpsr Lower when the interposer is installed Default Off Tray is not specified Display Time At Mode Selected Full Time Default At Mode Selected When you select an interposer tray you cannot change the Display Time setting When At Mode Selected is selected for Display Time the Sep Sheet settings only appear when the separation sheet function is selected The lock mark is displayed next to the pap...

Страница 263: ...ault At Mode Selected When you select an interposer tray you cannot change the Display Time and Apply Duplex settings When At Mode Selected is selected for Display Time the Desig Sheet 1 11 settings only appear when the designation sheet function is selected You can specify the Apply Duplex settings only when At Mode Selected is selected for Display Time The lock mark is displayed next to the pape...

Страница 264: ...vailable although other functions will be unaffected If you inadvertently do this connect the ring binder s binding unit again close the door and then turn the power off and back on to restore normal operation CGH014 Slide the ring binder tray fully in carefully Pull out the ring binder tray Remove bound booklets Before pulling out the ring binder tray make sure the machine is not in operation Whe...

Страница 265: ... stand 2 Ring opener 1 Punch holes into the pages that you want to insert into the ring bound booklet 2 With the ring bound booklet closed place the ring comb on the ring stand so that each of the rings is in a groove on the stand CET032 3 Insert the spine of the ring comb into the fixing lug of the ring stand Gently press down on the ring comb to lock it into place CET033 Changing Tray Paper Sett...

Страница 266: ...ing comb CET035 The rings of the comb will open as you push the ring opener through them 6 Insert the new pages 7 Holding the sides of the ring opener carefully press down the opened rings To close a 50 sheet type binding ring comb use the side of the ring opener that has the smaller grooves To close a 100 sheet type binding ring comb use the side of the ring opener that has the larger grooves 6 P...

Страница 267: ...ou can use to lower the stacker tray and confirm the status of the high capacity stacker CGH007 1 1 2 2 3 3 4 4 7 7 5 5 6 6 1 Tray Moving Indicator This flashes blue when the stacker tray is moving up or down When the stacker tray has moved all the way up and is in the standby state the indicator turns off When the stacker tray has moved all the way down the indicator lights up blue 2 Lower Tray B...

Страница 268: ...transporting paper from the high capacity stacker Do not use the stacker cart for any other purpose Do not attempt to get inside the high capacity stacker The paper press might leave a mark on the top of the paper stack To prevent this put several sheets of unwanted paper or a protective sheet between the paper press and the paper stack 1 Open the cover of the stacker control panel and then press ...

Страница 269: ...the stacker front cover DER105 3 Carefully pull out the stacker cart DER106 Take care not to let the paper stack topple 4 Rest the paper press on top of the paper stack CET022 Changing Tray Paper Settings 267 ...

Страница 270: ...re it is required and then unload the stacker cart 7 Return the paper press to its original position CET024 8 Put the stacker cart back inside the high capacity stacker DER107 Be careful to push the stacker cart in straight not at an angle 6 Paper Specifications and Adding Paper 268 ...

Страница 271: ...g automatically and the tray moving indicator begins flashing When the tray moving indicator stops flashing the tray is fully elevated Before moving the high capacity stacker be sure to take the stacker cart out of the high capacity stacker Changing Tray Paper Settings 269 ...

Страница 272: ...6 Paper Specifications and Adding Paper 270 ...

Страница 273: ...e group names of those items 2 Reset Press this key to reset the settings modifications currently configured You cannot reset he settings modifications after pressing Apply 3 Apply Press this key to apply the settings modifications 4 To Print Screen Press this key to display the print screen You can use this screen to view the changes you have made 5 Adjustment items Adjustment items are displayed...

Страница 274: ...ed Items and Setting Operations 3 Press Apply 4 Press Home at the bottom of the screen in the center Features of the Displayed Items and Setting Operations The following operations are available for each adjustment item Value setting Item setting Executing Display only Value setting Press or to increase or decrease the value respectively or use the numeric keypad to enter the value For some settin...

Страница 275: ...r Clear the entered value Change the sign of the entered value from positive to negative and vice versa Enter Confirm the entered value For some items you can select a value from the pull down list that appears when you press the input box Select a value from the list Item setting Select the item you require Accessing the Adjustment Settings for Operators 273 ...

Страница 276: ...d be sure to select the paper tray and paper size to which the settings apply Settings adjustable for each paper tray Settings adjustable for each paper size Settings adjustable for each paper tray These are settings adjustable for each paper tray Print jobs are processed with the adjusted settings when printing from a tray with the applied settings 7 Adjustment Settings for Operators 274 ...

Страница 277: ...r size Print jobs are processed with the adjusted settings when printing with a paper size that has the applied settings For details about selecting the paper tray and paper size for printing see the manuals for the related functions Accessing the Adjustment Settings for Operators 275 ...

Страница 278: ... the feeding direction 0106 Switch Paper Edge Detection Sensor Specify the level for detecting the paper edge for correcting the image position along the feeding direction Machine Image Quality For details about the following items see page 290 Machine Image Quality No Item Description 0201 Execute Image Quality Adjustment Execute image control or color registration adjustment manually 0202 Maximu...

Страница 279: ...aper jam when the image deviation in the feeding direction exceeds a certain degree 0307 Detect Control JAM097 098 Specify whether or not to correct the image position and skew in the vertical direction when a deviation in the direction is detected 0308 Detect JAM048 Specify whether or not to detect an error as a paper jam when a problem is detected while the registration mark is checked for image...

Страница 280: ...lopment unit 0509 Smooth Fusing Belt Smooth the Fuser Belt to remove vertical and horizontal lines from the printouts 0510 Fusing Belt Smoothing Setting Specify the condition to execute Fuser Belt smoothing 0511 Fuser Unit Speed Adjustment Correct the deviation in the rotation speed of the Fuser Unit 0514 Temperature Humidity Inside Display the internal temperature and humidity 0515 Temperature Hu...

Страница 281: ...tion Across Feed Adjust the vertical position of the punch holes when using Finisher SR5050 or Booklet Finisher SR5060 0608 Punch Position With Feed Adjust the horizontal position of the punch holes when using Finisher SR5050 or Booklet Finisher SR5060 0609 Punch Skew Correction Specify whether or not to correct the punch skew when using Finisher SR5050 or Booklet Finisher SR5060 0610 Amount of Pu...

Страница 282: ...osition for Booklet Adjust the horizontal position of the folding when using Booklet Finisher SR5060 0620 Paper Alignment for Booklet Across Feed Adjust the width of the Staple Jogger 1 when using Booklet Finisher SR5060 0621 Set Number of Folds for Booklet Specify the number of booklet folds to be performed when using Booklet Finisher SR5060 0622 Paper Alignment for Booklet With Feed Adjust the T...

Страница 283: ...rall fold size of letter foldout sheets 1 sheet fold when using the fold unit 0708 Letter Fold out Position 2 Multi sheet Fold Adjust the overall fold size of letter foldout sheets multi sheet fold when using the fold unit 0709 Letter Fold in Position 1 1 sheet Fold Adjust the fold position of the bottom segment of letter fold in sheets 1 sheet fold when using the fold unit 0710 Letter Fold in Pos...

Страница 284: ...et position when performing perfect binding 0803 Perfect Binding Finishing Angle Square the top bottom and outside edges when trimming a deck of paper 0804 Applying Binding Glue Adjust the amount of binding glue for perfect binding Finishing Stacker For details about the following items see page 339 Finishing Stacker No Item Description 0901 Ppr Align in Stack Tray Acr Feed 1 Adjust the alignment ...

Страница 285: ...k Tray With Feed Adjust the alignment position of the Tip Stopper when output sheets are ejected on the 2nd stacker 0907 Maximum Stack Quantity in Stacker Tray Specify the maximum number of sheets that can be stacked on the stacker tray The setting applies to both the 1st and 2nd stackers 1 A guide for aligning output sheets Paper is aligned at both ends Menu Items and Functions 283 ...

Страница 286: ...just the image position up and down on side 1 across the feeding direction Press or to shift the image position upward toward the back or downward toward the front DGH005 Right Trailing Edge Left Leading Edge Top Bottom Paper feed direction 7 Adjustment Settings for Operators 284 ...

Страница 287: ...elivered face down turn over the paper horizontally and check the image position This setting becomes invalid when you are printing from the tray for which custom paper is allocated In such case the value specified in Image Position Side 1 under the Advanced Settings of Custom Paper is applied 0102 Image Position Across Feed Side 2 Adjust the image position up and down on side 2 across the feeding...

Страница 288: ...ay LCIT Tray 5 2 Tray LCIT Tray 6 2 Tray LCIT Tray 7 2 Tray LCIT Tray 8 Extended Option Tray 0 00 3 00 3 00 0 01 mm If the paper is delivered face down turn over the paper horizontally and check the image position This setting becomes invalid when you are printing from the tray for which custom paper is allocated Instead the value specified in Image Position Side 2 under the Advanced Settings of C...

Страница 289: ...Value Min Value Step Unit Tray 1 Tray 2 3 Tray LCIT Tray 3 3 Tray LCIT Tray 4 3 Tray LCIT Tray 5 Bypass Tray 2 Tray LCIT Tray 3 2 Tray LCIT Tray 4 2 Tray LCIT Tray 5 2 Tray LCIT Tray 6 2 Tray LCIT Tray 7 2 Tray LCIT Tray 8 Extended Option Tray 0 00 3 00 3 00 0 01 mm If the paper is delivered face down turn over the paper horizontally and check the image position A paper jam may occur if the leadin...

Страница 290: ... 1 under the Advanced Settings of Custom Paper is applied 0104 Image Position With Feed Side 2 Adjust the image position left and right on side 2 along the feeding direction Press to shift the image position to the left toward the bottom edge or press to shift the position to the right toward the leading edge Paper feed direction Top Bottom Left Trailing Edge Right Leading Edge CWY014 7 Adjustment...

Страница 291: ...ered face down turn over the paper horizontally and check the image position This setting becomes invalid when you are printing from the tray for which custom paper is allocated Instead the value specified in Image Position Side 2 under the Advanced Settings of Custom Paper is applied 0105 Perpendicularity Adjustment Adjust the image skew perpendicularity across the feeding direction Press or to t...

Страница 292: ...Tray LCIT Tray 4 2 Tray LCIT Tray 5 2 Tray LCIT Tray 6 2 Tray LCIT Tray 7 2 Tray LCIT Tray 8 Extended Option Tray Normal High Accuracy Normal Select High Accuracy only when blank paper is fed Otherwise a paper jam may occur Machine Image Quality 0201 Execute Image Quality Adjustment Execute image control or color registration adjustment manually The machine adjusts the image density The time requi...

Страница 293: ...ensity Adjust the toner adhesion amount to the intermediate transfer belt during the image density adjustment When the degree of coloration differs depending on the difference in the degree of pigmentation adjust the toner adhesion amount Press or to increase or decrease the toner adhesion amount If you change the setting value Adjust Image Density is automatically performed before the machine sta...

Страница 294: ...ires the special color expansion kit Screen dots and hairline width become thicker when you increase the intensity 0204 Density Difference Across Feed Adjust the vertical density deviation of images in the direction perpendicular to the paper feed direction Press to darken the lower part and lighten the upper part or to lighten the lower part darken the upper part Setting Items Default Value Max V...

Страница 295: ...lume Setting Adjust the fan volume for the 3 Tray LCIT to separate sheets of paper in close contact Press or to increase or decrease the air flow Setting Items Default Value Max Value Min Value Step Unit 3 Tray LCIT Tray 3 3 Tray LCIT Tray 4 3 Tray LCIT Tray 5 50 100 10 10 0303 Pickup Assist Setting Specify the operation of the Paper Feed Roller in the trays of the main unit bypass tray and 3 tray...

Страница 296: ...ction Default Value Tray 1 Tray 2 3 Tray LCIT Tray 3 3 Tray LCIT Tray 4 3 Tray LCIT Tray 5 Bypass Tray 2 Tray LCIT Tray 3 2 Tray LCIT Tray 4 2 Tray LCIT Tray 5 2 Tray LCIT Tray 6 2 Tray LCIT Tray 7 2 Tray LCIT Tray 8 Extended Option Tray Curl Correction Level Off Curl Correction Level Small Curl Correction Level Large Curl Correction Level Off Curl Correction Level Small Curl Correction Level Larg...

Страница 297: ...99 under Advanced Settings of Custom Paper is applied Setting Items Values Default Value Tray 1 Tray 2 3 Tray LCIT Tray 3 3 Tray LCIT Tray 4 3 Tray LCIT Tray 5 Bypass Tray 2 Tray LCIT Tray 3 2 Tray LCIT Tray 4 2 Tray LCIT Tray 5 2 Tray LCIT Tray 6 2 Tray LCIT Tray 7 2 Tray LCIT Tray 8 Extended Option Tray Off On On 0306 Detect JAM080 Specify whether or not to detect error as a paper jam when the i...

Страница 298: ...y 3 2 Tray LCIT Tray 4 2 Tray LCIT Tray 5 2 Tray LCIT Tray 6 2 Tray LCIT Tray 7 2 Tray LCIT Tray 8 Extended Option Tray Off On On 0307 Detect Control JAM097 098 Specify whether or not to correct the image position and skew in the vertical direction when a deviation in the direction is detected 7 Adjustment Settings for Operators 296 ...

Страница 299: ...er jam when a problem is detected while the registration mark is checked for image position correction Setting Items Values Default Value Set Off On Off 0310 ADF Adjustment Adjust the image position and scaling factor when scanning originals on the Auto Document Feeder ADF You can correct the discrepancy stretching and shrinkage of originals caused by deviation during the feeding process Setting I...

Страница 300: ...ights Weight 3 or Heavier Weight 4 or Heavier Weight 5 or Heavier Weight 6 or Heavier Off Weight 3 or Heavier Stopping the fan deteriorates the cooling capacity and may cause blocking to occur Machine Maintenance 0501 Execute Process Adjustment Execute the following adjustments for printing at once image density color deviation charge roller cleaning charge bias and transfer current correction Set...

Страница 301: ...d remove the toner bottle by pushing the knob below the bottle 0503 Execute Charge Roller Cleaning Cleans the Charge Roller Execute this function when vertical streaks appear on the printed page Setting Items Description Execute Press Execute to execute the function Keep the front cover of the main unit closed until the process is completed 0507 Execute Developer Refreshing Replace some of the liq...

Страница 302: ...lt and prevent vertical and horizontal lines Select Belt Scratches if vertical or horizontal lines appear on the edges of the paper Select Uneven Gloss Short Time if there are patches of uneven glossiness Setting Items Selection Belt Scratches Uneven Gloss Short Time Press Execute 0510 Fusing Belt Smoothing Setting Specify the condition to execute Fuser Belt smoothing Setting Items Selection Defau...

Страница 303: ...mplete A message appears on the control panel while the process is being executed Keep the front cover of the main unit closed until the process is completed Setting Items Description Execute Press Execute to execute the function 0514 Temperature Humidity Inside Display the internal temperature and humidity Report this information if your service representative requests it Setting Items Remarks PC...

Страница 304: ...int Screen Select the mode that appears when To Print Screen is pressed copier mode or printer mode Setting Items Selection Default Value Set Copier Printer Copier 0519 Display Parts Life Counter Display the usage rate of the spare parts 7 Adjustment Settings for Operators 302 ...

Страница 305: ...Tray LCIT Tray 4 3 Tray LCIT Tray 5 Bypass Tray Interposer Upper Tray Interposer Lower Tray ADF 2 Tray LCIT Tray3 Fd Blt 2 Tray LCIT Tray4 Fd Blt 2 Tray LCIT Tray5 Fd Blt 2 Tray LCIT Tray6 Fd Blt 2 Tray LCIT Tray7 Fd Blt 2 Tray LCIT Tray8 Fd Blt The counter value of the replacement part is displayed When it reaches the time to replace a message will be shown to prompt the replacement Finishing Fin...

Страница 306: ... SEF 81 2 11 LEF 81 2 11 SEF 8K SEF 16K LEF 16K SEF Other Paper Sizes 0 2 2 1 mm 0602 Staple Position Across Feed 2 Adjust the vertical distance up and down between the staples dual when using Finisher SR5050 or Booklet Finisher SR5060 Press to move the two stapling positions away from the center and each other or to move them toward each other 7 Adjustment Settings for Operators 304 ...

Страница 307: ...0 28 16 1 mm B5 JIS LEF 0 75 16 1 mm B5 JIS SEF 0 0 16 1 mm 11 17 SEF 0 98 16 1 mm 81 2 14 SEF 0 34 16 1 mm 81 2 11 LEF 0 98 16 1 mm 81 2 11 SEF 0 34 16 1 mm 8K SEF 16K LEF 0 85 16 1 mm 16K SEF 0 12 16 1 mm Other Paper Sizes 0 115 16 1 mm 0603 Staple Position With Feed Adjust the horizontal position of the staples when using Finisher SR5050 or Booklet Finisher SR5060 Setting Values 305 ...

Страница 308: ...Max Value Min Value Step Unit A3 SEF B4 JIS SEF A4 LEF A4 SEF B5 JIS LEF B5 JIS SEF 11 17 SEF 81 2 14 SEF 81 2 11 LEF 81 2 11 SEF 8K SEF 16K LEF 16K SEF Other Paper Sizes 0 0 1 5 1 5 0 1 mm 0604 Paper Alignment for Stapling Across Feed Adjust the width of the Staple Jogger 1 when using the staple function on Finisher SR5050 or Booklet Finisher SR5060 7 Adjustment Settings for Operators 306 ...

Страница 309: ...EF 16K SEF Other Paper Sizes 0 0 1 0 1 0 0 1 mm 1 A guide for aligning output sheets when using the stapling function The guide is located inside the finisher 0605 Paper Alignment for Stapling With Feed Adjust the Tip Stopper movement when using the staple function applied at an angle on Finisher SR5050 or Booklet Finisher SR5060 Use the function to reduce the dispersion of paper orientation in th...

Страница 310: ...at one time If too many sheets are delivered to the shift unit the stacked sheets may not be correctly aligned due to the paper type and paper condition If that happens adjust the setting to the optimal value for the paper you are using When the number is less it takes more time to align and productivity may fall Setting Items Default Value Max Value Min Value Step Unit A3 SEF B4 JIS SEF 4 4 0 1 s...

Страница 311: ... sheet 0607 Punch Position Across Feed Adjust the vertical position of the punch holes when using Finisher SR5050 or Booklet Finisher SR5060 Press to move the position forward up or to move it backward down Paper feed direction Paper feed direction 2 Holes Top 2 Holes Left CVK007 Setting Items Default Value Max Value Min Value Step Unit 2 Holes JP EU 3 Holes US 4 Holes EU 4 Holes NE 2 Holes US 0 0...

Страница 312: ...e Max Value Min Value Step Unit 2 Holes JP EU 3 Holes US 4 Holes EU 4 Holes NE 2 Holes US 0 0 4 0 4 0 0 5 mm 0609 Punch Skew Correction Specify whether or not to correct the punch skew when using Finisher SR5050 or Booklet Finisher SR5060 If jamming or ear fold occurs at the punch section especially when thin paper is used set it to No Setting Items Values Default Value Set Off On Default On Defau...

Страница 313: ...r SR5060 Use this function when the topmost sheet of the stacked paper is skewed Select Accuracy Priority to lower the shifting speed of the tray to reduce the skew caused by inertia Setting Items Values Default Value Set Speed Priority Normal Accuracy Priority Speed Priority Normal 0612 Paper Alignment in Shift Tray Across Feed Adjust the width of Paper Alignment Jogger 1 on the Shift Tray when s...

Страница 314: ...e finisher 0613 Output Tray Descending Position Specify the tray descent range according to the paper weight when sheets are ejected and delivered to the Shift Tray of Finisher SR5050 or Booklet Finisher SR5060 The machine lowers the Paper Exit Guide each time it ejects stapled sheets If the descent range is not appropriate for the paper weight it may cause the paper to be improperly ejected or a ...

Страница 315: ...lect the timing appropriate for the paper you are using Setting Items Values Default Value Set Default Thin Paper Default 0615 Output Trail Edge Press Setting Specify whether or not to hold the trailing edge of sheets when they are ejected and delivered to the Shift Tray of Finisher SR5050 or Booklet Finisher SR5060 If too many sheets are delivered to the Shift Tray the Ejected sheets may not be c...

Страница 316: ...SR5050 or Booklet Finisher 5060 Increase the level if the sheets ejected on the Shift Tray are in close contact Setting Items Values Default Value Set Auto Increase Air Volume Auto 0618 Staple Position for Booklet Adjust the horizontal position of the booklet staples when using Booklet Finisher SR5060 Press to move the position left or press to move it right on the open booklet Paper feed directio...

Страница 317: ... SEF 123 5 181 2 SEF 12 18 SEF 11 17 SEF 81 2 14 SEF 81 2 11 SEF Other Paper Sizes 0 0 1 0 1 0 0 2 mm 0619 Folding Position for Booklet Adjust the horizontal position of the folding when using Booklet Finisher SR5060 Press to move the position left or press to move it right on the open booklet Folding position Paper feed direction CWY017 Setting Values 315 ...

Страница 318: ...7 SEF 81 2 14 SEF 81 2 11 SEF Other Paper Sizes 0 0 1 0 1 0 0 2 mm 0620 Paper Alignment for Booklet Across Feed Adjust the width of the Staple Jogger 1 when using Booklet Finisher SR5060 Use the function to reduce the dispersion of paper orientation at a right angle due to paper size thickness curl and so on Press or to increase or decrease the width 7 Adjustment Settings for Operators 316 ...

Страница 319: ... of booklet folds to be performed when using Booklet Finisher SR5060 You can adjust the paper folding strength by changing the number of folds per the booklet When you select 0 the default value the finisher folds the booklet according to the number of sheets in the booklet as shown below 1 13 sheets 1 time 14 15 sheets 2 times 16 25 sheets 3 times The value set here is added to the default values...

Страница 320: ...to paper size thickness curl and so on Press or to increase or decrease the amount of movement Setting Items Default Value Max Value Min Value Step Unit A3 SEF B4 JIS SEF A4 SEF B5 JIS SEF SRA3 SEF SRA4 SEF 13 191 5 SEF 13 19 SEF 13 18 SEF 123 5 191 5 SEF 123 5 181 2 SEF 12 18 SEF 11 17 SEF 81 2 14 SEF 81 2 11 SEF Other Paper Sizes 0 0 2 0 2 0 0 2 mm 0623 Z fold Skew Correction Select the method t...

Страница 321: ...tting Items Default Value Max Value Min Value Step Unit Set 0 0 0 0 9 0 0 5 mm 0625 Amount of Z fold Skew Correction Reverse Adjust the reverse rotation amount of Registration Roller during Z folding skew correction Use this function when Z folding skew correction causes a side effect The default reverse rotation amount 0 0 is set to 3 millimeters Press to reduce the reverse rotation amount The am...

Страница 322: ... Length Default 500 Sheets Default Finishing Fold 0701 Z fold Position 1 Adjust the fold position of the end segment S when using the fold unit Press to increase and to reduce S The mark indicates the leading edge relative to the paper feed direction and the mark indicates the trailing edge Paper feed direction S L DWP561 7 Adjustment Settings for Operators 320 ...

Страница 323: ...ther Paper Sizes 0 0 4 0 4 0 0 2 mm 0702 Z fold Position 2 Adjust the overall fold size L of the Z foldout sheets when using the fold unit Press to increase and to reduce L The mark indicates the leading edge relative to the paper feed direction and the mark indicates the trailing edge Paper feed direction S L DWP561 Setting Values 321 ...

Страница 324: ...n 1 sheet Fold Adjust the edge width of the half folded sheets 1 sheet fold when using the fold unit Press to increase and to reduce S This setting will be applied if the single sheet fold function is enabled The mark indicates the leading edge relative to the paper feed direction and the mark indicates the trailing edge Paper feed direction S L1 DWP562 7 Adjustment Settings for Operators 322 ...

Страница 325: ...4 SEF 81 2 11 SEF 8K SEF Other Paper Sizes 0 0 4 0 4 0 0 2 mm 0704 Half Fold Position Multi sheet Fold Adjust the edge width of the half folded sheets multi sheet fold when using the fold unit This setting will be applied if the multi sheet fold function is enabled Press to increase and to reduce S The mark indicates the leading edge relative to the paper feed direction and the mark indicates the ...

Страница 326: ...tep Unit A3 SEF B4 JIS SEF A4 SEF B5 JIS SEF SRA3 SEF SRA4 SEF 310 432mm SEF 226 310mm SEF 13 191 5 SEF 13 19 SEF 13 18 SEF 123 5 191 5 SEF 123 5 181 2 SEF 12 18 SEF 11 17 SEF 81 2 14 SEF 81 2 11 SEF 8K SEF Other Paper Sizes 0 0 4 0 4 0 0 2 mm 7 Adjustment Settings for Operators 324 ...

Страница 327: ...s the trailing edge Paper feed direction S2 L DWP563 Setting Items Default Value Max Value Min Value Step Unit A3 SEF B4 JIS SEF A4 SEF 0 0 4 0 4 0 0 2 mm B5 JIS SEF 0 0 3 0 3 0 0 2 mm 12 18 SEF 11 17 SEF 81 2 14 SEF 81 2 11 SEF 8K SEF Other Paper Sizes 0 0 4 0 4 0 0 2 mm 0706 Letter Fold out Position 1 Multi sheet Fold Adjust the fold position of the bottom segment of letter foldout sheets multi ...

Страница 328: ... 2 mm 81 2 14 SEF 81 2 11 SEF Other Paper Sizes 0 0 4 0 4 0 0 2 mm 0707 Letter Fold out Position 2 1 sheet Fold Adjust the overall fold size L of letter foldout sheets 1 sheet fold when using the fold unit Press to increase and to reduce L This setting will be applied if the single sheet fold function is enabled The mark indicates the leading edge relative to the paper feed direction and the mark ...

Страница 329: ...her Paper Sizes 0 0 4 0 4 0 0 2 mm 0708 Letter Fold out Position 2 Multi sheet Fold Adjust the overall fold size of letter foldout sheets multi sheet fold when using the fold unit This setting will be applied if the multi sheet fold function is enabled Press to increase and to reduce L The mark indicates the leading edge relative to the paper feed direction and the mark indicates the trailing edge...

Страница 330: ...ld in Position 1 1 sheet Fold Adjust the fold position of the bottom segment S of letter fold in sheets 1 sheet fold when using the fold unit Press to increase and to reduce S This setting will be applied if the single sheet fold function is enabled The mark indicates the leading edge relative to the paper feed direction and the mark indicates the trailing edge Paper feed direction S L DWP564 7 Ad...

Страница 331: ...ion 1 Multi sheet Fold Adjust the fold position of the bottom segment of letter fold in sheets multi sheet fold when using the fold unit This setting will be applied if the multi sheet fold function is enabled Press to increase and to reduce S The mark indicates the leading edge relative to the paper feed direction and the mark indicates the trailing edge Paper feed direction S L CWY009 Setting Va...

Страница 332: ... Position 2 1 sheet Fold Adjust the fold size of letter fold in sheets 1 sheet fold when using the fold unit Press to increase and to reduce LS This setting will be applied if the single sheet fold function is enabled The mark indicates the leading edge relative to the paper feed direction and the mark indicates the trailing edge Paper feed direction S L DWP564 7 Adjustment Settings for Operators ...

Страница 333: ...s 0 0 4 0 4 0 0 2 mm 0712 Letter Fold in Position 2 Multi sheet Fold Adjust the fold size when Inside 3 Folding is executed Overlap Folding when using the fold unit Press to increase and to reduce L The mark indicates the leading edge relative to the paper feed direction and the mark indicates the trailing edge Paper feed direction S L CWY009 Setting Values 331 ...

Страница 334: ...el Fold Position 1 Adjust the fold position S1 of the bottom segment 1 of double parallel folded sheets when using the fold unit Press to increase and to reduce S1 The mark indicates the leading edge relative to the paper feed direction and the mark indicates the trailing edge The illustration below shows a gatefold sheet partially opened in the half folded state Paper feed direction S1 L1 DWP565 ...

Страница 335: ... 4 0 4 0 0 2 mm 0714 Double Parallel Fold Position 2 Adjust the fold position S2 of the bottom segment 2 of double parallel folded sheets when using the fold unit Press to increase and to reduce S2 The mark indicates the leading edge relative to the paper feed direction and the mark indicates the trailing edge Paper feed direction S2 L3 L4 DWP566 Setting Values 333 ...

Страница 336: ...Adjust the fold position S1 of the bottom segment 1 of gatefold sheets when using the fold unit Press to increase and to reduce S1 The mark indicates the leading edge relative to the paper feed direction and the mark indicates the trailing edge The illustration below shows a gatefold sheet partially opened in the half folded state Paper feed direction S1 S2 L3 DWP567 7 Adjustment Settings for Oper...

Страница 337: ...ion 2 Adjust the fold position S2 of the bottom segment 2 of gatefold sheets when using the fold unit Press to increase and to reduce S2 The mark indicates the leading edge relative to the paper feed direction and the mark indicates the trailing edge The illustration below shows a gatefold sheet partially opened in the half folded state Paper feed direction S1 S2 L3 DWP567 Setting Values 335 ...

Страница 338: ...4 0 4 0 0 2 mm 0717 Gate Fold Position 3 Adjust the fold position S3 of the bottom segment 3 of gatefold sheets when using the fold unit Press to increase and to reduce S3 The mark indicates the leading edge relative to the paper feed direction and the mark indicates the trailing edge Paper feed direction S3 L3 DWP568 7 Adjustment Settings for Operators 336 ...

Страница 339: ...the vertical alignment of the cover sheet position when performing perfect binding When you bind the copies with the perfect binder make this adjustment if the center of the book block s spine and the center of the cover sheet are misaligned vertically Press or to move the image backward or forward Spine of the book Front cover Paper feed direction CWY011 Setting Items Default Value Max Value Min ...

Страница 340: ... image feed direction or reverse feed direction Paper feed direction Spine of the book Front cover CWY010 Setting Items Default Value Max Value Min Value Step Unit Set 0 0 5 0 5 0 0 1 mm 0803 Perfect Binding Finishing Angle Square the top bottom and outside edges when trimming a deck of paper Make this adjustment if the three edges of the deck of paper cut by the perfect binder are not square Ente...

Страница 341: ...f the binding and stick the pages together making it difficult to open the booklet Setting Items Default Value Max Value Min Value Step Unit Set 0 00 0 30 0 30 0 05 mm Finishing Stacker 0901 Ppr Align in Stack Tray Acr Feed 1 Adjust the alignment width in Main Jogger 1 when output sheets are stacked on the stacker Use the function to reduce the dispersion of paper orientation at a right angle due ...

Страница 342: ... stacker The guide is located inside the stacker 0902 Ppr Align in Stack Tray Acr Feed 2 Adjust the alignment width in Sub Jogger 1 when output sheets are stacked on the stacker Use the function to reduce the dispersion of paper orientation at a right angle due to paper size thickness curl and so on Press or to increase or decrease the width Setting Items Default Value Max Value Min Value Step Uni...

Страница 343: ...or to decrease or increase the amount of movement Setting Items Default Value Max Value Min Value Step Unit A3 SEF B4 JIS SEF A4 LEF A4 SEF B5 JIS LEF B5 JIS SEF A5 LEF A5 SEF 11 17 SEF 81 2 14 SEF 81 2 11 LEF 81 2 11 SEF 51 2 81 2 LEF 51 2 81 2 SEF Other Paper Sizes 0 0 1 0 1 0 0 1 mm 0904 Ppr Align in 2nd Stack Tray Acr Feed 1 Adjust the alignment width in Main Jogger 1 when output sheets are st...

Страница 344: ...cker The guide is located inside the stacker 0905 Ppr Align in 2nd Stack Tray Acr Feed 2 Adjust the alignment width in Sub Jogger 1 when output sheets are stacked on the 2nd stacker Use the function to reduce the dispersion of paper orientation at a right angle due to paper size thickness curl and so on Press or to increase or decrease the width Setting Items Default Value Max Value Min Value Step...

Страница 345: ...t A3 SEF B4 JIS SEF A4 LEF A4 SEF B5 JIS LEF B5 JIS SEF A5 LEF A5 SEF 11 17 SEF 81 2 14 SEF 81 2 11 LEF 81 2 11 SEF 51 2 81 2 LEF 51 2 81 2 SEF Other Paper Sizes 0 0 1 0 1 0 0 1 mm 0907 Maximum Stack Quantity in Stacker Tray Specify the maximum number of sheets that can be stacked on the stacker tray The setting applies to both the 1st and 2nd stackers The maximum number of sheets you can set diff...

Страница 346: ... B4 JIS A4 11 17 81 2 14 81 2 11 Small Size B5 JIS A5 51 2 81 2 If the unit detects that the number of sheets reaches the set upper limit a warning message will appear Setting Items Values Default Value Large Size 100 75 50 25 100 Small Size 100 75 50 25 50 7 Adjustment Settings for Operators 344 ...

Страница 347: ...ext 3 Click Next 4 Select the machine model you want to use in the Select Printer dialog box 5 Click Install 6 Configure the user code default printer and shared printer as necessary 7 Click Continue The installation starts 8 Click Finish When you are prompted to restart your computer restart it by following the instructions that appear 9 Click Exit in the first window of the installer and then ta...

Страница 348: ... the CD ROM drive in which the provided CD ROM is set and then click Setup exe Windows 8 1 Windows Server 2012 R2 1 On the desktop right click the Start button and then click File Explorer 2 Double click the CD ROM drive in which the provided CD ROM is set and then click Setup exe Windows 10 Windows Server 2016 1 On the desktop right click the Start button and then click File Explorer 2 Double cli...

Страница 349: ...erties Displaying the Printing Preferences Dialog Box Displaying the Printing preferences dialog box from the Start menu This section explains how to open the Printing preferences dialog box from Devices and Printers When the printer driver is distributed from the print server the setting values specified by the server are displayed as the default for Printing Defaults You cannot configure differe...

Страница 350: ...er For details about other items that can be configured from each menu see the printer driver Help The available functions may vary depending on the optional units that are installed For details about the optional units required for this function see Functions Requiring Optional Configurations Device Management Job Setup menu You can specify job type the classification code and authentication For ...

Страница 351: ... the output tray collate separation sheet and banner page For details about collate see Collate Basic Operations For details about separation sheet see Separation Sheet Basic Operations For details about banner page see Banner Page Basic Operations Finishing menu You can configure staple punch fold ring binding perfect binding and fore edge cut settings For details about staple and fore edge cut s...

Страница 352: ...he relevant setting simply by clicking on the one click preset name This helps to avoid incorrect settings and misprints One click presets can be added modified and deleted as required By using registered one click presets users without in depth knowledge of the printer driver can utilize advanced printing functions easily Follow the procedure to register one click presets 1 Open the Printing pref...

Страница 353: ...per right corner of the setting dialog box for the printer driver a question mark sign will be displayed next to the mouse pointer by clicking that button Move this question mark over the item whose Help information you want to view and then left click to display the Help information Displaying the Printer Driver Settings Screen 351 ...

Страница 354: ...Portrait or Landscape as the orientation of the original 8 In the Paper Type list select the type of paper that is loaded in the paper tray 9 In the Input Tray list select the paper tray that contains the paper you want to print onto If you select Auto Tray Select in the Input Tray list the source tray is automatically selected according to the paper size and type specified 10 Select Color or Blac...

Страница 355: ...of the original 7 Select Color or Black and White in the Color Black and White list 8 Click the Paper tab 9 In the Document Size list select the size of the original to be printed 10 In the Input Tray list select the paper tray that contains the paper you want to print onto If you select Auto Tray Select in the Input Tray list the source tray is automatically selected according to the paper size a...

Страница 356: ...m Paper When using the PCL 6 printer driver 1 Click the WordPad menu button in the upper left corner of the window and then click Print 2 Select the printer you want to use 3 Click Preferences 4 Click the Frequently Used Settings tab You can also click the Detailed Settings tab and then click 2 Sided Layout Booklet in the Menu box 5 Select the method for binding the output pages in the 2 sided lis...

Страница 357: ...the application s Print dialog box Types of two sided printing You can select which way the bound pages open by specifying which edge to bind Orientation Open to Left Open to Top Portrait Landscape Printing on Both Sides of Sheets 355 ...

Страница 358: ...u want check that Manual Setting is selected When specifying the paper settings for envelopes by allocating from a registered custom paper select Allocate from Media Catalog select custom paper to use and then press Allocate to Tray When specifying the setting values manually proceed to the next step After allocating the setting values from the media catalog proceed to Step 9 4 Press Edit the Sett...

Страница 359: ...e window and then click Print 2 Select the printer you want to use 3 Click Preferences 4 Click the Paper tab 5 In the Document Size list select the envelope size 6 In the Input Tray list select the paper tray where the envelopes are loaded 7 In the Type list select Envelope 8 Change any other print settings if necessary 9 Click OK 10 Start printing from the application s Print dialog box If you ar...

Страница 360: ...8 Print 358 ...

Страница 361: ...lder on a computer running Windows confirming a computer s information The following procedures explain how to create a shared folder on a computer running Windows and how to confirm the computer s information In these examples Windows 7 is the operating system and the computer is a member in a network domain Write down the confirmed information Step 1 Confirming the user name and computer name Co...

Страница 362: ...access rights only to specific users Use the following procedure to remove Everyone and specify user access rights 1 Create a folder just as you would create a normal folder in a location of your choice on the computer 2 Right click the folder and then click Properties 3 On the Sharing tab select Advanced Sharing 4 Select the Share this folder check box 5 Click Permissions 6 In the Group or user n...

Страница 363: ...re creating a shared folder for the first time on this computer you must enable the file sharing function For details see Windows Help To register a shared folder in the machine s address book you need the computer s IP address or computer name and the user name and password of a user who has access permissions for the shared folder For details about registering shared folders see Registering Fold...

Страница 364: ... computer s name and the user name Confirm the computer name and the user name for the computer you will send scanned documents to Write down the confirmed information 1 On the Apple menu click About This Mac 2 Click System Report 3 In the left pane click Software and then confirm the computer name and user name under System Software Overview The computer name is displayed under Computer Name The ...

Страница 365: ...ssword on the destination computer and then press OK 10 Re enter the password for confirmation and then press OK 11 Press Folder 12 Select a folder from Browse Network 1 Press Browse Network 2 Select the group to which the destination computer belongs Browse for the domain name workgroup name 3 Press the name of the computer you want to send the file to 4 Select the shared folder on the destinatio...

Страница 366: ...the name of the destination folder 3 Press OK 14 Press Connection Test 15 When a message indicating that the connection has been successfully established appears press Exit If a message Cannot find the specified path Please check the settings appears see page 446 Messages displayed on the control panel when you use the scanner function 16 Press OK 17 Press User Tools on the top right of the screen...

Страница 367: ...e destination computer to the address book 1 Press Home at the bottom of the screen in the center 2 Press the Scanner Classic icon 3 Make sure that no previous settings remain If a previous setting remains press Reset 4 Press the Folder tab 5 Place originals 6 If necessary specify the scan settings according to the original to be scanned Example Scanning the document in color duplex mode and savin...

Страница 368: ...eld and then press the Clear key You can cancel a destination selected from the destination list by pressing the selected destination again To cancel scanning press the Stop key Check the information displayed in the dialog box and then press any button You can also store a file and simultaneously send it by Scan to Folder For details see Simultaneous Storage and Sending by Scan to Folder Basic Op...

Страница 369: ...nations For details about sending a file to a destination that is registered in the machine s address book see page 375 Selecting the Destination from the Machine s Address Book For details about sending a file over the network to a shared folder see page 368 Sending Files to a Shared Network Folder For details about sending a file to an FTP server using Send to Folder see page 370 Sending files t...

Страница 370: ...g methods Enter the path to the destination directly Specify the path by browsing the network for the destination If the firewall of an antivirus program is active you may not be able to specify a shared folder on the computer as a folder destination If this is the case see the antivirus program s Help If Windows firewall is active and you cannot specify a shared folder on the computer as a folder...

Страница 371: ... change the path for the folder that has been entered press Edit on the left side of the destination field Enter the correct path for the folder and then press OK The connection test may take time You may not be able to press Connection Test right after pressing Cancel during a connection test Even if the connection test was successful the machine may fail to transfer the file if you do not have w...

Страница 372: ...nd browse that level If authentication is required to access the selected computer the authentication screen appears To authenticate enter the user name and password 6 Select the destination folder When the selected folder has sub folders the sub folders list appears If you cannot find the destination folder press Up One Level and then search for the folder at that level 7 Press OK twice Up to 100...

Страница 373: ...ard 10 Enter the password according to the setting at the destination Press Manual Entry next to the password field to make the soft keyboard appear 11 To change the port number which is set in System Settings press Change on the right side of the port number field Enter a port number using the number keys and then press the key 12 Press Connection Test A connection test is performed to check whet...

Страница 374: ...ge the registered path to a destination folder press Edit to the left of the destination field to display the soft keyboard enter the new path and then click OK The machine may fail to transfer the file if you do not have write privileges for the folder or there is not enough free hard disk space 9 Scan 372 ...

Страница 375: ... tab 5 Place originals 6 If necessary specify the scan settings according to the original to be scanned Example Scanning the document in color duplex mode and saving as a PDF file Press Scan Settings press Full Color Text Photo in the Original Type tab and then press OK Press Original Feed Type press 2 Sided Original and then press OK Press PDF under Send File Type Name and then press OK Basic Pro...

Страница 376: ...achine as a user and specify the sender Note however that the Recept Notice notification e mail may not be transmitted if the e mail software of the recipient does not support Message Disposition Notification If you press Preview and then start scanning the Preview screen appears You can use this screen to check how the originals are scanned and the scan setting used for scanning After checking th...

Страница 377: ...ress Cc or Bcc and then select destinations For details about entering the destination when using Scan to Folder see page 368 Entering the path to the destination manually Selecting the Destination from the Machine s Address Book This section explains how to select the destination from the machine s address book To use this function you must register the destinations in System Settings in advance ...

Страница 378: ...destination by selecting its initial letter from the title Depending on the security setting some destinations may not appear in the destination list Selecting destinations by entering the registration numbers Select the destination from the machine s address book using its registration number 1 Press Reg No 2 Using the number keys enter the five digit registration number assigned to the required ...

Страница 379: ...ect a destination To send the file by e mail select To Cc or Bcc 8 Press OK If LDAP Search is set to On in Administrator Tools under System Settings check that Address Book has been selected before executing the search Search criteria that appear in Advanced Search such as Name Email Address and Folder Name are registered in the machine s address book For details see Registering Addresses and User...

Страница 380: ...n the specified destination is updated using the Central Management function the spooled documents are sent to the destination after updating For details about Central Management see Administrator Tools Device Management Entering an E mail Address Manually 1 Press Manual Entry 2 Enter the e mail address 3 Press OK Depending on the security settings Manual Entry may not be displayed To change a reg...

Страница 381: ...tering a destination in the address book manually Selecting Destinations by Searching an LDAP Server This section explains how to search for an address registered in an LDAP server and specify it as an e mail destination To use this function an LDAP server must be connected to the network The LDAP server must be registered and LDAP Search must be set to On in Administrator Tools under System Setti...

Страница 382: ...ame To configure the LDAP server see Administrator Tools Device Management 4 Enter the beginning of the destination name To search by e mail address enter the beginning of the destination address 5 Press OK 6 Press Start Search 7 Select the destination 8 Select To Cc or Bcc 9 Press OK Search criteria that appear in Advanced Search such as Name Fax Destination Email Address Company Name and Departm...

Страница 383: ...ls about configuring the advanced search options see Steps 5 and 6 and Note of Searching the machine s address book for the destination and selecting it page 375 Selecting the Destination from the Machine s Address Book Registering a Destination E mail Address or Folder When the Central Management function is in use the address book is managed by the server and Prg Dest is not available on the con...

Страница 384: ...Press OK Depending on the security setting Prg Dest may not appear In such case you cannot complete the registration You can also register a destination selected from the LDAP server To register in the machine s address book a destination searched for and selected from the LDAP server display the destination and then press Prg Dest Registering a recently used destination in the address book 1 Pres...

Страница 385: ...t entering the other information see Registering Addresses and Users Device Management 5 Press OK Depending on the security settings Recent may not be displayed If there are multiple recent destinations press or to scroll through them Basic Procedure for Sending Scan Files by E mail 383 ...

Страница 386: ... the hard disk to store important files The supplier shall not be responsible for any damage that may result from the loss of files 1 Press Home at the bottom of the screen in the center 2 Press the Scanner Classic icon 3 Make sure that no previous settings remain If a previous setting remains press Reset 4 Place originals 5 Press Store File 6 Press Store to HDD 7 If necessary specify the stored f...

Страница 387: ...Device or SD Card By pressing Store to HDD Send you can simultaneously store scan files and send them For details see Simultaneous Storage and Sending by E mail and Simultaneous Storage and Sending by Scan to Folder Basic Operations Only Store to Memory Device is available in Store File when PDF is selected as the File Type and Security is specified in the PDF File Setting You cannot specify Store...

Страница 388: ...r or document name see Searching by User Name and Searching by File Name Basic Operations 4 Press Preview If you select a password protected stored file a screen for entering the password appears To select the file enter the correct password and then press OK You cannot preview documents stored as High Compression PDF files Stored File Preview Screen 1 2 3 4 5 6 7 DWP454 1 Switch You can switch to...

Страница 389: ... display the files stored in the machine on a client computer You can also check files stored under the copier Document Server and printer functions If you enter http machine IPv4 address or host name in the address bar of the client computer s web browser the top page of Web Image Monitor appears You can also download the stored files It is recommended that you use Web Image Monitor only within y...

Страница 390: ...e mail application a phishing warning might appear after you receive an e mail message To prevent phishing warnings appearing after you receive e mail from a specified sender you must add the sender to your e mail application s exclusion list For details about how to do this see your e mail application s Help 1 Press Select Stored File 2 Specify the folder in which to save the stored files 3 Selec...

Страница 391: ...ession PDF setting When multiple files are selected all file types available for each file can be specified However some files may not be sent with the specified file type depending on the settings specified when stored Full color or gray scale documents stored using the Compression Gray Scale Full Color setting in Send Settings under Scanner Features set to On are sent as PDF or PDF A files even ...

Страница 392: ...rrect password and then press OK 5 Press Delete File 6 Press Yes Files waiting for sending cannot be deleted You can also delete files stored in the machine by accessing the machine from a client computer using Web Image Monitor For detail about Web Image Monitor see Web Image Monitor Help Changing stored document information You can change information for a stored file such as the user name file ...

Страница 393: ... press OK 5 Press Change User Name 6 Enter a new user name The user names shown here are names that were registered in the address book To change a user name not shown here press Manual Entry and then enter the user name 7 Press OK 8 Make sure that the user name was changed 9 Press Reset Using Web Image Monitor you can also change the user name of a file stored in the machine from the client compu...

Страница 394: ...nd then press OK 5 Press Change File Name 6 Enter a new file name 7 Press OK 8 Make sure that the file name was changed 9 Press Reset For information about how to enter characters see Entering Text When Using the Standard Applications Preparation Using Web Image Monitor you can also change the file name of a file stored in the machine from the client computer For details about Web Image Monitor se...

Страница 395: ... four to eight digit password 7 Press OK 8 Enter the same number again using the number keys 9 Press OK 10 Press Reset Using Web Image Monitor you can also change the password of a file stored in the machine from the client computer For details about Web Image Monitor see Web Image Monitor Help Searching for stored documents You can search for stored documents by user name or document name Searchi...

Страница 396: ...e user name 5 Press OK The search begins and then files belonging to the specified user appear Searching by file name You can search for a stored file by its file name 1 Press Select Stored File 2 Specify the folder in which to save the stored files 3 Press File Name 4 Enter the file name For information about how to enter characters see Entering Text When Using the Standard Applications Preparati...

Страница 397: ...ng the file in the Document Server 1 Press Store File 2 Press Access Privileges 3 Press New Program 4 Select the users or groups to whom you want to assign permission You can select more than one user By pressing All Users you can select all the users 5 Press Exit 6 Select the user to whom you want to assign access permission and then select the permission Select the access permission from Read on...

Страница 398: ...er By pressing All Users you can select all the users 9 Press Exit 10 Select the user to whom you want to assign access permission and then select the permission Select the access permission from Read only Edit Edit Delete or Full Control 11 Press Exit 12 Press OK 13 Press Reset Storing the Scanned Documents to a USB Flash Memory Device or SD Card This section explains how to save data on external...

Страница 399: ...vious settings remain If a previous setting remains press Reset 5 Place originals 6 Press Store File 7 Press Store to Memory Device 8 Press OK 9 If necessary specify the scan settings according to the original to be scanned Example Scanning the document in color duplex mode and saving as a PDF file Press Scan Settings press Full Color Text Photo in the Original Type tab and then press OK Press Ori...

Страница 400: ... memory storage device can be printed from the machine s control panel For details see Direct Printing from a Memory Storage Device Basic Operations The documents stored on the memory storage device cannot be sent from the machine s control panel Depending on the security settings Store to Memory Device may not be displayed For details see Restricting Media Slot Access Security Guide You cannot sp...

Страница 401: ... scanning multiple originals one file is created for each single page and the number of files sent is the same as the number of pages scanned Multi page TIFF PDF If you select a multi page file type when scan multiple originals scanned pages are combined and sent as a single file Selectable file types differ depending on the scan settings and other conditions For details about file types see Notes...

Страница 402: ... file format you select the following limitations will apply Single Page TIFF JPEG Originals scanned in black and white are sent as TIFF files According to the settings specified for Compression Gray Scale Full Color under Scanner Features originals scanned in full color or gray scale are sent in one of the following file types On JPEG file Off TIFF file Multi page TIFF or PDF When Full Color Text...

Страница 403: ...ession PDF is selected as the file type areas of uneven shade may appear in the halftone sections in the document If this happens change the PDF File Setting to PDF A or PDF PDF A Security Settings in the PDF File Setting cannot be selected OCR Settings You cannot select OCR Settings if TIFF JPEG or TIFF is selected as the file type 100 dpi or 150 dpi is selected as the resolution When the WSD or ...

Страница 404: ...cifying Scan Settings 1 Press Scan Settings 2 Specify resolution scan size and other settings as required For details about individual scan setting items see Scan Settings Preparation 3 Press OK 9 Scan 402 ...

Страница 405: ...ge the file name User Name You can register a user name to identify the user or user group that stored the documents To assign it select the user name registered in the Address Book or enter the name directly Depending on the security setting Access Privileges may appear instead of User Name For details about the Address Book see Registering Addresses and Users Device Management Password To preven...

Страница 406: ...bs Preparation You can omit the user name file name password and folder in which to store the document A file name is specified automatically and the document is stored in the shared folder if you do not specify a folder to store it in You can enter up to 20 characters for a file name In the list however up to 16 characters are displayed as the file name If above limits are exceeded the list will ...

Страница 407: ...nts by limiting access For details see Specifying Access Permission for Stored Documents Basic Operations For details about how to enter text see Entering Text When Using the Standard Applications Preparation Storing Data 405 ...

Страница 408: ... Bottom Specify Duplex Pages Booklet Magazine For details about each function see the each section 1 Select a folder 2 Select a document to be printed 3 When printing two or more documents at a time repeat Step 2 Up to 30 documents can be printed 4 When specifying printing conditions press To Printing Screen and then configure print settings 5 Enter the number of print copies with the number keys ...

Страница 409: ...the printing conditions are stored on the first document but not on the succeeding documents When printing two or more documents at a time the printing conditions specified for the first document are applied to all the remaining documents Some of the selected documents may not be printed due to the difference in the size or resolution When printing two or more documents while selecting the Sort fu...

Страница 410: ...Press the Stop key DWP353 2 Enter the number of sets anew with the number keys 3 Press Continue Printing Printing will be resumed The number of sets you can enter in Step 2 differs depending on when the Stop key is pressed Sample Print When the number of sets is massive you can print a single set in advance to check the printing order and the printing conditions of the selected documents 10 Docume...

Страница 411: ...inue Printing will be resumed To cancel the printing press Suspend in Step 7 The print screen will appear enabling to select another item Printing a Specified Page You can print the specified page of the document selected on the document selection screen There are three ways to specify how to print a document 1st Page Print the first page of a document When two or more documents are selected the f...

Страница 412: ...in Start Number and the number of the last page in End Number 1 Select a folder 2 Select the document to be printed 3 Press Print Specified Page 4 Specify the page to print 5 Enter the page or range to be printed with number keys as necessary 6 Press the Start key 10 Document Server 410 ...

Страница 413: ...d An invalid key was pressed on the control panel or screen or the entered password was incorrect Single long beep Operation Completed A Copier Document Server Features job has finished 2 long beeps Warm up When the power is turned on or the machine exits Sleep mode the machine has fully warmed up and is ready for use 5 long beeps Auto Reset An auto reset was performed through the simple screen of...

Страница 414: ...d closed within a short space of time the beeping sound might continue even after normal status has resumed You can change the sound type and volume For details about Sound see General Features Device Management When You Check the Indicator Lamps Status Icons and Messages on the Control Panel The status of the machine is indicated by the indicator lamps on the control panel the status icons and me...

Страница 415: ...on is displayed 3 Messages Messages appear on the control panel to indicate the status of the machine such as error messages or status messages For details about the problems that cause messages to appear and the corrective actions to be taken see page 425 When Messages Appear When a status icon is displayed This section describes the status icons displayed when the machine requires the user to re...

Страница 416: ...24 Replacing the waste toner bottle Hole Punch Receptacle Full icon Appears when the hole punch receptacle is full For details about removing punch waste see page 514 Removing Punch Waste Waste Staple Full icon Appears when the waste staple receptacle is full For details about removing staple waste see page 515 Removing Staple Waste Service Call icon Appears when the machine is malfunctioning or r...

Страница 417: ...Messages Displays a message that indicates the status of the machine and each function 4 Status icons The status icons that can be displayed are described below The function is performing a job An error has occurred on the machine The function cannot be used because an error has occurred in the function or machine This icon may also appear if the toner is running low The following table explains p...

Страница 418: ...n the only icon that appears on the home screen is the Copier Classic icon Functions other than the copier function are not yet ready Wait a little longer The machine has just been turned on and the User Tools screen is displayed but the User Tools menu has items missing Functions other than the copier function are not yet ready Time required varies by function Functions appear in the User Tools m...

Страница 419: ...tion Screen is Displayed The Authentication screen appears Basic Authentication Windows Authentication or LDAP Authentication is set Enter your login user name and user password For details about the Authentication screen see page 134 When the Authentication Screen is Displayed An error message is still displayed even if misfed paper is removed Paper is still jammed in the tray Remove the jammed p...

Страница 420: ...The tray s side or end fences may not be set properly Remove the misfed paper For details about removing jammed paper see page 495 Removing Jammed Paper Check that the side or end fences are set properly Also check that the side fences are locked For details about setting the side and end fences see page 190 Changing the Paper Size Misfeeds occur frequently Paper of undetectable size has been load...

Страница 421: ...d envelopes on the tray one at a time and print them individually For details about how to load envelopes see page 235 Envelopes When printing to envelopes the envelopes may be fed in together or the envelopes may not be fed The envelopes are curled Make sure you fully flatten curled envelopes before you load them Do not stack envelopes over the specified limit for the paper tray If misfeeds still...

Страница 422: ...he machine cannot perform the shutdown procedure Repeat the shutdown procedure If the machine does not turn off contact your service representative An error has occurred when the Address Book is changed from the display panel or Web Image Monitor The Address Book cannot be changed while you delete the multiple stored documents Wait a while and then retry the operation Cannot use Web Image Monitor ...

Страница 423: ... Paper Curl in Adjustment Settings for Operators When the paper is curled upward select Curl Correction Level Small or Curl Correction Level Large under Correct Output Paper Curl in Adjustment Settings for Operators For details about the Adjustment Settings for Operators see page 271 Adjustment Settings for Operators Output paper to the stacker tray does not align properly When the paper weight is...

Страница 424: ...ions The multi folding unit outputs sheets with creased edges when Gate Fold is applied The paper is curled Remove the paper and then reload it upside down Remove the paper and then reload it in the opposite direction The position of the fold is incorrect when Letter Fold in is applied to a B5 JIS sheet Multi sheet Fold has been specified when only one sheet is being printed In Output Customize Fu...

Страница 425: ...QJ WHUQDO 6FDQQHU 2SHUDWLRQV IRU 6FDQQLQJ 6FDQQLQJ 6WDQGDUG 6FDQQHU 2SHUDWLRQV IRU 6FDQQLQJ 6FDQQLQJ WHUQDO 7 1 6FDQQLQJ 6WDQGDUG 7 1 6FDQQLQJ RFXPHQW 6HUYHU 2SHUDWLRQV IRU RFXPHQW 6HUYHU 6FDQQLQJ D RFXPHQW WR 6WRUH LQ RFXPHQW 6HUYHU 3ULQWLQJ IURP RFXPHQW 6HUYHU HE RFXPHQW 6HUYHU 3ULQWLQJ XQFWLRQ RPSDWLELOLW KHQ XVLQJ DQ H WHUQDO FRORU FRQWUROOHU 7KH FKDUW VKRZV XQFWLRQ RPSDWLELOLW ZKHQ QWHUOHDYH ...

Страница 426: ...or details about Interleave Priority see General Features Device Management When the finisher is installed you can specify the output tray where documents are delivered For details about Output Tray Settings see General Features Device Management While printing is in progress scanning a document using another function may take longer than usual 11 Troubleshooting 424 ...

Страница 427: ... message appears when the machine is warming up Wait for a while If the machine is not ready in 5 minutes turn off the power and make sure the main power indicator turns off Wait at least 10 seconds and then turn on the power again If the machine is still not ready in 5 minutes contact your service representative Wait until the message disappears Do not turn off the power while the message is show...

Страница 428: ...e this message is displayed If the power has been turned on follow the message that appears For details about turning on and off the power see page 91 Turning On Off the Power The shutdown time varies according to the options that are installed and the environmental conditions of the location where the machine is set up If the main power indicator remains lit after 18 minutes have elapsed contact ...

Страница 429: ...ocked files see Unlocking Stored Files Security Guide Cannot detect original size The original placed on the exposure glass is a non standard size Place the original on the exposure glass again Face the original down If the machine cannot detect the size of the original specify the size manually do not use Auto Paper Select mode or the Auto Reduce Enlarge function For details about specifying the ...

Страница 430: ...ble with this paper size A paper size not available in Duplex mode Select an appropriate paper size For details about paper sizes see Specifications for the Main Unit Specifications Exceeded the maximum number of sheets that can be used Copying will be stopped The number of pages the user is permitted to copy has been exceeded For details about how to check the number of copies available per user ...

Страница 431: ...inals have been scanned Press Print to copy scanned originals Do not remove remaining originals n is replaced by a variable The number of scanned originals exceed the number of pages that can be stored in memory Press Print to copy scanned originals and cancel the scanning data Press Clear Memory to cancel the scanning data and not copy Perfect Binding is not available for different paper sizes Mi...

Страница 432: ...pecified Cancel Mixed Sizes mode or specify the Auto Reduce Enlarge function Ring Binding is not available with the selected position Ring Binding cannot be applied in the position that you have specified Select a proper binding position For details about proper binding positions see Ring binding Basic Operations Ring Binding is not available with the settings Ring Binding is not possible under th...

Страница 433: ...ion This section describes the principal messages that appear on the control panel error logs or reports If other messages appear follow their instructions Messages displayed on the control panel when you use the printer function Before turning off the power see page 91 Turning On Off the Power Message Cause Solution Exceeded the maximum number of sheets possible for Ring Binding with the currentl...

Страница 434: ...ge appears again contact your service representative Load following paper in n To force print select another tray and press Continue n is replaced by a variable The printer driver settings are incorrect or the tray does not contain paper of the size selected in the printer driver Check that the printer driver settings are correct and then load paper of the size selected in the printer driver into ...

Страница 435: ...s mismatched Select another tray from the following and press Continue Paper type can also be changed in User Tools A tray name is placed at n The type of the paper in the tray does not match the paper type specified in the printer driver Select a tray containing paper that is the same type as the specified paper type Perfect Binding is not available with this No of sheets Perfect Binding is not p...

Страница 436: ... GB The total size of the selected files exceeds 1 GB Files or groups of files larger than 1 GB cannot be printed When the total size of the multiple files that are selected exceeds 1 GB select files separately When the size of the selected file exceeds 1 GB print from a memory storage device using a function other than the Direct printing function You cannot select files of different formats at t...

Страница 437: ...t available with Perfect Binding see page 26 Perfect Binding A function which cannot be used with Ring Binding was set The job was cancelled A function not available with Ring Binding has been selected For details about which functions are not available with Ring Binding see page 30 Ring Binding A job via the network that was not printed exists because an error occurred It was stored as a job not ...

Страница 438: ...han Document Server in Job Type or deselect Unauthorized Copy Prevention Error occurred while processing an Unauthorized Copy Prevention job Job cancelled The Enter User Text field on the Unauthorized Copy Prevention for Pattern Details screen is blank On the printer driver s Detailed Settings tab click Effects in Menu Select Unauthorized Copy Prevention and then click Details to display Unauthori...

Страница 439: ...aximum number of Multi sheet Fold was exceeded Specify fewer sheets for the Multi sheet Fold function For details about the maximum number of Multi sheet Fold see Specifications for Multi Folding Unit Specifications Fold is not available with the settings The job has been cancelled Fold function is not available with the current settings Check the paper settings For details about the limitations o...

Страница 440: ... then print the file again Z fold error Z folding was canceled Check the tray paper orientation print orientation and Z fold settings again When there is a problem with the print settings Message Cause Solution Booklet Half Fold Error The job was canceled because you specified invalid settings for saddle stitching or half fold Check the settings for saddle stitching or half fold Classification Cod...

Страница 441: ...ate with Reduce the number of pages to print Exceeded the maximum number of multi sheet fold Half Fold The maximum number of multi sheet folds Half Fold was exceeded For details about the maximum number of multi sheet folds Half Fold see page 32 Fold Output Tray Changed The output tray was changed because the paper size of the specified output tray is limited Specify the proper output tray Perfect...

Страница 442: ...e printer driver Help Punch Cancelled Punch printing was canceled Check the paper orientation print orientation and then punch position Certain settings can produce print results that might not be as expected Ring Binding is not available with the settings Ring Binding is not possible under the settings that you have specified Check the current settings For details about which functions are not av...

Страница 443: ...nd Exceeded max number of files of Document Server Cannot store The maximum file capacity of the Document Server was exceeded Delete some of the files stored in the Document Server Exceeded max number of files Auto While you were using the error job store function to store Normal Print jobs as Hold Print files the maximum file capacity for file storage or Hold Print file management automatic was e...

Страница 444: ...cked Unlock the folder or specify another folder number that can be used For details about locked folders see Unlocking Folders Security Guide When there is not enough free hard disk space Message Cause Solution HDD Full When you were printing with the PostScript 3 printer driver the hard disk capacity for fonts and forms was exceeded Delete unneeded forms or fonts registered on the machine HDD Fu...

Страница 445: ... do not have a privilege to use this function This job has been cancelled The entered login user name or login password is not correct Check that the user name and password are correct You do not have a privilege to use this function This job has been cancelled The logged in user is not allowed to use the selected function For details about how to set permissions see Limiting Available Functions S...

Страница 446: ...he power and then back on again If the message appears frequently contact your service representative Command Error An RPCS command error occurred Check using the following procedure Check if the communication between the computer and the machine is working correctly Check if the correct printer driver is being used Check if the machine s memory size is set correctly in the printer driver Check th...

Страница 447: ...hile printing a Sample Print Locked Print Hold Print or Stored Print file the maximum page capacity was exceeded Delete unneeded files stored on the machine Reduce the number of pages to print File system is full PDF file does not print out because the capacity of the file system is full Delete all unnecessary files from the hard disk or decrease the file size sent to the machine Folding Unit Erro...

Страница 448: ...If printing does not start contact your service representative The contents of errors may be printed on the Configuration Page Check the Configuration Page in conjunction with the error log For details about how to print the Configuration Page see List Test Print Preparation Messages Displayed When You Use the Scanner Function Messages displayed on the control panel when you use the scanner functi...

Страница 449: ...ls about the procedure for excluding an IP address see your operating system s Help Exceeded max number of alphanumeric characters for the path The maximum number of specifiable alphanumeric characters in a path has been exceeded Check the maximum number of characters which can be entered and then enter it again For details about the maximum enterable number of characters see Values of Various Set...

Страница 450: ...e file formats used to transmit stored documents see page 388 Sending a Stored File Programmed Cannot program the destination s that is not programmed in the address book The destinations that were selected while registered to the program contain a folder destination for which one of the following destinations is set manually entered destination WSD destination or DSM destination WSD destinations ...

Страница 451: ...ivileges are required The currently logged in user does not have permission to view the destination that was registered in the program For details about how to set permissions see Restricting Usage of the Destination List Security Guide The program is recalled Cannot recall the destination s that is deleted from the address book The destination stored in the program could not be recalled because i...

Страница 452: ... data capacity Specify the scan size and resolution again Note that it may not be possible to scan very large originals at a high resolution For details about the settings for the scanner function see Relationship between Resolution and Scan Size Preparation Exceeded max data capacity Check the scanning resolution then reset n original s n in the message represents a variable The scanned original ...

Страница 453: ...the original again If displaying the entire image is not necessary press the Start key to start scanning with the current scaling factor Not all of the image will be scanned Check the ratio and then press the Start key again Using Specify Reproduction Ratio to scale down a large document may cause part of the image to be lost Specify a large size in Specify Size and then scan the original again If...

Страница 454: ... the machine for storing in the Document Server only some of the pages could be scanned Specify whether or not to use the data Memory is full Scanning has been cancelled Press Send to send the scanned data or press Cancel to delete Because there is not enough free hard disk space in the machine for sending by e mail while data is being stored in the Document Server only some of the pages could be ...

Страница 455: ...There was not enough free space on the hard disk of the SMTP server FTP server or client computer at the destination Allocate sufficient space Transmission has failed To check the current status press Scanned Files Status While a file was being sent a network error occurred and the file could not be sent correctly If the same message appears again after scanning again the cause could be a mixed ne...

Страница 456: ...e not scanned and then store them as a new file For details about storing files see page 384 Storing and Saving the Scanned Documents Exceeded max number of stored files Cannot send the scanned data as capturing files is unavailable Too many files are waiting to be sent Try again after they have been sent Exceeded maximum number of file to store Delete all unnecessary files Too many files are wait...

Страница 457: ...ce the number of originals and then scan again Remove any misfed original and then scan again Use Scanner Journal to check there are no jobs awaiting transmission and then scan again When documents cannot be stored on a memory storage device Message Cause Solution Cannot write on the memory storage device because remaining free space is insufficient The memory storage device is full and scan data ...

Страница 458: ... not be completed because the maximum number of pages that can be scanned by this machine was exceeded during the scanned data was written to the memory storage device Reduce the number of documents to be written to the memory storage device and then try again Memory is full Press Write to write the current scanned data to the memory storage device or press Cancel to delete The scan could not be c...

Страница 459: ...des has been exceeded The maximum number of modes that can be stored is 100 Delete unneeded modes Cannot detect the paper size of the original Specify the scanning size The set original was misaligned Place the original correctly Specify the scan size When placing an original directly on the exposure glass the lifting lowering action of the ADF triggers the automatic original size detection proces...

Страница 460: ...can conditions have exceeded the setting range of the machine Check whether the scanning settings made with the application exceed the setting range of the machine Fatal error has occurred in the scanner An unrecoverable machine error has occurred An unrecoverable machine error has occurred Contact your service representative Insufficient memory Close all other applications then restart scanning M...

Страница 461: ...sfeed occurs you might not scan an original Remove the misfeed and then scan the original again Invalid Winsock version Please use version 1 1 or higher You are using an invalid version of Winsock Install the operating system of the computer or copy Winsock from the operating system CD ROM No response from the scanner The machine or client computer is not connected to the network correctly Check w...

Страница 462: ...dy Check the scanner and the options The ADF cover is open Check whether the ADF cover is closed The name is already in use Check the registered names You tried to register a name that is already in use Use another name When there is a problem connecting to the scanner Message Cause Solution Cannot connect to the scanner Check the network Access Mask settings in User Tools An access mask is set Fo...

Страница 463: ...he previous scan Cannot find the scanner Check if the scanner main power is on The machine s power is off Turn on the power Communication error has occurred on the network A communication error has occurred on the network Check whether the client computer can use the TCP IP protocol Scanner is not available Check the scanner connection status The machine is not connected to the network correctly C...

Страница 464: ...See page 534 Maintaining Your Machine Failed to read the PDF file There is a possibility that the PDF version is not supported by the browser s PDF viewer or an unsupported encryption level is specified With this machine s browser PDF files other than those whose versions and encryption levels are specified below cannot be viewed PDF version 1 3 1 7 PDF encryption level 128Bit AES or 256Bit AES Fo...

Страница 465: ...as number of prints paper size and paper type Wait for the machine to resume operation When there is a problem scanning or storing originals Message Cause Solution Cannot detect original size Select scan size The machine failed to detect the size of the original Place the original correctly Specify the scan size and then place the originals again When placing an original directly on the exposure g...

Страница 466: ...e exclusion list in the application settings For details about how to add programs to the exclusion list see the antivirus software Help To prevent a firewall from blocking the connection register the machine s IP address in the firewall s IP address exclusion settings For details about the procedure for excluding an IP address see your operating system s Help Updating the destination list Please ...

Страница 467: ...atch The SMTP authentication e mail address and the administrator s e mail address do not match For details about how to set SMTP authentication see File Transfer Device Management When the machine cannot be operated due to a problem with the user certificate Message Cause Solution The destination cannot be selected because its encryption certificate is not currently valid The user certificate des...

Страница 468: ... MIME see Configuring S MIME Security Guide XXX cannot be YYY because the Digital Signature s device certificate is not currently valid XXX and YYY indicate the user action The device certificate PDF with digital signature or PDF A with digital signature has expired A new device certificate PDF with digital signature or PDF A with digital signature must be installed For details about how to instal...

Страница 469: ...ine cannot perform authentication For details about authentication see Configuring User Authentication Security Guide When the user lacks privileges to perform an operation Message Cause Solution You do not have the privileges to use this function The logged in user name does not have permissions for the selected function For details about how to set permissions see Managing Print Volume per user ...

Страница 470: ...eeded time limit for LDAP server search Check the server status A network error has occurred and connection has failed Try the operation again If the message is still displayed the network may be busy Check that the correct settings for LDAP server are listed in Administrator Tools of System Settings For details about LDAP server see Programming the LDAP server Device Management LDAP server authen...

Страница 471: ...he control panel select Auto Density The reverse side of an original image is copied Image density is too high Adjust the image density settings For details about image density settings see Adjusting Copy Image Density Basic Operations The reverse side of an original image is copied Auto Image Density is not selected On the control panel select Auto Density The reverse side of an original image is...

Страница 472: ...ntaining Your Machine Identical blemishes appear in the same place on every copy The original that has already been printed is scanned Original Type is set to Text Photo and an original with text and photographs that can hardly be distinguished from each other is loaded On the control panel press Generation Copy to start a copy job The shadow density of an area is different from that of the origin...

Страница 473: ...ted Select the correct paper size Parts of images are not copied Even if you place originals on the exposure glass or in the ADF correctly margins of a few millimeters on all four sides of the original might not be copied Use Create Margin function to reduce the image of its original size For details about image areas that cannot be copied see Create margin Basic Operations Images appear only part...

Страница 474: ...how to set originals see Placing Originals Preparation A moire pattern is produced on copies The original has a dot pattern image or many lines Place the original on the exposure glass at a slight angle Black spots appear on the copy of a photographic print Because of high humidity the photographic print has stuck to the exposure glass Place an OHP transparency on the exposure glass and then place...

Страница 475: ...er only as high as the upper limit markings on the side fences of the paper tray the markings on the paper guides of the bypass tray or the markings on the Large Capacity Tray LCT Fan the sheets thoroughly before loading them Misfeeds occur frequently The paper tray s side fences are set too tightly Push the side fences lightly and then reset it Misfeeds occur frequently The paper is damp Use pape...

Страница 476: ...y paper becomes creased The paper is damp Use paper that has been stored in the recommended temperature and humidity conditions For details about the paper storage conditions we recommend see page 240 Paper Storage Copy paper becomes creased The paper is too thin Use recommended paper For details about recommended paper see page 207 Recommended Paper Sizes and Types You want to check print quality...

Страница 477: ...hanging the Paper Size Images are skewed The paper is fed in at a slant Load the paper correctly For details about loading paper see page 170 Loading Paper Images are skewed The original guide of the ADF is not set properly Make sure the original guide is set properly For details about how to set the original guide see page 168 Placing Originals in the Auto Document Feeder Edges of sheets are crea...

Страница 478: ... Operations In Erase Border Erase Center or Erase Center Border mode parts of the original image are not copied You have entered a wide erased margin Make the margin width narrower In Erase Border Erase Center or Erase Center Border mode parts of the original image are not copied Originals are not scanned correctly Place the originals correctly In Margin Adjustment mode parts of the original image...

Страница 479: ...in Copier Document Server Features For details about the setting of Orientation Booklet Magazine see Edit Preparation When Combine is used parts of the image are not copied You specified a reproduction ratio that does not match the sizes of the originals and copy paper When you specify a reproduction ratio using Manual Paper Select mode make sure the ratio matches the originals and the copy paper ...

Страница 480: ...pe that can be used for duplex printing For details about setting Paper Type see page 243 Tray Paper Settings Copies are not in correct order You placed the originals in the incorrect order When you place a stack of originals in the ADF the last page should be on the bottom If you place an original on the exposure glass start with the first page to be copied When Duplex is used copy is made top to...

Страница 481: ...comes full The Document Server memory is full Delete unnecessary files On the file selection display select unnecessary files and then press Delete File If this does not increase available memory space do the following Switch to the scanner screen and then delete unnecessary files stored under the scanner function Switch to the printer screen and then delete unnecessary files stored under Sample P...

Страница 482: ...et Finisher SR5060 Specifications Saddle stitched documents come apart and do not stack properly Certain types of paper are resistant to folding and open out after being folded and stitched For details about the recommended paper see page 207 Recommended Paper Sizes and Types Staples are wrongly positioned Originals are not set correctly For details about how to place the originals with stapling s...

Страница 483: ... is deleted However if the earliest error is a Sample Print Locked Print Hold Print or Stored Print error it is not deleted The error is recorded separately until 30 errors are recorded You cannot view Error Log on the simple screen If the power is turned off the log is deleted 1 Press Home at the bottom of the screen in the center and press the Printer Classic icon 2 Press Error Log 3 Select the ...

Страница 484: ...le before turning on the power The login user name login password or driver encryption key is invalid Check the login user name login password or driver encryption key Advanced encryption has been set using the extended security function Check the extended security function settings For details about extended security function settings see Specifying the Extended Security Functions Security Guide ...

Страница 485: ...ecommended Paper Sizes and Types The printed image is faded over the entire page If the Toner Saving is selected in the printer driver settings the entire page will be faded when printed On the printer driver s Detailed Settings tab click Print Quality Standard in Menu and then select Off in the Toner Saving list Images smudge when rubbed Toner is not fixed The specified paper type and the paper t...

Страница 486: ... details about reduction function see the printer driver Help Photo images are coarse Some applications print at lower resolution Use the application s settings or printer driver s settings to specify a higher resolution For details about printer driver s settings see the printer driver Help A solid line is printed as a dashed line or appears blurred Dither patterns do not match Only when using Po...

Страница 487: ...about the paper storage conditions we recommend see page 240 Paper Storage The image on the back side of duplex copies has mottled blank patches or is smudged Missing patches and smudges are caused by moisture leaking from the paper Do not install the machine in low temperature areas Use paper that has been stored where temperature and humidity conditions meet the conditions we recommend For detai...

Страница 488: ...y The paper tray s side fences are set too tightly Push the side fences lightly and then reset them Misfeeds occur frequently The paper is damp Use paper that has been stored in the recommended temperature and humidity conditions For details about the paper storage conditions we recommend see page 240 Paper Storage Misfeeds occur frequently The paper is too thick or thin Use recommended paper For ...

Страница 489: ...ns we recommend see page 240 Paper Storage Paper becomes creased The paper is too thin Use recommended paper For details about recommended paper see page 207 Recommended Paper Sizes and Types Edges of sheets are creased The paper is damp Use paper that has been stored in the recommended temperature and humidity conditions For details about the paper storage conditions we recommend see page 240 Pap...

Страница 490: ...to complete a print job Sleep mode or Fusing Unit Off mode might be set The machine requires time to warm up if it has been in Sleep mode or Fusing Unit Off mode For details about Sleep mode and Fusing Unit Off mode see page 92 Saving Energy It takes a long time to complete a print job Photographs and other data intensive pages take a long time for the machine to process Wait until printing is com...

Страница 491: ...rd protected To print password protected PDF files enter the password in the PDF Menu or on Web Image Monitor For details about printing PDF files see PDF Menu Preparation or Web Image Monitor Help PDF files cannot print or PDF direct printing cannot be performed PDF files cannot print if they are print disabled in PDF file security setting Change the PDF file security setting PDF direct print pro...

Страница 492: ... Cause Solution Stored files cannot be deleted File names and passwords cannot be changed Files cannot be delivered repeatedly Operational restrictions have been imposed using the available extended security function For details about the extended security function see Specifying the Extended Security Functions Security Guide When you cannot browse the network to send a scan file Problem Cause Sol...

Страница 493: ...ax Email Size Because Yes per Max Size is specified for Divide Send Email the file is divided halfway down the page and sent Specify Yes per Page for Divide Send Email in Scanner Features The file is divided per page and sent To send an e mail without splitting it perform the following Specify a resolution so that the file size does not exceed the maximum size set in Max Email Size Specify a large...

Страница 494: ...ed the administrator appears in the From field and the sender appears in the Reply to field For details about applying S MIME see Configuring S MIME Security Guide The size of S MIME e mails is larger than that of e mails without using S MIME When you cannot send scan files using WSD Problem Cause Solution The WSD scanner function cannot be used Scan Profile is not set on the client computer Set S...

Страница 495: ...ace the original in the correct orientation For details about how to place originals see Setting of Original Feed Type Basic Operations No scanned image is available The original was placed with the front and back reversed When the original is placed directly on the exposure glass the side to be scanned must face down When the original is placed in the ADF the side to be scanned must face up Scann...

Страница 496: ...ify PDF A for PDF File Setting For details about PDF file settings see Specifying the File Type and File Name Basic Operations A text pattern appears in the background You have scanned a document protected from unauthorized copying Check the document For details about how to prevent unauthorized copying of documents see Printing Documents that Are Not Authorized for Duplication Basic Operations Af...

Страница 497: ...ne If paper jams continue to occur see page 416 When You Have Problems Operating the Machine page 473 When You Cannot Make Copies As Wanted and page 482 Other Printing Problems for details about how to resolve the problem If the actions recommended in this manual cannot resolve the problem contact your service representative When removing jammed paper you can touch only those areas explicitly indi...

Страница 498: ...and causes U to appear contact your service representative If a paper misfeed occurs in Rb1 Rb5 check whether any paper has been output on top of the paper press of the finisher shift tray If there is paper on top of the paper press remove the paper and then remove the misfed paper from inside the finisher Procedure for removing jammed paper 1 Remove the jammed paper by following the procedures th...

Страница 499: ...he original state If D is displayed and you cannot remove the misfed paper from the right side of the fusing unit use the knob located on the inside of the left front cover 1 Pull out the knob located on the inside of the left front cover DWP527 2 Align the knob with the slot on the fusing unit and then insert it Clearing Misfeeds 497 ...

Страница 500: ...r jam has occurred in certain locations the procedure for removing the jammed paper is not displayed on the control panel Open the front cover in the place corresponding to the letter displayed on the control panel and then proceed as instructed on the sticker or sheet inside the front cover or in the following descriptions If a lamp is lit when the front cover is opened open the guide plate at th...

Страница 501: ...When L is displayed DWP559 Clearing Misfeeds 499 ...

Страница 502: ...When Mc1 Mc4 is displayed BQL010S When Mc5 or Mc6 is displayed BQL011S 11 Troubleshooting 500 ...

Страница 503: ...er Mc7 to its original position Remove any bound booklets that are inside the machine Close the front right cover of the ring binder Remove any jammed bound booklets from the paper exit When Mk1 or Mk2 is displayed Open the interposer and Mk1 covers Open the Mk2 cover and then remove misfed paper Close the Mk2 Mk1 and interposer covers Remove paper if the display reports a paper jam in Mk3 Mk5 CXG...

Страница 504: ...k14 Remove misfed paper Remove misfed paper Return levers Mk4 and Mk5 to their original positions Return the upper left cover Mk3 and interposer unit to their original positions CXG011 When Mk6 is displayed Open the front cover of the bridge unit to the right of the perfect binder Raise lever Mk6 and then remove misfed paper Return lever Mk6 to its original position Close the front cover of the br...

Страница 505: ...inal position Close the front left and front right covers of the perfect binder CXG013 When Mk9 Mk11 is displayed Check that the LED on the front right cover of the perfect binder is unlit Open the front right and front left covers of the perfect binder Raise lever Mk9 Turn knob Mk10 and then remove misfed paper Return lever Mk9 to its original position Lower lever Mk11 Remove misfed paper Return ...

Страница 506: ...r Raise lever Mk12 and then remove misfed paper Return lever Mk12 to its original position Turn lever Mk13 to the left Remove misfed paper Lower lever Mk14 and then remove misfed paper Return levers Mk14 and Mk13 to their original positions Close the front left and front right covers of the perfect binder CXG015 When N1 N5 is displayed CDN025 11 Troubleshooting 504 ...

Страница 507: ...kwise Remove misfed paper Return lever N7 to its original position Pull handle N9 and pull the unit fully out Pull lever N10 towards you and then check the lock is released Leave cover N10 in its open position Remove misfed paper from inside Close cover N10 Pull lever N10 towards you and hold it to release the lock and then pull the lever to the right to open cover N10 as shown in the illustration...

Страница 508: ...ed paper Close cover N12 Open cover N15 Turn knob N16 clockwise 7 to 8 times Remove misfed paper Close cover N15 Return levers N13 and N14 to their original positions Lower lever N17 to the right Pull lever N18 to the right Remove misfed paper Return levers N17 and N18 to their original positions Turn knob N19 clockwise 8 to 9 times Open cover N20 Remove misfed paper Raise lever N21 Remove misfed ...

Страница 509: ...he right and then remove misfed paper Return lever Rb5 to its original position Close the finisher front cover Raise lever Rb3 and then remove misfed paper Return lever Rb3 to its original position CXG020 When Rb6 Rb9 is displayed when Finisher SR5050 is installed Remove misfed paper Close the finisher front cover Open the finisher front cover Lower lever Rb6 Pull lever Rb7 to the left Turn knob R...

Страница 510: ...ed when Booklet Finisher SR5060 is installed Open the finisher front cover Raise lever Rb1 and then remove misfed paper Turn knob Rb2 and then remove misfed paper Return lever Rb1 to its original position Turn lever Rb4 to the right and then remove misfed paper Return lever Rb4 to its original position Raise lever Rb5 to the right and then remove misfed paper Return lever Rb5 to its original posit...

Страница 511: ...oklet Finisher SR5060 is installed Open the finisher front cover Turn knob Rb10 Turn knob Rb11 9 to 11 times Pull handle Rb12 and then pull out the staple unit Raise lever Rb13 and then remove misfed paper Return lever Rb13 to its original position Turn knob Rb14 and then remove misfed paper Lower lever Rb15 and then turn knob Rb16 Remove misfed paper Raise lever Rb17 and then remove misfed paper ...

Страница 512: ...e booklet finisher tray when removing misfed paper pulling out or pushing in the finisher s staple unit You can trap and injure your fingers if you do not Curled paper may cause staples to jam To avoid this turn paper over in the tray When the finisher is installed after jammed staples are removed staples will not be ejected the first few times when you use the stapler If a staple jam occurs on th...

Страница 513: ...ull out staple unit Turn knob Rb19 counterclockwise to rotate the staple unit Pull out the cartridge gently Return the staple unit to its original position Close the finisher front cover Pull down the face plate until it clicks Push the cartridge until it clicks Pull out the cartridge lever Open the face plate of the cartridge Clearing Misfeeds 511 ...

Страница 514: ...n pull out staple unit Turn knob Rb19 counterclockwise to rotate the staple unit Pull out the cartridge gently Return the staple unit to its original position Close the finisher front cover Pull down the face plate until it clicks Push the cartridge until it clicks Pull out the cartridge lever Open the face plate of the cartridge 11 Troubleshooting 512 ...

Страница 515: ...il it clicks Push down the cartridge until it clicks Pull out the cartridge levers Open the face plate of the cartridge Removing Jammed Ring Combs If ring combs become jammed a message appears on the control panel Follow the message s instructions to remove the jammed ring combs This section describes how to remove jammed ring combs when the procedure is not displayed on the control panel Keep you...

Страница 516: ...rly aligned Removing Punch Waste If the punch receptacle is full remove punch waste by following the procedures indicated in the animation that appears on the control panel While Hole Punch Receptacle is full is displayed you cannot use the Punch function Hole Punch Receptacle is full is displayed until the punch waste box is installed again If the message is still displayed install the punch wast...

Страница 517: ...If the waste paper receptacle is full remove waste paper by following the procedures stated in the animation that appears on the control panel While The waste paper receptacle is full Empty the receptacle is displayed you cannot use the perfect binding While The Trimmer waste paper receptacle is full Empty the receptacle is displayed you cannot use the trimmer The waste paper receptacle is full Em...

Страница 518: ...ress Check 6 Press Home at the bottom of the screen in the center This process will take approximately 1 5 minutes to complete A message is displayed on the control panel while the process is being executed Keep the front cover of the main unit closed until the process is completed When the Color Registration Shifts This section describes how to adjust the color registration and gradation by speci...

Страница 519: ...copy function press Start in Copier Function To perform auto color calibration using the printer function press Start in Printer Function 7 Press Start Printing 8 When using the printer function select the item to calibrate and then press Start Printing 9 Place the test pattern on the exposure glass and then press Start Scanning The test pattern will not be read if it is set into the ADF The test ...

Страница 520: ... above the test pattern Returning to the previous setting 1 Press Previous Setting When returning the auto color calibration of the copy function press Previous Setting in Copier Function If returning the auto color calibration of the printer function press Previous Setting in Printer Function 2 Press Yes 11 Troubleshooting 518 ...

Страница 521: ...ponents Unplug the power cord from the wall outlet before you move the machine While moving the machine take care that the power cord is not damaged under the machine Failing to take these precautions could result in fire or electric shock When disconnecting the power cord from the wall outlet always pull the plug not the cord Pulling the cord can damage the power cord Use of damaged power cords c...

Страница 522: ...ters keep the machine warm even if the main power switch is turned off Ventilation When you use this machine in a confined space without good ventilation for a long time or print large quantities you might detect an odd smell This might cause the output paper to also have an odd smell When you detect an odd smell regularly ventilate in order to keep the workplace comfortable Set up the machine so ...

Страница 523: ...es of extremely high temperatures such as near heaters Backing Up Hard Disk Data You can store data such as images and Address Book information on the machine s hard disk This section describes how to back up or download this data Avoid strong impact to the machine Doing so may damage the hard disk When turning off the power or disconnecting the power cord follow the proper procedures Not doing so...

Страница 524: ...uct s packaging Keep the polythene materials bags etc supplied with this machine away from babies and small children at all times Suffocation can result if polythene materials are brought into contact with the mouth or nose Do not use a vacuum cleaner to remove spilled toner including used toner Absorbed toner may cause a fire or explosion due to electrical contact flickering inside the vacuum cle...

Страница 525: ... is shut Always replace the toner cartridge when a notification appears on the machine Fault may occur if you use toner other than the recommended type When adding toner do not turn off the main power If you do settings will be lost Store toner where it will not be exposed to direct sunlight temperatures above 35 C 95 F or high humidity Store toner horizontally Do not shake the toner cartridge wit...

Страница 526: ... not printed Disposing of used toner This section describes what to do with used toner Toner cannot be re used Pack used toner containers in the container s box or a bag to prevent the toner from leaking out of the container when you dispose of it mainly Europe and Asia If you want to discard your used toner container please contact your local sales office If you discard it by yourself treat it as...

Страница 527: ...ve been in contact with toner out of reach of children If toner or used toner is inhaled gargle with plenty of water and move into a fresh air environment Consult a doctor if necessary If toner or used toner gets into your eyes flush immediately with large amounts of water Consult a doctor if necessary If toner or used toner is swallowed dilute by drinking a large amount of water Consult a doctor ...

Страница 528: ...l regarding how to replace a waste toner bottle Replace the waste toner bottle if Waste Toner Bottle is full Replace Waste Toner Bottle appears on the control panel When the Replacement of Waste Toner Bottle will soon be necessary appears on the control panel the waste toner bottle should be replaced soon Prepare a new waste toner bottle Your service representative can replace the waste toner bott...

Страница 529: ...ing combs Add new ring combs to the cartridge only when the Out of binding ring combs message appears on the control panel The ring comb cartridge can hold both 100 sheet and 50 sheet type ring combs but be sure not to mix the two sizes inside the cartridge We recommend that you prepare separate ring comb cartridges for each type and color of ring comb Store ring combs in their original packaging ...

Страница 530: ...m whose ambient temperature is 20 to 40 C 4 to 104 F away from moisture extremely high temperatures direct sunlight and open flames Keep binding glue out of the reach of children Use of non recommended glue can result in failed bindings and faulty adhesion of the cover sheet and book block To use binding glue you must first heat it To begin the heating process press the glue temperature adjustment...

Страница 531: ...formance Contact your service representative if you need to lift the machine such as when relocating it to another floor Do not attempt to lift the machine without the assistance of your service representative The machine will be damaged if it topples or is dropped resulting in malfunction and risk of injury to users The machine s various handling areas are for service engineer use only Do not tou...

Страница 532: ...ferent from those recommended a failure may occur Low temperature and humidity or high temperature and humidity The following is the recommended temperature and humidity range Temperature 10 32 C 50 89 6 F humidity to be 54 at 32 C 89 6 F Humidity 15 80 temperature to be 27 C 80 6 F at 80 Places that are exposed to direct sunlight or other sources of strong light more than 1 500 lux Places that ar...

Страница 533: ... not use any power sources other than those that match the specifications shown Doing so could result in fire or electric shock Do not use any frequencies other than those that match the specifications shown Doing so could result in fire or electric shock Do not use multi socket adaptors Doing so could result in fire or electric shock Do not use extension cords Doing so could result in fire or ele...

Страница 534: ...sentative Use of the plug could result in fire or electric shock Be sure to disconnect the power cord from the wall outlet at least once a year and check for the following The power cord s inner wires are exposed broken etc The power cord s coating has a crack or dent When bending the power cord the power turns off and on Part of the power cord becomes hot The power cord is damaged If any of the a...

Страница 535: ... or electric shock Be sure to disconnect the plug from the wall outlet and clean the prongs and the area around the prongs at least once a year Allowing dust to build up on the plug constitutes a fire hazard When performing maintenance on the machine always disconnect the power cord from the wall outlet Power Source mainly Europe and Asia 220 240 V 16 A 50 60 Hz mainly North America 208 240 V 16 A...

Страница 536: ... this manual Other parts should only be cleaned by your service representative Wipe the machine with a soft dry cloth If this does not remove the dirt wipe the machine with a damp and tightly wrung cloth If a damp cloth still does not remove the dirt try using a mild detergent Use the cleaning cloth provided with the machine to wipe the exposure glass or scanning glass If a cleaning procedure is s...

Страница 537: ... Auto Document Feeder If the ADF is dirty copy clarity may be reduced Clean these parts if they are dirty Cleaning the Machine Use the cleaning cloth provided with the machine to wipe the scanning glass 1 Wipe the sheet and guide plate of the ADF 2 1 DWP511 1 Guide plate 2 Sheet Maintaining Your Machine 535 ...

Страница 538: ...d Plug Be sure to disconnect the plug from the wall outlet at least once a year and check for the following There are burn marks on the plug The prongs on the plug are deformed If any of the above conditions exist do not use the plug and consult your dealer or service representative Use of the plug could result in fire or electric shock 12 Maintenance 536 ...

Страница 539: ...the prongs at least once a year Allowing dust to build up on the plug constitutes a fire hazard Turn off the main power switch before unplugging the power cord See page 91 Turning On Off the Power After cleaning the power cord plug make sure that the power cord is connected to the machine firmly and then connect the plug to the wall outlet Cleaning the TIM Mag Unit Before cleaning the TIM Mag unit...

Страница 540: ...2 Lower the lever C1 1 2 DWP530 3 Pull out the drawer unit until it stops 1 2 DWP531 4 Raise the cover DWP533 12 Maintenance 538 ...

Страница 541: ...P535 The revolver consists of a counter roller a shading correction plate and a glass scale When you turn off the power the counter roller stops at the upper position The shading correction plate is a plate with a white curved surface between the black counter rollers The glass scale is located between the white counter rollers Maintaining Your Machine 539 ...

Страница 542: ...Steps 6 and 7 to clean the counter roller the shading correction plate and the glass scale Wipe the shading correction plate and the glass scale in one direction either from the back to the front or from the front to the back using the cleaning cloth provided with the machine DWP543 9 Lower the cover DWP539 12 Maintenance 540 ...

Страница 543: ...10 Push the drawer into its original position 1 2 DWP540 11 Raise the lever C1 1 2 DWP541 12 Close the front cover Maintaining Your Machine 541 ...

Страница 544: ... this machine trimmer ring binder and perfect binder Once a year check that the earth leakage breaker functions properly Normally the breaker is in the On position The following procedure is explained using illustrations of the main unit and trimmer as an example 1 Turn off the main power Make sure that the main power indicator goes out 2 Open the front left cover and then turn off the AC power sw...

Страница 545: ...Trimmer CWW508 4 Check that the earth leakage breaker moves to the Off position Main unit DER116 Trimmer CWW509 Checking the Earth Leakage Breakers 543 ...

Страница 546: ... check whether the earth leakage breaker is in the Off position If the breaker is in the Off position contact your sales or service representative Do not reset the earth leakage breaker yourself Useful Information This section describes how to check the counter value telephone number for repairs or ordering consumables such as toner Counter The counter displays the total number of pages used by ea...

Страница 547: ...Bottle Staple Staple Booklet Black Binding Combs 50 sheets White Binding Combs 50 sheets Black Binding Combs 100 sheets White Binding Combs 100 sheets Binding Glue Machine Maintenance Repair Telephone No Serial No of Machine Sales Representative Telephone No Supply Order Telephone No 1 Press Home at the bottom of the screen in the center 2 Press the User Tools icon 3 Press Inquiry 4 To print an in...

Страница 548: ...epresentative s telephone number Supply Order Displays the contact number for placing supply orders Supply Details Displays the name of toner staples etc used on the machine 1 Press the Check Status key DWP146 2 Press the Maintnc Inquiry Mach Info tab 3 Press Inquiry 4 After checking the information press Close twice 12 Maintenance 546 ...

Страница 549: ...MEMO 547 ...

Страница 550: ...MEMO 548 EN GB EN US EN AU D0AK 7415 ...

Страница 551: ... 2018 ...

Страница 552: ...D0AK 7415 AU EN US EN GB EN ...

Отзывы: