background image

How to Use the [Import From Master Library] Screen

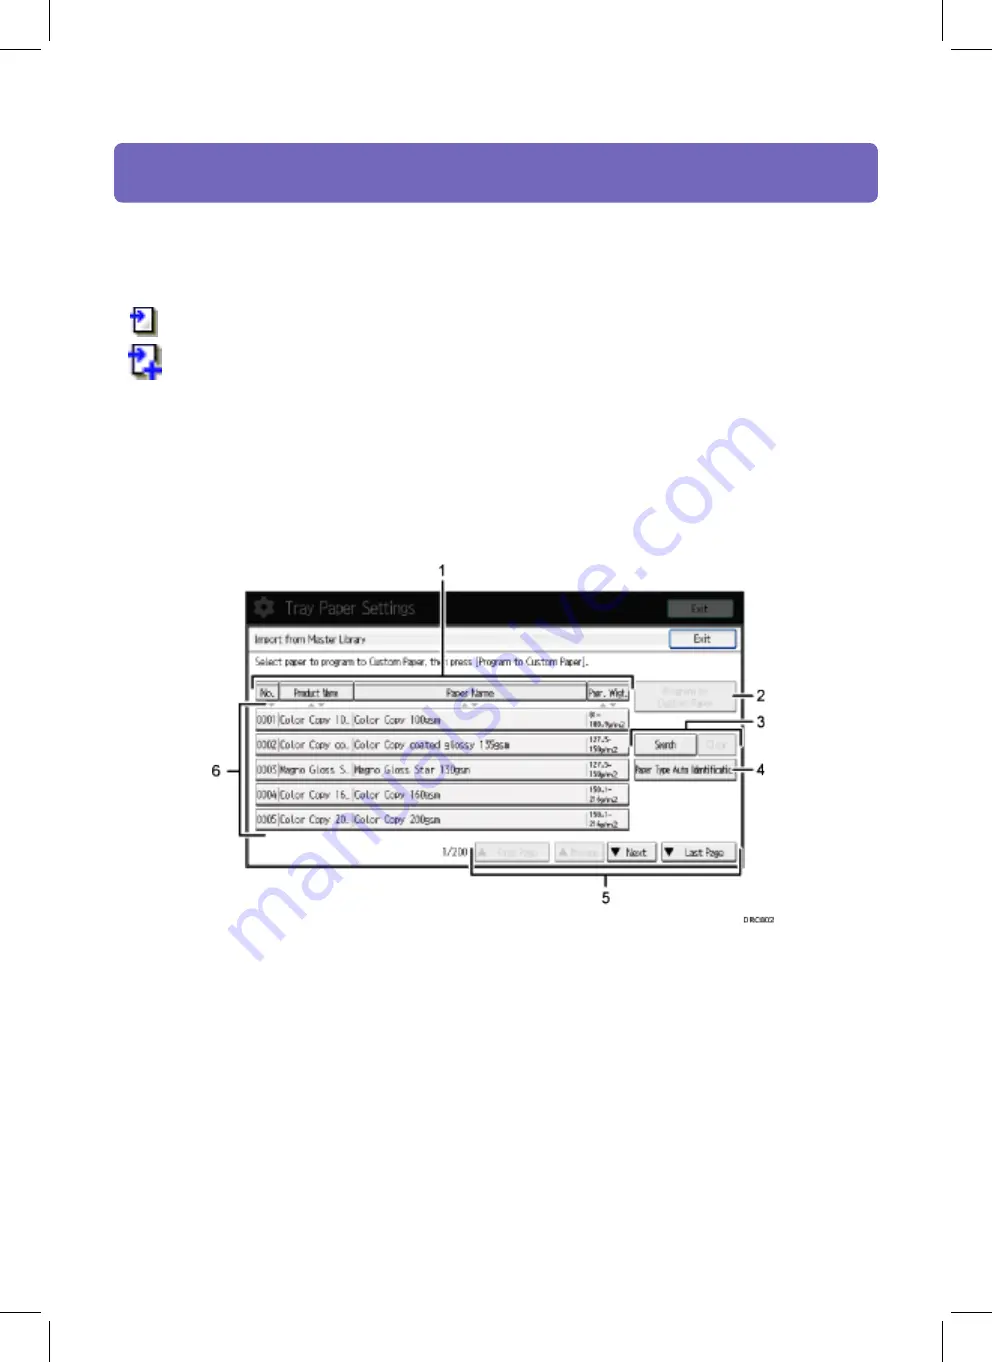
This section explains the items on the [Import from Master Library] screen.

This screen appears when you press [Import from Master Library] on the [Edit Custom Paper] screen.

1. [No.], [Product Name], [Paper Name], and [Papr. Wigt.]

Press the item to be used for the sorting.

2. [Program to Custom Paper]

Press this key to register the selected paper from the list as a custom paper

3. Search], [Clear]

Press [Search] to search the papers in the paper list. Press [Clear] to return to the paper list from the search results.

4. [Paper Type Auto Identification]

Scans paper with the Media Identification Unit, and then searches the master library for a custom paper with 
settings that are similar to those of the scanned paper.

5. [Up arrow key First Page], [Up arrow key Previous], [Down arrow key Next], [Down arrow key Last Page]

Displays the first, previous, next, or last page of the list.

6. List of papers in the library

The registration numbers, product names, paper names, and weights of library's papers are displayed in the list.

CIP Training 

Pro C5200 series 

Paper Catalogue 

12. List of custom papers

The registration numbers, product names, paper names, sizes, and weights of custom papers are displayed in the list. 
Icons to the left of the product names indicate which custom paper is registered from the master library and whether 
their settings have been modified.

 Indicates a custom paper that is registered from the master library.

Indicates a custom paper that is registered from the master library and that its settings have been modified.

No icons appear for custom papers that were registered manually.

Содержание Pro C5200 Series

Страница 1: ...4 Control Panel CIP Training Pro C5200 series...

Страница 2: ......

Страница 3: ...n check the following items under Inquiry Machine Repairs Displays the machine number and contact number which are required for service Sales Representative Displays the sales representative s telepho...

Страница 4: ...Help Displaying Top Page This section explains the Top Page and how to display Web Image Monitor When entering an IPv4 address do not begin segments with zeros For example If the address is 192 168 0...

Страница 5: ...t which allows you to switch between the administrator and guest mode 3 Refresh Help Refresh Click at the upper right in the work area to update the machine information Click the web browser s Refresh...

Страница 6: ...Press to register frequently used settings or to recall registered settings Press to program defaults for the initial display when modes are cleared or reset or immediately after the main power switc...

Страница 7: ...2 Simple Screen key Press to switch to the simple screen See Switching Screen Patterns 13 key Enter key Press to confirm values entered or items specified 14 Start key Press to start copying printing...

Страница 8: ...such as paper feed settings fusing temperatures registration and many other settings The custom paper function enables you to con gure the tray paper settings simply by assigning a custom paper to a p...

Страница 9: ...r to those of the scanned paper 5 Search Clear Press Search to search for papers in the list of custom papers Press Clear to return to the list of custom papers from the search results 6 Print the Set...

Страница 10: ...ar to those of the scanned paper 5 Up arrow key First Page Up arrow key Previous Down arrow key Next Down arrow key Last Page Displays the first previous next or last page of the list 6 List of papers...

Страница 11: ...er sizes and types that can be used see Recommended Paper Sizes and Types Paper Specifications and Adding Paper Selecting the Paper s Name from the Master Library 1 Press the Paper Setting key 2 Press...

Страница 12: ...r You can select the type of paper from the master library and register it as a custom paper even if you don t know the name of the paper The selectable paper types are as follows Plain Yellow Green B...

Страница 13: ...12 Specify the paper type and then press OK Press Change if you changed the paper type 13 Specify Coated Paper Type Paper Color Prepunched or Not Textured or Not Apply Duplex and Apply Auto Paper Sele...

Страница 14: ...per Setting key 2 Press Edit Custom Paper 3 Press New Program 4 Press Use Another Custom Paper s Settings 5 Select the custom paper whose settings you want to modify 6 Press OK 7 Change the settings f...

Страница 15: ...aster library When custom paper with configurations that are similar to those of the scanned paper is found it is displayed 2 Scanning lamp Lights up when paper is inserted into the scanning area Afte...

Страница 16: ...ress Edit Custom Paper 3 Press Import from Master Library 4 Press Paper Type Auto Identification 5 Insert paper into the Media Identi cation Unit and then remove it Hold the edges of the paper with bo...

Страница 17: ...paper size setting on the Custom Paper Management screen For details about modifying the custom paper see Modifying a Custom Paper in User Guide Registering a new custom paper with the Media Identi c...

Страница 18: ...ey Modifying the registered custom paper settings using the Media Identi cation Unit When you register and scan custom paper using the Media Identi cation Unit following items are automatically speci...

Страница 19: ...with both hands when inserting the paper Keep the paper at as you pull it out 5 Insert paper into the Media Identi cation Unit and then remove it 6 Change the settings for custom paper such as paper...

Страница 20: ...paper whose configurations are similar to those of the scanned paper appears 5 Select the custom paper you want to use and then press OK The custom papers that can be used in the selected tray appear...

Страница 21: ...right trailing edge Press to shift the image the left leading edge CIP Training Pro C5200 series Image Position registration Machine Image Position 0101 Image Position Side 1 With Feed Adjust the hori...

Страница 22: ...2 Image Position Across Feed Press to shift the image to the top Press to shift the image to the bottom Image Position registration CIP Training Pro C5200 series Side 1 Press to shift the image to the...

Страница 23: ...achine administrator can adjust the image position registered in Advanced Settings 1 Press the User Tools key Image Position registration CIP Training Pro C5200 series 2 Press the Login Logout key 3 P...

Страница 24: ...in password and then press OK password blank by default press OK Image Position registration CIP Training Pro C5200 series 4 Enter your login user name and then press OK If you are logging on as the a...

Страница 25: ...ustment appear Manual Adjustment of the registration All adjustments are between 3 0mm to 3 0mm in 0 1mm steps 001 Image Position Side 1 Across Feed 002 Image Position Side 2 Across Feed 003 Image Pos...

Страница 26: ...__________________________________________________________ __________________________________________________________________________________ __________________________________________________________...

Страница 27: ...__________________________________________________________ __________________________________________________________________________________ __________________________________________________________...

Страница 28: ......

Отзывы: