background image

4

Pla
y

ba
ck

82

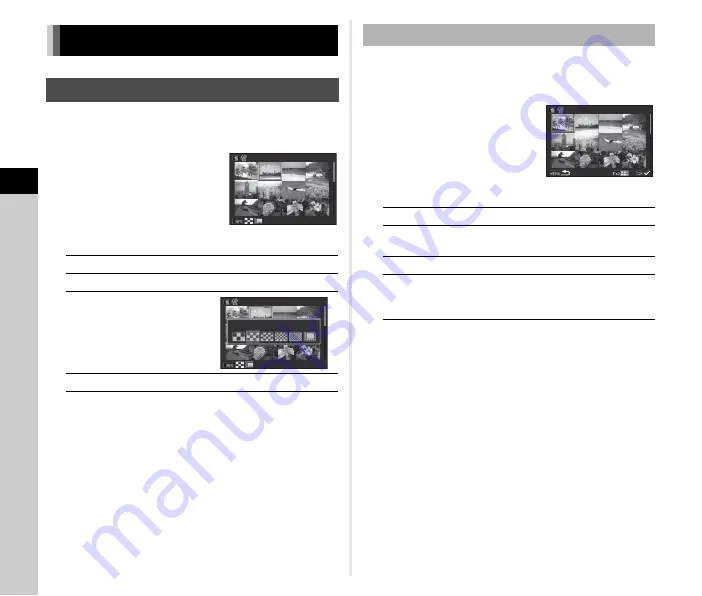
You can display 6, 12, 20, 35, or 80 thumbnail images at the 
same time.

1

Turn 

R

 to the left in 

playback mode. 

The multi-image display screen 
appears.

Available operations

2

Press 

E

.

The selected image appears in single image display.

1

Press 

L

 in Step 1 of “Displaying Multiple 

Images” (p.82).

2

Select the images to 
delete.

Available operations

In the upper left area of the monitor, the number of selected 
images is displayed.

3

Press 

L

.

The delete confirmation screen appears.

4

Select [Delete] and press 

E

.

t

 Memo

• You can select up to 500 images at a time.
• Protected images cannot be selected.
• You can delete the images selected individually along with 

the images selected by specifying the range to delete.

• Use the same steps to select multiple images for the following 

functions.
• RAW Development (p.90)
• Protect (p.110)

Changing the Playback Method

Displaying Multiple Images

ABCD

Moves the selection frame.

Q

Shows the next/previous page.

G

Shows the 
display style 
selection 
screen.

L

Deletes the selected images.

100-0505

100-0505

100-0505

100-0505

12 Thumbnail Display

12 Thumbnail Display

Deleting Selected Images

ABCD

Moves the selection frame.

E

Confirms/cancels the selection of the 
image to delete.

Z

Selects the range of images to delete.

R

Shows the selected image in single 
image display.
Use 

Q

 to select a different image.

100-0505

100-0505

001/500

001/500

Содержание pentax KP

Страница 1: ...D Jun Yao International Plaza 789 Zhaojiabang Road Xu Hui District Shanghai 200032 CHINA http www ricoh imaging com cn http www ricoh imaging co jp english This contact information may change without notice Please check the latest information on our websites SLR Digital Camera Operating Manual Introduction 1 2 Getting Started 3 Shooting 4 Playback 5 Sharing 6 Settings 7 Appendix To ensure the best...

Страница 2: ...ire electric shock or camera breakdown The specified voltage is 100 240V AC Do not disassemble or modify the product This can cause a fire or electric shock If the generation of smoke or strange odor from the product or other abnormality occurs immediately discontinue using and consult your nearest service center Continued use can cause a fire or electric shock If water should happen to get inside...

Страница 3: ...eakage from the battery should come in contact with skin or clothing it may cause irritation to the skin Wash the affected areas thoroughly with water Precautions for D LI109 Battery Usage USE SPECIFIED CHARGER ONLY DO NOT INCINERATE DO NOT DISASSEMBLE DO NOT SHORT CIRCUIT DO NOT EXPOSE TO HIGH TEMP 140 F 60 C Warning Do not place the camera and its accessories within the reach of small children 1...

Страница 4: ...2 Memo ...

Страница 5: ...3 1 2 3 4 5 6 7 Introducing the KP Getting Started Taking Pictures Playback Functions Sharing Images Changing the Settings Appendix ...

Страница 6: ...ring the Capture Settings p 48 Taking Still Pictures p 48 Recording Movies p 52 Setting the Exposure p 54 Using the Built in Flash p 57 Setting the Focus Method p 59 Setting the Drive Mode p 64 Setting the White Balance p 72 Controlling the Image Finishing Tone p 74 Correcting Images p 76 How to Use This Manual 1 Introducing the KP p 9 Gives you an overview of the KP Read this and get to know your...

Страница 7: ...nit p 121 Troubleshooting p 123 Main Specifications p 126 Index p 133 Care to be Taken During Handling p 137 WARRANTY POLICY p 141 There is a possibility that the illustrations and the display screen of the monitor in this manual are different from the actual ones 4 Playback Functions p 81 Explains various operations for playing back and editing images 5 Sharing Images p 92 Explains how to connect...

Страница 8: ...Turning the Camera On 42 Setting the Display Language 42 Setting the Date and Time 43 Setting the LCD Display 43 Formatting a Memory Card 44 Basic Shooting Operation 44 Shooting with the Viewfinder 44 Shooting while Viewing the Live View Image 46 Reviewing Images 47 Taking Pictures 48 Configuring the Capture Settings 48 Image Capture Settings 48 Movie Capture Settings 48 Taking Still Pictures 48 S...

Страница 9: ...age on the Memory Card 92 Operating the Camera with a Computer 93 Using the Camera with a Communication Device 93 Enabling the Wi Fi Function 93 Operating the Camera with a Communication Device 94 Changing the Settings 102 Camera Settings 102 Customizing the Button E dial Functions 102 Setting the Monitor and Indicator Lamps 107 Saving Frequently Used Settings 108 Selecting Settings to Save in the...

Страница 10: ...eration The liquid crystal panel used for the monitor is manufactured using extremely high precision technology Although the level of functioning pixels is 99 99 or better you should be aware that 0 01 or fewer of the pixels may not light up or may light up when they should not However this has no effect on the recorded image The Shake Reduction SR mechanism of this camera uses the PENTAX original...

Страница 11: ...ery grip terminal cover Installed on camera Grip S O GP167 Installed on camera Rechargeable lithium ion battery D LI109 Battery charger D BC109 AC plug cord Strap O ST162 Software CD ROM S SW167 Operating Manual this manual Lenses you can use Lenses that can be used with this camera are DA DA L D FA FA J and FA lenses and lenses that have an 9 Auto position on the aperture ring To use any other le...

Страница 12: ...ard slot for SD Memory Card Tripod socket Battery cover Mirror Lens unlock button Lens information contacts Strap lug Hot shoe Lens mount index Speaker AF assist light Self timer lamp Tiltable monitor Microphones Battery grip terminal Battery cover unlock lever Microphone cable release terminal DC input terminal AF coupler Grip mounting screw Image plane indicator ...

Страница 13: ...to switch to capture mode 5 Main switch Turns the power on or off p 42 6 Front e dial Q Changes the values for camera settings such as exposure p 49 You can change the menu category when a menu screen is displayed p 23 In playback mode use this to select a different image 7 Mode dial lock button Press to allow the mode dial to be turned p 45 8 Mode dial Changes the capture mode p 45 p 48 9 Flash p...

Страница 14: ...n button M Resets the value being adjusted h Playback button 3 Switches to playback mode p 47 Press the button again to switch to capture mode i Four way controller ABCD Displays the Sensitivity White Balance Flash Mode or Drive Mode setup menu p 20 When a menu or the control panel is displayed use this to move the cursor or change the item to set Press B in single image display of the playback mo...

Страница 15: ... when the status screen or Live View image is displayed Press G in standby mode to display the control panel and change settings p 21 You can change the type of information displayed in standby mode by pressing G while the control panel is displayed p 16 t Memo You can set the display color of the status screen control panel and menu cursor in Initial Settings p 42 Display Indicators Monitor Captu...

Страница 16: ... 15 13 17 16 18 19 21 23 31 30 29 27 26 25 24 28 22 15 20 12 12 9 2 3 4 5 6 7 8 102400 102400 1 1 250 250 F F 5 6 5 6 99999 99999 G1A1 G1A1 1 0 1 0 1 7EV 1 7EV 1 2000 1 2000 F2 8 F2 8 102400 102400 9999 9999 0EV 0EV 1 180 1 180 F2 8 F2 8 1600 1600 9999 9999 1 202223 3 4 9 11 27 29 10 8 7 6 31 17 2 35 16 30 36 37 13 14 15 28 18 32 26 33 34 20 Flash Mode p 57 Wireless mode channel p 120 28 File Form...

Страница 17: ...rmat p 48 23 JPEG Recorded Pixels p 48 Movie Recorded Pixels p 48 9 High ISO NR p 55 10 Clarity p 78 11 Skin Tone p 78 24 Wi Fi p 94 12 Digital Filter p 75 25 AF Active Area p 60 p 62 13 HDR Capture p 77 14 Pixel Shift Resolution p 78 26 Focus Peaking p 61 27 AE Metering p 57 10 23 10 23 1 2 3 4 9 8 11 16 21 10 15 20 12 6 5 7 17 22 13 18 23 24 14 19 33 35 34 99999 99999 Custom Image Custom Image C...

Страница 18: ...gle appears on the right side When the angle exceeds the range that can be displayed in each scale the indicator segments of the scale are displayed in red Display Off Nothing is displayed on the monitor Electronic Compass Displays the current latitude longitude altitude direction CoordinatedUniversal Time UTC capture mode and exposure value Turn the camera off and on again to return to the status...

Страница 19: ...nformation Display Only the captured image is displayed Single image display Standard Information Display Playback Info Display selection screen 1 2000 1 2000 F2 8 F2 8 200 200 0 3 0 3 100 0001 100 0001 1 2000 1 2000 F2 8 F2 8 200 200 0 3 0 3 100 0001 100 0001 G Standard Information Display Standard Information Display Detailed Information Display 1 Captured image 10 Focus Method p 59 2 Rotation i...

Страница 20: ...inge Correction p 90 43 Framerate p 48 28 Highlight Correction p 76 44 Tampered image warning 29 Shadow Correction p 76 45 Photographer p 113 46 Copyright Holder p 113 30 AA Filter Simulator p 79 47 Altitude 31 Shake Reduction Horizon Correction Movie SR 48 Lens direction 49 Latitude 50 Longitude 32 File Format p 48 51 Universal Coordinated Time Histogram Display 1 Histogram Brightness 2 RGB histo...

Страница 21: ...iopter setting until the AF frame in the viewfinder looks sharp and clear Viewfinder 1 AF frame p 45 11 Sensitivity p 54 Exposure compensation value Image storage capacity Wireless mode channel p 120 AF Active Area p 60 2 Spot metering frame p 57 3 AF point p 60 4 Flash indicator p 57 5 Focus Method p 59 6 Shutter speed AF Mode p 60 Exposure time for timed exposure in M mode Number of shots for Br...

Страница 22: ...r off Examples of Electronic Level in the Viewfinder t Memo You can assign a different function to h Y Also you can assign Electronic Level to X or Z p 102 You can select whether to display the electronic levels in Viewfinder Overlay and Live View of the A5 menu p 26 Press ABCD in standby mode Electronic Level When level at 0 When tilted 5 to the left When held vertically and tilted 3 to the right...

Страница 23: ...Function Function Dial Function Page R Disables the setting dial operation AE Changes the AE Metering method p 57 HDR Changes the capture type of HDR Capture p 77 CH CL Changes the shooting speed for Continuous Shooting p 65 C1 Changes the image finishing tone for Custom Image default setting p 74 C2 Changes the capture type of AA Filter Simulator default setting p 79 C3 Changes the brightness of ...

Страница 24: ...ault settings 4 Press E Selectable functions are displayed in the pop up menu 5 Use AB to select the function to save Select if you do not want to save any function 6 Press E The screen of Step 3 reappears 7 Press Z The control panel reappears 8 Press F The camera returns to standby mode Customizing the Control Panel Select the location of the Select the location of the Select the location of the ...

Страница 25: ... AUTO Setting ISO AUTO Setting Program Line Program Line AE Metering AE Metering Custom Image Custom Image AF with Live View AF with Live View Exit Exit Skin Tone Skin Tone Clarity Clarity HDR Capture HDR Capture Digital Filter Digital Filter Pixel Shift Resolution Pixel Shift Resolution ASTROTRACER ASTROTRACER Skin Tone Skin Tone Clarity Clarity HDR Capture HDR Capture Digital Filter Digital Filt...

Страница 26: ... certain amount of time when the subject happens to move out of the selected focusing area after being focused Low AF with Live View AF Active Area 1 2 Selects the area to adjust the focus for shooting with Live View Face Detection p 62 Focus Peaking 1 2 Emphasizes the outline and contrast of the subject in focus and makes it easier to check the focus Off p 61 AF S Setting Sets the action priority...

Страница 27: ...ts overexposed areas from occurring Auto p 76 Shadow Correction 1 Expands the dynamic range and prevents underexposed areas from occurring Auto Noise Reduction Slow Shutter Speed NR 1 Sets the Noise Reduction setting when shooting with a slow shutter speed Auto p 50 High ISO NR 1 Sets the Noise Reduction setting when shooting with a high ISO sensitivity Auto p 55 A3 Clarity 1 Changes the clarity o...

Страница 28: ...tained 35mm p 119 A5 Viewfinder Overlay Electronic Level 1 Displays the electronic level at the bottom of the viewfinder Off p 20 Superimpose AF Area Displays the active AF point in red in the viewfinder On p 19 Live View Grid Display 1 2 Sets the type and color of the grid lines displayed during Live View Off Black p 46 Electronic Level 1 Displays the electronic level during Live View On Histogra...

Страница 29: ...is pressed EV Compensation AF AE L Button Sets the function for when f is pressed Enable AF1 Function Dial C1 Assigns the functions to C1 C2 and C3 of the function dial Custom Image p 105 C2 AA Filter Simulator C3 Outdoor View Setting E Dial Program ming G Sets the Q R M operation for each exposure mode I J XG p 106 H ISO I I J J K I J GLINE L I J GLINE Rotation Direction Reverses the effect obtai...

Страница 30: ...k Info Display On Outdoor View Setting Off Night Vision LCD Display Off Operation Control Lock On Save USER Mode Save Settings You can save frequently used capture settings to O to 5 of the mode dial HDR LANDSCAPE MACRO ASTROPHOTO MANUAL LENS p 108 Rename USER Mode Changes the names of the saved USER modes to display on the monitor HDR LANDSCAPE MACRO ASTROPHOTO MANUAL LENS USER5 Check Saved Setti...

Страница 31: ...ts the number of recorded pixels of the movie u p 48 Framerate 1 Sets the frame rate of the movie 30p Recording Sound Level 1 Sets the sound volume level for recording Auto p 53 C2 D Range Settings Highlight Correction 1 Expands the dynamic range and prevents overexposed areas from occurring Auto p 76 Shadow Correction 1 Expands the dynamic range and prevents underexposed areas from occurring Auto...

Страница 32: ...i zation AF AE L Button Sets the function for when f is pressed Enable AF1 p 102 E Dial Program ming m Sets the Q R M operation for each exposure mode p 106 j I GLINE n J GLINE p I J GLINE o I J GLINE Rotation Direction Reverses the effect obtained when Q or R is turned Rotate Right Item Function Default Setting Page ...

Страница 33: ...ed images at once p 110 Delete All Images Deletes all stored images at once Quick Zoom Sets the initial magnification when magnifying images Off p 47 Playback Sound Volume Sets the sound volume during movie playback 10 p 54 LCD Display Auto Image Rotation Rotates images which were captured with the camera held vertically or of which the rotation information has been changed On p 84 Grid Display Se...

Страница 34: ...witched to AF area change mode On p 61 One Push File Format Sets whether to make a beep sound when the file format is changed with X Y or Z On p 103 Electronic Level Sets whether to make a beep sound when the Electronic Level display is turned on or off with X Y or Z On p 20 Wi Fi Sets whether to make a beep sound when the Wi Fi function is turned on or off with X On p 94 Night Vision LCD Display ...

Страница 35: ...image IMGP _IMG p 112 File No Sequential Numbering Continues the sequential numbering for the file name when a new folder is created On p 113 Reset File Number Resets the file number setting and returns to 0001 each time a new folder is created Copyright Information Sets the photographer and copyright information embedded in the Exif data Off p 113 Format Formats a memory card p 44 D5 Pixel Mappin...

Страница 36: ...he shutter while the built in flash is being charged Off p 58 9 Bracketing Order Sets the order for Bracketing shooting 0 p 66 10 One Push Bracketing Shoots all frames with one press of the release in Bracketing Off p 66 11 Interval Shooting Options Sets whether to start counting the time of interval from when exposure starts or when exposure ends for Interval Shooting Interval Composite and Inter...

Страница 37: ...et to Self timer Enable Auto SR Off p 64 20 Save Rotation Info Saves rotation information when shooting On p 84 21 Save Menu Location Saves the last menu tab displayed on the monitor and displays it again the next time F is pressed Reset Menu Location p 23 E4 22 Catch in Focus Enables Catch in Focus shooting when a manual focus lens is attached The shutter is released automatically when the subjec...

Страница 38: ... replace it with the optional Grip M O GP1671 or Grip L O GP1672 fully loosen the grip mounting screw using the hex wrench supplied with the optional grip and remove the grip The screw cannot be removed from the grip Attach the grip to the camera so that the tabs of the grip are engaged in the slots on the camera and securely tighten the grip mounting screw The optional Battery Grip D BG7 is suppl...

Страница 39: ...n a lens is not attached Be sure to attach the lens mount cover and lens cap to the lens after removing it from the camera Do not insert your fingers inside the lens mount of the camera or touch the mirror The camera body and lens mount incorporate lens information contacts Dirt dust or corrosion may damage the electrical system Please contact your nearest service center for professional cleaning ...

Страница 40: ...ully charged u Caution Do not use the battery charger D BC109 to charge batteries other than the battery D LI109 Charging other batteries may cause damage or heating Replace the battery with a new one in the following cases If the indicator lamp blinks or does not light after the battery is inserted correctly If the battery starts to run down more quickly even after being charged the battery may h...

Страница 41: ...time may be reset if you leave the battery out of the camera for long periods of time If this happens set the current date and time again p 42 1 Open the battery cover Slide the battery cover unlock lever 1 before opening the cover 2 Face the A mark on the battery towards the lens mount side of the camera and insert the battery until it locks into place To remove the battery push the battery lock ...

Страница 42: ...emory card or data may be corrupted if the connection to the power supply is lost while the card is being accessed Be sure to read the manual of the AC adapter kit before using the AC adapter The following memory cards can be used with this camera SD Memory Card SDHC Memory Card SDXC Memory Card In this manual these cards are referred to as memory cards 1 Make sure that the camera is turned off 2 ...

Страница 43: ...ith the recording speed writing may stop during recording You can adjust the monitor angle in vertical direction 1 Hold the camera grip with your right hand and hold the top of the monitor with your left hand 2 Slowly pull open the monitor until it stops 3 Hold the bottom of the monitor and lift upward 4 Adjust the angle Perform Step 3 and then Step 2 towards directions opposite to the arrows to r...

Страница 44: ...to select DST daylight saving time and use CD to select Y or Z 5 Press E The camera returns to the Initial Setting screen 6 Press B to select Text Size and press D 7 Use AB to select Std or Large and press E Selecting Large increases the text size of the selected menu item 8 Press B to select Settings complete and press E The Date Adjustment screen appears Initial Settings Turning the Camera On Se...

Страница 45: ...e language text size and date and time settings from the D1 menu and the display color from Other Display Settings of the A5 menu p 27 p 32 Setting the Date and Time 00 00 00 00 Time Time Date Date Date Format Date Format mm dd yy mm dd yy 01 01 2017 01 01 2017 Date Adjustment Date Adjustment Settings complete Settings complete Cancel Cancel OK OK 00 00 00 00 Time Time Date Date Date Format Date F...

Страница 46: ...ected to a computer the memory card is recognized as a removable disk with the name KP Take pictures in R Scene Analyze Auto mode in which the camera analyzes shooting conditions and automatically sets the optimal shooting settings 1 Remove the front lens cap by pushing the top and bottom portions as indicated in the illustration When a retractable lens is attached extend the lens before turning t...

Страница 47: ...ble operations during Instant Review t Memo You can use f to focus on the subject p 59 You can select whether to make a beep sound and change the sound volume in Sound Effects of the D1 menu p 32 You can set the operation and display settings for Instant Review in Instant Review of the A5 menu p 26 When Display Time is set to Hold the Instant Review image is displayed until the next operation u Ca...

Страница 48: ... can magnify the image using the Smart Function in Step 2 p 21 p 105 How to Use a Retractable Lens If the camera is turned on when a retractable lens such as smc PENTAX DA L 18 50mm F4 5 6 DC WR RE is attached and is not extended an error message is displayed on the monitor Turn the zoom ring in the direction of 2 while pressing the button on the ring 1 to extend the lens When retracting the lens ...

Страница 49: ...of LCD Display in the B1 menu p 31 You can change the Grid Display LCD Display Options Image Magnification and Outdoor View Setting settings using the Smart Function during playback when these features are assigned to the function dial p 21 p 105 Reviewing Images 1 2000 1 2000 F2 8 F2 8 200 200 0 0 0 0 100 0001 100 0001 C Q to the left Displays the previous image D Q to the right Displays the next...

Страница 50: ... this camera t Memo You can save frequently used exposure modes and capture settings to O to 5 and replace the preset settings with them p 108 Configuring the Capture Settings Image Capture Settings A2 File Format JPEG RAW RAW JPEG Recorded Pixels q p o r JPEG Quality m l k RAW File Format PEF DNG Color Space sRGB AdobeRGB Movie Capture Settings C1 Recorded Pixels Frame Rate u 60i 50i 30p 25p 24p ...

Страница 51: ...r During Live View D appears for the value that can be changed 2 Turn R The aperture value is changed in J K L or M mode The sensitivity is changed in H mode 3 Turn Q The shutter speed is changed in I K or L mode Shooting in Exposure Modes Mode Change Shutter Speed Change Aperture Value Change Sensitivity EV Compen sation G Program Automatic Exposure 1 1 x x H Sensitivity Priority Automatic Exposu...

Страница 52: ...you can specify how the exposure is controlled t Memo The Program Line setting is enabled in the following situations In G or H mode When GLINE is set for the M operation of K or L in E Dial Programming of Button Customization in the A5 menu When Program Line is assigned to the function dial you can change the setting using the Smart Function p 21 p 105 Reducing Noise when Shooting with a Slow Shu...

Страница 53: ...res p 104 Locking the Exposure To lock the exposure before shooting use the AE Lock function This function can be used by assigning AE Lock to X Y Z or f p 102 Disabling Operation Controls Specific functions or operations of buttons and dials can be temporarily disabled to prevent misoperation during shooting by assigning Operation Control Lock to X Y or Z p 102 Turning R while pressing the button...

Страница 54: ...d p 46 can deliver quieter shooting with less mirror movement sound When Shutter Mode Selection is assigned to the function dial you can change the setting using the Smart Function p 21 p 105 1 Set the A K C switch to C The Live View image is displayed 2 Set the mode dial to the desired capture mode The following settings are available depending on the capture mode 3 Use Q or R to set the exposure...

Страница 55: ...fications to the microphone cable release terminal Also do not use an external microphone with a 3 meter or longer cable Doing so may cause the camera to malfunction If an external microphone is used when recording a movie with the Wi Fi function enabled radio noise may be recorded depending on the compatibility with the microphone Button Customization setting Autofocus operation when f is pressed...

Страница 56: ...with the EV step setting for the exposure set from 2 Sensitivity Steps of the E1 menu When the sensitivity is set to ISO 102400 or higher ISO value is displayed in the viewfinder by a combination of the letter H and a three digit number e g ISO 102400 H102 Playing Back Movies A Plays back pauses a movie D Forwards a frame when paused Press and hold D Fast forwards playback C Reverses a frame when ...

Страница 57: ...Range Maximum Sets the upper limit value for ISO AUTO ISO Range Minimum Sets the lower limit value for ISO AUTO ISO Sensitivity Options Sets whether to set the minimum shutter speed automatically AUTO or manually Tv Minimum Shutter Speed When ISO Sensitivity Options is set to AUTO Slow Std Fast When ISO Sensitivity Options is set to Tv 1 6000 to 30 99999 99999 3200 3200 1 1 250 250 F F 5 6 5 6 640...

Страница 58: ...es while automatically changing the exposure p 66 You can assign other functions to J Z Also you can assign EV Compensation to X or Y p 102 When EV Compensation is assigned to the function dial you can change the setting using the Smart Function p 21 p 105 R Shows the next previous page M Resets the Noise Reduction level to the default setting 1 100 100 200 200 400 400 800 800 1600 1600 3200 3200 ...

Страница 59: ...s Using the Built in Flash A Auto Flash Discharge Automatically measures the ambient light and determines whether to use the flash B Auto Flash Red eye Discharges a pre flash for red eye reduction before an automatic flash C Flash On Discharges a flash for each picture D Flash On Red eye Discharges a pre flash for red eye reduction before the main flash for each picture E Slow speed Sync Sets to a...

Страница 60: ... desired shutter speed of 1 180 seconds or slower can be set The built in flash is optimum for a subject at a distance from approx 0 7 m to 5 m Vignetting may occur when used at a distance closer than 0 7 m this distance varies slightly depending on the lens being used and the sensitivity setting For details on the use of external flashes refer to Functions when Using an External Flash p 120 R Com...

Страница 61: ...rom x y or z mode which enables automatically switching between x and y Faster autofocus performance than the contrast detection AF is possible p 59 Shooting with Live View Contrast detection AF Face Detection and Tracking are available p 61 Focusing on the Subject Using the f Button You can use f to focus on the subject The f button operation can be set in Button Customization of the A5 and C2 me...

Страница 62: ... selected 9 AF points the camera automatically selects the optimum focusing area E Select Sets the focusing area to the user selected point from 27 points F Expanded Area AF S Sets the focusing area to the user selected point from 27 points When the subject happens to move out of the selected focusing area after being focused 8 peripheral points are used as back up points Available only in y mode ...

Страница 63: ... Edge the outline and contrast of the subject in focus is emphasized and this makes it easier to check the focus This function works in both v and w modes The outline of the subject is not emphasized while autofocus is performed or a movie is recorded Histogram Display and Highlight Alert become inactive while the outline of the subject is emphasized ABCD Changes the AF point E Returns the AF poin...

Страница 64: ...lect is selected 2 Press and hold E AF Mode 99 99 99 99 Multiple AF Points Multiple AF Points AF Active Area e Face Detection Detects and tracks faces of people The main face detection frame for AF and AE is displayed in yellow f Tracking Tracks the subject in focus The shutter can be released even if the subject is not in focus 0 MultipleAF Points Sets the focusing area to the desired area The se...

Страница 65: ...Apply All or Apply One and press E 3 Select Setting and adjust the value Available operations 4 Press E The adjustment value is saved 5 Press F twice The camera returns to standby mode ABCD Changes the position of the AF area R Increases reduces the size of the AF area when Multiple AF Points is selected M Returns the AF area to the center OK OK AF Fine Adjustment E4 Apply All Applies the same adj...

Страница 66: ...es pictures while 0 is kept pressed p 65 Self timer O P Y Releases the shutter about 12 seconds or 2 seconds after 0 is pressed p 65 Bracketing T 1 Takes consecutive pictures at different exposure levels p 66 Depth of Field Bracketing x y Takes consecutive pictures at different depth of fields aperture values p 67 Motion Bracketing u v Takes consecutive pictures at different shutter speeds p 68 Mi...

Страница 67: ... 5 Press E The screen of Step 1 reappears 6 Press E The camera returns to standby mode 7 Press 0 halfway and then fully The shutter is released after about 12 seconds or 2 seconds Continuous Shooting Z Continuous Shooting at high speed a Continuous Shooting at medium speed b Continuous Shooting at low speed Continuous Shooting H Continuous Shooting H Cancel Cancel OK OK Self timer O Self timer shu...

Страница 68: ... EV steps according to the 1 EV Steps setting of the E1 menu The following settings for Bracketing can be set in the E2 menu When Bracket Value is assigned to the function dial you can change the bracket value using the Smart Function p 21 p 105 Bracketing T Bracketing 1 Bracketing Self timer Q Sets the number of shots R Changes the bracket value J R Adjusts the exposure compensation value M Reset...

Страница 69: ... The bracket value can be set in increments of 1 3 EV steps or 1 2 EV steps according to the 1 EV Steps setting of the E1 menu u Caution When using a lens with an 9 position if the aperture ring is set to a position other than 9 Depth of Field Bracketing cannot be selected Depth of Field Bracketing x Bracketing y Bracketing Self timer 1 0 1 0 Depth of Field Bracketing Depth of Field Bracketing Can...

Страница 70: ...ode 8 Shoot Takes three pictures with one release of the shutter The camera returns to standby mode t Memo The bracket value can be set in increments of 1 3 EV steps or 1 2 EV steps according to the 1 EV Steps setting of the E1 menu Motion Bracketing u Bracketing v Bracketing Self timer 1 0 1 0 Motion Bracketing Motion Bracketing Cancel Cancel OK OK Reset Reset Motion Bracketing Motion Bracketing ...

Страница 71: ...t the shooting conditions 5 Press E The screen of Step 1 reappears 6 Press E The camera returns to standby mode Mirror Lock up Shooting Mirror Lock up Shooting Mirror Lock up Shooting Cancel Cancel OK OK Multi exposure V Multi exposure z Multi exposure Continuous Shooting W Multi exposure Self timer Composite Mode Select from Average Additive or Bright Number of Shots Select from 2 to 2000 times S...

Страница 72: ... composite image replacing only the portions that are brighter compared with the first image Interval Shooting q Interval Shooting Takes pictures at set intervals and saves them U Interval Composite Takes pictures at set intervals and merges them into a single image V Interval Movie Record Takes still pictures at set intervals and saves them as a single movie file Motion JPEG file extension AVI w ...

Страница 73: ...the specified number of shots are taken In such cases you can set Standby Interval in 11 Interval Shooting Options of the E2 menu so that pictures are taken at the set intervals after each exposure ends The screen displayed in Step 4 varies depending on the 11 Interval Shooting Options setting For q U V and w the focus position used when the first picture is taken is locked In order to perform aut...

Страница 74: ...rding to the light source of each area Multi Auto White Balance is not available in C mode The following settings for the white balance can be set in the E2 3 menus Setting the White Balance g Auto White Balance u Multi Auto White Balance h Daylight i Shade j Cloudy k q Fluorescent Daylight Color r Fluorescent Daylight White s Fluorescent Cool White t Fluorescent Warm White l Tungsten n Color Temp...

Страница 75: ... can specify the white balance with the color temperature 1 Select p in Step 2 of Setting the White Balance p 72 2 Use R to select 1 to 3 3 Press G 4 Adjust the color temperature Set the color temperature value within the range from 2 500K to 10 000K Available operations 5 Press E The White Balance setting screen reappears t Memo Select Mired in 16 Color Temperature Steps of the E3 menu to set the...

Страница 76: ...disabled when the drive mode is set to Mirror Lock up Shooting Multi exposure or Interval Shooting When Custom Image is assigned to the function dial you can change the image finishing tone using the Smart Function p 21 p 105 By default Custom Image is assigned to C1 Controlling the Image Finishing Tone Custom Image A1 C1 Auto Select Bright Natural Portrait Landscape Vibrant Radiant Muted Flat Ble...

Страница 77: ...lecting one of the Favorite settings 1 to 3 for the parameter 1 Select Digital Filter in the A3 or C2 menu and press D The Digital Filter setting screen appears 2 Select a filter Select No Filter to not shoot with a digital filter Available operations when shooting with the viewfinder Proceed to Step 6 if you do not need to change the parameters 3 Press G The parameter setting screen appears Savin...

Страница 78: ...yback mode p 87 Expands the dynamic range and enables a wider range of tones to be recorded by the CMOS sensor and reduces the occurrence of overexposed underexposed areas Set the correction functions from D Range Settings of the A2 or C2 menu u Caution When the sensitivity is set to less than ISO 200 Highlight Correction cannot be set to On t Memo Highlight Correction in C mode can be set to Auto...

Страница 79: ...n a compatible lens is attached p 116 The features are disabled when an accessory such as a rear converter is attached between the camera and the lens When File Format is set to RAW or RAW in Image Capture Settings of the A2 menu correction information is saved as a RAW file parameter and you can select whether to apply the correction to the images when developing them When developing RAW images t...

Страница 80: ...ift Resolution is disabled This function cannot be used in combination with some other functions p 115 AA Filter Simulator and Shake Reduction of the A4 menu are fixed to Off Shutter Mode Selection of the A2 menu is fixed to Electronic Shutter Quality Level and Texture Adjustment Adjusting the Texture A3 Enhancing the Skin Tone A3 Type1 Determines the skin tone of the subject by the Face Detection...

Страница 81: ...Capture in the A3 menu is set AA Filter Simulator is fixed to Off When the shutter speed is faster than 1 1000 seconds the full effect of this function cannot be achieved t Memo When AA Filter Simulator is assigned to the function dial you can change the capture type using the Smart Function p 21 p 105 By default AA Filter Simulator is assigned to C2 Reducing Color Moiré A4 Type1 Takes pictures wh...

Страница 82: ...Live View u Caution You cannot use this function when the ASTROTRACER function is used t Memo When Grid Display is set to On in Live View of the A5 menu grid lines are displayed on the screen of Step 4 The adjusted composition is saved even if Live View is ended or the camera is turned off To reset the saved adjustment value when the camera is turned off set Composition Adjust to Y Off in Memory o...

Страница 83: ...s p 87 d Resize 1 2 Changes the number of recorded pixels of an image p 86 e Cropping 1 Crops out only the desired area of an image p 86 f Protect Protects images from being accidentally erased p 110 h Slideshow Plays back images one after another p 84 i Save as Manual WB 1 Saves the white balance settings of a captured image as Manual White Balance p 73 j Save Cross Processing Saves the settings ...

Страница 84: ...ot be selected You can delete the images selected individually along with the images selected by specifying the range to delete Use the same steps to select multiple images for the following functions RAW Development p 90 Protect p 110 Changing the Playback Method Displaying Multiple Images ABCD Moves the selection frame Q Shows the next previous page G Shows the display style selection screen L D...

Страница 85: ... Multiple Images p 82 The display style selection screen appears 2 Select Calendar Filmstrip Display Available operations 3 Press E The selected image appears in single image display Displaying Images by Folder ABCD Moves the selection frame L Deletes the selected folder Deleting a Folder 100_0707 100_0707 100 100 101 101 102 102 103 103 104 104 105 105 106 106 107 107 123 123 Displaying Images by...

Страница 86: ...n single image display 2 Select Image Rotation in the playback mode palette The selected image is rotated in 90 increments and the four thumbnail images are displayed 3 Use ABCD to select the desired rotation direction and press E The image rotation information is saved and the camera returns to single image display mode u Caution When 20 Save Rotation Info is set to Off in the E3 menu image rotat...

Страница 87: ... connected to an AV device nothing is displayed on the camera monitor Also you cannot adjust the sound volume on the camera Adjust the volume on the AV device Some HDMI adapters are not compatible with this camera Proper operation has been confirmed with the following HDMI adapter SP6001 Analogix Semiconductor Inc Do not supply power to an HDMI adapter from an external power source This may cause ...

Страница 88: ... and press E Crops out only the desired area of the selected image and saves it as a new file 1 Display the image to edit in single image display 2 Select Cropping in the playback mode palette The cropping frame to specify the size and position of the area to crop appears on the screen 3 Specify the size and position of the area to crop by using the cropping frame Available operations 4 Press E Th...

Страница 89: ...e image display 2 Select Digital Filter in the playback mode palette The screen to select a filter appears 3 Select a filter Use Q to select a different image Proceed to Step 7 if you do not need to change the parameters 4 Press G The parameter setting screen appears Correcting Color Moiré Cancel Cancel OK OK Processing Images with Digital Filters Base Parameter Adj Extract Color Replace Color Toy...

Страница 90: ...ear 4 To check the parameter details press G Press G again to return to the previous screen 5 Press E The image selection screen appears 6 Use Q to select an image for applying the same filter effects and press E You can only select an image that has not been processed with a filter The save confirmation screen appears 7 Select Save and press E t Memo If Searching for original image is selected in...

Страница 91: ... cancel the selection 6 Press F The screen of Step 3 reappears 7 Press E The save confirmation screen appears 8 Select Save and press E t Memo Select dividing points in chronological order from the beginning of the movie When canceling the selected dividing points cancel each of them in reverse order from the end of the movie to the beginning In an order other than specified you can neither select...

Страница 92: ... Develops an image Select multiple images Develops up to 500 images with the same settings Select a folder Develops up to 500 images in the selected folder with the same settings Develop images as shot Allows you to change only File Format Aspect Ratio JPEG Recorded Pixels JPEG Quality and Color Space Developimages with modified settings Allows you to change all setting items 100 0001 100 0001 001...

Страница 93: ... The Lens Correction settings cannot be changed when developing RAW images t Memo When Select multiple images or Select a folder is selected in Step 2 a folder with a new number is created and the JPEG or TIFF images are stored in it For HDR Capture and Pixel Shift Resolution the parameters of either one of the two functions used during shooting can be changed With the provided software Digital Ca...

Страница 94: ...nect the USB cable to the USB video output terminal 4 Connect the USB cable to the USB port of the computer 5 Turn the camera on The camera is recognized as a removable disk 6 Save the captured images to the computer 7 Disconnect the camera from the computer u Caution The camera cannot be operated while it is connected to a computer To operate the camera terminate the USB connection on the compute...

Страница 95: ...llowing methods Setting from the menus p 94 Using the X button p 94 When the Wi Fi function is enabled a beep sounds and the 7 white icon indicating the wireless LAN status is displayed on the status screen and Live View screen When 8 gray is displayed a connection with the communication device is not established correctly t Memo Even after the Wi Fi function is enabled it returns to an inactive s...

Страница 96: ...s iOS and Android and can be downloaded from the App Store or Google Play For the supported operating system and other details refer to the download site t Memo The Image Sync screenshots used in this manual are the ones under development and may differ from the actual display The screen layout and elements may be also changed due to causes such as the version upgrade of the application or operati...

Страница 97: ...on device 3 Tap PENTAX KP The Choose a Network screen appears on the communication device 4 Tap PENTAX_xxxxxx in the Network List The Enter Password screen appears 5 Enter the password and tap Connect A Wi Fi connection is established between the camera and the communication device The list of images appears on the Image Sync screen t Memo Refer to Communication Info in Wi Fi of the D3 menu for th...

Страница 98: ... between the camera and the communication device 4 Start Image Sync on the communication device Image Sync is started and the list of images appears Flick left or right on the screen to switch operation modes t Memo You can change the operation mode also by tapping the buttons displayed at the bottom of the screen When an iOS Device is Used Screens of Image Sync Application image list Camera image...

Страница 99: ...nc as necessary Shooting with a Communication Device 1 Settings p 100 2 Capture mode 3 Live View 4 AF frame 5 White Balance Shutter Speed Aperture value EV Compensation Sensitivity 6 Live View on off 7 Operation modes 8 Communication icon 9 Battery level 10 Thumbnail of the last captured image When tapped the camera image list is displayed 11 File Format Image storage capacity 12 Drive Mode 13 Gre...

Страница 100: ...nnot be performed if there is not enough available space on the memory card t Memo Shooting can also be performed by tapping the Live View image Set in Touch AF on the Settings screen p 100 While shooting with Image Sync the autofocus system operates in x mode regardless of the autofocus mode setting and the shutter release has priority regardless of the AF S Setting setting of AF with Live View i...

Страница 101: ...e location album from Application or Gallery or Camera Roll 1 Tap 4 2 Select the album The images in the selected album are displayed 1 Tap 5 2 Tap the images to select Blue check marks appear 3 Touch and hold one of the selected images Selecting the Image Storage Location Selecting Multiple Images ...

Страница 102: ...p 6 The Settings screen appears The following settings are available Changing the Settings Touch AF Sets whether to perform only autofocus or perform shooting after autofocus when touching the Live View image Image Capture Settings Changes the settings for File Format and JPEG Recorded Pixels Composition Adjustment Turns the composition adjustment function on or off General Settings Changes the co...

Страница 103: ...tings to change the communication settings and the display language 3 Tap the setting item to change Communication Settings The password and wireless channel can be changed Device Information Language 4 Change the settings and tap 1 ...

Страница 104: ...on Page Fx1 Button Fx2 Button Fx3 Button EV Compen sation Sets the exposure compensation value assigned to Z by default p 56 Sensitivity Sets the ISO sensitivity p 55 Preview Displays the preview image to check the composition exposure and focus before shooting p 104 AE Lock Locks the exposure settings p 51 Change AF Area Switches the function of the arrow keys to AF area change mode or direct key...

Страница 105: ...to X 1 Set One Push File Format to Fx1 Button Fx2 Button or Fx3 Button in Step 3 of Setting the Button Operation p 102 2 Select Z or Y for Cancel after 1 shot 3 Select the file format when the button is pressed The left side is the File Format setting and the right side is the changed file format when the button is pressed 4 Press F three times The camera returns to standby mode t Memo When the bu...

Страница 106: ...ome functions cannot be checked during Digital Preview or are not applied to the saved preview image Setting the Preview U Optical Preview Activates the Optical Preview function to check the depth of field with the viewfinder f Digital Preview Activates the Digital Preview function to check the composition exposure and focus on the monitor Zoom Review Save Preview Image Histogram Display and Highl...

Страница 107: ... focusing area selection mode p 60 p 62 2 Button Customization Button Customization E Dial Programming E Dial Programming Function Dial Function Dial Function Dial Function Dial AA Filter Simulator AA Filter Simulator Outdoor View Setting Outdoor View Setting Custom Image Custom Image Focus Peaking Changes the Focus Peaking setting p 61 Program Line Changes the Program Line setting p 50 Shutter Mo...

Страница 108: ...he E Dial Programming screen appears 3 Select an exposure mode and press D The screen for the selected exposure mode appears 4 Press D and use AB to select the combination of functions for when Q and R are turned and M is pressed 5 Press E 99999 99999 Custom Image Custom Image Setting the E dial Operation I Change Shutter Speed J Change Aperture Value ISO Change Sensitivity e EV Compensation XG Re...

Страница 109: ...Select LCD Display Settings in the D2 menu and press D The LCD Display Settings screen appears 2 Adjust the brightness saturation and color Available operations 3 Press E The D2 menu reappears u Caution When Outdoor View Setting is set LCD Display Settings cannot be changed Setting the Monitor and Indicator Lamps D2 Adjusting the Brightness Saturation and Color of the Monitor AB Selects a paramete...

Страница 110: ...ave USER Mode screen appears 3 Select Save Settings and press D The Save Settings screen appears 4 Select a USER mode from USER1 to USER5 and press D 5 Select Save and press E 6 Press F The screen of Step 3 reappears u Caution Save USER Mode cannot be selected when the mode dial is set to R or in C mode Adjusting the Brightness of the Monitor for Outdoor Shooting Setting the Lighting up of the Ind...

Страница 111: ... mode can be changed in Exposure Mode of the A1 menu t Memo The settings changed in Step 2 are not saved as the USER mode settings When the camera is turned off the camera returns to the saved USER settings To change the saved settings save the USER mode settings again Editing a Setting Name ABCD Moves the text selection cursor R Moves the text input cursor Z Switches between upper and lower case ...

Страница 112: ...ype appears 2 Select Select image s or Select a folder and press E 3 Select the image s or folder to protect Proceed to Step 5 if Select a folder is selected y How to select image s p 82 4 Press G The confirmation screen appears 5 Select Protect and press E t Memo To protect all images stored on the memory card select Protect All Images of the B1 menu Selecting Settings to Save in the Camera A5 Se...

Страница 113: ...een appears 4 Change the text Enter five single byte alphanumeric characters Available operations 5 After entering the text move the text selection cursor to Finish and press E 6 Press F twice Specifying the Folder File Settings D4 Create New Folder Folder Name _MMDD _MMDD Folder Name Folder Name Date Date Folder Name Folder Name Optional Optional Date The four digits of the month and day of the s...

Страница 114: ...ng of Image Capture Settings in the A2 menu The first four characters can be changed to a character string of your choice 1 Select File Name in the D4 menu and press D The File Name screen appears 2 Select A or C and press D The text entry screen appears 3 Change the text Up to four single byte alphanumeric characters can be entered as an alternative for the first part of the file name while the a...

Страница 115: ...ic characters and symbols can be entered y How to enter text p 109 5 Press F twice t Memo The Exif information can be checked in Detailed Information Display of the playback mode p 17 or using the provided software Digital Camera Utility 5 File No Z Continues the sequential numbering for the file name even if a new folder is created Y Returns the file number of the first image saved to a folder to...

Страница 116: ...tination and press D The G Destination screen appears 4 Use CD to select a city Use R to change the region 5 Select DST daylight saving time and use CD to select Y or Z 6 Press E The screen of Step 2 reappears 7 Press F twice t Memo Refer to List of World Time Cities p 131 for cities that can be selected as a hometown or destination Select F Hometown in Step 3 to change the city and DST settings f...

Страница 117: ...onic Shutter Clarity Skin Tone Digital Filter HDR Capture Pixel Shift Resolution ASTRO TRACER AA Filter Simulator Distortion Correction Diffraction Correction Save RAW Data Flash Drive Mode Continuous Shooting 3 Bracketing Depth of Field Bracketing Motion Bracketing 3 4 Mirror Lock up Shooting 3 Multi exposure 3 Interval Shooting 1 1 2 3 4 Interval Composite 3 4 Interval Movie Record 1 1 2 3 Star ...

Страница 118: ...8 ED IF and FAk250 600mm F5 6 ED IF 8 Fixed to Spot 9 J with the aperture set to wide open The aperture ring has no effect on the actual aperture value u Caution When the aperture ring is set to a position other than 9 or a lens without an 9 position or accessories such as an extension tube are used the camera does not operate unless 24 Using Aperture Ring is set to Enable in the E4 menu Refer to ...

Страница 119: ...en the focal length is 20 mm or less or when the focal length is 35 mm and the shooting distance is less than 1 5 m vignetting may occur DA 16 85mm F3 5 5 6 ED DC WR When the focal length is 24 mm or less and the shooting distance is 0 8 m or less vignetting may occur DA 17 70mm F4 AL IF SDM When the focal length is less than 24 mm or when the focal length is 35 mm and the shooting distance is 1 m...

Страница 120: ...tion to the open aperture but an exposure deviation may occur D FA FA F A M S with diaphragm accessories such as Extension Tube K Pictures can be taken with the set aperture value but an exposure deviation may occur Manual diaphragm lens such as reflex lens lens only FA SOFT 28mm FA SOFT 85mm F SOFT 85mm lens only Pictures can be taken with the set aperture value within a manually adjustable apert...

Страница 121: ...nction operates by obtaining the lens information such as focal length Set the focal length when using a lens that the focal length information cannot be automatically obtained 1 Set 24 Using Aperture Ring to Enable in the E4 menu 2 Turn the camera off 3 Attach a lens to the camera and turn the camera on The Input Focal Length screen appears 4 Use AB to set the focal length Press C to select a val...

Страница 122: ... of contacts such as Hot Shoe Grip as a malfunction may occur Combining with flashes from other manufacturers may cause equipment breakdown t Memo With the AF540FGZ AF540FGZ II AF360FGZ or AF360FGZ II you can use the high speed sync flash to discharge a flash and take a picture at a shutter speed faster than 1 180 seconds Set the capture mode to I K or L By using two or more external flashes AF540...

Страница 123: ...irection Coordinated Universal Time UTC capture mode and exposure value Select Electronic Compass in Shooting Info Display p 16 ASTRO TRACER Tracks and captures celestial bodies By matching the movement of the camera s built in Shake Reduction unit with the movement of celestial bodies celestial bodies can be captured as individual points even when shooting with a long exposure setting p 121 GPS T...

Страница 124: ...le operations 3 Adjust the focus and press 0 fully Shooting starts 4 Press 0 fully again Shooting stops When the timed exposure is enabled shooting stops automatically after the set time has elapsed u Caution This function cannot be used in some capture modes or in combination with some other functions p 115 Shooting with the ASTROTRACER M Enables Disables the timed exposure Q Changes the exposure...

Страница 125: ...olors intricate designs rapidly moving objects or scenery shot through a window or a net like pattern Lock the focus on another object located at the same distance as your subject then aim at the target and take a picture Alternatively use w The subject is too close Move away from the subject and take a picture The focus cannot be locked AF Active Area of Live View is set to Tracking Set AF Active...

Страница 126: ...of the blower inside the lens mount area If the power is turned off during cleaning it may cause damage to the shutter the CMOS sensor and the mirror Hold the camera with the lens mount down while cleaning the sensor so dust will fall away from the camera when the blower is used When the battery level is low the message Not enough battery power remaining to clean sensor is displayed on the monitor...

Страница 127: ...r Not enough battery power remaining to update the firmware Unable to update firmware There is a problem with the firmware update file The firmware cannot be updated The update file is damaged Try downloading the update file again Image folder cannot be created The maximum folder number 999 is being used and no more images can be saved Insert a new memory card or format the card Unable to store im...

Страница 128: ... 4000 Quality Level RAW 14bit PEF DNG JPEG m Best l Better k Good RAW JPEG simultaneously recordable Color Space sRGB AdobeRGB Storage Media SD SDHC and SDXC memory cards UHS I compatible Storage Folder Folder Name Date 100_1018 101_1019 or user assigned name default PENTX Storage File File Name user assigned name default IMGP File No Sequential Numbering Reset Type Pentaprism Finder Coverage FOV ...

Страница 129: ...n Button Customization Type Mechanical shutter electronically controlled vertical run focal plane shutter Electronic shutter Shutter Speed Mechanical shutter Auto 1 6000 to 30 seconds Manual 1 6000 to 30 seconds 1 3 EV steps or 1 2 EV steps Bulb timed exposure setting possible from 10 seconds to 20 minutes Electronic shutter Auto 1 24000 to 30 seconds Manual 1 24000 to 30 seconds 1 3 EV steps or 1...

Страница 130: ...ync Contrast Control Sync High speed Sync Wireless Sync Available with two or more compatible external flash units Custom Image Auto Select Bright Natural Portrait Landscape Vibrant Radiant Muted Flat Bleach Bypass Reversal Film Monochrome Cross Processing Cross Processing Random Preset 1 3 Favorite 1 3 Digital Filter Extract Color Replace Color Toy Camera Retro High Contrast Shading Invert Color ...

Страница 131: ...evelopment parameters White Balance Custom Image Sensitivity Clarity Skin Tone Digital Filter HDR Capture Pixel Shift Resolution Shadow Correction High ISO NR Distortion Correction Peripheral Illumination Correction Lateral Chromatic Aberration Adjustment Diffraction Correction Color Fringe Correction File Format JPEG TIFF Aspect Ratio JPEG Recorded Pixels JPEG Quality Color Space Editing Features...

Страница 132: ... Actual results may vary depending on the shooting conditions circumstances Connection Port USB 2 0 micro B external power supply terminal stereo microphone cable release input terminal ø3 5 mm connector USB Connection MSC PTP Video Output USB Video output terminal SlimPort to HDMI adapter required Standards IEEE 802 11b g n standard wireless LAN protocol Frequency Center Frequency 2412 to 2462 MH...

Страница 133: ...ecorded Pixels JPEG Quality PEF m l k q 24M 527 1192 2339 151 p 14M 889 1996 3837 o 6M 1964 4309 7923 r 2M 4723 9824 16374 List of World Time Cities Region City North America Honolulu Anchorage Vancouver San Francisco Los Angeles Calgary Denver Chicago Miami Toronto New York Halifax Central and South America Mexico City Lima Santiago Caracas Buenos Aires Sao Paulo Rio de Janeiro Europe Lisbon Madr...

Страница 134: ...nment for USB Connection and Provided Software Windows OS Windows 10 32 bit 64 bit Windows 8 1 32 bit 64 bit Windows 8 32 bit 64 bit or Windows 7 32 bit 64 bit CPU Intel Core 2 Duo or higher RAM 4 GB or more HDD For installing and starting up the program Approx 100 MB or more of available space For saving image files Approx 10 MB file JPEG Approx 30 MB file RAW Monitor 1280 1024 dots 24 bit full c...

Страница 135: ...al 10 Bleach Bypass Custom Image 74 Bold Monochrome Digital Filter 75 87 Bracketing 66 Bracketing Order 66 Bright Custom Image 74 Brightness adjustment 76 Brightness histogram 18 Built in flash 10 57 Bulb B Mode Options 51 Bulb Exposure 49 51 Button 11 Button Customization 102 C Cable release 53 Cable release terminal 53 Calendar Filmstrip Display 83 Calibration 121 Capture mode 48 Card 40 Card ac...

Страница 136: ...scent Warm White White Balance 72 Focus indicator 45 Focus Method 59 Focus Peaking 61 Folder display 83 Folder Name 111 Format 44 Four way controller 12 20 Framerate 48 Function Dial 21 105 Fx1 Fx2 Fx3 button 102 G GPS Time Sync 121 GPS unit 121 GPS E Compass 121 Grid Display 26 47 Grip 36 Guide Display 45 Guide number 58 H HDMI terminal 85 HDR Capture 77 HDR LANDSCAPE 48 High Contrast Digital Fil...

Страница 137: ...81 Playback Sound Volume 54 Portrait Custom Image 74 Posterization Digital Filter 87 Power 42 Precise Calibration 121 Preview 51 104 Processing images 86 Program Automatic Exposure 49 Program Line 50 Protect 110 Protect All Images 110 Provided software 132 PTP 92 Q Quality 48 Quality level adjustment 78 Quick Zoom 47 R Radiant Custom Image 74 RAW 48 RAW Development 90 RAW File Format 48 Rec Mode m...

Страница 138: ...ext input 109 111 Text Size 42 Texture adjustment 78 Thumbnail display 47 82 TIFF 90 Time Setting 114 Timed exposure 51 Tone Expansion Digital Filter 87 Toy Camera Digital Filter 75 87 Tracking AF Active Area 62 Trailing Curtain Sync 57 TTL phase matching AF 59 Tungsten White Balance 72 I bracketing 68 I mode 49 U Unicolor Bold Digital Filter 75 87 USB Connection 92 132 USB terminal 92 USB video o...

Страница 139: ...ly Do not attach or remove a lens when there are any rain or water drops on the camera If water enters the camera or the lens a malfunction may occur Do not press on the monitor with excessive force This could cause it to break or malfunction Be careful not to overtighten the screw in the tripod socket when using a tripod Do not clean the camera with organic solvents such as thinner alcohol and be...

Страница 140: ...are multiple wireless LAN access points near the camera and the same channel is used search operation may not be executed correctly The security of your data stored sent or received is your own responsibility This camera conforms to the technical standards under the Radio Law and Telecommunications Business Law and the certification of conformance to technical standards can be displayed on the mon...

Страница 141: ...untries HDMI the HDMI logo and High Definition Multimedia Interface are trademarks or registered trademarks of HDMI Licensing LLC in the United States and or other countries Analogix and SlimPort are trademarks or registered trademarks of Analogix Semiconductor Inc MHL the MHL Logo and Mobile High Definition Link are trademarks or registered trademarks of MHL LLC in the United States and other cou...

Страница 142: ...with or without modification are permitted provided that the following conditions are met 1 Redistributions of source code must retain the above copyright notice this list of conditions and the following disclaimer 2 Redistributions in binary form must reproduce the above copyright notice this list of conditions and the following disclaimer in the documentation and or other materials provided with...

Страница 143: ...can be returned to you owing to the complicated customs procedures required If the camera is covered by warranty repairs will be made and parts replaced free of charge and the camera will be returned to you upon completion of servicing If the camera is not covered by warranty regular charges of the manufacturer or of its representatives will apply Shipping charges are to be borne by the owner If y...

Страница 144: ... into an outlet on a circuit different from that to which the receiver is connected Consult the dealer or an experienced radio TV technician for help FOR CALIFORNIA U S A ONLY Perchlorate Material special handling may apply The lithium battery used in this camera contains perchlorate material which may require special handling See www dtsc ca gov hazardouswaste perchlorate Declaration of Conformit...

Страница 145: ...té Cet appareil numérique de la classe B est conforme à la norme NMB 003 B du Canada Le présent appareil est conforme aux CNR d Industrie Canada applicables aux appareils radio exempts de licence L exploitation est autorisée aux deux conditions suivantes 1 l appareil ne doit pas produire de brouillage et 2 l utilisateur de l appareil doit accepter tout brouillage radioélectrique subi même si le br...

Страница 146: ...on about collection and recycling of used products please contact your local authorities your waste disposal service or the point of sale where you purchased the products 2 In other countries outside the EU These symbols are only valid in the European Union If you wish to discard used products please contact your local authorities or dealer and ask for the correct method of disposal For Switzerlan...

Страница 147: ...ire electric shock or camera breakdown The specified voltage is 100 240V AC Do not disassemble or modify the product This can cause a fire or electric shock If the generation of smoke or strange odor from the product or other abnormality occurs immediately discontinue using and consult your nearest service center Continued use can cause a fire or electric shock If water should happen to get inside...

Страница 148: ...D Jun Yao International Plaza 789 Zhaojiabang Road Xu Hui District Shanghai 200032 CHINA http www ricoh imaging com cn http www ricoh imaging co jp english This contact information may change without notice Please check the latest information on our websites SLR Digital Camera Operating Manual Introduction 1 2 Getting Started 3 Shooting 4 Playback 5 Sharing 6 Settings 7 Appendix To ensure the best...

Отзывы: