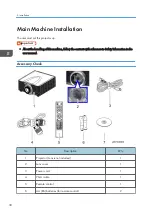
No
Description
Q’ty
7
User Manual (CD-ROM)
1
-
Warranty Card
1
• Due to different applications in each country, some regions may have different accessories.
Precautions
Please follow all warnings, precautions and maintenance as recommended in this manual.
• Do not stare into the beam when the projector is ON. The bright light may result in permanent eye
damage.
• To reduce the risk of fire or electric shock, do not expose this projector to rain or moisture.
• When switching the projector OFF, please ensure the cooling cycle has been completed before
disconnecting power. Allow 60 seconds for the projector to cool down.
• Do not use the lens cap when the projector is in operation.
• Do not look into or point the laser pointer on your remote control into your or someone’s eyes.
Laser pointers can cause permanent damage to eyesight.
• Do not transport the projector with any lens installed.
Do
• Turn OFF and unplug the power plug from the AC outlet before cleaning the product.
• Use a soft dry cloth with mild detergent to clean the display housing.
• Disconnect the power plug from AC outlet if the product is not being used for a long period of time.
Do not
• Block the slots and openings on the unit provided for ventilation.
• Use abrasive cleaners, waxes or solvents to clean the unit.
• Use under the following conditions:
• In extremely hot, cold or humid environments.
• Ensure that the ambient room temperature is within 5°C to 40°C
• Relative humidity is 10% to 85%
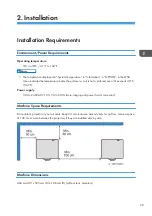
Main Machine Installation
31
Содержание LU6000
Страница 2: ......
Страница 10: ...Projection Light 145 Light 145 8 ...
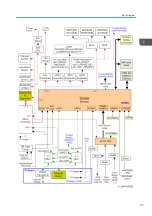
Страница 28: ...Block Diagram 1 Product Information 26 ...
Страница 29: ...Block Diagram 27 ...
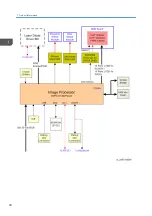
Страница 30: ...1 Product Information 28 ...
Страница 44: ...4 Front Cover A x6 5 Front IR Sensor A 2 hooks 3 Replacement 42 ...
Страница 46: ...4 Left Cover A x6 Right Cover 1 Top Cover page 38 Top Cover 3 Replacement 44 ...
Страница 51: ...3 LAN Board A x3 x2 There are 2 connectors A at the back side Part Replacement 49 ...
Страница 67: ...4 Fan Bracket A x2 5 Fan 3 A Fan 4 Fan 4 A is located next to the heat sink B Part Replacement 65 ...
Страница 69: ...4 Fan Bracket A x3 5 Fan 4 A x2 Fan 5 1 Right Cover page 44 Right Cover Part Replacement 67 ...
Страница 70: ...2 Fan Bracket A x4 3 Fan 5 A x6 LD Driver Board PSU Thermal Pad 1 Bottom Shielding A x6 3 Replacement 68 ...
Страница 71: ...2 Bracket A x6 3 Horizontal Motor with bracket A x2 4 LD Driver Board Casing A x3 x4 Part Replacement 69 ...
Страница 78: ...3 Replacement 76 ...
Страница 100: ...When the calibration has finished a message appears 4 Adjustment 98 ...
Страница 104: ...2 Select OPTION Information 3 Check the serial number 4 Adjustment 102 ...
Страница 106: ...2 Select Factory Reset 3 Select Yes and then press the Enter key 4 Adjustment 104 ...
Страница 116: ...5 Troubleshooting 114 ...
Страница 127: ...3 Cancel selection of the proxy server as shown below and then click OK Network Test 125 ...
Страница 128: ...6 Test Inspection 126 ...
Страница 146: ...Cooling System Location of fans 8 Detailed Description 144 ...
Страница 148: ... Blue laser light is used for the Blu ray Disc laser light source and optical receivers 8 Detailed Description 146 ...
Страница 149: ...MEMO 147 ...
Страница 150: ...MEMO 148 EN ...

