Quick Installation Guide
Quick Installation Guide
2/4
Next Sheet
2/4
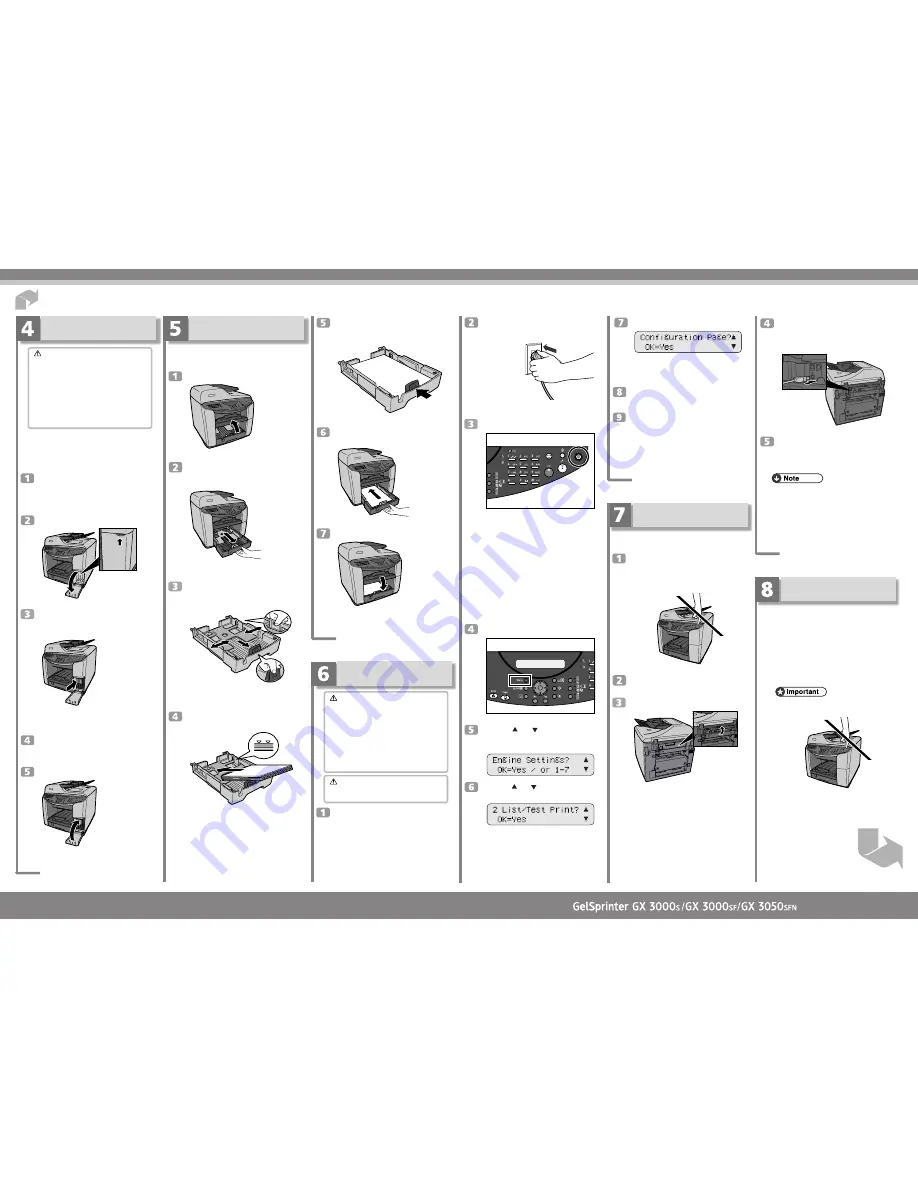
Installing the Print Cartridges
Caution
•
If ink comes into contact with your eyes, rinse im-
mediately in running water. For other symptoms,
consult a doctor.
•
If ink is ingested, induce vomiting by drinking a
strong saline solution. Consult a doctor immediately.
•
If your skin comes into contact with ink, wash the
affected area thoroughly with soap and water.
•
Keep the ink or ink container out of reach of chil-
dren.
Print cartridges and supplies comply with the
manufacturer's safety specifications. To ensure safety
and reliability, use genuine print cartridges and sup-
plies.
Remove the packaging from the print
cartridges.
Take care not to touch the cartridge chip.
Open the right front cover.
AQR368S
Check the orientation of each cartridge,
and then install them gently.
AQR198S
Install in the following order from the left: black, cyan,
magenta, and yellow.
Push in each cartridge by pressing on
the PUSH area.
Close the right front cover.
AQR199S
Loading Paper
Loading Paper into Tray 1
A4/Letter size paper is loaded here.
Lift the output tray.
AQR192S
Hold the tray 1 grip, pull the tray half-
way out, lift it slightly, and then pull it
out further.
AQR041S
Pull tray 1 completely out. Take care not to drop it.
Squeeze the paper guide on the right
side, and then position it according to
the paper size.
AKS011S
Beforehand, make sure to squeeze the front end paper
guide, and then expand the guide.
Load paper print side down and not over
the limit mark.
AKS012S
Load paper according to the capacity of the tray.
Squeeze the front end paper guide, and
then slide it to meet the edge of the pa-
per.
AKS013S
Hold both sides of tray 1, and push it
gently in until it stops.
AQR194S
Lower the output tray.
AQR195S
Plugging in the Power Cord
and Turning the Power On
Warning
•
Only connect the machine to the power source de-
scribed on this sheet.
•
Avoid multi-wiring.
•
Connect the power cord directly into a wall outlet
and never use an extension cord.
•
Do not damage, break or make any modifications
to the power cord. Do not place heavy objects on it.
Do not pull it hard nor bend it more than necessary.
These actions could cause an electric shock or fire.
Warning
•
Do not plug or unplug the power cord with your hands
wet. Otherwise, an electric shock might occur.
Remove the orange tape from around
the power cord.
Plug the power cord fully into the wall
outlet.
ACW049S
Press the [Power] key.
AQR266S
The machine starts feeding ink into its print-heads (tak-
ing approximately 6 minutes).
Make sure the “ STD 100%” message is displayed on
the control panel.
Do not switch off the power of the machine during this
period. Make sure the plug is not removed from the
wall outlet.
You might hear a clicking sound while the print heads
are filling. This is not a malfunction. It will stop after a
while.
Print the configuration page.
Press the [Menu] key.
AQR267S
Press the [ ] or [ ] key to display [En-
gine Settings], and then press the [Yes]
key.
Press the [ ] or [ ] key to display [List/
Test Print], and then press the [Yes] key.
Press the [Yes] key.
The configuration page is printed.
The engine settings menu screen returns on comple-
tion of printing.
Press the [No] key.
The initial screen appears.
To switch the power off, hold the [Power]
key down until the machine shuts down.
If you are connecting the machine to a computer via
USB, proceed to step 7.
If you are connecting the machine to a network, pro-
ceed to step 9.
Before Installing the Software
(USB)
Connecting the Machine via USB
Make sure the machine is off.
Do not turn the machine on until you have read how to
do so.
AQR191S
Turn on the power of the computer, and
start Windows.
Lift the connector cover.
AQR415S
Remove the seal on the USB slot located
on the rear of the machine, and then in-
sert the USB cable's hexagonal (type B)
plug firmly into the slot.
AQR225S
Insert the USB cable's rectangular (type
A) plug firmly into the computer's USB
slot.
❒
Insert the USB cable’s plug with the USB mark
facing up.
❒
Make sure that the USB cable is fully inserted.
❒
Make sure the USB cable is connected properly,
especially when the multi bypass tray is attached to
the machine, because the tray makes connecting the
cable difficult.
Quick Install for USB
Follow the procedure below to install the printer driver,
TWAIN driver, LAN-Fax driver, Device Setting Util-
ity, and User Guide.
Only the GX 3000SF and GX 3050SFN models sup-
port the LAN-Fax driver and Device Setting Utility.
The following explanation uses Windows XP as an
example. Procedures under other operating systems
may differ.
Screens vary according to the operating environment.
❒
Do not turn the machine on until you have read how
to do so.
AQR191S
❒
To install under Windows 2000/XP or Windows
Server 2003, you must log on as a user with admin-
istrator rights.
❒
If your operating system is Windows NT, you can-
not use LAN-Fax functions.


