background image

Step 7: Specifying a Destination (Destination Folder Selection Screen)

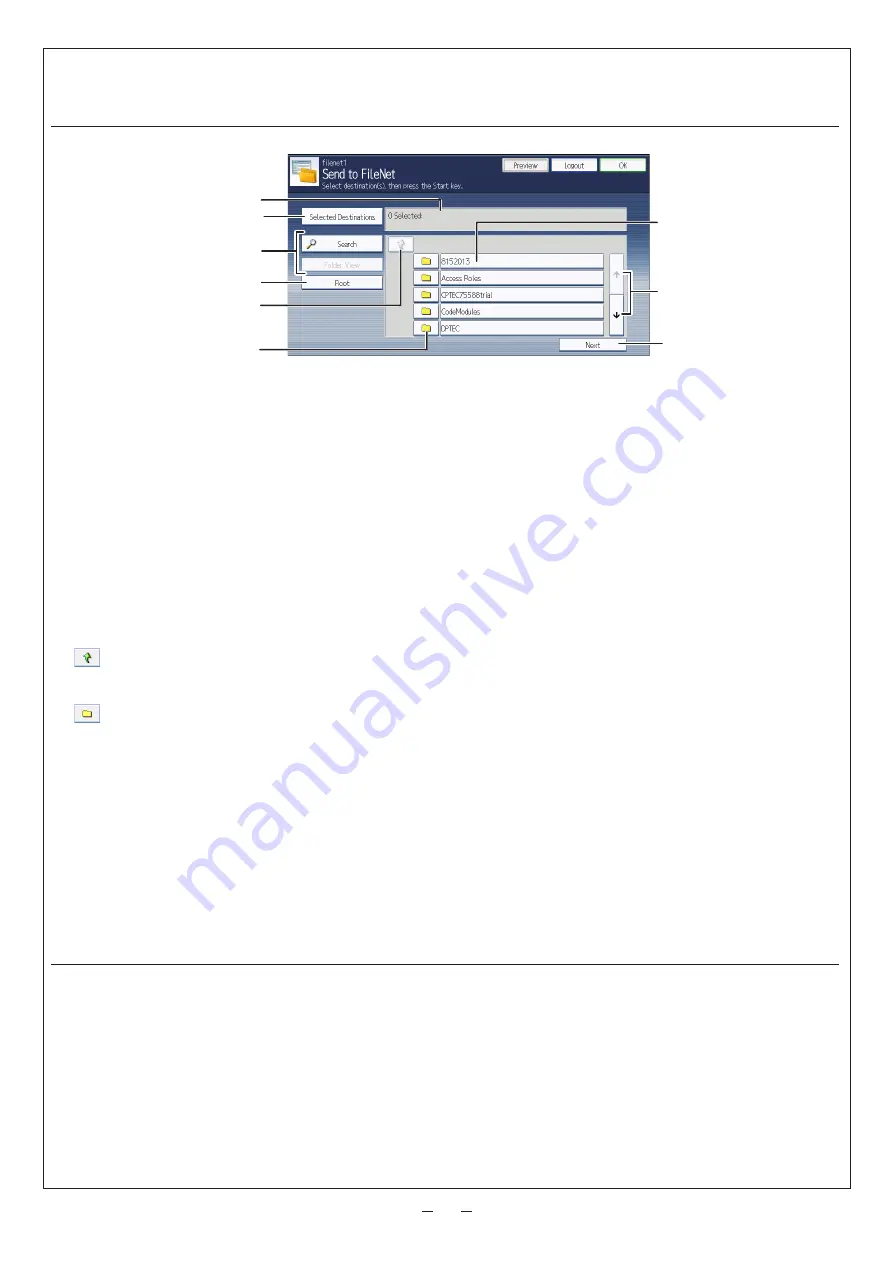
Send to FileNet Screen Overview   


DBV030

A
B

C

D
E

F

G

H

I


Fig. 10:

 Send to FileNet Screen 

A.  Selected Folder

The number of selected destinations and the selected folder name are displayed in the following format: 

[

Display Name

folder

B.  Selected Destinations

Display a list of the destination folders currently selected. You can press folders in this list to remove them.

C.  Search, Folder View

Perform the keyword search in the current folder and its sub-tree folder(s).

D.  Root

Return to the screen displaying the root folders.

E. 

Display the folders on the upper level folders. This button is disabled in root folder view.

F. 

The list of accessible sites, libraries, and/or folders is displayed. 

G.  Folder Name

Select a folder name to add that folder to [

Selected Destinations

].

H.  Scroll key

Use the up and down keys to scroll through the Folder Name list when all of the folders will not fit on one screen.

I.  Next

If one or more destination folder(s) is specified, move to the Document Information Input screen.
If not, an  error dialog will appear.

Procedure   


From Send to FileNet screen (Fig. 10), proceed as follows:
1. 

Select a destination folder.

2. 

 Press [

Next

].


The Document Information Input screen is displayed.

Содержание GlobalScan NX Plug-in

Страница 1: ...OF THIS DOCUMENT THE SUPPLIER SHALL NOT BE LIABLE TO YOU FOR DAMAGES OR LOSS OF ANY DOCUMENT OR DATA PRODUCED BY USING THIS SOFTWARE THE SUPPLIER SHALL NOT BE LIABLE TO YOU FOR ANY CONSEQUENTIAL INCID...

Страница 2: ...d might be trademarks of their respective companies We disclaim any and all rights to those marks Before You Begin Abbreviations The following abbreviations are used in this guide to shorten content P...

Страница 3: ...e screen shown in Fig 6 or Fig 7 below will appear If login is not required proceed to P 3 Step 4 Selecting Entering Metadata With an Authentication Fig 6 Login Screen 1 Press User Name and enter your...

Страница 4: ...Service The Service Menu for the project selected in P 3 Step 2 Opening the Group Project Screen appears 1 Press Send to FileNet Fig 8 Service Menu If only one service exists the Repository Selection...

Страница 5: ...ation profile has been set to the project A Repository Specify the repository to connect The repository list is listed in alphabetical order This input is not visible until the user performs a success...

Страница 6: ...r s D Root Return to the screen displaying the root folders E Display the folders on the upper level folders This button is disabled in root folder view F The list of accessible sites libraries and or...

Страница 7: ...The UI control type varies depending on the document property type String Integer Date time Parameter settings on the screen that are marked with an asterisk must be specified Up to 14 properties can...

Страница 8: ...e Step 10 Start the Scan 1 Confirm that the destinations are correct If necessary open the Service Menu screen and then press Details To close the Details screen press Summary 2 Confirm that the contr...

Отзывы: