


3.2 CHARGE CORONA WIRE AND CHARGE CORONA GRID
REPLACEMENT
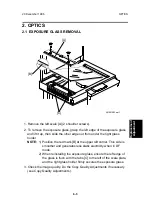
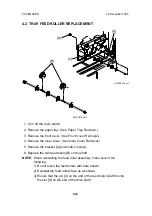
1. Open the front cover.
2. Remove the imaging unit. (See Imaging Unit Removal.)
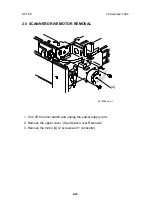
3. Remove the charge corona unit [A] (1 screw) from the imaging unit.
4. Remove the grid [B] from the charge corona unit, as shown by [C].
5. Remove the front endblock cover [D] and the rear endblock cover [E].
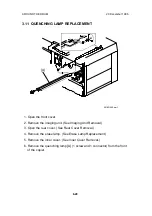
6. Unhook the spring [F] from the corona wire and replace the wire.
NOTE: 1) The new corona wire must be in the groove of the front
endblock [F] as shown.
2) Do not handle the new corona wire with bare hands. Oil on the
wire may cause uneven charge on the drum.
3) Do not rub the corona wire with rough material (sandpaper,
etc.). This will damage the corona wire.
4) Do not use any solvents to clean the wire. This will cause
uneven charge on the drum.
5) Do not damage the grid plate when replacing the corona wire.
6) Oils and chemicals from your hands will deteriorate the grid
plate.
7) Do not bend the grid plate. This can result in an uneven
charging.
[E]
[B]
[F]
[C]
[D]
[F]
A219R518.wmf
[A]
A219R560.wmf
Replacement
Adju
stment
20 December 1996
AROUND THE DRUM
6-19
Содержание FT 4015
Страница 2: ...SECTION 1 OVERALL MACHINE INFORMATION...
Страница 10: ...5 PAPER PATH 1 2 3 A219V502 wmf 1 By pass Feed 2 Paper Tray Feed 3 Copy Tray PAPER PATH 20 December 1996 1 8...
Страница 14: ...SECTION 2 DETAILED DESCRIPTIONS...
Страница 71: ...SECTION 3 INSTALLATION...
Страница 90: ...SECTION 4 SERVICE TABLES...
Страница 118: ...SECTION 5 PREVENTIVE MAINTENANCE...
Страница 126: ...SECTION 6 REPLACEMENT AND ADJUSTMENT...
Страница 190: ...SECTION 7 TROUBLESHOOTING...
Страница 212: ...Yes No Change or clean the defective parts Replace the main control board COPY QUALITY 20 December 1996 7 22...
Страница 222: ...SECTION 8 OPTIONS...
Страница 223: ...SECTION 9 APPENDIX TIMING CHART...
Страница 225: ...COPIER A219 ELECTRICAL COMPONENT LAYOUT 4 2 3 1 5 6 A219S500 wmf...
Страница 226: ...10 15 14 13 12 11 9 8 7 18 17 16 A219S501 wmf...
Страница 227: ...24 40 23 28 27 26 25 19 20 21 22 29 39 31 32 33 34 35 36 38 37 30 A219S502 wmf...


