
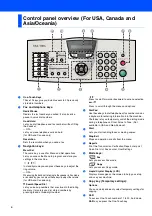


12
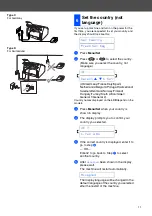
You can change the display language.
(English/Français/Deutsch/Italiano/Español/
Português/Nederlands/Dansk/Norsk./Svenska/
Suomi/POLSKI/Magyar/Cesky)
1
Press
Menu/Set
,
0
,
0
.
2
Press
or
to select the language,
and then press
Menu/Set
.
Languages displayed on the
LCD
depend
on the countries.
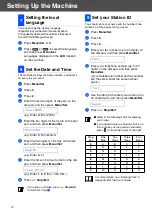
The machine displays the date and time, and prints it
on every fax you send.
1
Press
Menu/Set
.
2
Press
0
.
3
Press
2
.
4
Enter the last two digits of the year on the
dial pad, and then press
Menu/Set
.
(e.g. Enter
0
,
5
for 2005.)
5
Enter the two digits for the month on the dial
pad, and then press
Menu/Set
.
(e.g. Enter
0
,
3
for March)
6
Enter the two digits for the day on the dial
pad, and then press
Menu/Set
.
(e.g. Enter
0
,
1
.)
7
Enter the time in 24-hour format on the dial
pad, and then press
Menu/Set
.
(e.g. Enter
1
,
5
,
2
,
5
for 3:25 P.M.)
8
Press
Stop/Exit
.
You should store your name and fax number to be
printed on all fax pages that you send.
1
Press
Menu/Set
.
2
Press
0
.
3
Press
3
.
4
Enter your fax number (up to 20 digits) on
the dial pad, and then press
Menu/Set
.
5
Enter your telephone number (up to 20
digits) on the dial pad, and then press
Menu/Set
.
(If your telephone number and fax number
are the same, enter the same number
again.)
6
Use the dial pad to enter your name (up to
20 characters), and then press
Menu/Set
.
7
Press
Stop/Exit
.
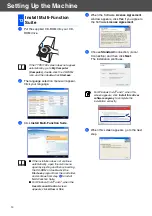
7
Setting the local
language
8
Set the Date and Time
Year:2005
Month:03
Day:01
Time:15:25
If you make a mistake, press
Stop/Exit
to start from Step
1
.
9
Set your Station ID
Fax:_
Tel:_
Name:_
■
Refer to the following chart for entering
your name.
■
If you need to enter a character that is on
the same key as the previous character,
press
to move the cursor to the right.
Press
key
One
time
Two
times
Three
times
Four
times
2
A
B
C
2
3
D
E
F
3
4
G
H
I
4
5
J
K
L
5
6
M
N
O
6
7
P
Q
R
S
8
T
U
V
8
9
W
X
Y
Z
For more details, see “Entering Text” in
Appendix B of the User's Guide.
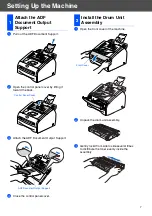
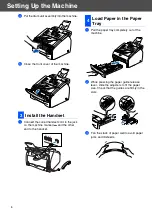
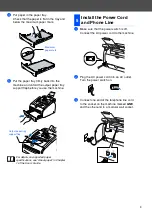
Setting Up the Machine
Содержание FAX 1190L
Страница 18: ...H558 6030 GB...


