


Quick Reference Printer Guide
c
Please follow these instructions using your PC
g
D4686704
Copyright © 2008
Printed in China
EN USA D468-6704
How to install the printer driver...
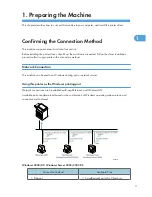
Users of Windows 2000 / XP / Vista, and Windows Server
2003 / 2003 R2 / 2008 can install printer driver easily using
the supplied CD-ROM.
A
Insert the provided CD-ROM into the computer’s CD-ROM
drive.
B
Select an interface language, and then click [OK].
C
Click [Quick Install].
PCL6 printer driver and DeskTopBinder-SmartDeviceMonitor
for Client are installed.
D
Click [I accept the agreement], and then click [Next >].
E
Select the machine model you want to use.
F
Click
[Install]
The printer driver installation starts.
G
Click [Finish], and then click [Exit].
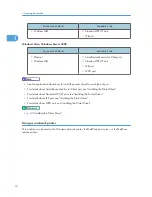
Downloading the printer driver
If your operating system is Windows XP Pro x64, or Windows
Server 2003 / 2003 R2 / 2008 x64, you must download the
printer driver from the supplier’s Web site.
For details, see “Installing the Printer Driver”, Printer
Reference.
•
A
On the [File] menu, click [Print], and then click [Preferences].
B
In [Job Type:], select [Locked Print].
C
Click
[Details...].
D
Specify [User ID] and [Password].
E
Click
[OK].
F
Perform steps as described in ‘How to print...’ from step 3
onwards.
G
Go to the machine and then press the
{
Printer
}
key.
H
Press
[Prt.Jobs].
I
Select [Locked Print Jobs] using the [
▲
] or [
▼
] key, and then
press [Job List].
J
Select your document using the [
▲
] or [
▼
] key, and then
press [Print].
K
Enter your password, and then press [OK].
Reconfi rm by pressing [Print].
The Locked Print fi le is printed, and deleted afterwards.
How to print a confi dential document...
A
On the [File] menu, click [Print], and then click [Preferences].
B
In [Job Type], select [Hold Print] or [Stored Print].
C
Click
[Details...].
D
Specify [User ID], [File Name], and [Password] if necessary
(for password protected Stored Print documents).
E
Click
[OK].
F
Perform steps as described in ‘How to print...’ from step 3
onwards.
G
Go to the machine, and then press the
{
Printer
}
key.
H
Press
[Prt.Jobs].
I
Select [Hold Print Jobs] or [Stored Print Jobs] using the [
▲
]
or [
▼
] key, and then press [Job List].
J
Select your document using the [
▲
] or [
▼
] key, and then
press [Print].
K
Enter the password if necessary (for password protected
Stored Print documents).
L
Enter the number of copies to print. (for Stored Print
documents).
M
Press
[Print].
The Hold Print fi le is printed, and deleted afterwards.
The Stored Print fi le is printed.
How to print documents later (Hold Print)
How to print stored documents on the hard disk (Stored Print)
How to prepare for printing...
A
On the [Start] menu, click [Printer and Faxes].
B
Right-click the icon of the printer you want to use, and then
click [Set as Default Printer].
C
On the [File] menu, click [Properties].
D
On the [Accessories] tab, select the options and specify the
paper trays you want to use.
E
Specify the paper size of the original, and then click the
[General] tab.
F
Click [Printing Preferences...]. Make your settings under
[One Click Presets], [Detailed Settings], and [Confi guration/
About].
G
Save the One Click Presets you have made If necessary:
click [Register Current Settings...] on the [One Click Presets]
tab, enter a name, and then click [OK].
How to print...
A
Open your document.
B
- Click the print icon directly, or
- On the [File] menu, click [Print].
C
Select the printer you want to use in the [Name] or [Select
Printer] list, and then click [Preferences].
D
Make the settings you require, and then click [OK].
E
Set a number of copies.
F
Click
[OK].
A
Start your Web browser.
B
In your browser's address bar, enter the following:
http://machine's IP address/
C
Select one of the following functions:
Home
Fax Received File
Printer: Print Jobs
Job
Confi guration
Why use Web Image Monitor?
To access the machine anywhere via a Web browser.
To provide you with the convenience of managing certain
functions from your computer.
•
•
•
•
•
•
•
How to use Web Image Monitor...
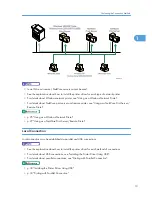
How to monitor your machine in the network...
Use SmartDeviceMonitor, which is automatically installed
with your printer drivers.
A
Right-click the green PC icon at the bottom of your screen.
B
Point to [Properties], and then click [Monitor Device
Settings...].
C
On the [Network Devices] tab, click [Browse...].
D
Select your machine, and then click [OK].
E
On the [Printers Folder] tab, click the [To be monitored] and
[Displayed on Task Bar] check boxes.
If you select this machine from the SmartDeviceMonitor icon,
you can see the [Status], [Confi guration] and [Job History].
Next time you print, you get a message on your pc in case of
any failure.
Setting must be made before you can receive fax
documents. For details, “Fax via Computer”, Facsimile
Reference.
A
Start your Web browser.
B
In your browser's address bar, enter the following:
http://machine's IP address/
C
In the menu area to the left, click [Fax Received File].
D
Click Property Icon of a fax document.
E
View contents of fax documents.
F
To download a fax document, click [PDF] or [TIFF].
How to receive a fax to download
StellaC4̲QuickReferencePrinterGu1 1
StellaC4̲QuickReferencePrinterGu1 1
2008/10/28 13:21:55
2008/10/28 13:21:55
Содержание Aficio MP 171
Страница 2: ......
Страница 29: ...28 ...
Страница 37: ...1 Simple Search 36 1 ...
Страница 40: ... p 40 External Items p 42 Control Panel p 54 Turning On Off the Power Guide to Components 39 2 ...
Страница 52: ... Delete the cache memory of a Web browser after logging out When the Authentication Screen is Displayed 51 2 ...
Страница 59: ...2 Getting Started 58 2 ...
Страница 63: ...Paper Orientation BRA020S 3 Adding Paper 62 3 ...
Страница 79: ...3 Adding Paper 78 3 ...
Страница 90: ...Keyboard Type A BRA036S Keyboard Type B BRA037S Entering Text 89 5 ...
Страница 91: ...Keyboard Type C BRA038S Keyboard Type D BRA039S 5 Entering Text 90 5 ...
Страница 107: ...7 Remarks 106 7 ...
Страница 123: ...8 Appendix 122 8 ...
Страница 128: ...MEMO 127 ...
Страница 129: ...MEMO 128 EN USA D069 6752 ...
Страница 130: ...Copyright 2008 ...
Страница 133: ......
Страница 142: ...10 ...
Страница 156: ...1 Placing Originals 24 1 ...
Страница 174: ... To change the value you entered in step 3 press the Clear Stop key and then enter a new value 2 Copying 42 2 ...
Страница 198: ...3 Copier Features 66 3 ...
Страница 202: ...4 Appendix 70 4 ...
Страница 205: ...Copyright 2008 ...
Страница 210: ......
Страница 263: ... For details about envelopes see Envelopes About This Machine 2 Printing Documents 54 2 ...
Страница 265: ... p 58 Printing on both sides of sheets p 111 System 2 Printing Documents 56 2 ...
Страница 271: ...2 pages per sheet BMF018S BMF023S BMF024S 4 pages per sheet BMF019S 2 Printing Documents 62 2 ...
Страница 273: ... Only the PCL6 printer driver is supported 2 Printing Documents 64 2 ...
Страница 275: ...BAC016S Set Collate when using the PCL printer driver 2 Printing Documents 66 2 ...
Страница 283: ...2 Printing Documents 74 2 ...
Страница 328: ...The Default setting is On p 105 Accessing User Tools PS Menu 119 5 ...
Страница 341: ...MEMO 132 GB GB EN USA AE AE D468 ...
Страница 342: ...Copyright 2008 ...
Страница 343: ...Operating Instructions Printer Reference D468 6701 EN USA ...
Страница 346: ......
Страница 361: ... p 203 E mail Settings p 205 IP Fax Settings 16 ...
Страница 456: ...6 Specify a destination and then press the Start key Programmed Name is selected by default Label Insertion 111 2 ...
Страница 460: ... The SID Code is printed on lists and reports p 258 Maximum Values Setting SUB Codes for Transmission 115 2 ...
Страница 467: ...2 Other Transmission Features 122 2 ...
Страница 472: ... For details about Parameter Setting see Parameter Settings p 226 Parameter Settings Types of Reception 127 3 ...
Страница 487: ... p 226 Parameter Settings 3 Reception 142 3 ...
Страница 495: ...3 Reception 150 3 ...
Страница 515: ...4 Confirming Communication Information 170 4 ...
Страница 585: ...8 Press the User Tools Counter key 6 Fax Features 240 6 ...
Страница 607: ...7 Appendix 262 7 ...
Страница 614: ...Copyright 2008 ...
Страница 618: ......
Страница 668: ...1 Sending Scan Files by E mail 50 1 ...
Страница 698: ...2 Sending Scan Files to Folders 80 2 ...
Страница 704: ... p 95 Changing a Scan Profile 3 Sending Scan Files Using WSD 86 3 ...
Страница 716: ...3 Sending Scan Files Using WSD 98 3 ...
Страница 744: ...5 Delivering Scan Files 126 5 ...
Страница 749: ... p 168 Software Supplied on CD ROM p 168 Auto Run Program Before Using the Network TWAIN Scanner 131 6 ...
Страница 772: ...7 Various Scan Settings 154 7 ...
Страница 804: ...W Web Image Monitor 19 WIA Scanning 175 WSD scanner 81 WSD scanner destination 89 WSD scanner screen 87 186 ...
Страница 805: ...MEMO 187 ...
Страница 806: ...MEMO 188 GB GB EN USA AE AE D468 ...
Страница 807: ...Copyright 2008 ...
Страница 808: ...Operating Instructions Scanner Reference D468 6751 EN USA ...
Страница 810: ......
Страница 828: ...Exiting User Tools This section describes how to end User Tools 1 Press the User Tools Counter key BKR020S 19 ...
Страница 829: ...20 ...
Страница 869: ...1 System Settings 60 1 ...
Страница 913: ...2 Connecting the Machine 104 2 ...
Страница 925: ...3 Using a Printer Server 116 3 ...
Страница 1033: ...4 Monitoring and Configuring the Printer 224 4 ...
Страница 1038: ... Printer Scanner p 235 Authentication Information Address Book 229 5 ...
Страница 1142: ...7 Press Yes 8 Press the User Tools Counter key Registering Names to a Group 333 5 ...
Страница 1169: ...6 Special Operations under Windows 360 6 ...
Страница 1174: ...Use the wins command to make the setting with telnet p 156 Remote Maintenance by telnet Configuring the WINS Server 365 7 ...
Страница 1177: ... For details see Remote Maintenance by telnet p 156 Remote Maintenance by telnet 7 Appendix 368 7 ...
Страница 1210: ...Copyright 2008 ...
Страница 1213: ......
Страница 1222: ...10 ...
Страница 1264: ...1 Windows Configuration 52 1 ...
Страница 1273: ...Configuring the Printer Use the control panel to enable AppleTalk The default is active Configuring the Printer 61 2 ...
Страница 1274: ...2 Mac OS Configuration 62 2 ...
Страница 1312: ...4 Printer Utility for Mac 100 4 ...
Страница 1317: ...Copyright 2008 ...
Страница 1318: ...PostScript 3 Supplement EN USA D468 6800 AE AE GB GB ...
Страница 1320: ......
Страница 1343: ... p 21 Administrators 2 Configuring Administrator Authentication 24 2 ...
Страница 1366: ...10 Press the OK key 11 Press the User Tools Counter key User Code Authentication 47 3 ...
Страница 1378: ...14 Press the OK key 15 Press the User Tools Counter key p 53 Specifying Login User Names and Passwords Basic Authentication 59 3 ...
Страница 1405: ...10 Press the OK key 11 Press the User Tools Counter key 3 Configuring User Authentication 86 3 ...
Страница 1408: ... p 217 Specifying the Extended Security Functions Printer Job Authentication 89 3 ...
Страница 1417: ...3 Configuring User Authentication 98 3 ...
Страница 1425: ...4 Protecting Data from Information Leaks 106 4 ...
Страница 1459: ...5 Securing Information Sent over the Network or Stored on Hard Disk 140 5 ...
Страница 1535: ...7 Enhanced Network Security 216 7 ...
Страница 1553: ...8 Specifying the Extended Security Functions 234 8 ...
Страница 1566: ... p 241 Supervisor Operations Supervisor Operations 247 10 ...
Страница 1636: ...Copyright 2008 ...
Страница 1675: ...36 GB GB EN USA AE AE D468 6801 ...
Страница 1676: ...Copyright 2008 ...
Страница 1677: ...UNIX Supplement GB GB EN USA AE AE D468 6801 ...
Страница 1679: ......
Страница 1682: ...7 Appendix Trademarks 97 INDEX 99 4 ...
Страница 1708: ...2 Troubleshooting When Using the Copy Function 30 2 ...
Страница 1772: ...BQP004S When A is displayed BQP005S 6 Clearing Misfeeds 94 6 ...
Страница 1773: ...When P is displayed BQP003S When Y1 is displayed BQP006S Removing Jammed Paper 95 6 ...
Страница 1774: ...When Y2 is displayed BQP007S 6 Clearing Misfeeds 96 6 ...
Страница 1779: ...Copyright 2008 ...


