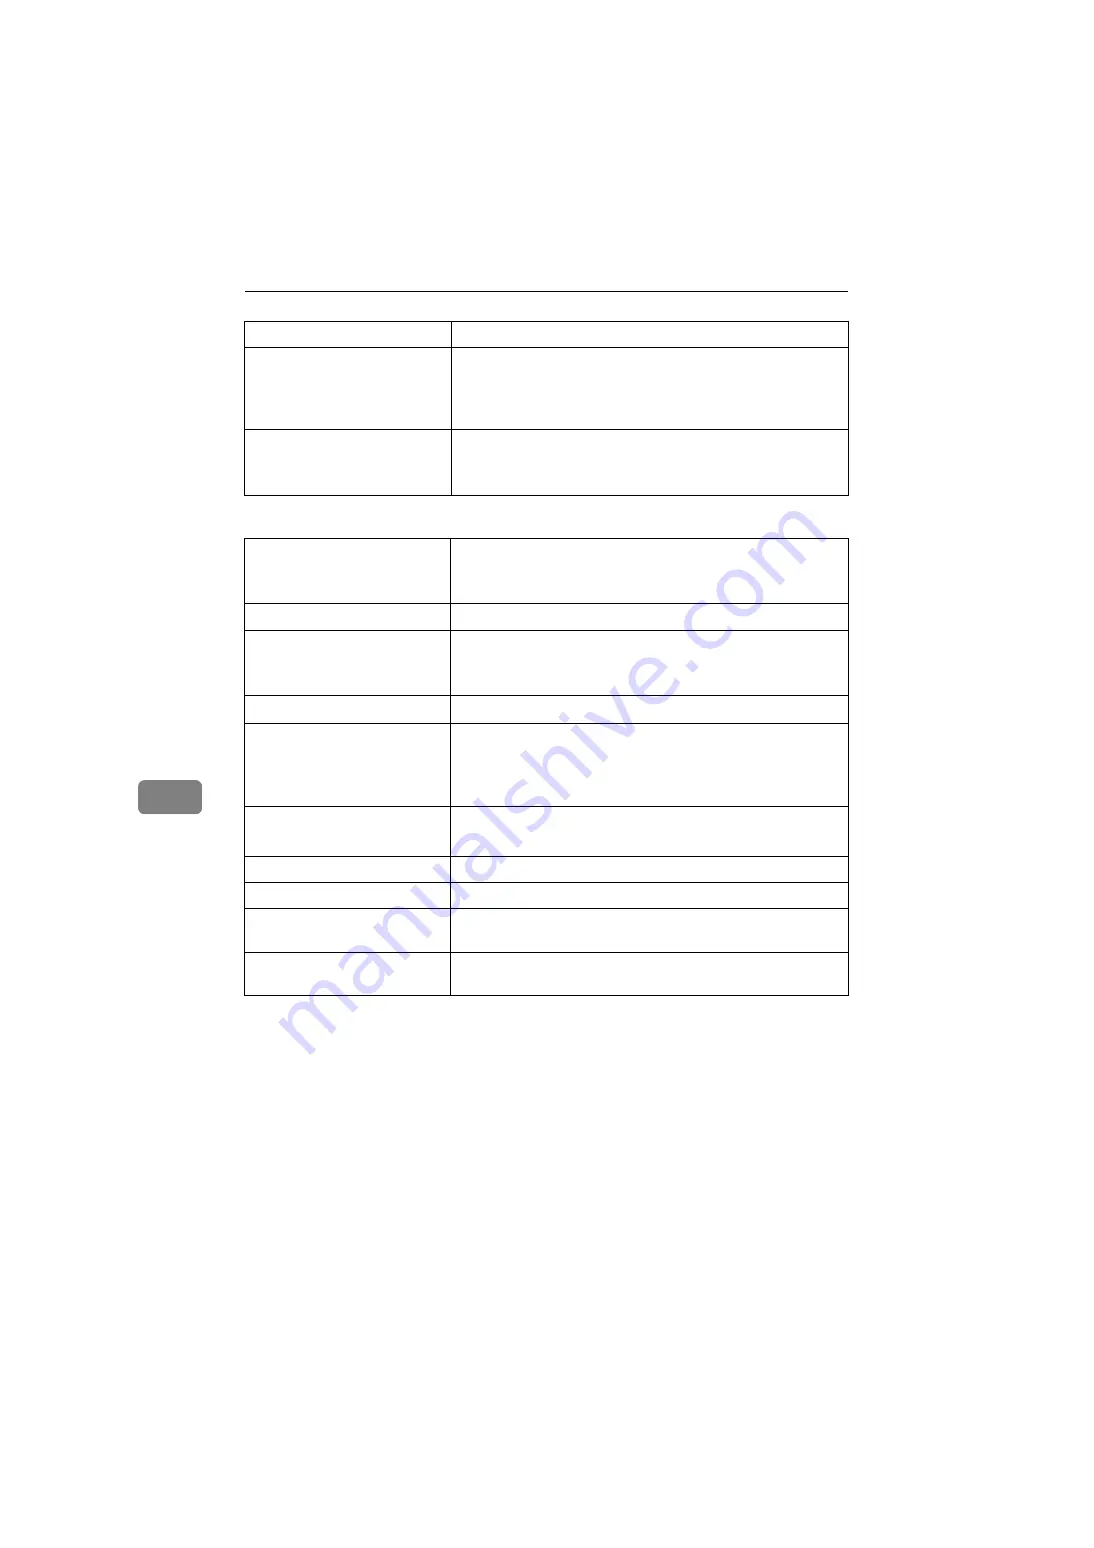
Ricoh Aficio C3000 Скачать руководство пользователя страница 280

Appendix

270

7

Internet Fax Transmission and Reception

*1

Full mode

Compatible machines

IP-Fax compatible machines

IP-Fax transmission function

Specify an IPv4 address and send faxes to an IP-Fax compati-
ble fax through a network.

Also capable of sending faxes to a G3 fax connected to a tele-
phone line via a VoIP gateway.

IP-Fax reception function 

Receive faxes sent from an IP-Fax compatible fax through a network.

Also capable of receiving faxes from a G3 fax connected to a 
telephone line via a VoIP gateway.

Network 

LAN : Local Area Network 

Ethernet/10Base-T, 100Base-TX, IEEE1394 (IPv4 over 1394), 
IEEE802.11b (wireless LAN)

Transmit function

E-mail 

Scan line density

200 

×

 100 dpi (Standard character), 200 

×

 200 dpi (Detail char-

acter), 200 

×

 400 dpi (Fine character: optional) 

*1 

, 400 

×

 400 dpi 

(Super Fine character: optional) 

*1 

Original size : Scanning width

A3 

*1 

, B4 

*1 

, A4

Communication Protocols

• Transmission

SMTP, TCP/IP

• Reception

POP3, SMTP, IMAP4, TCP/IP

E-mail format

Single/Multi-part, MIME Conversion

Attached file forms: TIFF-F (MH, MR 

*1 

, MMR 

*1 

 compression)

Authentication method

SMTP-AUTH, POP before SMTP, A-POP

Internet communication 

Send and receive e-mail with a computer that has an e-mail address

E-mail send functions

Automatic conversion of sent documents to e-mail format and 
e-mail transmission. Memory transmission only. 

E-mail receive functions 

Automatic detection and printing of appended TIFF-F (MH) 
files and ASCII text. Memory reception only. 

Содержание Aficio C3000

Страница 1: ...machine and keep it handy for future reference For safe and correct use be sure to read the Safety Information in About This Machine before using the machine Transmission Other Transmission Features Reception Changing Confirming Communication Information Storing a Document Fax via Computer Appendix 1 2 3 4 5 6 7 ...

Страница 2: ...countries PowerPC is a trademark of International Business Machines Corporation in the United States other countries or both Adobe and Acrobat are registered trademarks of Adobe Systems Incorporated Ethernet is a registered trademark of Xerox Corporation Other product names used herein are for identification purposes only and might be trademarks of their respective companies We disclaim any and al...

Страница 3: ...f the machine It explains security func tions that the administrators can use to protect data from being tampered or prevent the machine from unauthorized use Also refer to this manual for the procedures for registering administrators as well as setting user and administrator authentication Copy Document Server Reference Explains Copier and Document Server functions and operations Also refer to th...

Страница 4: ...ide DeskTopBinder Introduction Guide Auto Document Link Guide Note Manuals provided are specific to machine types Adobe Acrobat Reader Adobe Reader must be installed in order to view the manuals as PDF files The following software products are referred to using general names 1 Optional Product name General name DeskTopBinder Lite 1 and DeskTopBinder Profes sional DeskTopBinder ScanRouter EX Profes...

Страница 5: ...Immediate Transmission 17 Sending multiple originals using the exposure glass 19 Displaying Confirmation of Transmission 20 IP Fax Functions 21 Terminology 23 Notes on Using IP Fax 24 Functions Not Available for IP Fax Transmission 24 Internet Fax Functions 25 Notes on Using Internet Fax 26 Functions Not Available by E mail Transmission 27 Functions Not Available by E mail Reception 28 E mail Subj...

Страница 6: ...Destinations 75 Programming Destinations in the Address Book 77 Registering Entered Destinations to the Address Book 79 Searching for a Destination in the Address Book 80 Search by Destination Name 81 Search by Fax Number IP Fax Destination 83 Search by E mail Address 86 Search Using Advanced Search 88 Search by Registration Number 91 On Hook Dial 93 Manual Dial 95 Sender Settings 97 Advanced Feat...

Страница 7: ... Memory Reception 142 Substitute Reception 143 Receiving documents unconditionally 144 Receiving documents according to parameter specified settings 144 Reception Modes 146 Manual Reception 146 Auto Reception 146 Switching the Reception Mode 147 Receiving Internet Fax Documents 148 Auto E mail Reception 148 Manual E mail Reception 149 Received Images 149 Reception Functions 151 Routing Received Do...

Страница 8: ... Memory 169 Deleting a Destination from a Simultaneous Broadcast 170 Adding a Destination 172 Changing the Transmission Time 174 Changing the SMTP Server Setting 176 Printing a File from Memory 179 Printing a List of Files in Memory Print TX File List 181 Resending a File 183 Checking the Transmission Result Transmission File Status 185 Confirming on Display 185 Confirming by Report 186 Confirming...

Страница 9: ...cuments from File List 223 Specifying documents by User Name 223 Specifying documents by File Name 224 Displaying a preview 224 Printing Stored Documents 225 Changing Stored Document Information 227 Changing a user name 229 Changing the file name 230 Changing the password 230 Deleting a Stored Document 231 6 Fax via Computer Sending Fax Documents from Computers 233 Before Use 234 Using the Softwar...

Страница 10: ... SmartDeviceMonitor for Admin 254 LAN Fax Operation Messages 254 Viewing Fax Information Using a Web Browser 255 Viewing Printing and Deleting Received Fax Documents Using a Web Image Monitor 255 Viewing received fax documents using a Web browser 255 Printing fax information using a Web browser 256 Deleting fax information using a Web browser 257 Programming Destination Information from Web Browse...

Страница 11: ...ints to pay attention to when using the machine and explanations of likely causes of paper misfeeds damage to originals or loss of data Be sure to read these explanations Indicates supplementary explanations of the machine s functions and instruc tions on resolving user errors This symbol is located at the end of sections It indicates where you can find fur ther relevant information Indicates the ...

Страница 12: ...mile Auto Reset Timer in System Settings You can have the machine return to standby mode after each transmission us ing User Parameters switch 17 bit 3 in the Facsimile Features menu To manually return to the standby display do one of the following If you have placed the original in the Auto Document Feeder ADF and have not pressed the Start key remove the original If you have not placed an origin...

Страница 13: ...ion between fax IP Fax and Internet Fax When Internet Fax Settings is set to On in the Facsimile Features menu appears When Fax is selected you can specify fax numbers or IP Fax destinations When Internet Fax is selected you can specify e mail addresses 6 Displays the entered number of a destination 7 Allows you to store documents in the Document Server 8 Press to display various informa tion abou...

Страница 14: ... a group destination Note The display will differ depending on installed optional units You can change Internet Fax Settings under Initial Settings in the Facsim ile Features menu Information about documents sent using the facsimile function cannot be checked in Job List Use Change TX Info Reference p 9 Transmission Modes p 73 Switching the titles in the Address Book p 80 Searching for a Destinati...

Страница 15: ...to the simplified display Letters and keys are displayed at a larger size making operations easier Example of a simplified display 1 Key Colour Press to change the key colour and in crease the brightness of the display panel Note To return to the initial display press the Simplified Display key again Certain keys do not appear on the simplified display AMG051S ALV009S ...

Страница 16: ...ion Select a destination list to be used in Search Destination Communication Page Count Checks the transmission and reception and totals on the display Adjust Sound Volume Adjust the sound volume during On Hook Mode and Immediate Transmission Box Setting The following functions are for delivery and transfer of documents Personal Box Infor mation Box and Transfer Box Box Setting Print List You can ...

Страница 17: ... be forwarded to a programmed receiver Reception File Setting Selects whether received documents are saved on the hard disk to be printed later or printed immediately without being saved Stored Reception File User Setting The administrator can be specified for man aging documents stored on the machine after fax documents are received SMTP RX File Delivery Settings This function is available on sys...

Страница 18: ...k Code Register an ID required for Closed Network communication Program Memory Lock ID Program a Memory Lock ID to be entered be fore printing documents when the Memory Lock Reception function is activated Internet Fax Settings You can select to display the Internet Fax icon or not Select Dial Push Phone Use this function to select a line type when the machine is connected to a G3 analog line Prog...

Страница 19: ...ansmission starts automatically after the original is stored in memory This is convenient when you are in a hurry and want to take the document away with you You can also send the same original to several destinations Immediate Transmission Immediately dials the destination number and while scanning the original sends it It is very convenient when you want to send an original quickly or when you w...

Страница 20: ... the Clear Modes key is pressed See Registering a priority function using a program Reference p 15 Parallel Memory Transmission p 16 Simultaneous Broadcast p 264 Registering a priority function using a program Selecting Type of Transmission You can select the transmission type standard fax IP Fax or Internet Fax Press the tab in the standby display to select the transmission type When sending to a...

Страница 21: ... about one hour all the documents stored in memory are de leted As soon as the main power switch is turned on the Power Failure Re port is printed to help you identify deleted files Simply turning off the power by pressing the operation switch does not delete stored documents See Troubleshooting When Using the Facsimile Function Troubleshooting If memory is full 0 appears in Memory at the upper ri...

Страница 22: ...press the Clear Stop key and then enter the correct number To select a destination from the Address Book see Using the Address Book to Specify Destinations E When sending the same original to several destinations broadcasting press Add to specify the destinations You do not have to press Add when adding a destination using the destina tion list ...

Страница 23: ... you can specify for all files in cluding files in memory see Maximum Values For the maximum number of documents you can store in memory for Memory Transmission see Maximum Values For the maximum number of pages you can store in memory using A4 Standard ITU T q1 Chart see Maximum Values Reference p 43 Scan Type p 45 Resolution p 54 Density Contrast p 60 Sending Over a Fax Line p 63 Sending by IP F...

Страница 24: ...l face down on the exposure glass C Specify a destination D Make the scan settings you require E Press the Start key The machine starts scanning F Place the next original on the exposure glass within 60 seconds after the ma chine has finished scanning the first original G Repeat steps D to F for all originals H Place the last original and then press the q key The machine dials the destination and ...

Страница 25: ...n progress When two or more destinations are specified When an original is placed on the exposure glass and then sent When you send documents stored in the Document Server Note You can turn this function on or off with the User Parameters switch 07 bit 2 in the Facsimile Features menu Standard Memory Transmission may be used instead of Parallel Memory Transmission depending on the optional equipme...

Страница 26: ...e first destination and then specify the next destination by pressing Add If you dial several destinations for the same document broadcasting the docu ments are sent in the order in which they were dialed If the fax document could not be transmitted the machine redials that destination after the last destination specified for broadcasting For example if you specify four destinations A through D fo...

Страница 27: ...ble with standard fax transmission and IP Fax transmission Important Internet Fax is executed in only Memory Transmission that starts transmis sion automatically after storing documents in memory If you switch the type of transmission to Internet Fax while the machine is in the Immediate Trans mission mode the transmission mode is automatically switched to the Mem ory Transmission mode Group canno...

Страница 28: ...tion from the Address Book see Using the Address Book to Specify Destinations E Press the Start key The machine dials a destination Note Documents are not stored in memory Reference p 43 Scan Type p 45 Resolution p 54 Density Contrast p 60 Sending Over a Fax Line p 63 Sending by IP Fax p 72 Using the Address Book to Specify Destinations p 74 Specifying Group Destinations p 75 Selecting Destination...

Страница 29: ...ed TX B Place the first page face down on the exposure glass C Specify a destination D Make the scan settings you require E Press the Start key F Place the next original on the exposure glass within 10 seconds after the ma chine has finished scanning the first original G Repeat steps D to F for all originals H Place the last original and then press the q key ...

Страница 30: ...n this screen you can check the destination transmission mode and other transmission settings before transmitting A Press Check Modes and then check the transmission settings The following display appears B After checking the settings on the display press Exit ...

Страница 31: ...he network protocol Specify an IPv4 address or host name instead of a fax number for sending When using a gatekeeper specify its alias telephone number Specify addresses of the gatekeeper or SIP server proxy server register server redirect server as appro priate in Initial Settings in the Facsimile Features menu When using a SIP server you can send by specifying SIP user name You can also transmit...

Страница 32: ... set up correctly under Initial Settings in the Facsimile Features menu The facsimile function of this machine cannot be used with IPv6 Before using this function configure the network in the System Settings menu Note IP Fax supported by this machine is ITU T Recommendation T 38 compliant ALT001S ...

Страница 33: ...es connected to an IP network and converts alias telephone numbers to IPv4 addresses and performs authentication functions In addition a gatekeeper governs band transmission rate assignment and access control SIP server A SIP server mediates connection requests between devices connected to an IP network and is composed mainly of servers that have the following three functions Proxyserver ReceivesS...

Страница 34: ...deleted the Power Failure Report is automatically printed out when the main power switch is turned on Use this report to check which documents were deleted Simply turning off the power by pressing the operation switch does not delete stored documents See Troubleshooting When Using the Facsimile Function Troubleshooting Reference Troubleshooting When Using the Facsimile Function Troubleshooting Fun...

Страница 35: ...forward received e mail messages Important To use Internet Fax functions this machine must be connected to a LAN and set up correctly in System Settings The facsimile function of this machine cannot be used with IPv6 To send Internet Fax documents in the Facsimile Features menu under Ini tial Settings set Internet Fax Settings to On However documents can still be forwarded or delivered to Internet...

Страница 36: ...otice p 121 Setting an E mail Destination as a BCC p 124 Entering the Subject p 127 Entering the Text p 149 Received Images p 185 Checking the Transmission Result Transmission File Status Connecting the Machine General Settings Guide System Settings General Settings Guide Facsimile Features General Settings Guide Notes on Using Internet Fax The following are notes about using Internet Fax When usi...

Страница 37: ...ot delete stored documents See Troubleshooting When Using the Facsimile Function Troubleshooting You may not be able to send large files as e mail depending on e mail envi ronment conditions Whenavailablememoryislow youmaynotbeabletosendInternetFaxdocuments Because the machine sends documents as e mail messages with an attached TIFF F image viewer applications are required in order to view documen...

Страница 38: ...ects differ depending on Stamp Sender Name settings When Stamp Sender Name is set to on From Sender Name Fax Message NO xxxx When Stamp Sender Name is set to off If Own Fax Number and Own Name are programmed From Own Fax Number Own Name Fax Message NO xxxx If only Own Fax Number is programmed From Own Fax Number Fax Message NO xxxx If only Own Name is programmed From Own Name Fax Message NO xxxx I...

Страница 39: ... that the final recipient address sent is pro grammed in the Address Book If it is programmed as a full mode destination the sender automatically registers the receiver s reception capability The reg istered reception capability is updated each time the sender receives new re ception capability information The sender can send documents to the receiver based on this information If the receiver is p...

Страница 40: ...ference Non compatible originals for the Auto Document Feeder Copy Docu ment Server Reference Note that Special Original of the copy function cannot be used with the facsimile function Place the originals according to their paper size Important If you place A5 size originals on the exposure glass they are not detected Place A5 size originals into the ADF Do not lift the ADF while using it to scan ...

Страница 41: ...has completely dried before plac ing your original If it is still wet the exposure glass will become marked and those marks will appear on the received image Generally place A4 8 1 2 11 originals in the landscape orientation L If you place an A4 8 1 2 11 original in the portrait orientation K the image is sent rotated by 90 You can send the first page from the exposure glass then the remaining pag...

Страница 42: ...ion with Image Rotation p 47 Scan Size p 264 Registering a priority function using a program Facsimile Features General Settings Guide Placing Originals Copy Document Server Reference Setting the Original Orientation When you store documents in the Document Server set Original Orientation A Place the original and then select the scan settings you require B Press Original Feed Type C Specify the or...

Страница 43: ...ed original will be printed in order on separate sheets at the other end The orientation of alternate sheets may be reversed at the other end If you want to print the original with the same orientation at the other end specify the Original position and Page opening orientation Important The ADF is required to use this function Two sided originals cannot be sent by using just the exposure glass Two...

Страница 44: ...ngs you require B Press Original Feed Type C Specify the original orientation Check the orientation of the placed document and then press or Make sure that the specified original orientation matches the orientation of originals loaded in the ADF D Press 2 Sided Original ...

Страница 45: ...ge G Press OK 2 Sided Original appears above Original Feed Type H Specify a destination and then press the Start key Note You can confirm whether both sides were properly scanned using the Stamp function You can set the original feed types that are selected right after the power is turned on or the Clear Modes key is pressed See Registering a priority function using a program Reference p 41 Stamp ...

Страница 46: ...cceptable original size Maximum number of sheets Paper thickness Exposure glass Up to A3 297 420 mm 11 17 279 432 mm 1 ADF one sided docu ment A5 L to A3 L up to 1200 mm long 51 2 81 2 K to 11 17 L 50 sheets 80 g m2 20 lb 40 128 g m2 11 34 lb ADF two sided docu ment A5 L to A3 L up to 432 mm long 51 2 81 2 K to 11 17 L 50 sheets 80 g m2 20 lb 52 105 g m2 14 28 lb ...

Страница 47: ...1 17 on the exposure glass only an A3 11 17 area is scanned Exposure Glass ADF Maximum scan area The following shows the maximum scan area Memory Transmission 297 1200 mm 11 47 W L from the ADF Immediate Transmission 297 1200 mm 11 47 W L from the ADF 297 432 mm 11 17 W L from the exposure glass AAG019S ...

Страница 48: ... the ADF an original wider than about 263 mm 10 4 is scanned as A3 11 17 size An original narrower than about 230 mm 9 1 is sent as 81 2 11 or 81 2 14 size and an original narrower than about 263 mm 10 4 is scanned as B4 JIS Japanese Industrial Standard Originals up to 1200 mm 47 2 in length can be scanned See the following table for sizes the machine can detect when you place an original on the e...

Страница 49: ... text or drawings originals that contain areas of solid print originals that have solid print around their edges originals with glossy surfaces bound originals of more than 10 mm 0 3 in thickness such as books The following paper sizes are automatically detected in facsimile mode Metric Version Auto detect Unable to auto detect Inch Version Auto detect Unable to auto detect Note You can select fro...

Страница 50: ... 2 11 original in the portrait orientation K the image is sent rotated by 90 Providing the receiver has A4 81 2 11 landscape paper L the document is printed the same size as the original Note This function is unavailable with Immediate Transmission When Image Rotation is used all documents are sent by normal Memory Transmission This function is unavailable when using Mixed Original Sizes ...

Страница 51: ...en sending a two sided document the document is marked at the bottom of the front page and top of the rear page Important Stamp only works when scanning from the ADF A Place the original and then select the scan settings you require B Press Original Feed Type C Press Stamp To cancel the stamp press Stamp again before pressing OK D Press OK ...

Страница 52: ...an have the machine select the Stamp function right after the power is turned on or the Clear Modes key is pressed See Registering a priority function using a program You can program one of the Quick Operation keys with operations for this function Using the Quick Operation key allows you to omit step B A paper jam during Parallel Memory Transmission may cause the trans mission to fail even if sta...

Страница 53: ...strations or diagrams with complex shading patterns or grays select the appropriate scan type to optimize image clarity Text Select Text to send high contrast black and white image originals Use this setting when you only want to send clearer text even if the original contains text and photographs Text Line Art Select Text Line Art to send high contrast black and white graphic originals at improve...

Страница 54: ...Text is selected If you send a fax document with Text Line Art Text Photo or Photo and the background of the received image is dirty reduce the density setting and resend the fax You can set the scan type that is selected right after the machine is turned on or the Clear Modes key is pressed See Registering a priority function using a program Reference p 54 Density Contrast p 264 Registering a pri...

Страница 55: ...kes to transmit Therefore images scanned at high resolution Super Fine have high quality but transmission takes longer Conversely low resolution Standard scanning results in lower quality but the original is sent more quick ly Select the setting that matches your needs based upon this trade off between speed and image clarity Standard 8 x 3 85 lines mm 200 x 100 dpi Select for originals containing...

Страница 56: ...Transmission 46 1 A Press Scan Settings B Press Resolution C Select the resolution you require and then press OK ...

Страница 57: ... right after the machine is turned on or the Clear Modes key is pressed See Registering a priority function using a program When using Internet Fax transmission documents are sent at Detail res olution even if you have specified Super Fine To send a document at Super Fine configure the Full Mode when registering the destinations in the Address Book Reference p 29 T 37 Full Mode p 192 Print Journal...

Страница 58: ... scans all pages using that size If the machine cannot detect the original size a confirmation message appears Place the original again A Place the originals B Press Scan Settings C Press Scan Size D Make sure that Auto Detect is selected If it is not press Auto Detect ...

Страница 59: ...pecify a destination and press the Start key Regular The placed original is scanned according to specified size regardless of actual size The sizes that can be specified are A4KL B4 JISL A3L 81 2 11 KL 81 2 14 L and 11 17 L A Place the originals B Press Scan Settings C Press Scan Size ...

Страница 60: ...ed size appears above Scan Settings F Specify a destination and press the Start key Note To cancel the selected scan size select Auto Detect Area Program the sizes of the originals to be scanned in advance Only the area in the specified size is scanned regardless of the actual size of a placed original A Place the originals B Press Scan Settings ...

Страница 61: ...gs 51 1 C Press Scan Size D Press Area 1 or Area 2 E Press OK The specified size appears above Scan Settings F Specify a destination and press the Start key Note To cancel the selected scan size select Auto Detect ...

Страница 62: ...DF For ex ample when A3L and A4K size originals are sent together usually all are sent using the size of the first original By selecting Mixed Original Sizes the machine scans and sends each original according to its size A Place the originals B Press Scan Settings C Press Scan Size D Press Mixed Original Sizes ...

Страница 63: ...4K B4L and B5K A4L and A5K When using Mixed Original Sizes the machine sends the originals by Memory Transmission When using Mixed Original Sizes rotation transmission is disabled You can have the machine select Mixed Original Sizes right after the power is turned on or the Clear Modes key is pressed See Registering a priority function using a program Reference p 40 Transmission with Image Rotatio...

Страница 64: ...ipping or if the writing is faint adjust the density Auto Density The appropriate density setting for the original is automatically selected A Make sure that Auto Density is selected Manual Density Use manual density to set density manually You can select one of seven density levels A If Auto Density is selected press Auto Density to turn it off B Press W or V to adjust the density The cursor move...

Страница 65: ...e that Auto Density is selected B Press W or V to adjust the density The cursor moves Note Selecting Text Text Line Art or Text Photo for the scan type causes Auto Density to be selected You can set the density that is selected right after the machine is turned on or the Clear Modes key is pressed See Registering a priority function using a program Reference p 264 Registering a priority function u...

Страница 66: ...next page that you checked on the exposure glass C Select the density resolution and scan type You have about 60 seconds 10 seconds for Immediate Transmission to se lect density resolution and scan type The time remaining is shown on the display Adjust the settings for each page before you press the Start key When placing originals in the Auto Document Feeder ADF A Check which pages you want to sc...

Страница 67: ...talled unit Multi port When the extra G3 interface unit is installed communications can take place simultaneously through three lines at once The following list shows protocol combinations available for each line type IP Fax When sending an IP Fax select either SIP or H 323 as the protocol To display SIP and H 323 on the screen make the settings in Initial Set tings in the Facsimile Features menu ...

Страница 68: ...Select the line you want to use If you select G3 Auto the machine will use any available line This increas es efficiency When one optional extra G3 unit is installed When two optional extra G3 units are installed When H 323 SIP are set to On ...

Страница 69: ...tering a priority function using a program Facsimile Features General Settings Guide Simultaneous Broadcast Using Multiple Line Ports The Standard Broadcast function sends faxes one at a time to multiple destina tions in the order of specified destinations However the Simultaneous Broadcast function can simultaneously send faxes to multiple destinations using different lines This results in a shor...

Страница 70: ...rol panel A Make sure that Fax is selected B Enter the fax number using the number keys If you make a mistake press the Clear Stop key and then enter again If the optional extra G3 interface unit is installed select G3 before pressing the Start key To select a destination from the Address Book see Using the Address Book to Specify Destinations C Press the Start key The machine starts to scan the o...

Страница 71: ...Address Book to Specify Destinations p 79 Registering Entered Destinations to the Address Book p 272 Maximum Values Entering a pause Press Pause when dialing or storing a number to insert a pause of about two seconds Note A pause is shown as a on the display You can also program numbers including pauses in the destination list ...

Страница 72: ... function with On Hook Dial as an example A Press On Hook B Enter the fax number using the number keys C Press Tone D Enter the number you want to tone dial using the number keys E Press the Start key The machine starts to scan the original and stores it in memory When scan ning ends the Communicating indicator lights and transmission starts Note Certain services may be unavailable even when using...

Страница 73: ...ecify the protocol to be used in Select Line in advance A Make sure that Fax is selected B Press Manual Entry C Enter the IP Fax destination and then press OK If you enter an incorrect character press Backspace or Delete All Then re enter the characters correctly To change the IP Fax destination after pressing OK press Edit Dest re enter an IP Fax destination and then press OK To select a destinat...

Страница 74: ...or a list of gateways T 38 compliant gatekeepers or SIP servers that are certified as operable with this machine contact your local reseller or serv ice representative Methods of entering a destination vary depending on the network settings made by the administrator Ask the machine administrator for details For detailsaboutenteringtheIP Faxdestination see RegardingIP Faxdestinations To avoid accid...

Страница 75: ...er From IP Fax to IP Fax Specify the IPv4 address or host name of the receiving machine Example 192 168 1 10 IPv4 address Example IPFAX1 host name From IP Fax to G3 fax Specify the G3 fax telephone number of the receiving machine Example 0312345678 When using a gatekeeper server From IP Fax to IP Fax Specify the alias telephone number of the receiving machine Example 0311119999 alias telephone num...

Страница 76: ... receiver s host name is IPFAX1 and the port number is 2100 specify IPFAX1 2100 Ask the network administra tor for details An alias telephone number is a number that is registered in the gatekeeper and is available only in the network to which the gatekeeper is connected Pay attention to the number of telephone number digits set in the gate way IPv4 address conversion table to avoid transmission e...

Страница 77: ...ress Manual Entry D Enter the e mail address destination and then press OK If you enter an incorrect character press Backspace or Delete All Then re enter the characters correctly To change the e mail address after pressing OK press Edit Dest re enter an e mail address and then press OK To select a destination from the Address Book see Using the Address Book to Specify Destinations ...

Страница 78: ...sion see Canceling a Transmission To avoid accidentally pressing the wrong Destination key you can set the machine so that each time a destination is added using a Destination key Add must be pressed Make the setting in User Parameters switch 17 bit 2 in the Facsimile Features menu For the maximum number of digits for a destination see Maximum Values If Auto Specify Sender Name is set to On in Sys...

Страница 79: ...pecify the host name of the other party as the domain part of the e mail address program the host name of the other party on the DNS server If the other party s IPv4 address is not registered on the DNS server specify the IPv4 address at the domain part of the e mail address To use this function the other party s fax machine must be compatible with Internet Fax connected to the same LAN as this ma...

Страница 80: ...y s host name Specify a destination s e mail address by adding the other party s host name to the domain part of the e mail address Specify the address to the right of as follows host name dot and domain name xxxx host name of the other party domain name Example The other party s e mail address is abc defcompany com and the host name is HOST abc HOST defcompany com Specify the other party s IPv4 a...

Страница 81: ...Book is enabled To send Internet Fax documents from a computer use the LAN Fax Driver to specify whether or not to bypass the SMTP server When sending with the Use device address check box selected the SMTP server setting speci fied on this machine is enabled Reference p 233 Sending Fax Documents from Computers System Settings General Settings Guide Registering Addresses and Users for Facsimile Sc...

Страница 82: ... or groups of destinations A Press Fax or Internet Fax to switch the transmission type to fax IP Fax or Internet Fax B Press the title word key where the desired destination is programmed For example if you want to specify NEW YORK OFFICE programmed in LMN press LMN C Press the Destination key programmed with the desired destination If the desired Destination key is not shown press U and T to look...

Страница 83: ...Settings General Settings Guide Registering Addresses and Users for Facsimile Scanner Functions Gen eral Settings Guide Switching the titles in the Address Book There are three types of titles for destination lists Title 1 Title 2 and Title 3 The above display shows Title 1 A Press Change Title B Select the type of the title and then press OK ...

Страница 84: ...for Memory Transmission it cannot be used for Immediate Transmission The machine automatically changes to Memory Transmission when you use group destination The total number of destinations programmed in multiple groups should not exceed the maximum number of destinations you can specify for one file For details see Maximum Values A Press Fax or Internet Fax to switch the transmission type to fax ...

Страница 85: ...ed destination and then press the Clear Stop key You can also cancel a transmission by pressing the highlighted Destination key to dese lect it Reference p 272 Maximum Values System Settings General Settings Guide Facsimile Features General Settings Guide Registering Addresses and Users for Facsimile Scanner Functions Gen eral Settings Guide Selecting Destinations from Recent Destinations The mach...

Страница 86: ...s the Start key Note You can select Internet Fax and IP Fax destinations from Recent Destina tions as well When you press Program Dest you can register a selected recipient in the destination list For the maximum number of recent destinations the machine can store see Maximum Values Reference p 79 Registering Entered Destinations to the Address Book p 272 Maximum Values ...

Страница 87: ...stinations and folder destinations using Address Book Management in Administrator Tools in the System Settings menu A Press the User Tools Counter key B Press System Settings C Press Administrator Tools D Press Address Book Management E Press New Program For a description of the subsequent procedure see System Settings General Settings Guide ALV007S ...

Страница 88: ...ed message appears Press Exit to bring up the facsimile s initial display You can register in the Address Book using Web Image Monitor or Smart DeviceMonitor for Admin For details about installation see Monitoring and Configuring the Printer Network Guide or for information about the Address Book see the relevant Help Reference System Settings General Settings Guide Registering Addresses and Users...

Страница 89: ...nter any necessary information For details about registering destinations see Registering Addresses and Users for Facsimile Scanner Functions General Settings Guide C Press OK Note Depending on security settings Prg Dest may not appear and you may be unable to register the destination When you press the Facsimile key after changing the contents of the Ad dress Book the Destination list machine set...

Страница 90: ...ission type between fax IP Fax and Internet Fax The search returns only destinations that partially match the entered name A warning message appears if the search returns more than the maximum number of destinations you can search for at a time Press Exit and change the destination name to view fewer destinations Although one user can program multiple e mail addresses only one address can be retri...

Страница 91: ... a destination registered in the Address Book by name A Press Search Dest B Select a search destination To search through the Address Book select Address Book To search through an LDAP server select the relevant LDAP server C Press Fax or Internet Fax to switch the transmission type to fax IP Fax or Internet Fax ...

Страница 92: ... for and then press OK If you enter a wrong destination name press Backspace and Delete All and then enter the destination name again F Confirm the characters you entered and then press Start Search A search in progress message appears When the search is finished a result appears ...

Страница 93: ...or T to scroll through the list Press Details to display the detailed information of the selected destination Reference Entering Text About This Machine Search by Fax Number IP Fax Destination Follow these steps to search for a destination registered in the Address Book by fax number or IP Fax destination A Press Search Dest ...

Страница 94: ...through an LDAP server select the relevant LDAP server C Press Fax Destination D Enter the number you want to search for and then press OK To search for an IP Fax destination enter the IP Fax destination that you want to find If you enter a wrong number press Backspace or Delete All and then enter the number again ...

Страница 95: ...nd then press Start Search A search in progress message appears When the search is finished a result appears F Select a destination If the desired destination does not appear use U or T to scroll through the list Press Details to display the detailed information of the selected destination ...

Страница 96: ...h for a destination registered in the destination list A Press Search Dest B Select a search destination To search through the Address Book select Address Book To search through an LDAP server select the relevant LDAP server C Press Internet Fax to switch the type of transmission to Internet Fax ...

Страница 97: ...address you want to search for and then press OK If you enter a wrong e mail address press Backspace or Delete All and then enter the e mail address again F Confirm the entered characters and then press Start Search A search in progress message appears When the search is finished a result appears ...

Страница 98: ...etailed information of the selected destination Search Using Advanced Search Follow these steps to search for a destination registered in the Address Book by specifying search criteria A Press Search Dest B Select a search destination To search through the Address Book select Address Book To search through an LDAP server select the relevant LDAP server ...

Страница 99: ...ndition and then enter a partial string The following conditions can be specified for Address Book searches Name User Code Fax Destination E mail Address and Folder Name The following conditions can be specified for LDAP server searches Name Fax Destination E mail Address Company Name and Department Name ...

Страница 100: ...atch the specified character Example When searching for ABC enter ABC Include one Word Search for strings that include the specified character Example When searching for ABC enter A B or C Exclude Words Search for strings that do not include the specified charac ter Example When searching for ABC enter D Fuzzy Search Perform a fuzzy search This item appears when selecting an LDAP server in step B ...

Страница 101: ...ttings General Settings Guide The string you enter in the Name condition field is read as the first or last name depending on the administrator s setting For example to search for the name John Smith ask the system administrator whether you should enter John or Smith Reference Entering Text About This Machine System Settings General Settings Guide Search by Registration Number Follow these steps t...

Страница 102: ...ou to enter five digits If you make a mistake press Clear and then try again D Press OK The corresponding destination appears Note If the Cannot find the specified Registration No message ap pears the specified registration number or selected type of transmission is wrong or does not exist Press Exit check the registration number again and then follow the procedure from step B ...

Страница 103: ...e unit Internet Fax and IP Fax A Place the original and then select the scan settings you require B Press On Hook You will hear a low tone from the internal speaker If you want to cancel this operation press On Hook again C Dial The machine immediately dials the destination If you make a mistake press On Hook or the Clear Modes key and then try again To select a destination from the Address Book s...

Страница 104: ...r Lower to adjust the volume of the on hook sound The volume can also be preprogrammed in the Facsimile Features menu If you have an external telephone on the fax machine you can speak with the other party when you hear a voice If you hear a voice before pressing the Start key pick up the external telephone and tell the receiver you want to send a fax document ask them to switch to facsimile mode ...

Страница 105: ...s printed the re sult of a transmission with Manual Dial is not mentioned in the report A Place the original and then select the scan settings you require B Pick up the handset You will hear a dial tone C Dial The machine immediately dials the destination If you make a mistake replace the handset and then try again from step B To select a destination from the Address Book see Using the Address Boo...

Страница 106: ...ls After transmission the standby display appears Note When the operation switch is off even if the main power switch is on you cannot operate this machine using only the handset of the external tele phone You must first press the operation switch to turn on the machine Reference p 72 Using the Address Book to Specify Destinations ...

Страница 107: ...resses and set the User Name as Sender in advance If user authentication is set the user logged in is set as sender The transmis sion result is sent to the logged in user s e mail address A Place the original and then select the scan settings you require B Press Sender Name C Select a sender To select a sender by specifying the registration number registered in the Ad dress Book press Registration...

Страница 108: ...unction the sender s name user name appears on the re ceiver s sheet lists and report F To confirm the transmission results by e mail notification press E mail TX Results to highlight it If the sender s e mail address is registered you can send the transmission re sult to the registered e mail address G Press OK The standby display appears To check the settings press Sender Name ...

Страница 109: ...switch 10 bit 6 in the Facsimile Fea tures menu You can use Communication Result Report etc to check usage status by specified users If user authentication is set you can check usage by logged in users If User Code is set to sender you can count the number of uses by each user To cancel the Sender Name cancel the transmission See Canceling a Transmission Reference p 108 Canceling a Transmission Fa...

Страница 110: ... for a particular receiver since only a person who knows the SUB Code can print the document Documents can also be sent via facsimiles that have the Transfer Station function This function helps you save costs when you send the same document to more than one place in a distant area and saves time since many documents can be sent in a single operation Important Documents can be sent to facsimiles t...

Страница 111: ...n Setting D Press SUB Code Transmission E Press OK twice The standby display appears F Enter the fax number of a destination or an IP Fax destination G Press Adv Features H Make sure that SUB Code is selected I Press Transmission SUB Code ...

Страница 112: ...e sure the number of digits in the SUB Code matches the specification of the machine to which you are sending For the maximum number of dig its for the SUB Code of this machine see Maximum Values You can store SUB Codes as well as names and fax numbers in the destina tion list and Keystroke Programs When a SUB Code is stored in the destination list the SUB Code can be modified or deleted after sel...

Страница 113: ...ing Keystroke Programs p 272 Maximum Values Registering Addresses and Users for Facsimile Scanner Functions Gener al Settings Guide Setting SEP Codes for Reception Follow these steps to enter a SEP Code to request the destination to transmit a document You can receive a document stored in the destination s memory if the document has the same SEP Code as the SEP Code you entered This function enabl...

Страница 114: ...on Setting C Press SEP Code Reception D Press OK twice The standby display appears E Enter the fax number of a destination or an IP Fax destination F Press Adv Features G Make sure that SEP Code is selected H Press Reception SEP Code ...

Страница 115: ...ing For the maximum number of digits for the SEP Code of this machine see Maximum Values You can enter numbers p q and spaces You can store SEP Codes as well as names and fax numbers in the destina tion list and Keystroke Programs When a SEP Code is stored in the destination list the SEP Code can be modified or deleted after selecting a destination using the Destination keys The SEP Code is printe...

Страница 116: ...ams p 272 Maximum Values Registering Addresses and Users for Facsimile Scanner Functions Gener al Settings Guide SEP Code RX Reserve Report This report is printed after SEP Code Reception is set up You can use this report to check the reservations for SEP Code Reception Note You can turn this function on or off with the User Parameters switch 03 bit 3 in the Facsimile Features menu You can have a ...

Страница 117: ...on with the Journal You can turn this function on or off with the User Parameters switch 03 bit 4 in the Facsimile Features menu To view the report without text disruption select a font of even character width in your e mail application s settings You can display a destination with the User Parameters switch 04 bit 4 in the Facsimile Features menu You can display a sender name with the User Parame...

Страница 118: ... Is Scanned Use this procedure to cancel a transmission before pressing the Start key A Press the Clear Modes key Note When originals are placed into the ADF you can cancel transmission sim ply by removing them While the Original Is Being Scanned Use this procedure to cancel a transmission while the originals are being scanned after the Start key has been pressed A Press the Clear Stop key The mac...

Страница 119: ...on while the Communicating indicator is lit A Press the Clear Stop key You can also cancel a Memory Transmission by pressing Change TX Info B Select the file you want to cancel If the desired file is not shown press U or T to find it There are cases when a destination may not be selected as the destination ap pears as p depending on the security settings C Press Stop Transmission ALV002S ...

Страница 120: ...cel a document while it is being sent the transmission is halted as soon as you finish the cancellation procedure However some pages of the document may already have been sent and received at the other end If the transmission finishes while you are carrying out this procedure it will not be canceled If multiple destinations were specified only one destination number appears ...

Страница 121: ...earch for the file to be canceled among the files stored in memory and then de lete it You can cancel transmission of a file while the file is being sent stored in mem ory or fails to transmit All the scanned data is deleted from memory Important This function is unavailable with Immediate Transmission A Press Change TX Info B Press Check Stop Transmission File The list of stored files being trans...

Страница 122: ...ot shown press U or T to find it There are cases when a destination may not be selected as the destination ap pears as p depending on the security settings D Press Stop Transmission E Press OK To cancel another file repeat steps C and E To cancel stopping transmission press Cancel ...

Страница 123: ...of your file may have already been sent and is received at the other end If the transmission finishes while you are carrying out this procedure transmission cannot be canceled If multiple destinations were specified only the number of destinations for unsent documents appears If multiple destinations were specified only one destination number ap pears To display all destinations press Check Change...

Страница 124: ...nge TX Info B Press Check Stop Transmission File C Select a file to check If multiple destinations were specified only the destination selected first appears If multiple destinations were specified only the number of destinations for unsent documents appears ...

Страница 125: ...Confirming a Transmission 115 1 D Press Check Change Settings E Confirm a transmission and then press Exit F Press Exit twice The standby display appears ...

Страница 126: ...3 bit 2 in the Facsimile Features menu Even if the machine is set up not to print this report it is still printed if an orig inal could not be stored You can select whether to include part of the original image on the report with the User Parameters switch 04 bit 7 in the Facsimile Features menu You can select whether to display a destination with the User Parameters switch 04 bit 4 in the Facsimi...

Страница 127: ...to be by the machine at the time Important If the machine is switched off for about one hour all fax documents stored in memory are lost If documents are lost for this reason a Power Failure Report is automatically printed when the operation switch is turned on Use this re port to identify lost documents For details see Troubleshooting When Us ing the Facsimile Function Troubleshooting This functi...

Страница 128: ...splay appears To check the settings press TX Mode F Specify a destination and then press the Start key Note You can specify a time within 24 hours of the current time If the current time shown is not correct change it You can program one of the Quick Operation keys with operations for this function Using the Quick Operation key allows you to omit step B You can cancel the transmission setup for Se...

Страница 129: ... Result column of the Journal allowing the originator to verify the transmission was received Important The Reception Notice feature is only available if the receiver supports MDN Message Disposition Notification A Place the original and then select the scan settings you require B Press TX Mode C Press Reception Notice to highlight it D Press OK The standby display appears To check the settings pr...

Страница 130: ...ion notice message indicating an error Error appears in the Result column and will not be overwritten even if you subsequently receive a reception notice message as OK following the error message Reception notice results are only shown in the Journal The Result column in all other files lists and transmission reports show Reception notice messages themselves are not recorded in the Journal You can...

Страница 131: ... you require B Press TX Mode C Press BCC Transmission to highlight it D Press OK The standby display appears To check the settings press TX Mode E Specify a destination and then press the Start key Note You can program one of the Quick Operation keys with operations for this function Using the Quick Operation key allows you to omit step B Reference Facsimile Features General Settings Guide ...

Страница 132: ...ssion results by sending an e mail noti fication to the specified destination Important Register the e mail address of the destination for e mail notification in the destination list in advance A Place the original and then select the scan settings you require B Press TX Mode C Press E mail TX Results to highlight it ...

Страница 133: ...hlight off E mail TX Results gets highlighted and the destination of notification selected appears E Press OK To check the settings press TX Mode The standby display appears F Specify a destination and then press the Start key Note You can program one of the Quick Operation keys with operations for this function Using the Quick Operation key allows you to omit step B Reference Facsimile Features G...

Страница 134: ... Features 124 2 Entering the Subject Allows you to enter a subject for the document you want to send A Place the original and then select the scan settings you require B Press TX Mode C Press Subject D Enter the subject ...

Страница 135: ...uently used subjects in advance in Pro gram Change Delete User Text in System Settings If you send e mail without setting a subject a subject is automatically in serted For details about how the subject is automatically inserted see E mail Subject and Received Images You cannot send a subject only as e mail without an original You can program one of the Quick Operation keys with operations for thi...

Страница 136: ...nsmission Features 126 2 Reference p 28 E mail Subject p 149 Received Images p 272 Maximum Values Entering Text About This Machine System Settings General Settings Guide Facsimile Features General Settings Guide ...

Страница 137: ...ansmitted Important Program text strings in advance in Program Change Delete E mail Mes sage in System Settings A Place the original and then select the scan settings you require B Press TX Mode C Press Text D Select a text and then press OK E Press OK The standby display appears ...

Страница 138: ... key Note You cannot send text only without an original You can program one of the Quick Operation keys with operations for this function Using the Quick Operation key allows you to omit step B Reference System Settings General Settings Guide Facsimile Features General Settings Guide ...

Страница 139: ...nt Please phone and Copy to corres section You can also program other messages Important While this function is in use the third line of the Label Insertion is not printed When there is an image around the area where the standard message is to be stamped that image is deleted Program a standard message in Program Change Delete Standard Mes sage in the Facsimile Features menu See Facsimile Features...

Страница 140: ...mp multiple standard messages Note You can program one of the Quick Operation keys with operations for this function Using the Quick Operation key allows you to omit step B and step C Reference p 132 Label Insertion Facsimile Features General Settings Guide Auto Reduce When this function is turned on if the receiver s paper is smaller than the size of the original you are sending the document is a...

Страница 141: ...may be deleted when printed at the other end A Place the original and then select the scan settings you require B Press TX Mode C Select Option Setting D Make sure that Auto Reduce is highlighted To cancel an Auto Reduce press Auto Reduce to turn the highlight off E Press OK twice F Specify the destination and then press the Start key ...

Страница 142: ...area where the Label is to be printed that image is deleted The receiver s name is printed as follows Receiver s name printed at the top of the page and preceded by To Standard message the programmed message is printed within the next two lines Set this function as follows Set Label Insertion to On when programming fax destinations Set Label Insertion to on when sending fax documents On the Standa...

Страница 143: ... Note You can program one of the Quick Operation keys with operations for this function Using the Quick Operation key allows you to omit step B and step C To print a standard message that is not programmed as a default program it in advance in Program Change Delete Standard Message in the Facsimile Features menu Reference p 129 Standard Message Stamp Facsimile Features General Settings Guide ...

Страница 144: ...s function is not available with Internet Fax A Place the original and then select the scan settings you require B Press TX Mode C Select Option Setting D Press Closed Network to highlight it To cancel a Closed Network transmission press Closed Network again E Press OK twice F Specify the destination and then press the Start key Note YoucanprogramoneoftheQuickOperationkeyswithoperationsforthisfunc...

Страница 145: ...ended to the spec ified destination transmission is in standard fax mode When you select a destination that has a registered SUB Code from the Ad dress Book if SUB Code Transmission is set to off the SUB Code is not ap pended and transmission is in standard fax mode A Place the original and then select the scan settings you require B Press TX Mode C Select Option Setting D Press SUB Code Transmiss...

Страница 146: ...ortant This function is not available with Internet Fax To perform SEP Code Reception a SEP Code must be set in Adv Features the Address Book or Keystroke Programs in advance Otherwise even if SEP Code Reception is set to on reception is not performed If the other party s fax machine has a polling transmission function the machine performs poll ing reception When you select a destination that has ...

Страница 147: ...and then press the Start key Note You can program one of the Quick Operation keys with operations for this function Using the Quick Operation key allows you to omit step B and step C Reference p 103 Setting SEP Codes for Reception p 262 Programs Facsimile Features General Settings Guide Registering Addresses and Users for Facsimile Scanner Functions Gen eral Settings Guide ...

Страница 148: ...and Second Name For example if you store your department name in one and your organization name in the other you could use the first when sending internal faxes and the second for external faxes A Place the original and then select the scan settings you require B Press TX Mode C Select Option Setting D Make sure that Fax Header Print is highlighted To cancel Fax Header Print press Fax Header Print...

Страница 149: ...spective User Parameters switch 18 bit 3 2 1 0 in the Facsimile Features menu If you used the number keys to specify the receiver the first header name is printed on the receiver s paper To print the second header name contact your service representative You can program one of the Quick Operation keys with operations for this function Using the Quick Operation key allows you to omit step B and ste...

Страница 150: ...Other Transmission Features 140 2 ...

Страница 151: ...ine may not be able to receive fax documents when free memory space is low If free memory reaches 0 during Immediate Reception any further recep tion becomes impossible and the current communication is terminated Note Normally this machine receives documents by Immediate Reception But Memory Reception is used when Multi copy Reception or 2 Sided Print is set to on If the Substitute Reception is us...

Страница 152: ... be able to receive large numbers of documents or doc uments with high data content In such cases it is recommended that you switch off multi copy and 2 sided printing or install the optional expansion memory The machine may not be able to receive fax documents when free memory space is low If free memory reaches 0 during Memory Reception any further reception becomes impossible and the current co...

Страница 153: ...r all fax documents received or for only those documents that match a condition specified in the User Parameters in the Facsimile Features menu The Receive File indicator lights to let you know when fax documents have been received using Substitute Reception Important Reception may not take place if there is not enough free memory If free memory reaches 0 during Substitute Reception any further re...

Страница 154: ...s automatically printed after the current job finishes The message Output Tray is full Re move paper appears The output tray is full Remove paper from the output tray h is lit The cover is open Close the cover shown in the display Problems Causes Solutions h is lit Paper is jammed Remove the jammed paper For details about removing the pa per see Clearing Misfeeds Trou bleshooting h is lit All tray...

Страница 155: ...sender has not programmed their Own Name or Own Fax Number the machine may fail to receive an important fax document It is recommended that you ask important senders to program an Own Name or Own Fax Number in advance Free The machine switches to Substitute Reception regardless of whether or not the sender has programmed their Own Name or Own Fax Number Closed Network Code match The machine switch...

Страница 156: ...witch manually to facsimile mode A When the machine rings pick up the handset of the external telephone B If you hear beeps press the Start key or hold the Facsimile key down for a few seconds The Start key is only available in facsimile mode when an original is not placed C Replace the handset of the external telephone The machine will start receiving Note When the operation switch is off even if...

Страница 157: ...Facsimile Fea tures menu If you program a Quick Operation key with Switch Reception Mode you can switch the reception mode quickly A Press Switch RX Mode B Select the reception mode and then press OK To cancel the selection press Cancel The standby display appears Reference Facsimile Features General Settings Guide ...

Страница 158: ...l is set to POP3 or IMAP4 you can set the machine to retain incoming e mail or delete it from the server in System Settings With User Parameters switch 21 bit 1 in the Facsimile Features menu you can have the machine send the return receipt in response to the reception no tice request attached to the sent e mail Reference System Settings General Settings Guide Facsimile Features General Settings G...

Страница 159: ...splay appears Reference Facsimile Features General Settings Guide Received Images Here is an example of an Internet Fax document sent from this machine and re ceived on a computer using the Outlook Express e mail application The received image varies according to the e mail application Important When Internet Fax e mail is sent to computer the following information is al ways inserted in the e mai...

Страница 160: ...t the time of transmission If no subject is specified one is automatically assigned in the format shown in 1 above 7 The message is inserted in all e mail xxxx is the machine name 8 Attachment File Any document included by the sender is displayed as an attached document Note The display format of the sender name differs according to that of the Stamp Sender Name setting and other functions The dis...

Страница 161: ...nd the document is routed to the destination whose SUB Code is specified Important You must set the Personal Box and register a delivery destination beforehand Personal Boxes can be programmed in Box Setting in the Facsimile Features menu This function is not available when you set received documents to be deliv ered to the network delivery server Delivery of received documents can be set in Syste...

Страница 162: ...rer Reference Facsimile Features General Settings Guide SEP Code Transfer Report You can check the results of transmission to Receiving Stations The machine prints this report when it has finished transmitting to Receiving Stations Note You can select whether the SEP Code Transfer Report be automatically print ed using the User Parameters switch 04 bit 1 in the Facsimile Features menu You can set ...

Страница 163: ...ination according to the sender specify the Forwarding destination for each sender under Facsimile Features Reception Settings Program Special Sender Documents from other senders are forwarded to the default Forward ing destination specified for this function You can select whether the machine prints out the documents it forwards with User Parameters switch 11 bit 6 in the Facsimile Features menu ...

Страница 164: ...on is enabled on the DNS server e mail sent from the SMTP server will not be received and the machine reports an error if SMTP reception is not set Also the SMTP server sends an error notification to the originator If an error occurs while receiving e mail reception is aborted the e mail is de leted and Error Report is printed Also the SMTP server will send an error notification to the originator ...

Страница 165: ...as follows Fax Number fax destination fax number host name of this machine domain name Example to transfer to fax number 212 123 4567 fax 2121234567 abc company com Single destination programmed in the destination list fax qregistration number of 5 digits or less host name of this machine do main name Example to transfer to the destination number 00001 fax q00001 abc company com Group destination ...

Страница 166: ...than with other methods of compression It allows you to receive documents sent in the JBIG format through JBIG Transmission Important You can only use this function with telephone line Auto Fax Reception Power Up This machine can be set to shut down automatically if no one has used it for a while In these situations even though the operation switch is off the machine can still receive incoming doc...

Страница 167: ... of the beep or turn it off completely using Adjust Sound Volume in the Facsimile Features menu set the volume to the mini mum level Reference Facsimile Features General Settings Guide Checkered Mark When this function is turned on a Checkered Mark is printed on the first page of fax documents to help you separate them Note You can turn this function on or off using Checkered Mark in the Facsimile...

Страница 168: ...acsimile Features menu Reference Facsimile Features General Settings Guide Reception Time You can have the date time and file number printed at the bottom of the docu ment when it is received Note You can turn this function on or off using Print Reception Time in the Facsim ile Features menu When a received document is printed on two or more sheets the reception time is printed on the last page Th...

Страница 169: ...necessary You must also have paper set in the machine of the same size as that sent by the sending par ty In Two Sided Printing this machine will correctly receive in A3L B4 JIS Japanese Industrial Standard L A4KL B5 JISKL A5KL 11 17 L 81 2 14 L 81 2 11 KL 81 2 51 2 L The following table shows the re sults that can be achieved when receiving with this machine This function works only when all page...

Страница 170: ...ame size are printed on the same paper Some stored documents may be unavailable for this printing option Reference Facsimile Features General Settings Guide 180 degree rotation printing When printing on both sides of the paper this machine rotates images as shown in the diagram Multi Copy Reception If you switch this function on multiple copies of each incoming fax document is printed You can also...

Страница 171: ... Reception File Print Quantity in the Facsimile Features menu The machine will use Memory Reception for Multi copy Reception Reference Facsimile Features General Settings Guide Image Rotation If you have set paper in the standard tray K incoming fax documents are auto matically rotated to fit onto the paper Note If you specified a tray for Paper Tray in the Facsimile Features menu the paper loaded...

Страница 172: ...cument is reduced if it is less than 20 mm 0 79 When a document is split an asterisk p is inserted at the split position and about 10 mm 0 39 of the split area is duplicated on the top of the second sheet Note Your service representative can customize this function with the following settings Reduction Print split mark Overprinting Overprinting length Guideline for split You can adjust the overpri...

Страница 173: ...e printing quality may not be as good as usual Reference p 162 Page Separation and Length Reduction Facsimile Features General Settings Guide TSI Print Transmitting Subscriber Identification Print Usually the sender s Fax Header is printed on received documents When you receive an Internet Fax document the e mail address of the sender is printed If the sender has not programmed their Fax Header yo...

Страница 174: ... the size of the sent original Reference p 161 Image Rotation p 162 Page Separation and Length Reduction p 163 Page Reduction Facsimile Features General Settings Guide Setting priority trays With the same size of paper loaded into multiple trays you can make the ma chine use one tray for one function and another tray for another function For example you may load white A4 paper into tray 1 to use w...

Страница 175: ... printed automatically the printer automatically continues printing from where it left off If any documents or reports were being printed manually the printer does not resume printing Perform the operation from the beginning again Reference Facsimile Features General Settings Guide Having incoming documents printed on paper from the bypass tray You can print documents sent from Specified Senders o...

Страница 176: ...ion and 180 degree rotating printing are not possible Reference Facsimile Features General Settings Guide Where Incoming Documents Are Delivered Output Tray You can specify the output tray or output position to facilitate separation of re ceived documents Specifying tray for lines Use this function to specify the output tray for each line port You can specify the document feeding tray for each por...

Страница 177: ...ed for fax output you can use the Tray Shift function whenever a fax or report is printed This is useful for separating faxes stacked in the finisher output tray For exam ple if the previous incoming fax was output to the left the next incoming fax will be output to the right and vice versa Note You can turn this function on or off with the User Parameters switch 19 bit 0 in the Facsimile Features...

Страница 178: ...Reception 168 3 ...

Страница 179: ...ansmission change the settings of a transmission print a stored file print a list of stored files and resend a file which the machine failed to transmit Note If the No transmission files found message appears on the screen af ter you press Check Stop Transmission File no files are being stored or sent by Memory Transmission You cannot check or edit a file being sent Also a SUB Code Transmission fi...

Страница 180: ...Broadcast You can delete selected broadcasting destinations Important If you delete a destination that is the only destination for a transmission the transmission is canceled A Press Change TX Info B Press Check Stop Transmission File C Select the file from which you want to delete a destination ...

Страница 181: ...ear Stop key to delete the destination and then press OK Pressing the Clear Stop key deletes by single digits the fax number or IP Fax address The Internet Fax address can be entirely deleted at once by pressing the Clear Stop key G Press Exit To delete another destination repeat from step C H Press Exit twice The standby display appears ALV002S ...

Страница 182: ...ming Communication Information 172 4 Adding a Destination You can add a destination for broadcasting A Press Change TX Info B Press Check Stop Transmission File C Select the file to which you want to add a destination ...

Страница 183: ...u can switch the transmission type between fax IP Fax and Internet Fax by pressing Fax or Internet Fax To add an e mail address switch the type of transmission to Internet Fax by pressing Internet Fax Then press Manual Entry and enter the e mail address You can also program a SUB Code or SEP Code by pressing Adv Features G Press Exit Repeat from step C if you want to add another destination H Pres...

Страница 184: ...the transmission time specified with Send Later You can also delete the transmission time If the transmission time is deleted the file is transmitted immediately A Press Change TX Info B Press Check Stop Transmission File C Select the file for which you want to change or cancel the transmission time ...

Страница 185: ...enter the transmission time using the number keys and then press OK If you press Transmit Now the file is transmitted immediately However if there is a file on standby that file is sent first G Press Exit Repeat from step C if you want to change another transmission time H Press Exit twice The standby display appears ...

Страница 186: ...rmation 176 4 Changing the SMTP Server Setting You can change the settings for whether or not to bypass the SMTP server A Press Change TX Info B Press Check Stop Transmission File C Select a file whose SMTP server setting you want to change ...

Страница 187: ...Changing the Settings of Files in Memory 177 4 D Press Check Change Settings E Press Change F Press SMTP G Select Yes or No and then press OK ...

Страница 188: ...Changing Confirming Communication Information 178 4 H Press OK I Press Exit Repeat from step C to change the SMTP server settings of other recipients J Press Exit twice The standby display appears ...

Страница 189: ...ntents of a file that is stored in memory and not yet sent use this procedure to print it out A Press Change TX Info B Press Check Stop Transmission File C Select the file you want to print If multiple destinations were specified only the number of destinations for unsent documents appears ...

Страница 190: ...Cancel The display returns to that of step C E Press the Start key To cancel printing after pressing the Start key press Stop Printing The dis play returns to that of step C Repeat from step C if you want to print another file F Press Exit twice The standby display appears Note You can also print files that have not been successfully transmitted ...

Страница 191: ...find out which files are stored in memory and what their file numbers are Knowing the file number can be useful for example when erasing files A Press Change TX Info B Press Check Stop Transmission File C Press Print List To cancel printing before pressing the Start key press Cancel The screen returns to that displayed before pressing Print List ...

Страница 192: ...rinting The dis play returns to that of step C E Press Exit twice The standby display appears Note The contents of a file stored in memory can also be printed You can set whether or not to display a sender name with the User Param eters switch 04 bit 5 in the Facsimile Features menu Reference Facsimile Features General Settings Guide ...

Страница 193: ...uld not be transmitted to On in User Parameters switch 24 bit 0 in the Facsimile Features menu A Press Change TX Info B Press Check Stop Transmission File C Select the file you want to resend TX failed is displayed for files that could not be sent If multiple destinations were specified only the destination you specify first appears If multiple destinations were specified only the number of destin...

Страница 194: ... resend another file To cancel transmissions press Cancel The display returns to that of step D F Press Exit twice The standby display appears Transmission starts Note Files that could not be transmitted are kept for either 24 or 72 hours de pending on the setting you make in User Parameters switch 24 bit 1 in the Facsimile Features menu Reference Facsimile Features General Settings Guide ...

Страница 195: ...nge TX Info B Select Transmission File Status C Check the transmission results Transmission results are displayed from the latest result down in groups of nine When a fax is sent Destination shows the Own Fax Number or Fax Header information of the receiver When an Internet Fax is sent the e mail address and name programmed in the destination list appears For a transmission from a computer LAN Fax...

Страница 196: ...tion Memory Transmission Ifadocumentcannotbesent aCommunicationFailureReportisautomaticallyprinted Or you canusetheCommunicationResultReporttocheckeachtransmissionresultregardlessofstatus This report is printed each time a Memory Transmission is completed if turned on with User Parameters switch 03 bit 0 in the Facsimile Features menu You can also print the report by programming the TX Status Repo...

Страница 197: ...sender the transmission results are sent to senders e mail addresses that have been registered Select the sender from the Internet Fax destinations in the destination list If you send fax documents from a computer use LAN Fax Driver to specify whether or not the LAN Fax Result Report is sent to the computer Reference p 97 Sender Settings p 103 Setting SEP Codes for Reception p 188 Immediate TX Res...

Страница 198: ...rt of the original image on the report with the User Parameters switch 04 bit 7 in the Facsimile Features menu To view the report without text disruption select a font of even character width in your e mail application s settings You can set whether or not to display a destination with the User Parameters switch 04 bit 4 in the Facsimile Features menu The Pg s column gives the total number of page...

Страница 199: ...ransmissions so you can send them again Note You can select whether the Communication Failure Report is automatically printed using the User Parameters switch 04 bit 1 in the Facsimile Features menu This report is only printed if the Communication Result Report is turned off andadocumentcouldnotbesuccessfullytransmittedwithMemoryTransmission You can select whether to include part of the original i...

Страница 200: ...n Display Follow these steps to display the reception result A Press Change TX Info B Press Reception File Status C Check the reception results Reception results are displayed from the latest result in groups of nine When a fax or IP Fax is received Sender shows the Own Fax Number or Fax Header information When an Internet Fax is received the sender s e mail address appears ...

Страница 201: ... For details see the Web Image Monitor s Help If a document is received while you are using this function the result will not appear To view the latest result exit Reception File Status and then try again You can program one of the Quick Operation keys with operations for this function Using the key allows you to omit step A Reference p 272 Maximum Values Facsimile Features General Settings Guide ...

Страница 202: ...the Facsimile Features menu You can display a sender name with the User Parameters switch 04 bit 5 in the Facsimile Features menu Depending on security settings the Journal is not automatically printed You can set whether the Journal is printed by line type with the User Param eters switch 19 bit 1 in the Facsimile Features menu You can program one of the Quick Operation keys with operations for t...

Страница 203: ...f communications in the order made A Press Change TX Info B Press Print Journal C Select All D Press the Start key To cancel a file printing press Stop Printing The display returns to that of step C E Press Exit twice The standby display appears ...

Страница 204: ...mber A Press Change TX Info B Press Print Journal C Select Print per File No D Enter a 4 digit file number If you make a mistake press Clear or the Clear Stop key and then try again E Press the Start key To cancel a file printing press Stop Printing The display returns to that of step C F Press Exit twice The standby display appears ...

Страница 205: ... Change TX Info B Press Print Journal C Select Print per User D Select a user Press Cancel if the user is not registered The display returns to that of step C E Press OK after checking the user name shown on the display Press Cancel if a wrong user name is selected The display returns to that of step C ...

Страница 206: ...hanging Confirming Communication Information 196 4 F Press the Start key To cancel a file printing press Stop Printing The display returns to that of step C G Press Exit twice The standby display appears ...

Страница 207: ... Shows the transmission or reception date 4 Time Shows the transmission or reception start time 5 Other end For fax destinations Shows the name for display pro grammed by the other end Shows the programmed fax number if the name for display was not pro grammed If neither name nor fax number was programmed by the other end an entered fax number or a name programmed in a destination list is shown fo...

Страница 208: ... Q indicates outgoing e mail for which a Reception Notice is set in TX Mode whereas an A indicates reception notice e mail For IP Fax transmissions and recep tions After and T for outgoing faxes or R for incoming faxes the com munication mode appears in alpha betical letters or symbols For forwarding to the folder destina tions After folder mark and T for outgoing faxes the communication mode appe...

Страница 209: ...e mail format the Journal is printed out The name of an attached CSV file is JOURNALnyear month date hours minutes For example the file name transmitted in 14 40 on 20th December 2005 is JOURNAL200512201440 csv The subject of a Journal sent by e mail begins with Journal Reference Facsimile Features General Settings Guide Journal by e mail If the setting is made so that the Journal is transmitted a...

Страница 210: ...u before using this function Note If you have selected to store received documents and specified an e mail ad dress for notification of receipt fax reception notification can be sent to that e mail address For the maximum number of received documents you can store on the ma chine s hard disk see Maximum Values You can view and print received and stored documents using a Web Image Monitor or DeskTo...

Страница 211: ...ete File after Printing To perform two sided printing press Print on 2 Sides before pressing the Start key D Press the Start key E Press Exit twice The standby display appears Note This function allows you to print only received and stored documents You cannot print and delete received documents using the Document Server function You can program one of the Quick Operation keys with operations for ...

Страница 212: ...red Reception File C Select a file to be deleted and then press Delete D Press Yes To cancel a deletion press No The display returns to that of step C E Press Exit twice The standby display appears Note You cannot delete a document while another person is previewing or printing it using a Web Image Monitor or DeskTopBinder You can specify and delete multiple documents For the maximum number of doc...

Страница 213: ...re using this function the following preparations are required Program your Memory Lock ID Set Memory Lock Reception to On Important If the main power switch is turned off for about an hour all documents pro tected by Memory Lock Reception are deleted When this happens the Power Failure Report is printed so you can confirm which documents have been de leted For details see Troubleshooting When Usi...

Страница 214: ... received documents be come stored documents Even when Memory Lock Reception is available if free memory is insuffi cient reception is not possible You can also apply a Memory Lock Reception to documents that come only from certain senders Documents received by SEP Code Reception are automatically printed even if this function is switched on You can program one of the Quick Operation keys with ope...

Страница 215: ...he document using SUB Code Transmission with that SUB Code When your ma chine has received a confidential document the Confidential File i indicator lights Important If the main power switch is turned off for about an hour all documents received into Personal Boxes are deleted When this happens the Power Failure Report is printed so you can confirm which documents have been deleted For details see...

Страница 216: ...Personal Box Documents Follow these steps to print a document received into a Personal Box A Make sure that the Confidential File indicator is lit B Press Change TX Info C Press Print Personal Box File D Select the box with the document you want to print ALV004S ...

Страница 217: ... print a document in another Personal Box repeat from step D G Press Exit twice The standby display appears Note If you print a Personal Box document it is deleted The passwords for Personal Boxes can be programmed under General Settings in the Facsimile Features menu Reference Facsimile Features General Settings Guide Confidential File Report You can check whether a document was received to a Per...

Страница 218: ...them Important If the main power switch is turned off for about an hour all documents stored in Information Boxes are deleted When this happens the Power Failure Report is printed so you can confirm which documents have been deleted For details see Troubleshooting When Using the Facsimile Function Troubleshooting For other parties to be able to retrieve a document programmed in an Information Box ...

Страница 219: ...rearepre programmedfiles afilemarkappearstotheleftoftheboxname A message is displayed if you select a box with a file stored in it Press Yes when changing the file The stored original file is overwritten D If a password has been set for the box enter the password and then press OK If you make a mistake press Clear or the Clear Stop key before pressing OK and then try again To cancel entering a pas...

Страница 220: ...The machine starts to scan the original To stop scanning press Stop The display returns to that of step C To store a document in another Information Box repeat from step C G Press Exit twice The standby display appears Note One Information Box stores one file The stored file is not deleted automatically If you want to delete a stored file see Deleting Information Box Documents Reference p 212 Dele...

Страница 221: ... Box File C Press Print D Select the box that contains the stored file you want to print You cannot select a box that has no stored file E If a password has been set for the box enter the password and then press OK If you make a mistake press Clear or the Clear Stop key before pressing OK and then try again To cancel entering a password press Cancel The display returns to that of step D ...

Страница 222: ... stop printing after pressing the Start key press Stop Printing The dis play returns to that of step D Repeat from step D to print another stored file in the box G Press Exit twice The standby display appears Deleting Information Box Documents Follow these steps to delete a file stored in an Information Box A Press Change TX Info B Press Store Delete Print Information Box File C Press Delete D Sel...

Страница 223: ...lear or the Clear Stop key before pressing OK and then try again To cancel entering a password press Cancel The display returns to that of step D F Press Yes To stop deleting press No The display returns to that of step D Repeat from step D to delete another stored file in another box G Press Exit twice The standby display appears ...

Страница 224: ...Changing Confirming Communication Information 214 4 ...

Страница 225: ...the Document Server enables the following Once stored a document can be sent out as many times as you want just by selecting it Storing a document does not use facsimile memory You can send and print multiple stored documents as a single document and also send them with scanned originals at the same time Follow the instructions under Select Stored File when sending or printing stored documents Imp...

Страница 226: ... in the Document Server can be downloaded and managed on the computer See Document Server Copy Document Server Reference For the maximum values of the following items see Maximum Values Number of documents you can store in the Document Server using the fac simile function Number of pages per document you can store in the Document Server Number of pages you can store in the Document Server in total...

Страница 227: ...d correctly in the preview B Press Store File C Select Send Store or Store Only Select Send Store to send documents after they are stored Select Store Only to store documents D Set the user name file name and password as necessary If you are not setting a user name file name or password proceed to step E You cannot change multiple documents at once E Press OK The file name appears to the left of S...

Страница 228: ...ettings Guide Programming a user name A Press User Name B Press the user name to be programmed Press the title key to switch between titles To set a non programmed user name press Manual Entry and then enter the name User names entered by pressing Manual Entry are not programmed into the user code C Press OK Note Depending on the security settings Access Privileges might be displayed instead of Us...

Страница 229: ... Stored File 219 5 Reference Entering Text About This Machine Setting a file name A Press File Name B Enter the file name C Press OK Reference Entering Text About This Machine Setting a password A Press Password ...

Страница 230: ... documents stored in the Document Server can be sent again and again until they are deleted Once sent documents are stored in the Document Server Therefore you can send them in just one operation without having to set your originals again Important Store the documents to be sent in advance You can program a password for this function You can change the user names file names and passwords of stored...

Страница 231: ...he documents in alphabetical order Press User Name to place the documents in order by programmed user name Press Date to place the documents in order of programmed date To view details about stored documents press Details Press the Thumbnails key to switch the screen to thumbnail display C If you select a document with a password enter the password and then press OK If the document does not have a...

Страница 232: ...documents place the original and then select any scan settings you require The added originals are not stored Note You can send only documents saved with the facsimile function in the Doc ument Server You cannot send documents stored in the Document Server using the copy printer or scanner functions The specified documents are sent with the scan settings made when they were stored To see details o...

Страница 233: ... B Select the file Specifying documents by User Name A Select User Name B Select the user name of the programmed document and then press OK To search by directly entering a user name press Manual Entry and then enter the user name Partial matching is used when searching for a user name C Select the file to be sent ...

Страница 234: ...ter the name of the document to be sent and then press OK Partial matching is used when searching for a file name C Select the file to be sent Displaying a preview A Select the document you want to send Press the Thumbnail key to switch the screen to thumbnail display B Press Preview ...

Страница 235: ... larger than A3 they are not displayed on the preview window If the image file is corrupt store it again If you stored originals that had multiple mixed size pages without using the Mixed Original Sizes function the displayed size might differ from the actual size for pages after the first page Printing Stored Documents Use this function to print documents stored in the Document Server Important W...

Страница 236: ...int 1st Page When Print File is pressed the machine prints all the pages When Print 1st Page is pressed the machine prints only the first page To print both sides press Print 2 Sides When multiple files are specified they are printed per file To cancel printing press Cancel E Press the Start key When only the first page is printed the file name is printed at the top of the paper To cancel printing...

Страница 237: ...n specify and print multiple documents at one time For the maximum number of stored documents you can print at a time us ing Print 1st Page see Maximum Values For the maximum number of stored pages you can print at a time see Maximum Values Reference p 272 Maximum Values Changing Stored Document Information You can change the file name user name and password of stored documents To change a stored ...

Страница 238: ...a password is set enter the password and then press OK When a selected file does not have a password proceed to step D D Change the desired information of the stored document Press the keys for the items you want to change E Press Exit The standby display appears ...

Страница 239: ...h between titles To set a non programmed user name press Manual Entry and then enter the name User names entered by pressing Manual Entry are not programmed into the user code Note Depending on the security settings Change Access Priv might be dis played instead of Change User Name For details about setting Change Ac cess Priv ask the administrator Reference Entering Text About This Machine ...

Страница 240: ...t 230 5 Changing the file name A Press Change File Name B Press Backspace or Delete All and then re enter the file name C Press OK Reference Entering Text About This Machine Changing the password A Press Change Password ...

Страница 241: ... File 231 5 B Enter a new password using the number keys and then press OK C Enter the password again and then press OK Deleting a Stored Document Use this function to delete stored documents A Press Select Stored File ...

Страница 242: ... the document you want to delete You can also delete multiple documents at once D Enter a password using the number keys and then press OK E Press Delete File F Press Yes If you do not want to delete the document press No G Press Exit The standby display appears ...

Страница 243: ...LAN Fax enables pa perless faxing from your computer to the other destinations In addition to sending faxes the LAN Fax Driver allows this machine to be used for printing out documents prepared on a computer for proof checking To use the LAN Fax Driver connect this machine to a LAN and make the nec essary network settings and then install the LAN Fax Driver and the related utilities on your comput...

Страница 244: ...eless LAN See Connecting the Machine General Settings Guide Reference Connecting the Machine General Settings Guide System Settings General Settings Guide Preparing the Machine Printer Reference Using the Software This section provides information about LAN Fax Driver Address Book and LAN Fax Cover Sheet Editor LAN Fax Driver This driver allows you to use LAN Fax functions Important All operations...

Страница 245: ... beginning installation exit all other applications Address Book Address Book helps you edit LAN Fax transmission destinations Operating systems Microsoft Windows 98 Me Microsoft Windows 2000 XP Microsoft Windows Server 2003 Microsoft Windows NT 4 0 LAN Fax Cover Sheet Editor LAN Fax Cover Sheet Editor helps you edit LAN Fax cover sheets Operating systems Microsoft Windows 98 Me Microsoft Windows ...

Страница 246: ...rting the CD ROM Keep the SHIFT key held down until the computer stops reading the CD ROM Clicking Cancel during installation aborts the installation If you cancel the installation restart your computer and install the rest of the software or print er driver Note If your operating system is Windows 2000 XP Windows Server 2003 or Win dows NT 4 0 installing a printer driver using Auto Run requires A...

Страница 247: ...tware license agreement window appears E Read all of the terms and if you agree select I accept the agreement and then click Next If you select I don t accept the agreement you cannot complete the installation F Select the LAN Fax Driver check box and then click Next G Confirm that the Printer Name LAN Fax M8 check box is selected and then click Continue Select the desired port H Click Finish The ...

Страница 248: ...Other Hardware and then Printers and Faxes B Select to highlight LAN Fax M8 then click Properties on the File menu With Windows NT click Document Defaults on the File menu C WhenusingWindows98 Me clickthe Paper tabtosetthefollowingproperties Paper Size Orientation Tray Resolution Gray Scale Print as Graphics D When using Windows NT 4 0 set the following properties Paper Size Orientation Tray Resol...

Страница 249: ...s click Load from Device E When this machine is connected locally to your computer select the check boxes for the installed optional units F Click Apply Option configuration settings are complete G Click OK Accessories tab The Accessories tab contains the following items besides option configura tion items Prohibit manual destination entry Check this option to inhibit direct destination specificat...

Страница 250: ...are using In all cases select LAN Fax M8 for the printer D Specify the destination For details about specifying a destination see the LAN Fax Driver s Help When user authentication is used with this machine click User Settings E Specify necessary options F Click Send When you click Send Print the fax is sent to the destination and your ma chine prints a copy of the document you sent Note Themachin...

Страница 251: ... D Specifying a destination using Address Book Important In order to use this method you need to register destinations in the address list using Address Book A Click the Address Book tab The Address Book tab appears B Select a CSV file containing the desired destination list from the Address Book drop down menu Up to the three most recently used files appear in the dropdown menu To use a destinati...

Страница 252: ...Type dropdown menu To send by standard fax or IP Fax select Fax To send by Internet Fax select E mail After you select the fax type the items corresponding to the selected type appear C Specify the destination Specify the destination depending on the selected fax type as follows If you selected Fax enter the fax number To send by IP Fax enter the IP Fax destination If you selected E mail enter the...

Страница 253: ...he following transmission options when sending a fax For details about transmission options see the LAN Fax Driver s Help Sending at specific time Print Fax Header Attach a Cover Sheet 2 sided printing Preview Save as file Document Server To send a fax document at a specific time A Click Send Options The Send Options tab appears B Select the Sending at specific time check box and then specify a tr...

Страница 254: ...the 2 sided printing check box To display preview Selecting the Preview check box allows you to check how the fax document will be output at the destination A Click Send Options The Send Options tab appears B Select the Preview check box C Click Send or Send Print The Preview window appears D Click Next or Previous to check the image To close the Preview window click Cancel Saving as files You can...

Страница 255: ...e name will be RicHHMMSS tif HH hours MM minutes SS seconds H Enter a file name You can also change the folder in this step I Click Save The image file is saved in the specified folder Note Single page documents are saved as single TIFF files and multiple page documents are saved as multiple TIFF files To store the fax document on the Document Server Important If Hard Disk Unit is not selected in ...

Страница 256: ...nsmission results In that case refer to the machine s transmission results See the relevant Help for details Reference p 188 Communication Result Report Memory Transmission p 272 Maximum Values Confirming Transmission Results by E mail After communicating in the LAN Fax mode this function transmits the commu nication results with the computer by e mail When you have done Send or Send Print using t...

Страница 257: ...47 LAN Fax Result Report p 272 Maximum Values Facsimile Features General Settings Guide LAN Fax Result Report This section explains the LAN Fax Result Report If E mail TX results is set to Notify if there be any insufficient configura tions in the e mail menu on this machine or if Auto Specify Sender Name is set to Off the LAN Fax result notification e mail is not transmitted and the LAN Fax Resul...

Страница 258: ...an also save documents in TIFF format For details about saving in TIFF format see Saving as files You can select the length of time the machine keeps document data in memory if print fails due to problems such as a paper shortage or paper jams Make this setting with User Parameters switch 20 bit 2 3 4 5 in the Facsimile Features menu Date is deleted when the specified length of time elapses Refere...

Страница 259: ...made changes to a destination a confirmation message appears To save the changes click Yes If you do not want to save the changes and want to quit editing click No To return to the editing display click Cancel The confirmation dialog box does not appear when you have not made any changes after starting Address Book Note To program the contents of the destination list of this machine to the Ad dres...

Страница 260: ...ion message appears To save the changes click Yes If you do not want to save the changes and want to quit editing click No To return to the editing display click Cancel The confirmation dialog box does not appear when you have not made any changes after starting Address Book Deleting programmed destinations A On the Start menu point to Programs LAN Fax Utilities and then click Ad dress Book The Ad...

Страница 261: ...on table of the LAN Fax Driver by selecting New Browse in Address Book Save the file again for the LAN Fax Driver Note When destinations registered in groups by this machine are inserted into Ad dress Book each person s destination is determined according to the follow ing order of priority check before inserting and changing the order of priority if necessary IP Fax destination Fax number Mail ad...

Страница 262: ...artment name as sender information Person name as sender information Telephone number as sender information Fax number as sender information Date Message A On the Start menu point to Programs LAN Fax Utilities and then click LAN Fax Cover Sheet Editor The LAN Fax Cover Sheet Editor dialog box appears B Edit the cover sheet For details about operations see Help C Click Save as on the File menu D Se...

Страница 263: ...less you select an other file If you want to change only destination information omit this step and proceed to step E E Select the type of information from To You can select Use Address Book To Whom It May Concern Edit Names or None Selecting Edit Names allows you to enter company department and person names F To print the date select the With a Date check box G Enter the sender information You ca...

Страница 264: ...ains typical operation error messages displayed on the compu ter when using the LAN Fax Driver and solutions to those messages Message Causes and Solutions Cannot connect to the de vice Check the network connection Check that the power is turned on The number of entries in Destinations exceed the limits Up to 500 entries can be entered The number of destinations specified exceeds the maximum possi...

Страница 265: ...inder s manual and Help Viewing Printing and Deleting Received Fax Documents Using a Web Image Monitor Use the following procedure to view and or print received fax documents using a Web Image Monitor Viewing received fax documents using a Web browser A Start a Web browser B Enter the machine s IPv4 address in the Address field C Click Fax Received File in the left pane D If you have programmed a ...

Страница 266: ...or details about downloading see the Web Image Monitor Help The method for downloading differs depending on the selected format For more information see Help on the Web Image Monitor Reference Network Guide Printing fax information using a Web browser A Start a Web browser B Enter the machine s IPv4 address in the Address field C Click Fax Received File in the left pane The list of received fax do...

Страница 267: ...ting multiple documents you can also cancel deletion of some of the selected documents For more information see Help on the Web Image Monitor G Click OK The display returns to that of step E Programming Destination Information from Web Browser If the receiving machine is compliant with T 37 full mode Internet Fax you can program the receiver s properties from Web Image Monitor You can program the ...

Страница 268: ...d then enter the Administrator s name and password D Click Address Book in the left pane The Address Book is displayed E Click the radio button to the left of the machine you want to modify and then click Change The Change User page appears F Set the properties for Internet Fax data format other than the mode selection If you change the mode to Simple Mode you cannot set machine properties G Click...

Страница 269: ...e left pane The Address Book is displayed E Click Add User The Add User page appears F Enter the registration number name and e mail address then set the nec essary properties You can set the Internet Fax data format after entering the e mail address G Click Full Mode under Internet Fax Data Format and set the properties ac cording to the receiver s properties If you change the mode to Simple Mode...

Страница 270: ...th no SUB Code Own Name or Own Fax Number are saved in the delivery server inbox You can also set it so that the received documents are stored in the specified delivery server inbox according to the line used for reception You can check or download received documents stored in the delivery server inbox using DeskTopBinder Note Documents received in Personal Boxes are also forwarded to the delivery...

Страница 271: ...and RX Print Standby File s Others shows the total number of documents registered in Information Boxes and received in Person al Boxes See When the Machine Dose Not Operate As Wanted Troubleshooting Note If you set the Reception File Setting in the Facsimile Features menu to Store you can check the number of received documents using RX Print Standby File s Reference p 3 Reading the Display Panel a...

Страница 272: ...ginal Settings Stamp Select Line SUB SID SEP PWD Code entry Send Later Reception Notice BCC Transmission E mail TX Results Text Standard Message Auto Reduce La bel Insertion Closed Network SUB Code Transmission SEP Code Reception Fax Header Print TX Status Report Store File Program name A Make the settings you want to register in the program The procedure for programming differs depending on the i...

Страница 273: ... try again You should register the program name To cancel a program press Cancel The display returns to that of step E G Press Exit The standby display appears Note Use the same procedure to register and change programs In step E select the program number you want to change For the maximum number of Keystroke Programs you can register see Maximum Values For the maximum number of characters you can...

Страница 274: ...elect these functions right after the power is turned on or the Clear Modes key is pressed To set the priority functions register the desired settings to a program Then re call the registered program and then press Program as Defaults on the Program screen The recalled settings are registered as priority functions Important Destinations and SUB SID SEP PWD Code entries cannot be registered as prio...

Страница 275: ...he standby display is shown If the standby display is not shown press the Facsimile key B Press the Program key C Press Change Name D Select the program number of the name you want to change E Enter a new program name and then press OK Press Cancel to cancel the change and proceed to step F F Press Exit The standby display appears ALV006S ...

Страница 276: ...csimile mode and the standby display is shown If the standby display is not shown press the Facsimile key B Press the Program key C Press Delete D Select the program number you want to delete E Press Yes Press No not to delete the program The display returns to that of step D F Press Exit The standby display appears ALV006S ...

Страница 277: ...s the registered program number The standby display appears The programmed fax number appears and the registered settings are recalled E Press the Start key The machine starts to scan the original Then transmission starts with the recalled transmission settings Note Using the program causes the previous settings to be cleared If you have no programmed destinations or scan settings as programs se l...

Страница 278: ...uments at high resolution Super Fine This also allows you to receive fax documents at high resolution Fine or Super Fine If you require this option consult your service representative Reference p 272 Maximum Values Extra G3 Interface Unit This option provides one extra G3 line connection A maximum of two G3 interface units can be installed ...

Страница 279: ...ard paper using a laser Transmission speed G3 33 600 31 200 28 800 26 400 24 000 21 600 19 200 16 800 14 400 12 000 9 600 7 200 4 800 2 400bps auto shift down system Immediate Transmission approx 260 W Memory Transmission approx 230 W Memory Reception approx 225 W Reception approx 520 W Network LAN Local Area Network Ethernet 10base T 100base TX IEEE1394 IPv4 over 1394 IEEE802 11b wireless LAN Sca...

Страница 280: ... LAN Transmit function E mail Scan line density 200 100 dpi Standard character 200 200 dpi Detail char acter 200 400 dpi Fine character optional 1 400 400 dpi Super Fine character optional 1 Original size Scanning width A3 1 B4 1 A4 Communication Protocols Transmission SMTP TCP IP Reception POP3 SMTP IMAP4 TCP IP E mail format Single Multi part MIME Conversion Attached file forms TIFF F MH MR 1 MM...

Страница 281: ...fications for coding original size and resolution For de tails about the specifications available in full mode see Intenet Fax Transmission and Reception in Specifications Reference p 269 Specifications Communication protocols Transmission SMTP Reception POP3 SMTP IMAP4 E mail format Format MIME Base64 Content Type Image tiff Multipart mixed text plain Image tiff attached file forms Data format Pr...

Страница 282: ... destinations you can search at a time using Search Dest 100 100 Number of recent destinations the machine can store 10 10 Number of digits for a destination 128 128 Number of digits for a SEP SUB PWD SID Code 20 20 Number of characters you can enter in the e mail subject line 128 128 Number of communication results you can check on this machine 200 200 Number of communication results printed in t...

Страница 283: ... can specify at a time in Select Stored File 30 30 Number of stored pages you can send in one op eration in Select Stored File 1 000 1 000 Number of stored documents you can print at a time using Print 1st Page 30 30 Number of stored documents you can print at a time using Print File 30 30 Number of documents you can store in the Doc ument Server using the facsimile function 2 000 2 000 Number of ...

Страница 284: ... is started 111 Canceling a transmission of an Internet Fax 108 Canceling a transmission while the original is being scanned 108 Canceling a transmission while the original is being transmitted 109 Centre Mark 6 158 Change File Name 230 Change Name 265 Change Password 230 Change Stop Transmission File 114 Change Title 73 Change TX Info 169 179 181 Change User Name 229 Changing a program name 265 C...

Страница 285: ...nts 200 202 Delivering files received by fax 260 Density contrast 54 Destination key 72 74 Detail 45 Displaying a preview 224 Displayingconfirmationoftransmission 20 Document Server 245 Dual Access 16 E Edit Cover Sheet 253 Edit Dest 63 66 Editing Address Book 248 Editing fax cover sheets 251 Editing programmed destinations 250 E mail Address 86 E mail subject 28 E mail text 149 E mail TX Results ...

Страница 286: ...eport 247 LDAP server 80 Louder 93 Lower 93 M Makingsettingsforoptionconfiguration 239 Manage Delete File 227 231 Managing facsimile functions using SmartDeviceMonitor for Admin 254 Manual Density 54 Manual Dial 95 Manual e mail reception 149 Manual E mail RX 149 Manual Entry 63 66 218 223 Manual Reception 146 Manuals for This Machine i Max E mail Size 6 Maximum values 272 MDN 119 Memory 261 Memor...

Страница 287: ...ts 264 Program Change Delete Gateway 6 Program Change Delete Scan Size 6 Program Change Delete Standard Message 6 Program Closed Network Code 6 Program Dest 75 Program Fax Information 6 Program key 262 Program Memory Lock ID 6 Programming a user name 218 Programming destination information from Web browser 257 Programming destinations in the Address Book 77 Programming new destinations 249 Program...

Страница 288: ...eserve Report 106 SEP Code RX Result Report 107 SEP Code Transfer Report 152 Setting an e mail destination as a BCC 121 Setting LAN Fax Driver properties 237 Setting print properties 238 Setting priority trays 164 Setting the Original Orientation 32 SID Code 103 Simplified display 5 Simplified Display key 5 Simultaneous Broadcast 16 Simultaneous Broadcast using multiple line ports 59 SIP 23 SIP se...

Страница 289: ...s 9 Transmission SUB Code 100 Transmission with Image Rotation 40 Transmit Failed File 183 Transmit Stored File only 220 Transmitting Journal by e mail 199 Tray Shift 167 TSI Transmitting Subscriber Identification 163 TSI Print Transmitting Subscriber Identification Print 163 Two Sided Printing 159 TX File List 181 TX Mode 117 119 121 122 124 127 Types of reception 141 U User Name 218 User Text 12...

Страница 290: ...280 GB GB B786 8600 ...

Страница 291: ...ice to Users Accessing Analog PSTN in EEA Countries This product is designed to be able to access analog PSTN in all EEA countries Local PSTN compat ibility is dependent on software switch settings Please contact your service representative if relocating this product to another country In the event of problems please contact your service representative in the first instance The CE Declaration of C...

Страница 292: ...FAX Option Type C3000 Operating Instructions Facsimile Reference GB GB B786 8600 ...

Отзывы: