background image

68

Duplex—Making 2 Sided Copies

1 Sided 

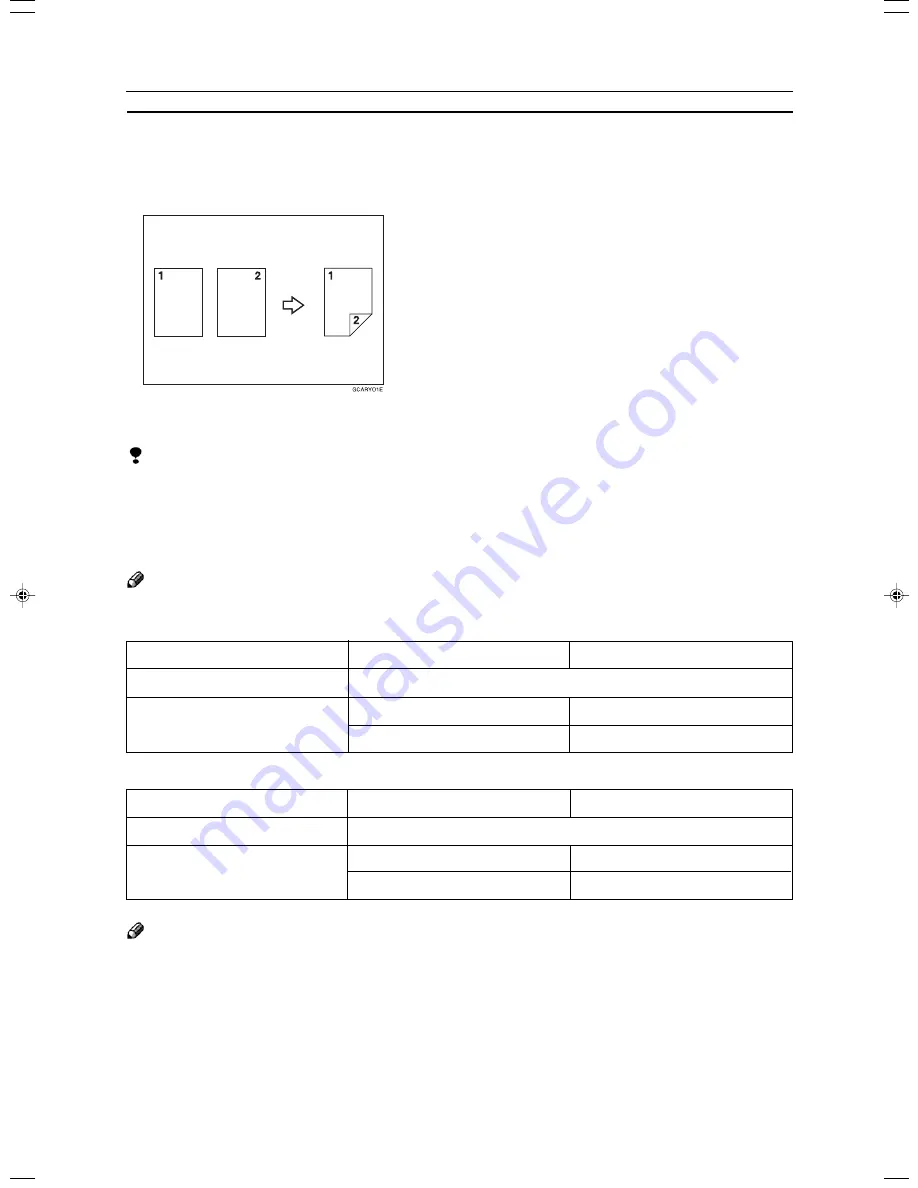
 2 Sided—Making Two-sided Copies from One-sided Originals

This function makes 2 one-sided originals onto two-sided copy.

Limitation

You cannot use the following copy paper in this function:

   • Paper smaller than A5, 5

1/2

×

 8

1/2

"

   • Translucent paper
   • Adhesive labels
   • OHP transparencies

Note

The following paper limitations apply:

Note

❐ 

The image on the back-side of copies is shifted by just the binding margin.

❐ 

You can change the width and position of the binding area.

❐ 

You can change the default binding margin and width.

Duplex—Making 2 Sided Copies

Inch version

Single color

Full color

Paper weight

17 - 28 lb

Copy Number Input

smaller than 8

1/2

×

 14": 50 sheets

11" 

×

 17" - 5

1/2

×

 8

1/2

": 20 sheets

11" 

×

 17": 30 sheets

Metric version

Single color

Full color

Paper weight

64 - 105g/m

2

Copy Number Input

smaller than B4: 50 sheets

A3 - A5: 20 sheets

A3: 30 sheets

Содержание Aficio 6010

Страница 1: ...Read this manual carefully before you use this product and keep it handy for future reference For safety please follow the instructions in this manual Operating Instructions...

Страница 2: ...e field The optical housing unit can only be repaired in a factory or at a location with the requisite equipment The laser subsystem is replaceable in the field by a qualified Customer Engineer The la...

Страница 3: ...mps Bonds Stocks Bank drafts Checks Passports Driver s licenses The copy samples in this Operating Instructions differ somewhat from actual copies due to printing effects The coloring of each Color ke...

Страница 4: ...ii...

Страница 5: ...warning could cause serious injury or even death RCAUTION Ignoring this caution could cause injury or damage to property Examples of Indications R Symbols R mean a situation that requires you take ca...

Страница 6: ...s machine There is a risk of fire electric shock explosion or loss of sight If the machine has laser systems there is a risk of serious eye damage r If the machine looks damaged or breaks down smoke i...

Страница 7: ...cord and causing fire or electric shock o If you use the machine in a confined space make sure there is a continuous air turnover m Do not reuse stapled paper Do not use aluminum foil carbon containin...

Страница 8: ...ns under this symbol Be sure to read the instructions all of which are described in the Safety Information section The statements above are notes for your safety Important If this instruction is not f...

Страница 9: ...Copy Image 14 Adding the Cover 15 Making Duplex Copies 16 Making Series Copies 16 Making Combine Copies 17 Color Creation 17 Image Creation 18 Image Overlay Only for Edit Type 19 Color Balance Adjusti...

Страница 10: ...ty 39 Selecting a Color Mode 40 Selecting the Original Image Type 44 Selecting the Copy Paper Size 47 Copying from the Bypass Tray 48 Auto Reduce Enlarge Having the Machine Choose the Reproduction Rat...

Страница 11: ...rase Erasing Parts of the Copy Image 80 Center Erase Erasing the Center Margin of the Original Image 80 Border Erase Erasing the Surrounding Area of the Original Image 80 Center Border Erase Erasing t...

Страница 12: ...and Storing the Color Balance 124 Color Balance Adjustment 124 Color Balance Program Storing and Recalling the Color Balance 125 Color Balance Sample Sampling the Color Balance 126 Color Adjustment 13...

Страница 13: ...d Changing Areas 159 Change Modes 159 Adding Areas 160 Erasing an Area 161 Erasing a Group 162 Exiting Area Editing 163 Combination Chart for Area Editing 164 What to do if Something Goes Wrong If You...

Страница 14: ...ting You can Change with the User Tools Copier Features 194 Maintaining Your Machine Where to Put Your Machine Do s and Don ts Remarks Use and Storage of Supplies Maintaining Your Machine 200 Exposure...

Страница 15: ...and Performing Shading 220 35mm Slides Positive 221 Positive Film on Glass 222 35mm Strip Negative 224 Negative Film on Glass 226 Adjusting Color Density and Focus 228 Color Tones in Film Scanning 22...

Страница 16: ...xiv Large Capacity Tray LCT Option 243 Projector Unit Option 243 Index Index 246 Table of Contents...

Страница 17: ...Where it is what it is 1 Where it is What it is...

Страница 18: ...his switch again the On indicator goes off 4 Operation panel See page 5 5 Front cover Open to access the inside of the machine 6 Paper tray Set paper here See page 172 7 Auto duplex tray Use to make t...

Страница 19: ...acing or leaning an object near it If the machine overheats a fault might occur 2 Bypass tray Use to copy onto OHP transparencies adhesive labels translucent paper post cards and non standard size pap...

Страница 20: ...hey will be fed automatically 3 Original tray Put your originals 4 Film projector unit Use to copy films See page 207 Note The holder is required for installation 5 Large capacity tray LCT Holds 1 500...

Страница 21: ...ess to make interrupt copies See page 55 11 Counter key Press to display the total number of copies made 12 Main Power indicator This indicator lights up when the main power switch is turned on and go...

Страница 22: ...isplay Reference Regarding detailed information about each key and function see page 12 For how to use the touch panel display see page 25 COPY COUNTER Counts number of copies made so far You can sele...

Страница 23: ...7 What You can do with this Machine What You can do with this Machine...

Страница 24: ...Color Select Full Color Black White Single Color Twin Color Auto Original Type Select Auto Paper Select Preset R E Zoom Size Magnification Directional Magnification Poster Mode Shift Margin Adjustment...

Страница 25: ...ine Recall Auto Start Program Auto Reduce Enlarge Bypass Tray Copying Duplex Combine Copying Default Setting User Tools Display Color Edit type Full color Basic type Full color Functions Differences b...

Страница 26: ...7 Margin Adjustment Page 78 Cover Sheet Page 82 2 Center Erase Page 81 Border Erase Page 81 Center Border Erase Page 81 Auto Original Type Select Page 44 Auto Reduce Enlarge Page 54 Auto Paper Select...

Страница 27: ...e 72 Combine 2 Originals Page 75 2 2 Sided 1 Sided Page 74 Combine 4 Originals Page 76 2 Sort Page 102 1 Stack Page 103 1 Staple Page 104 1 Preset R E Page 59 Size Magnification Page 62 Directional Si...

Страница 28: ...Function Summary See page 39 Selecting the Color See page 40 Full color Black White Single color See page 139 See page 102 See page 109 GCFCLR1E GCWTBL1E See page 68 See page 54 GCSCLR1E GCTCLR1E User...

Страница 29: ...ets Zoom Reducing and enlarging in 1 steps Directional Magnification Stretching and squeezing the image in 1 steps Directional Size Magnification inch Stretching and squeezing the image into the copy...

Страница 30: ...r margin and surrounding area of the original image Function Summary Shifting the Image See page 77 Shift Centering Cornering the Image Margin Adjustment Adding margins for binding Border Erase Erasin...

Страница 31: ...hine Adding the Cover See page 82 Front Cover Copying a front cover Front Back Cover Copying front cover and adding back cover Front Back Cover Copying front and back covers Function Summary GCHYOS1E...

Страница 32: ...ided copies from one sided originals Book 2 Sided Making two sided copies from facing pages of a bound original Making Duplex Copies See page 68 Function Summary Book 1 Sided From book originals to 2...

Страница 33: ...ing copies with a color background Function Summary Type Mask Coloring text part and background part separately Color Creation See page 85 Color Erase Erasing the selected color GCCLPR2E Making Combin...

Страница 34: ...y im age Positive Negative Copying in comple mentary colors Shadow Image Adding a shadow around the copy image elements Mirror Image Making a mirror image Repeat Image Copying a part of the original i...

Страница 35: ...e page 109 1 Foreground image original 2 Background image original 1 Foreground image original 2 Background image original Function Summary Color Balance Adjusting and Storing the Color Balance See pa...

Страница 36: ...20 Function Summary Color Adjustment Adjusting a Single Color See page 131 Contrast Pastel Soft Sharp Background Density GCGAZO2E GCGAZO3E Image Adjustment See page 132 GCGAZO1E...

Страница 37: ...21 What You can do with this Machine Function Summary Program User Color Storing User Colors See page 135 Area Editing Only for Edit Type See page 139...

Страница 38: ...page 102 Sort Sorting into sets 123 123 123 Stack Stacking together all copies of a page 111 222 333 Staple Stapling copies GCSORT1E 1 2 3 1 2 3 1 2 3 1 2 3 GCSORT2E 1 2 3 1 1 1 2 2 2 3 3 3 GCSORT3E...

Страница 39: ...Machine Color Sample Chart Color Sample Chart This is the User Color sample You can mix the basic colors to make your own colors User Color Note The color sample might differ somewhat from actual cop...

Страница 40: ...24...

Страница 41: ...e number with the Number keys and press the key on the display to accept it Should you make a mistake If you have not pressed the key yet press the Clear key and then re enter it If there is not the C...

Страница 42: ...ou Have Selected When you set one or more copy settings the last item you selected will remain on the screen To check all the settings you have set so far press the Check Modes key Using the Touch Pan...

Страница 43: ...27 Basics Basics...

Страница 44: ...age 191 Power Switches This machine has the operation switch and main power switch Operation switch right side of the operation panel Press this switch to activate the machine When the machine has war...

Страница 45: ...our user code using the Number keys Then press the key Note To prevent others from making copies with your user code press the Clear Modes key and the Clear Stop key simultaneously after copying Refer...

Страница 46: ...the document feeder must be set to ADF Thin paper mode with the user tools See page 198 Originals larger than A3 11 17 Originals smaller than B6lp 51 2 81 2 lp Folded curled creased or damaged origina...

Страница 47: ...n cover or the document feeder 2 Set the original face down on the exposure glass platen glass The original should be aligned to the rear left corner 3 Lower the platen cover or the document feeder Se...

Страница 48: ...t lift the document feeder until the original has been completely fed out 1 Correct any curl fold or crease in the originals before setting the originals 2 Make sure the Insert Original indicator is l...

Страница 49: ...iginal indicator is lit and the exposure glass platen glass is clear of origi nals 3 Adjust the guide to the original size 4 Set the original face up into the document feeder until the Insert Original...

Страница 50: ...ith this function is 52 81g m2 14 20 lb Smaller size originals might be skewed a little Note If your stack of originals contains pages of different sizes make sure that Longer originals are at the bot...

Страница 51: ...the exposure glass platen glass then press the Start key Setting Non standard Sized Originals When copying from non standard sized originals enter the original size so that copy is well aligned Limita...

Страница 52: ...3 11 17 original Note You cannot remove the document feeder To remove the platen cover lift it out Note Lift the platen cover with both hands Place the removed cover on a flat surface such as a desk a...

Страница 53: ...37 Copying Basic Operation Copying...

Страница 54: ...ected If not press the keys Note Auto Color Select see page 40 Text Photo see page 44 Auto Paper Select see page 47 3 Enter the number of copies required using the Number keys Note To change the numbe...

Страница 55: ...elected select other color modes to cancel it See page 40 2 Press the Auto Image Density key Manual image density If you require darker or lighter copies adjust the image density yourself 1 If Auto Im...

Страница 56: ...ed to select Black White mode If you choose Auto Color Select mode the machine will reset the color selection for every original page taking a long time to complete the job 1 Make sure that the Auto C...

Страница 57: ...nned color Only for Edit type You can scan in a color from an original See page 42 Reference For copy samples see page 12 Basic color 1 Press the Single Color key 2 Select the color Note You can selec...

Страница 58: ...1 Press the Single Color key 2 Set your original then press the Scanned Color key Note The image of the original is displayed 3 Press the color on the image you wish to scan in with the editor pen No...

Страница 59: ...d User Colors You can have black parts copied in one of the following colors Red Green Blue Yellow Cyan Magenta Yellow Green Orange Marine Blue Beige Pink Purple and User Colors 1 Press the Twin Color...

Страница 60: ...ginals then press the Start key Text Photo mode This mode automatically detects the areas of your original containing text or photographs The text areas are copied using Text mode and the photographs...

Страница 61: ...or copying originals consisting of pictures photographs and screened letters areas but not solid letters Note There are 3 types of Photo mode Press Print Use when copying photographs or pictures that...

Страница 62: ...ion for originals written in highlight pen originals printed from inkjet printers or maps 1 Press the Special Original key 2 Select your desired original type from the High light Pen Inkjet Output and...

Страница 63: ...opy paper based on the original size and the reproduc tion ratio Reference For functions that cannot be used together with this function see page 106 Note Depending on the original type and size you u...

Страница 64: ...arencies insert them with the copy side up Do not stack copy paper above the limit mark If the copy paper is curled correct it before setting paper in the bypass tray If the curled is not corrected a...

Страница 65: ...er a blank slip sheet is inserted between OHP tranparencies 3 Press the OK key 4 Adjust the paper guides to the paper size Note Make sure that the paper guides matches to the pa per size If the paper...

Страница 66: ...ed might occur 1 Open the baypass tray 2 Press the Normal Paper Thick Extra Thick or OHP key 3 Press the Custom Size key 4 Select Custom1 Custom2 Custom3 or Enter Size keys Note If you select Custom1...

Страница 67: ...7 full bleed copying mode is automatically selected In this mode you can make A3 11 17 full bleed copies with 12 18 or 13 19 paper This is useful to make A3 11 17 size copies with colored background e...

Страница 68: ...e the results you require You cannot use this function for OHP transparencies translucent paper adhesive labels and postcards Do not use copy paper that has been already copied on with other machines...

Страница 69: ...ou copy onto non standard size paper press the Custom Size Orig key and select or enter the size For details see page 50 4 Press the OK key 5 Adjust the paper guides to the paper size Note Make sure t...

Страница 70: ...her with this function see page 106 Example Metric version original A3l copy paper A4l Inch version original 11 17 l copy paper 81 2 11 l 1 Press the Auto Reduce Enlarge key 2 Set your original on the...

Страница 71: ...gy Saver key again Interrupt Copying Temporarily Stopping one Job to Copy Something Else Use the Interrupt key to interrupt a copy run and make urgently needed copies Reference For functions that cann...

Страница 72: ...settings during the warm up pe riod 2 Press the Start key Note To cancel Auto Start press the Clear Stop key Recall Recalling the Previous Job Settings This machine automatically stores the previous...

Страница 73: ...ored programs store another program again Storing Your Settings 1 Set the copy settings you want to put into memory 2 Press the Program key 3 Press the Program key 4 Select the program number you want...

Страница 74: ...ith m contain a program 4 Set your originals then press the Start key Check Modes Checking the Selected Copy Jobs By pressing the Check Modes key you can see at a glance the modes you have selected Co...

Страница 75: ...ser tools See page 195 You can select a ratio regardless of the size of an original or copy paper With some ratios parts of the image might not be copied or margins will appear on copies To return to...

Страница 76: ...o 400 in 1 steps Note You can select a ratio regardless of the size of an original or copy paper With some ratios parts of the image might not be copied or blank margins will appear on copies To retur...

Страница 77: ...ur originals then press the Start key Using the Number keys 1 Press the Reduce Enlarge key 2 Press the Input Ratio keys 3 Enter the reproduction ratio with the Number keys Note To change the ratio ent...

Страница 78: ...t be copied or blank margins might appear on copies You can select a ratio from between 25 to 400 1 Press the Reduce Enlarge key 2 Press the Size Magnification key 3 Enter the original size with the N...

Страница 79: ...rts of the image might not be copied or blank margins might appear on copies 1 Press the Reduce Enlarge key 2 Press the Directional Mag key 3 Make sure that the Direct Mag key is se lected 4 Enter the...

Страница 80: ...3 Press the D Size Mag inch key 4 Enter the horizontal original size with the Number keys then press the key Note To change the value entered If you have not pressed the key yet press the Clear key a...

Страница 81: ...6 If you want to paste the sheets to make a poster one large sheet cut the margins out You can specify different ratios or numbers of pages in the horizontal and vertical directions Limitation If the...

Страница 82: ...nd then choose Poster Mode the machine switches automati cally to Full Color mode 4 Make sure that the Number of Pages key is selected 5 Enter the number of pages Note Up to 20 pages can be entered Yo...

Страница 83: ...py pages 1 Select the copy paper size 2 Press the Reduce Enlarge key 3 Press the Poster Mode key 4 Press the Direct Mag key 5 Enter the ratio Note You can specify different ratios or numbers or pages...

Страница 84: ...paper limitations apply Note The image on the back side of copies is shifted by just the binding margin You can change the width and position of the binding area You can change the default binding ma...

Страница 85: ...2 Press the 1 Sided 2 Sided key Duplex Making 2 Sided Copies The resulting copy image will differ according to the direction in which you set your original lengthwise p or widthwise l 1 The illustrat...

Страница 86: ...ount key The optional document feeder is required to use Auto Count function 4 Press the OK key 5 Set your originals in the document feeder then press the Start key 2 Sided 2 Sided Making Two sided Co...

Страница 87: ...ng table when you select original and copy paper sizes with 100 ratio 1 Press the Duplex Combine key 2 Select the lengthwise p copy paper 3 Press the Book 2 Sided key 4 Set your original on the exposu...

Страница 88: ...and copy paper sizes with 100 ratio 1 Press the Duplex Combine key 2 Select the lengthwise p copy paper 3 Press the Multi 2 Sided key 4 Set your originals in the document feeder then press the Start k...

Страница 89: ...te Refer to the following table when you select original and copy paper sizes with 100 ratio 1 Press the Duplex Combine key 2 Select the lengthwise p copy paper 3 Press the Book 1 Sided key 4 Set your...

Страница 90: ...s function Reference For functions that cannot be used together with this function see page 106 1 Press the Duplex Combine key 2 Select the lengthwise p copy paper 3 Press the 2 Sided 1 Sided key 4 Se...

Страница 91: ...e cannot copy originals different in size and direction Reference For functions that cannot be used together with this function see page 106 Setting Originals Originals set in the document feeder Orig...

Страница 92: ...Combine 4 Originals Combining 4 Originals Reference For functions that cannot be used together with this function see page 106 1 Press the Duplex Combine key 2 Select the widthwise l copy paper 3 Pre...

Страница 93: ...s larger than the original Note You cannot use 12 18 13 19 size copy paper for this function 1 Press the Shift Book key 2 Press the Shift key 3 Select the direction in which you want to shift the imag...

Страница 94: ...lt is as follows You can change this default setting with the user tools See page 195 If you set too wide a margin areas you do not want to delete might be erased Reference For functions that cannot b...

Страница 95: ...s the Clear key and enter a new value To make a left margin press the key until the number displayed reaches the required setting To make a right margin press the key until the number displayed reache...

Страница 96: ...e Erasing the Center Margin of the Original Image Border Erase Erasing the Surrounding Area of the Original Image Center Border Erase Erasing the Center Margin and Surrounding Area of the Original Ima...

Страница 97: ...Book key 2 Press the Center Erase Border Erase or Center Border Erase key 3 Adjust the width of the margin to be erased by pressing the or key You can adjust the width in the range of 3 50mm 0 1 2 0 4...

Страница 98: ...aper The cover sheets should be fed from the bypass tray The covers are copied in Thick mode Reference For functions that cannot be used together with this function see page 106 When you use Front Cov...

Страница 99: ...vers The optional document feeder is required to use this function Note You can specify whether to make a copy on a front cover sheet If you select Copy the last pages will be copied on the back cover...

Страница 100: ...t key When you use Front Back Cover mode with 2 Sided 1 Sided or 2 Sided 2 Sided mode 1 Enter 2 Sided 1 Sided or 2 Sided 2 Sided mode See page 70 or 74 2 Follow the steps 1 to 3 on above 3 Select Imag...

Страница 101: ...w Orange Red Magenta Green Cyan Blue Yellow Green Black White Beige Pink Marine Blue Purple User colors and Scanned Color This function can be made more or less sensitive to the color to be converted...

Страница 102: ...lor to be converted 4 Select the new color color to convert to 5 If you want to convert more than one color re peat steps 3 and 4 Note If you pick the wrong color press the Clear key 6 Press the OK ke...

Страница 103: ...nsitive to the color to be erased It can be adjusted within five levels from Narrow to Wide See page 197 For example if red is selected as the color to be converted Narrow will result in only red bein...

Страница 104: ...nta Green Cyan Blue Yellow Green Black Beige Pink Marine Blue Purple Scanned Color and User Colors In this mode color tones of photo or picture in originals might be changed due to the color on the ba...

Страница 105: ...he background the background is copied using the specified text color Colors that can be selected as a Text image and background color Yellow Magenta Cyan Green Red Blue Yellow Green Orange Marine Blu...

Страница 106: ...90 5 Press the Text key and select the color for the Text Note You can select the color density level 6 Press the OK key 7 Set your originals then press the Start key Color Creation...

Страница 107: ...Density and Text Photo mode Colors that can be selected as an outline color Yellow Orange Red Magenta Green Cyan Blue Yellow Green Black Beige Pink Marine Blue Purple Scanned Color and User Colors 1 P...

Страница 108: ...offset shadow The orientation of the original decides the position of the shadow as follows Note You can select the color of shadow as follows Same Color A shadow of the same color as the original is...

Страница 109: ...16 Same color shadow 1 Press the Image Creation key 2 Press the Shadow Image key 3 Press the Block or Offset key 4 Adjust the width by pressing the or key 5 Make sure the Same Color Halftone key is se...

Страница 110: ...e Shadow Image key 3 Press the Block or Offset key 4 Adjust the width by pressing the or key 5 Press the Shadow Color Density key 6 Select the color then press the OK key Note You can select the color...

Страница 111: ...ing on the angle some parts of the image may be lost 1 Press the Image Creation key 2 Press the Slanted Image key 3 Adjust the angle by pressing the arrow keys Note By pressing the or key the number o...

Страница 112: ...a mirror image copy of the original Note Set the original as below when setting on the exposure glass platen glass 1 Press the Image Creation key 2 Press the Mirror Image key 3 Set your originals then...

Страница 113: ...tire copy but here you specify the number of image repetitions you want and the copier will deter mine the width of the top band Editor Area This function allows you to select an area of the original...

Страница 114: ...3 Press the Size Input key 4 Enter the horizontal and vertical length with the Number keys then press the key Note The length that you can enter is 1 300mm 0 1 11 7 When you enter less than 5mm 0 2 ho...

Страница 115: ...n key 2 Press the Repeat Image key 3 Press the Number of Images key 4 Enter a horizontal and vertical number between 1 and 15 and press the key Note If the horizontal and vertical settings are 1 1 you...

Страница 116: ...e exposure glass platen glass then press the Editor Area key Limitation You cannot set your originals in the document feeder 4 Mark diagonally opposite corners of area to be repeated Note The area you...

Страница 117: ...original black and white areas of the original are reversed Note If you copy using twin color mode white areas are changed to black black areas are changed to white and color areas are changed to the...

Страница 118: ...s in the document feeder with this function For sorting the following limitations apply You cannot use OHP transparencies or non standard size paper in Sort mode You can make the machine select Sort m...

Страница 119: ...limitations apply You cannot use OHP transparencies or non standard size paper in Stack mode 1 Press the Stack key 2 Set your originals in the document feeder 3 Press the Start key GCSORT2E 1 2 3 1 1...

Страница 120: ...mode Sort mode is automatically selected You cannot use Staple mode with Stack mode You cannot use OHP transparencies or non standard size paper in Staple mode You cannot staple different widths of p...

Страница 121: ...tion 2 Set your originals in the document feeder 3 Press the Start key Stapling copies manually after copying 1 After Sort mode copying is completed select the stapling position Finishing Normal paper...

Страница 122: ...lex 2 Sided 2 Sided Book 2 Sided Multi 2 Sided Cover Sheet Image Overlay Color Conversion Color Creation Color Erase Color Background Type Mask Outline Image Shadow Image Slanted Image Image Creation...

Страница 123: ...ided 2 Sided 1 Sided Combine 2 Originals Combine 4 Originals 1 Sided 2 Sided 2 Sided 2 Sided Book 2 Sided Multi 2 Sided Cover Sheet Image Overlay Color Conversion Color Erase Color Background Type Mas...

Страница 124: ...108...

Страница 125: ...109 Copying Image Overlay Only for Edit Type Image Overlay Only for Edit Type...

Страница 126: ...ry of Image Overlay There are four kinds of Image Overlay Text See page 111 Full Image Overlay Image See page 113 Image Overlay Text See page 115 Area Image Overlay Image See page 117 Summary of Image...

Страница 127: ...color the text will be copied in the original color The modes that can be set for the background image original are Color Image Adjustment Image Density Color Mode Original Type Image Adjustment Colo...

Страница 128: ...in the Full Image Overlay 4 If you want to change the text color press the Text Color key Note If you want to edit the background original press the Edit Background key For details see page 121 If yo...

Страница 129: ...the right of the exposure glass Then set the background image original original that will be the back ground image on the left of the exposure glass 2 Press the Image Overlay key 3 Press the Image ke...

Страница 130: ...ou want to adjust the color image adjustment press the Color Image key 9 Make any adjustments you require Note You can select the overlay image density with Overlay Opacity Image Density see page 39 C...

Страница 131: ...over the background image 1 Set the foreground image original original that has the text or image to be composed on the right of the exposure glass Then set the back ground image original original th...

Страница 132: ...stination area 7 Press the Confirm Selection key 8 If you want to change the text color press the Text Color key Note If you want to edit the background original press the Edit Background key For deta...

Страница 133: ...ed on the right of the exposure glass Then set the background image original original that will be the back ground image on the left of the exposure glass 2 Press the Image Overlay key 3 Press the Ima...

Страница 134: ...page 122 0 If you want to adjust the color image adjustment press the Color Image key Make any adjustments you require Note Image Density see page 39 Color Mode see page 40 Original Type see page 44...

Страница 135: ...er lay 4 Select the Overlay Opacity Yes key 5 Mark diagonally opposite corners of the overlay image area to be overlaid Note If you want to clear the setting press the Erase key 6 Press the Confirm Se...

Страница 136: ...Image Adjustment see page 132 Color Adjustment see page 131 Color Balance Adjustment see page 124 Press the OK key If you want to adjust the color creation press the Color Creation key Make any adjust...

Страница 137: ...justment Color Balance Ad justment Color Creation Color Conversion Color Erase Color Background Color Image 1 Press the Edit Background key 2 Press the Color Image key 3 Make any adjustments you requi...

Страница 138: ...or Background see page 88 4 Press the OK key Basic Settings Changing Job Settings You can change the job settings 1 Press the Basic Settings key 2 Make any adjustments you require Note Auto Paper Sele...

Страница 139: ...123 Adjustment and Color Memory Adjustment and Color Memory...

Страница 140: ...copy sample see page 19 Note The color balance will return to the default when The machine is automatically reset The Clear Modes key is pressed The operation switch is turned off The main power swit...

Страница 141: ...ore up to three color balance Storing the adjusted color balance 1 Change the color balance see page 124 but don t press the OK key 2 Press the Color Balance Program key 3 Press the Program key 4 Sele...

Страница 142: ...r of steps Note The sample will be copied on two A4p 81 2 11 p sheets or two A3l 11 17 l sheets Selecting Color Balance Sample does not reset the adjustments allowing you to make many samples while pr...

Страница 143: ...key 2 Make sure the Color Balance key is selected 3 Press the Color Balance Sample key 4 Select the range of densities standard is the current setting 5 Set your original on the exposure glass 6 Press...

Страница 144: ...he sampled area Only for Edit type Note The sampled area is as shown below a 58mm 2 3 b 180mm 7 1 Orientation of the original and scanned image are related as shown 1 Press the Adjustment Memory key R...

Страница 145: ...nce Sample key 4 Select the range of densities standard is the current setting 5 Set your original on the exposure glass 6 Press the Sample Area Selection key 7 Press the Scan Start key Note The image...

Страница 146: ...130 9 Press the Print Start key Note The sample is copied 0 Select the color balance that you want to set then press the OK key Color Balance Adjusting and Storing the Color Balance...

Страница 147: ...Note This function requires Full Color mode or Auto Color Select mode The single color adjustment will return to the default when The machine is automatically reset The Clear Modes key is pressed The...

Страница 148: ...hlighting pen is difficult to duplicate it might be copied in different colors or some colors might not be copied You can make copies in pastel tones Reference For copy samples see page 20 Note Defaul...

Страница 149: ...he Clear Modes key is pressed The operation switch is turned off The main power switch is turned off 1 Press the Adjustment Memory key 2 Press the Image Adjustment key 3 Adjust the settings Reference...

Страница 150: ...are canceled only when you overwrite them with new settings 1 Press the Adjustment Memory key 2 Press the Image Adjustment key 3 Adjust the settings Reference For details see page 131 4 Press the OK k...

Страница 151: ...ys Up to 15 colors can be stored The total percentages of the mixed colors must be 255 or less If the total percentage of the mixed color is over 255 the copier cannot create the color properly and th...

Страница 152: ...scan an original to sample it s color See page 128 5 You can change the color density in two ways Note Increase or decrease in steps with the or key Press the keys key Enter the percentage with the N...

Страница 153: ...Keys 1 Press the Adjustment Memory key 2 Press the Prog User Color key 3 Select the number that you want to store the user color in 4 Press the Enter Size key 5 Select the color that you want to adju...

Страница 154: ...Press the OK key Sampling the User Color Only for Edit Type You can print out a sample of User Colors to check the colors you have made Note The sample will be copied on a A4p 81 2 11 p sheet or a A3...

Страница 155: ...139 Area Editing Only for Edit Type Area Editing Only for Edit Type...

Страница 156: ...you want to do the same edit What is Area Editing Original Designate areas There is an area in each group Scan Specify modes for each group Copy 1 Group 1 Positive Negative 2 Group 2 Mirror Image 3 G...

Страница 157: ...to edit and how those areas will be re produced The basic steps are summarized below Details are given in the rest of this section Enter Area Editing mode Press the Area Editing key Designate areas S...

Страница 158: ...tangle frame Specify straight frames by Rectangles Right Angle Polygon Polygon frame Specify straight frames by Right Angle Polygon Polygon Line Specify a series of points linked together by straight...

Страница 159: ...a Set modes for outside areas 10 Area Edit Edit inside the area 11 Confirm Areas Show selected areas modes and groups 12 Confirm Selection Complete a designated area 13 Erase Cancel last point selecte...

Страница 160: ...ulti Closed Loop See page 147 Rectangle frame See page 148 Frame Line Right Angle Polygon frame See page 148 Polygon frame See page 148 Line See page 149 Note You cannot use the optional document feed...

Страница 161: ...pen 4 Mark the diagonally opposite corner of the area you wish to select Note When you make a mistake press the Erase key Repeat 4 and 5 to add more rectangles When you continue to add areas you can s...

Страница 162: ...point press the Confirm Selection key 7 Press the Area Edit key specify your settings then press the OK key Reference For details see page 152 8 Press the Start key Closed Loop Limitation If you speci...

Страница 163: ...al areas with other selection tools 1 Set your original on the exposure glass 2 Press the Area Editing key 3 Press the Multi Closed loop key 4 Press on a point inside the exterior area you wish to spe...

Страница 164: ...nt with the editor pen 6 Mark the diagonally opposite corner of the area you wish to select 7 Press the Confirm Selection key 8 Press the Area Edit key specify your settings then press the OK key Refe...

Страница 165: ...next points 7 After making the last point press the Confirm Selection key 8 Press the Area Edit key specify your settings then press the OK key Reference For details see page 152 9 Press the Start ke...

Страница 166: ...tor pen 6 Mark the next points 7 After marking the last point press the Confirm Selection key 8 Press the Area Edit key specify your settings then press the OK key Reference For details see page 152 9...

Страница 167: ...eviously marked the last point you marked will be canceled automatically If you designate an area in Right Angle Polygon mode make sure to mark points that make right angles If you mark a point which...

Страница 168: ...tion Outline Image Shadow Image Slanted Image Mirror Image Positive Negative Note The editing functions available when specifying area with Frame Line mode are Width and Color Color Image Adjustment s...

Страница 169: ...see page 121 Color Creation see page 85 Image Creation see page 91 5 Press the OK key 6 Press the Start key Delete Area Erasing a Part of the Image This function blanks out designated areas 1 Designa...

Страница 170: ...Save Area Blanking out Part of the Image This function blanks out all areas except those designated 1 Designated area Note When you select Save Area mode previously selected modes are canceled 1 Desi...

Страница 171: ...ther modes Frame Line widths Metric version 0 25 2 0mm in 0 25mm steps Inch version 0 01 0 08 in 0 01 steps The frame and line width might be uneven depend ing on the angle of the line 1 Designate the...

Страница 172: ...ting Copy Image Density Adjustment Manual Image Density Color Mode Black The Original Image Type Photo Text You can change the default settings See page 187 The way to set modes is basically the same...

Страница 173: ...age Creation see page 91 Basic Settings see page 158 5 Press the OK key 6 Press the Start key Save Area 1 Designate the areas you wish to modify Note For designating areas see page 145 2 Press the Are...

Страница 174: ...59 Shift see page 77 Margin Adjustment see page 78 Sort Stack Staple Option see page 102 Note Regarding functions that cannot be used together in area editing see page 164 When you set Shift and desig...

Страница 175: ...can Change the modes for an area Group Add an area to a Group Erase an area Erase a Group Note Note that even if you erase a job setting a group or an area they still consume memory until you exit Ar...

Страница 176: ...see page 130 Basic Settings see page 158 Delete Area see page 153 Save Area see page 154 5 Press the Previous key Adding Areas 1 Press the Confirm Areas key Note The all designated areas are displayed...

Страница 177: ...te For designating areas see page 145 6 Press the Previous key Erasing an Area 1 Press the Confirm Areas key Note All designated areas are displayed 2 Select an area that you want to cancel 3 Press th...

Страница 178: ...rm Areas key Note All designated areas are displayed 2 Select a group that you want to cancel Note Areas in this group are highlighted 3 Press the Delete Group key 4 Press the Yes key 5 Press the Prev...

Страница 179: ...163 Area Editing Only for Edit Type Exiting Area Editing 1 Press the Cancel Editing key 2 Press the Yes key Exiting Area Editing...

Страница 180: ...Full Color Black White Single Color Twin Color Original Image Type Selection Type Mask Color Conversion Color Erase Color Background Paint Outline Image Shadow Image Slanted Image Mirror Image Positiv...

Страница 181: ...Density Full Color Black White Single Color Twin Color Original Image Type Selection Type Mask Color Conversion Color Erase Color Background Paint Outline Image Shadow Image Slanted Image Mirror Image...

Страница 182: ...166...

Страница 183: ...167 What to do if Something Goes Wrong What to do if Something Goes Wrong...

Страница 184: ...s under the energy saver condition Press the Energy Saver key See page 55 Is the right kind of paper in the paper tray Paper size and weight must be within the specifications for this machine Is folde...

Страница 185: ...desired copy set number The machine instructs you to set the duplex tray The machine instructs you to wait The panel display is off Action You can change the maximum copy quantity that you can make a...

Страница 186: ...originals correctly See page 31 32 or 33 Select the proper paper size Select the proper reproduction ratio Cause The image density is too dark The exposure glass platen glass or document feeder belt i...

Страница 187: ...narrow margin with the user tools See page 195 Select the proper reproduction ratio Cause The Text mode is selected The line images of the original might be overlapped each other The color balance is...

Страница 188: ...paper Translucent paper OHP transparencies Note Load paper with the side you wish to copy onto face down in the paper trays If copies are curled try turning the copy paper over in the tray If there i...

Страница 189: ...3 Square the paper and set it in the tray Note Do not stack paper over the limit mark Make sure that the leading corners of the paper are under the corners 4Reinstall the side fences 5Push the paper...

Страница 190: ...ing down 2 When the key stops blinking and lights up open the top cover Note Make sure no paper sheet is involved in the feeding part of the Large Capacity Tray Remove the sheet if any 3 Place the pap...

Страница 191: ...n RCAUTION R This machine has been tested for safety using this supplier s parts and consumables We recom mend you only use these specified supplies Note If you use toner other than that recommended a...

Страница 192: ...176 DAdding Toner 3 Pull out the toner container 4 Push in the new toner container until it fits in place 5 Turn the knob back to the position shown and close the front door...

Страница 193: ...nits and levers are returned to their original position and all covers are closed Do not touch originals in the document feeder when a paper misfeed occurs in the machine If you do the machine cannot...

Страница 194: ...played only when your machine is equipped with the document feeder 1 You can find the sticker with b at the top ex plaining how to remove the misfed paper on the document feeder as shown in the illust...

Страница 195: ...recommended staple failure or staple jams might occur 1 Open the sorter stapler front cover then pull the R3 holder and pull out the stapler unit 2 Push the cartridge forward to release it 3 Pull out...

Страница 196: ...80 7 Place the cartridge in the staple unit 8 Turn the cartridge backward until a click is heard 9 Return the R3 holder into the original position 0 Close the sorter stapler front cover dAdding Staple...

Страница 197: ...ing jammed staples staples might not be ejected the first few times you try to use the stapler 1 Open the sorter stapler front cover then turn the dial in the arrow direction until the staple unit sto...

Страница 198: ...ginal place until a click is heard 8 Place the cartridge in the staple unit 9 Turn the cartridge backward until a click is heard 0 Return the R3 holder into the original position Close the sorter stap...

Страница 199: ...183 Changing the Machine s Settings Changing the Machine s Settings...

Страница 200: ...r tray is not being used 2 Pull out the paper tray until it stops Note Remove any remaining copy paper 3 Adjust the back fence to the new paper size 4 Square the paper and set it in the tray Note Shuf...

Страница 201: ...e 1 Follow the steps 1 to 5 on page 184 2 Adjust the tray size with the paper size selector to the new paper size Note If you cannot find desired paper size on the paper size selector select the p the...

Страница 202: ...ngs key 4 Press the Next key until Tray Paper Size is dis played 5 Press the Change key to select the tray 6 Select the paper size then press the OK key 7 Press the User Tools key to exit from the use...

Страница 203: ...This section is for the key operators in change of this machine You can change or set the machine s default settings Note After using the tools be sure to exit from the user tools 1 Press the User To...

Страница 204: ...ngs by following the instructions on the panel display Note Prev Menu key Press to return to the previous menu Cancel key Press to return to the previous menu without changing any data Exiting from th...

Страница 205: ...192 page 192 page 192 page 192 page 193 page 193 page 193 page 193 Menu Panel Tone Ready Tone Copy Count Display Auto Timer Control Panel Off Timer System Reset Timer Function Reset Timer Tray Paper...

Страница 206: ...FC Twin A C S Priority Color Sensitivity Process Black Inkjet Output Mode Setting Duplex Tray Auto Clear SADF Auto Reset Timer ADF Thin paper ADF Mixed Sizes ADF Auto Paper Select Full Color Copy Sor...

Страница 207: ...to 120 minutes Note Default 60 minutes The machine enters Energy Saver mode automatically after your job is finished after the selected time The time can be set from 10 to 990 seconds or off In Energ...

Страница 208: ...Select mode is not selected Note Default Tray 1 If you load paper of the same size in two or more trays the machine automatically shifts another tray when the tray in use runs out of paper You can set...

Страница 209: ...he Number keys then press the key Note Adjustment value Metric version Vertical 100 330mm Horizontal 140 483mm Inch version Vertical 3 9 13 0 Horizontal 5 5 19 0 You can change the color of the displa...

Страница 210: ...elect mode Full Color mode or Black White mode that is selected automatically just after the machine is turned on or when modes are cleared Note Default Auto Color Select mode You can select the speci...

Страница 211: ...version left right 0 You can adjust the back side margin direction and width that is selected as a default in Back Side Margin Adjust Note Default Metric version left right 0mm Inch version left right...

Страница 212: ...White Single or Twin Color key Clear You can clear the user codes 1 Press the Clear key 2 Select the user code that you want to clear 3 If you want to clear the all user codes of the page press the S...

Страница 213: ...Magenta and Cyan are used Note Default 4 colors You can select the type of image adjustment for the Inkjet Output Mode from the below If you want to emphasis yellow select 1 If you want to emphasis r...

Страница 214: ...automatically when you insert two or more originals in the document feeder and make two or more copies from each original Note Default On Menu ADF Thin paper ADF Mixed Sizes ADF Auto Paper Select Ful...

Страница 215: ...199 Others Maintaining Your Machine Where to Put Your Machine Do s and Don ts Remarks Use and Storage of Supplies...

Страница 216: ...chemical cleaner or organic solvent such as thinner or benzene If they get into the machine or melt plastic parts a failure might occur Do not clean parts other than those specified in this manual Su...

Страница 217: ...idity to be 54 at 32 C 86 F Humidity 15 80 temperature to be 27 C 80 6 F at 89 6 A strong and level base The machine must be level within 5mm 0 2 both front to rear and left to right To avoid possible...

Страница 218: ...the wall outlet to avoid fire or electric shock When the machine will not be used for a long time unplug the power cord R CAUTION t When you pull out the plug from the socket grip the plug to avoid d...

Страница 219: ...ion Do not turn off the operation switch while copying When turning off the operation switch make sure that copying is completed The machine might fail to produce good copy images if there should occu...

Страница 220: ...t change to copy paper with less curl Load paper with the copy side down in the paper trays If copies are curled try turning the copy paper over in the tray If there is no improvement change to copy p...

Страница 221: ...wet or oily finger prints may appear on the copy Load paper with the copy side down in the paper trays If copies are curled try turning the copy paper over in the tray If there is no improvement chan...

Страница 222: ...and high humidity or low temperature and low humidity conditions store paper in a vinyl bag Do not store paper where it will be exposed to heat Store on a flat surface Use older stock first Do not lay...

Страница 223: ...207 Projector Unit Operation Projector Unit Operation...

Страница 224: ...left when opening the mirror unit 6 Focusing lever Adjusting the focus with this lever when you make copies from a glass mount film 7 Power switch Switches the power on or off 8 Mirror unit Reflects t...

Страница 225: ...glass Film strip holder Set negative or positive strip film and base film here Glass mount film holder Set the positive glass mount films in this holder This holder is covered with glass 3 Slide mount...

Страница 226: ...type C film and use the copy to position the film correctly on the exposure glass Make a copy from the original sheet cut around the surrounding margin on the dotted lines and cut away the center part...

Страница 227: ...luable images we recommend copying from duplicates When using a film strip be sure to take it out from the film protection sheet Before Operating the Projector Setting location Slide film Slide strip...

Страница 228: ...ting the Projector Area of film that can be copied Copy size copying full size Mount films using the slide holder Strip films using the film strip holder GCFPRE3E 7 6 124 mm 195 mm 4 8 GCFPRE4E 7 8 13...

Страница 229: ...older adjust the focus manually Do not forget to turn off the power switch of the projector when you are not using it Do not obstruct the light path from the projector If the light path is obstructed...

Страница 230: ...ow Refer to the rest of this section for details of each step Position the projector See page 215 Prepare the film See page 216 Select the film type and perform shading See page 220 Adjust color densi...

Страница 231: ...main switch of the projector 3 Lift the platen cover or the document feeder and lower the projector lens cover 4 Place the mirror unit so that the unit s position holes fit over the projector s positi...

Страница 232: ...ass Mount 35mm Strip Film Negative Strip Film Others Positive Max Size 142 210mm 5 5 8 2 Negative Filter P Positive Filter P Positive Filter P Positive Filter N Negative Filter P Positive Filter N Neg...

Страница 233: ...ICOLOR registered trademark of FUJI PHOTO COMPANY LIMITED For AGFA registered trademark of AGFAGEVAERT AG For KODAK registered trademark of EASTMAN KODAK COMPANY If you use film that does not have sui...

Страница 234: ...by one Note Set the front side of the film face down when setting in the slide holder or glass mount film holder When setting in the slide holder make sure that all slides are aligned with the glass...

Страница 235: ...s and position the film on the exposure glass a positioning sheet is required Make a copy of one of the positioning sheet originals and use it to make your own sheet Cut a hole the size of the film fr...

Страница 236: ...e to your film type see below Selecting the Film Type and Performing Shading Go to page Page 221 Page 221 Page 221 Page 223 Page 222 Page 226 Key To Select 35 mm Slides Positive 35 mm Slides Positive...

Страница 237: ...t the other way around Before going to the next step make sure that fresnel lens is lowered in position 3 Press the Shading key The machine will start shading automatically 4 Set the film slide or str...

Страница 238: ...llustration Note Be careful to insert the filter as shown not the other way around 3 Cut the positioning sheet to match the film size Reference Regarding the positioning sheet see page 219 4 Place the...

Страница 239: ...image might be out of focus In this case make the cutout film position sheet a little smaller than the film size and use it to hold the film down 7 If needed adjust the color density or focus Referen...

Страница 240: ...lowered in position 3 Set the base film in the holder Reference Regarding setting the base film see page 217 4 Open the film cover and while pressing the holder lever to the left insert film strip ho...

Страница 241: ...nsert the holder in the right slot 0 Adjust the holder by sliding it up and down to position the correct frame for copying If needed adjust the color density or focus Reference For details see page 22...

Страница 242: ...the marked corner of the film position sheet at the rear left corner of the exposure glass Before going to the next step make sure that the fresnel lens is lowered in position 5 Set the base film in t...

Страница 243: ...is curled the copy image may be out of focus In this case make the cut out film position sheet a little smaller than the film size and use it to hold the film down If needed adjust the color density o...

Страница 244: ...color tone of copies varies with the film brand You can adjust the tone of copies by adjusting Cyan Magenta and Yellow three basic colors Notes on color tone adjustments If the color balance differs...

Страница 245: ...hter 1 2 3 4 5 6 7 8 9 Darker Manufacturer FUJI COLOR Kodak Film type SUPER G ACE 3 SUPER V 4 SUPER G 5 REALAACE 6 GOLD 7 ROYAL GOLD 8 GOLD 9 ISO sensitivity 100 400 800 100 200 800 100 200 400 100 40...

Страница 246: ...Select the level 1 9 3 If your film type is 35mm and you want to adjust focus manually press the Manual Focus key 4 Place a blank piece of white paper under the mirror unit 5 Adjust the focus with the...

Страница 247: ...ct copier modes with the projector Regarding the modes that cannot be selected with the projector see page 106 1 After shading press the Copy Mode Setting key 2 Select the modes Note This operation is...

Страница 248: ...the mirror unit is moved or if some lines appear on the copy you can perform shading again Col Balance Dens You can adjust the color tone image density or adjust the focus manually Continue You can c...

Страница 249: ...fresnel lens If you do touch it clean it See page 236 3 Return the holders filters and other accesso ries to the accessory box 4 Close the lens cover 5 Turn off the power switch Note Though the power...

Страница 250: ...e is out of focus Check if the image on the film is focused or not If it is make sure the film is correctly set in the holder If you reset the film correctly in the holder and the image is still out o...

Страница 251: ...might appear on the lighter part of the copy even after shading 8 Black lines appear on the edge These lines are shadows caused by the film holder and cannot be eliminated 9 If a ring pattern appears...

Страница 252: ...n the lens wipe them with a soft cloth Film Holder Blow off any dust using the blower brush If there are fingerprints on the glass wipe with a soft cloth Holder Slot Blow off any dust using the blower...

Страница 253: ...237 Specification Specification...

Страница 254: ...g m2 28 lb use the bypass feed table and select Thick Paper mode Copy paper capacity Three 500 sheet trays Trays 1 2 and 3 Bypass Tray 50 sheets Copying speed Full size Mainframe Full color 4 colors A...

Страница 255: ...W 0 6kW 1 50kW less than 1 75kW Warm up Stand by Copying Maximum Full system 1 7kW 0 6kW 1 50kW less than 1 75kW Metric version 400 200 141 122 115 100 93 82 75 71 65 50 25 Enlargement Full size Reduc...

Страница 256: ...imensions W D H up to the exposure glass 730 770 980mm 28 8 30 4 38 6 Weight Approx 240kg 529 2 lb Specifications are subject to change without notice Mainframe Mainframe only Complete System less tha...

Страница 257: ...de ADF mode 52 128g m2 14 34 lb ARDF mode 52 105g m2 14 28 lb For 40 52g m2 11 14 lb originals use ADF Thin Paper mode B6l cannot be used in ARDF Thin Paper mode Maximum number of originals to be set...

Страница 258: ...2 13 l 81 4 13 l 8 10 l 8 101 2 l 8 13 l 81 2 11 pl 12 18 l 13 19 l Paper weight for bins Proof tray 64g m2 105g m2 17 28 lb Sort Stack 64g m2 256g m2 17 68 lb Staple 64g m2 256g m2 17 68 lb Bin capac...

Страница 259: ...ive film Size 35mm Others 60 45mm 60 60mm 60 70mm 60 80mm 60 90mm 4 5 Max 142 210mm 5 5 8 2 Mount Yes Up to 5 frames can be set in a film holder Strip Yes A series of 6 frames can be set in a film hol...

Страница 260: ...244...

Страница 261: ...245 Index Index...

Страница 262: ...nce Adjustment 124 Color Balance Program 125 Color Balance Sample 126 Color Conversion 85 Color Creation 85 Color Erase 87 Color Sample Chart 23 Combination Chart 106 Combination Chart for Area Editin...

Страница 263: ...signated Areas 156 Selectng Modes for Designated Areas 152 Series Copies 73 Setting Non standard Sized Originals 35 Setting Originals of Different Sizes in the Document Feeder 34 Setting Originals on...

Страница 264: ...248 UE USA A257...

Страница 265: ...d on the user is encouraged to try to correct the interference by one more of the following measures Reorient or relocate the receiving antenna Increase the separation between the equipment and receiv...

Страница 266: ...ral de Gaulle BP 307 92143 Clamart Cedex Phone 33 0 1 40 94 38 38 RICOH COMPANY LTD 15 5 1 chome Minami Aoyama Minato ku Tokyo Telephone Tokyo 3479 3111 Overseas Affiliates Printed in Japan UE USA A2...

Страница 267: ...Copying Front and Back Covers 7 Summary Features at a Glance Some limitations may apply to functions for details please refer to the Operating Instructions The copy samples in this guide differ somew...

Страница 268: ...ects a suitable color automatically Auto Original Type Select Selects a suitable original image type au tomatically Auto Paper Select Selectsasuitablepapersizeautomatically How to Make a Copy Set the...

Страница 269: ...3 Tip On the exposure glass platen glass In the document feeder To check the number of copies made so far press the Counter key Face down Press the Start key Face up...

Страница 270: ...r Edit type The Color Background function in Area Ed iting makes copies with the designated area filled in a selected color Filling a Background Area with a C Set the original on the exposure glass pl...

Страница 271: ...5 a Color Select Color Creation then press the Color Background key Select the desired color then press the OK key twice Press the Start key Press the Confirm Selection key Press the Area Edit key...

Страница 272: ...OK key Delete Area I wish to delete an area Select R A Polygon Mark the first point with the editor pen or your finger Mark the points Press the Area Edit key Press the Delete Area key Press the OK ke...

Страница 273: ...l an area but leave an internal part left unfilled Select Multi Closed Loop Touch on a point inside a closed loop Touch on a point that you don t want to paint Press the Area Edit key Press the Color...

Страница 274: ...tion Copies are too yellow Color Balance Adjustment The Color Balance function allows you to control the overall color tone of copies Adjusting the Color Balance Press the Adjustment Memory key Set th...

Страница 275: ...ith adjacent colors in the color circle 1 Press the Adjustment Memory key 2 Press the Color Adjustment key 3 Select the color that you want to adjust from the color circle 4 Adjust the color with the...

Страница 276: ...ginal image the im age original overlayed onto another origi nal image the background original Making a Leaflet Image Overlay Set the original on the exposure glass 1 Background original 2 Image origi...

Страница 277: ...e Confirm Selection key Select the area of the background image original Then press the Confirm Selection key To select the area Mark two diagonally opposite corners of a rectangle You can select the...

Страница 278: ...Use the Front Back Cover function to have the first and last pages copied onto a differ ent kind of paper e g colored than that used for the remaining pages Copying Front and Back Covers Set the origi...

Страница 279: ...13 rs Press the Start key Select the Copy or Blank key on The covers are copied in Thick mode Set cover sheets into the bypass tray...

Страница 280: ...ional document feeder required 3 Only for Edit type Margin Adjustment Page 78 Shift Page 77 Cover Sheet Page 82 2 Center Erase Page 81 Border Erase Page 81 Center Border Erase Page 81 Color Conversion...

Страница 281: ...age 115 3 Sort Page 102 1 Stack Page 103 1 Staple Page 104 1 Preset R E Page 59 Zoom Page 60 Size Magnification Page 62 Directional Magnification Page 63 Directional Size Magnification inch Page 64 Po...

Страница 282: ...e copies of this manual and stick them on the wall Set this manual face down on the exposure glass Press the Start key Stick the copies on the wall NDCS51EE A257 8657 UE USA Printed in Japan S1092 G10...

Отзывы: