background image

7

MAS-P Animal Scale Operator’s Manual

2.5.1

Battery Mount – Optional

Note

The mounting of the optional battery box differs slightly depending on 
the scale size.

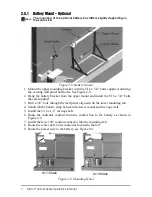
Figure 2-8. Battery Mount

1. Mount the upper mounting bracket with the 5/16 x 3/4” bolts supplied, utilizing 

the existing wall panel bolt holes. See Figure 2-9.

2. Hang the battery bracket from the upper mount and install the 5/16 x 3/4” bolts 

that are supplied.

3. Drill a 3/8” hole through the wall panel aligned with the lower mounting tab.
4. Sandwich the battery strap between the lower mount and the cage wall.
5. Install the 5/16 x 1/2” carriage bolt.
6. Route the indicator conduit from the control box to the battery as shown in 

Figure 2-9.

7. Install the lower 90° conduit connector into the mounting tab.
8. Route the scale cable to the connector located to the left.
9. Route the power wire to the battery, see Figure 2-9.

8 x 13 Scale

8 x 18 Scale

Figure 2-9. Mounting Holes

Содержание MAS8-13

Страница 1: ...Multiple Animal Scale Portable Installation Service Manual 132795 Rev D...

Страница 2: ......

Страница 3: ...ns 9 3 2 Permanent Installation 9 3 3 Portable Installation 9 3 4 Switching Between Modes 9 3 4 1 Converting to Weigh Mode 9 3 4 2 Converting to Transport Mode 10 4 0 Repair Parts 11 5 0 Maintenance 1...

Страница 4: ...ii MAS P Animal Scale Operator s Manual Rice Lake continually offers web based video training on a growing selection of product related topics at no cost Visit www ricelake com webinars...

Страница 5: ...ARNING DANGER Indicates an imminently hazardous situation that if not avoided will result in death or serious injury Indicates a potentially hazardous situation that if not avoided could result in dea...

Страница 6: ...ne is clear of the scale and any moving parts Use two hands when gripping the lift handle to raise or lower the scale Be sure the gates are latched or tied inward before transporting the scale Ensure...

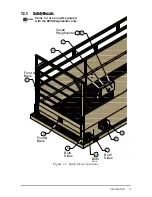
Страница 7: ...Introduction 3 1 1 1 Safety Decals QVLGH HLJKFHQWHU URQW DFN URQW DFN RWK 6LGHV RWK 6LG RWK 6LGHV Items 1 4 are on units equiped with the 920i Weighcenter only Note Figure 1 1 Safety Decal Locations...

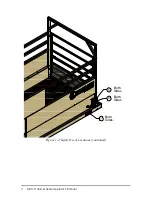
Страница 8: ...RWK 6LGHV RWK 6LGHV RWK 6LGHV 4 MAS P Animal Scale Operator s Manual Figure 1 2 Safety Decal Locations continued...

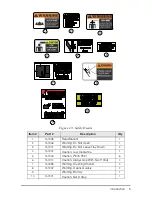
Страница 9: ...06 Warning Do Not Open 1 3 151907 Warning Do Not Leave Tray Down 2 4 151904 Caution Low Clearance 1 5 151909 Caution Pinch Point 6 6 151910 Caution Always Grip With Two Hands 4 7 151898 Warning Crushi...

Страница 10: ...e base frame In transport mode the scale system is locked down protecting the load cells from dam age during transport The scale is raised to the weigh mode using a lever and cam sys tem A digital ind...

Страница 11: ...e may be lifted by forklift ensuring the forks reach through both walls or by 4 straps and a crane or loader Ensure the scale is in the transport mode locked down see next section when loading and tra...

Страница 12: ...alled for shipping 2 Place the lifting fixture with small hole over the bolt 3 Reinstall the nut leaving the fixture free to move Lifting Fixture Nylon Locknut Figure 2 1 Lifting Fixture 2 1 2 Slingin...

Страница 13: ...4 The scale can now be stored as is or placed on a relatively flat location to be assembled 2 2 Package Removal The indicator is shrink wrapped for transportation Be careful when removing to avoid da...

Страница 14: ...overhead crane 1 Lift the first wall by using one sling in the center Note Note The wall with the operator s instructions is mounted on the left side 2 Stand the wall vertical and place the inserts fr...

Страница 15: ...ok Bolt 1 Install jam nut and lock washer onto the hook bolts Screw the nut on about 2 2 Insert one hook bolt into the lower and upper holes of the cage wall with the hook portion pointing upward 3 In...

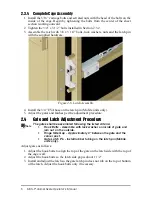
Страница 16: ...Adjust the gates and latches per the adjustment procedure 2 4 Gate and Latch Adjustment Procedure Note The gates shall be assembled following the listed criteria Hook Bolts Assemble with lock washer...

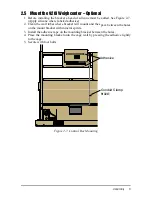
Страница 17: ...2 Clean the wall tubes where bracket will mount and the space between the holes on the mount bracket with mineral spirits 3 Install the adhesive tape on the mounting bracket between the holes 4 Place...

Страница 18: ...nt and install the 5 16 x 3 4 bolts that are supplied 3 Drill a 3 8 hole through the wall panel aligned with the lower mounting tab 4 Sandwich the battery strap between the lower mount and the cage wa...

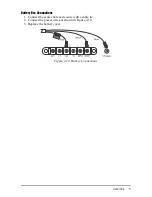
Страница 19: ...Assembly 8 Battery Box Connections 1 Connect the scale cable and secure with a cable tie 2 Connect the power wires as shown in Figure 2 10 3 Replace the battery cover Figure 2 10 Battery Connections...

Страница 20: ...ction A qualified local professional should be consulted to recommend the proper size of foundation for the location Foundation dimensional requirements are available from the dealer or Rice Lake Weig...

Страница 21: ...ing the scale Cam levers point toward each other in weigh mode and away from each other in transport See decals for direction of levers in each mode 6 You are now ready to weigh 3 4 2 Converting to Tr...

Страница 22: ...11 MAS P Animal Scale Operator s Manual 4 0 Repair Parts Lift Mechanism Figure 4 1 MAS M See Figure 4 2 Details A D for gate hardware item 14 See Figure 4 2 Detail E for lift mechanism parts...

Страница 23: ...10 127740 Cover Plate Scale Frame J box 11 126819 Foam Gasket J box 12 131891 Scale Junction Box 4 Cell SS 14 131707 Cage Floor MAS8 13 131934 Cage Floor MAS8 18 15 130842 Rice Lake Decal 16 15097 Bol...

Страница 24: ...O RRU DUGZDUH LQJH 13 15 33 24 14 HWDLO RRU DUGZDUH DWFK 6LGH 18 20 56 19 HWDLO LIWLQJ 0HFKDQLVP 9 17 2 3 6 57 58 59 60 61 16 16 58 65 62 63 64 HWDLO RRU DUGZDUH LQJH 6LGH 43 44 35 42 13 MAS P Animal...

Страница 25: ...16 Grade5 22 131784 Gate Latch 127021 Hair Pin 1 8 x 2 9 16 24 15181 Washer 3 4 31 132179 Hinge Bracket 33 111074 Nut 3 4 10NC 34 132217 Jam Nut 3 4 10NC 35 21939 Washer 5 16 36 131886 Cable 1 4 OD x...

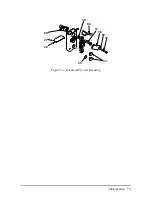
Страница 26: ...the load cell stands through the drain holes located at the bottom of the stand Disassembly and Greasing This is very important to ensure the long life of your unit Use the parts list drawings for ite...

Страница 27: ...26 27 28 35 36 33 37 38 39 40 34 Maintenance 16 Figure 5 1 Disassembly and Greasing...

Страница 28: ...g shown is effective for all models later then 09 17 2013 models built prior that date should rewire the scale to the updated configuration For information on rewire download Technical Bulletin PN 159...

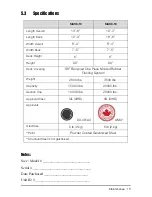
Страница 29: ...apacity 15000 lbs 20000 lbs Section Cap 10000 lbs 20000 lbs Approval Class IIIL IIIHD IIIL IIIHD Approvals t N A T I O NAL CONFER E N C E t O N W E I G HT S A N D M E A S U R E S 99 091A4 AM4 Grad Siz...

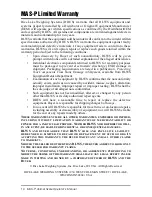
Страница 30: ...as not caused by accident misuse neglect alteration improper installation improper repair or improper testing RLWS shall be the sole judge of all alleged non conformities Such equipment has not been m...

Страница 31: ...00 321 6703 International 715 234 9171 Immediate Emergency Service For immediate assistance call toll free 1 800 472 6703 Canadian and Mexican customers please call 1 800 321 6703 If you are calling a...

Страница 32: ...21 MAS P Animal Scale Operator s Manual Notes...

Страница 33: ...Maintenance 22 Notes...

Страница 34: ...23 MAS P Animal Scale Operator s Manual Notes...

Страница 35: ......

Страница 36: ...USA U S 800 472 6703 t Canada Mexico 800 321 6703 t International 715 234 9171 t Europe 31 0 88 2349171 www ricelake com www ricelake mx www ricelake eu www ricelake co in m ricelake com Rice Lake We...

Отзывы: