background image

OPERATION INTERFACE

USING THE TOUCHSCREEN

The main way to control Android features is by using finger to 

manipulate icons, buttons, menu items, the on-screen keyboard, 

other items on the touchscreen, and to zoom in or out photos, 

webpages, e-mail, and maps. You can also change the screen’s 

orientation.

Touch:

To act on items on the screen, such as application and

setting icons, to type letters and symbols using the on-screen 

keyboard, or to press on-screen buttons, you simply touch them 

with your finger.

Touch & hold:

Touch & hold an item on the screen by touching it and not lifting your finger until an action occurs. For 

example, to open a menu

for customizing the Home screen, you touch an empty area on the

Home screen until the menu opens.


Drag:

Touch & hold an item for a moment and then, without lifting your finger, move your finger on the screen 

until you reach the target position. You drag items on the Home screen to reposition them.

Swipe or slide:

To swipe or slide, you quickly move your finger across the surface of the screen, without pausing when 

you first touch it. ( So you don’t drag an item instead ). For example, you slide the screen up or down 

to scroll a list, and in some Calendar views you swipe quickly across the screen to change the range 

of time visible.

Double-tap:

Tap quickly twice on a webpage, map, or other screen to zoom. 

For example, you double-tap a section of a webpage in Browser 

to zoom that section to fit the width of the screen.Touch (+ /-) at 

the lower right corner can do zooming action also.

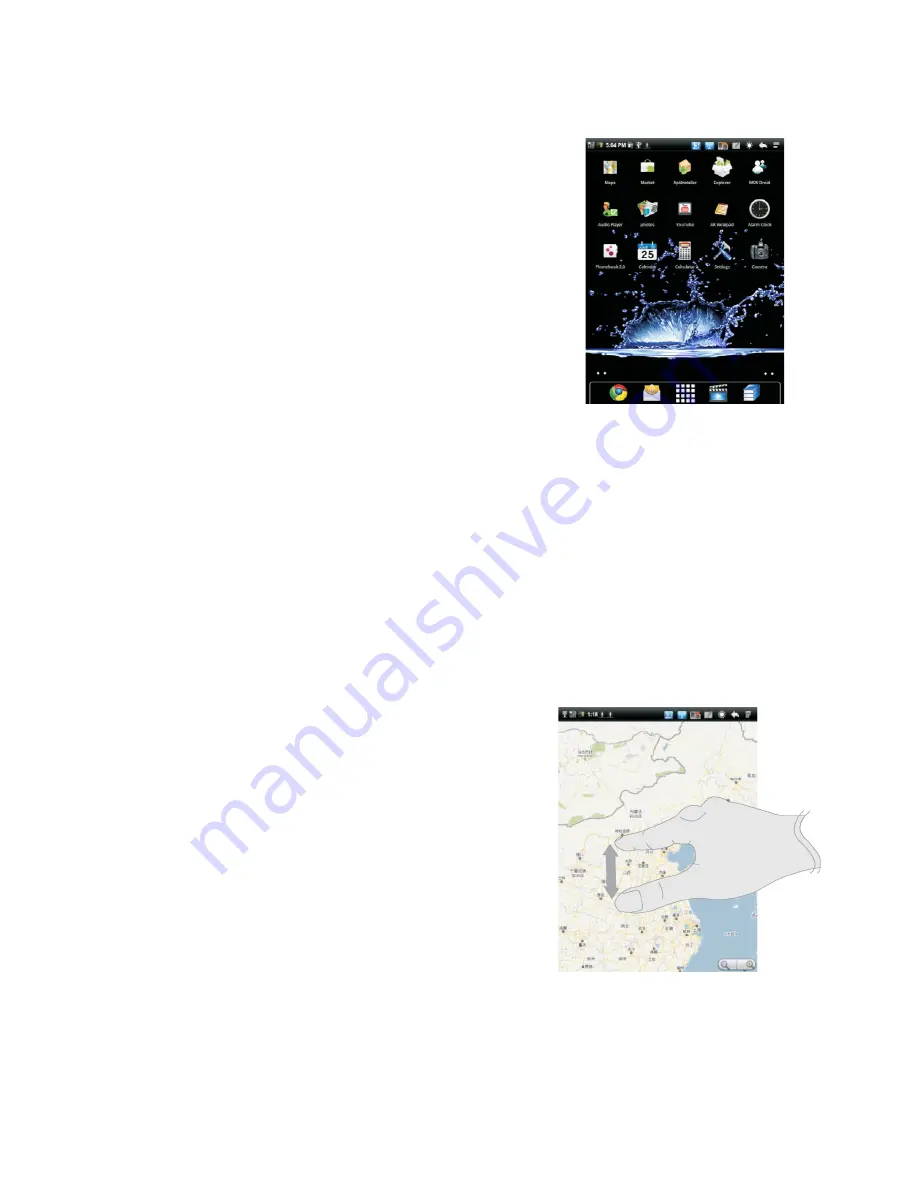
Pinch fingers together or apart

(only workable on multi-touch model):

When viewing photos, webpages, e-mail , or maps, you can 

zoom in and zoom out by pinch your fingers together or apart.

Rotate the screen:

The orientation of the screen rotates with the device as you turn 

it from upright to its side and back again.

Содержание Media Tablet

Страница 1: ...USER MANUAL GEBRUIKERSHANDLEIDING MODE D EMPLOI BEDIENUNGSANLEITUNG...

Страница 2: ...s Opening Switching Applications Status Bar Overview Settings Opening Settings Wireless networks Sound display Location security Applications Privacy SD Card sevice storage Language keyboard Date time...

Страница 3: ...Caution Moisture Open without Authorization High Temperature Poor Ventilation Media Tablet User Manual Mini USB Cable Adapter Hard Object Damage Dust and smoke...

Страница 4: ...lume Back 3 LED power indicator 4 LED charging indicator 5 Home 6 Touch screen 7 Speaker 8 Camera optional 9 Stylist 10 Microphone 11 Micro SD slot 12 Earphone jack 13 Mini USB port 14 Mini HDMI outpu...

Страница 5: ...battery and must be charged with the supplied adap tor 2 It is recommended to fully charge your b attery for 8 hours first two times After that the device can be fully charged within 4 hours 3 It is...

Страница 6: ...r move your finger on the screen until you reach the target position You drag items on the Home screen to reposition them Swipe or slide To swipe or slide you quickly move your finger across the surfa...

Страница 7: ...around an item on the Home screen 2 2 1 Touch hold the Item you want to move 2 2 2 Drag the item to a new location on the screen Pause at the edge of the screen to drag the item onto another home scr...

Страница 8: ...n to open its application Or press Back to return to the current application STATUS BAR OVERVIEW 1 Touch the Language setting icon to re set the language 2 Touch the Connection setting Icon to display...

Страница 9: ...nning Bluetooth devices in range 4 1 2 Once the desired Bluetooth device name appear in the list simply touch it and begin paring 4 2 To make the device Discoverable 4 2 1 Check the Discoverable Check...

Страница 10: ...Adjust the delay before the screen automatically turns off LOCATION SECURITY 1 Use wireless networks Location determined by Wi Fi and or mobile networks 3 Visible password Show password as you type AP...

Страница 11: ...as it appear on each region of the screen USB MODE SELECT Select USB mode OTG HOST SLAVE Host Mode Select USB work as host mode then you can mount U disk or 3G Modules UPDATE MEDIA LIBRARY When inser...

Страница 12: ...nput method 5 Flick Install Confirm to download and install the input method 6 After installment is done please enter SETTING from home screen and then open LANGUAGE AND KEYBOARD to select the install...

Страница 13: ...iagonal 800 x 600 pixels 30H stand by 7 4 V 1500mAH 10 Inch diagonal 1024 x 768 pixels 52H stand by 7 4 V 2600mAH System Memory Flash Drive Capacity Expansion Slot Screen Type Screen Size Aspect Ratio...

Страница 14: ...mail please sent a email to support ricatech com Please make sure that you mention the model number and serial number of the product mention your name address and describe your question or problem cle...

Страница 15: ...len van Toepassingen Statusbalkoverzicht Instellingen Openen Instellingen Draadloos netwerken Geluid weergave Locatie beveiliging Toepassingen Privacy SD kaart service opslag Taal Toetsenbord Datum ti...

Страница 16: ...Opgelet Condens Open zonder bevoegdheid Hoge temperatuur Slechte ventilatie Media Tablet Bedienings handleiding Mini USB Kabel Adapter Zwaar objectschade Stof en rook...

Страница 17: ...aan uit indicator 4 LED oplaadindicator 5 Home 6 Aanraakscherm 7 Luidspreker 8 Camera optioneel 9 Schrijfstift 10 Microphone 11 Micro SD sleuf 12 Oortelefoonaansluiting 13 Mini USB poort 14 Mini HDMI...

Страница 18: ...opgeladen te worden met de bijgeleverde adapter 2 Het is raadzaam de batterij de eerste keer volledig te laden gedurende 8 uur Nadien kan de batterij volledig opgeladen worden in 4 uur 3 Het is raadz...

Страница 19: ...t en dan zonder de vinger op te tillen verplaats de vinger op het scherm totdat de gewenste positie is bereikt De onderdelen op het Home scherm worden versleept om deze te herpositioneren Vegen of gli...

Страница 20: ...cherm 2 2 1 Raak aan houd het te verplaatsen onderdeel vast 2 2 2 Sleep het onderdeel naar een nieuwe locatie op het scherm Plaats het onderdeel tijdelijk naar de rand van het scherm om het naar een a...

Страница 21: ...passing te openen Of druk op Terug om terug te keren naar de huidige toepassing STATUS BALK OVERZICHT 1 Raak het pictogram Taalinstelling aan om de taal opnieuw in te stellen 2 Raak het pictogram Verb...

Страница 22: ...annen naar Bluetooth apparaten in de omgeving 4 1 2 Als eenmaal de gewenste Bluetooth apparaatnaam in de lijst verschijnt raak simpelweg aan en begin met paren 4 2 Het apparaat zichtbaar maken 4 2 1 V...

Страница 23: ...rm automatisch uitschakelt aan LOCATIE BEVEILIGING 1 Gebruik van draadloos netwerk Locatie bepaald door Wi Fi en of mobiele netwerken 3 Zichtbaar wachtwoord Wachtwoord weergeven tijdens het typen TOEP...

Страница 24: ...te raken als deze op elk vlak van het scherm verschijnt USB MODUS SELECTEREN Selecteren USB modus OTG HOST SLAVE Host modus Selecteer de optie USB host modus Vervolgens kunt u U disk of 3G modules aan...

Страница 25: ...hode 5 Klik Installeren Bevestigen om de invoermethode te downloaden en installeren 6 Nadat de installatie klaar is open INSTELLING vanuit het home scherm en open vervolgens TAAL EN TOETSENBORD om de...

Страница 26: ...tand by 7 4 V 1500mAH 10 Inch diagonal 1024 x 768 pixels 52H stand by 7 4 V 2600mAH Systeem Geheugen Flash Drive Capaciteit Expansie Slot Scherm Type Scherm Grootte Beeldverhouding Scherm Resolutie Au...

Страница 27: ...ve een e mail te sturen naar support ricatech com Zorg ervoor dat u het modelnummer en het serienummer van het product vermeldt onder vermelding van uw naam adres en een duidelijke omschrijving van uw...

Страница 28: ...applications Aper u de la barre d tat Param tres Ouverture des param tres Sans fil r seaux Son affichage Localisation s curit Applications Confidentialit Stockage de la carte SD de l appareil Langue c...

Страница 29: ...ATTENTION Humidit Ouvert sans autorisation Temp rature lev e Mauvaise ventilation Tablette m dia Manuel d utilisation C ble mini USB Adaptateur Dommages objet dur Poussi re et fum e...

Страница 30: ...alimentation 4 Voyant DEL de charge 5 Accueil 6 Ecran tactile 7 Haut parleur 8 Appareil photo en option 9 Styliste 10 Microphone 11 Fente pour micro SD 12 Prise pour couteurs 13 Port mini USB 14 Prise...

Страница 31: ...deux premi res fois il est recommand de charger enti rement la batterie pendant 8 heures Apr s cela l appareil pourra tre enti rement charg en 4 heures 3 Il est recommand de charger enti rement l app...

Страница 32: ...ition souhait e Vous pouvez tirer des l ments sur l cran d accueil pour les repositionner Faire d filer ou glisser Pour faire d filer ou glisser passez rapidement le doigt sur l cran sans vous arr ter...

Страница 33: ...ueil 2 2 1 Touchez maintenez l l ment que vous souhaitez d placer 2 2 2 Tirez l l ment jusqu un nouvel emplacement sur l cran Arr tez vous un moment au bord de l cran pour tirer l l ment jusqu un autr...

Страница 34: ...application Ou appuyez sur Retour pour retourner l application en cours APER U DE LA BARRE D ETAT 1 Touchez l ic ne de param tres de langue pour r initialiser la langue 2 Touchez l ic ne de param tre...

Страница 35: ...que le nom de l appareil Bluetooth d sir appara t dans la liste touchez le simplement et commencez l appariement 4 2 Pour permettre la d tection de l appareil 4 2 1 Cochez la case D tectable et votre...

Страница 36: ...matique de l cran LOCALISATION SECURITE 1 Utiliser les r seaux sans fil La position est d termin e par la Wifi et ou les r seaux mobiles 3 Mot de passe visible Affiche le mot de passe lors de la saisi...

Страница 37: ...USB S lection du mode USB OTG HOST SLAVE Mode Host S lectionnez le mode Host pour l USB ce qui vous permet de monter des modules U Disk ou 3G MISE A JOUR DE LA BIBLIOTHEQUE MEDIA Lorsque vous ins rez...

Страница 38: ...l charger et installer la m thode d entr e 6 Une fois l installation termin e veuillez entrer PARAMETRES partir de l cran d accueil puis ouvrir LANGUE ET CLAVIER pour s lectionner la m thode d entr e...

Страница 39: ...le 800 x 600 pixels 30H veille 7 4 V 1500mAH 10 pouces diagonale 1024 x 768 pixels 52H veille 7 4 V 2600mAH M moire syst me Capacit de m moire flash Lecteur suppl mentaire Type d cran Taille d cran Fo...

Страница 40: ...nous crire l adresse support ricatech com Assurez vous de bien nous communiquer le num ro de mod le et le num ro de s rie du produit vos nom et adresse ainsi qu une description claire de votre probl...

Страница 41: ...el zwischen Anwendungen berblick ber die Statusleiste Einstellungen Einstellungen beim Start Drahtlos netzwerke T ne Anzeige Ort Sicherheit Anwendungen Privatsph re SD Karte Ger tespeicher Sprache Tas...

Страница 42: ...VORSICHT Feuchtigkeit ffnen ohne Genehmigung Hohe Temperaturen Schlechte Bel ftung Media Tablet Bedienungsanleitung Mini USB Anschluss Adapter Sch den durch harte Gegenst nde Staub und Rauch...

Страница 43: ...tst rke Zur ck 3 LED Bereitschaftsanzeige 4 LED Ladeanzeige 5 Hauptseite 6 Touchscreen 7 Lautsprecher 8 Kamera optional 9 Zeigestift 10 Mikrofon 11 Mikro SD Slot 12 Klinkenstecker 13 Mini USB Anschlus...

Страница 44: ...iehlt sich den Akku bei den ersten beiden Verwendungen f r 8 Stunden zu laden Sp ter l dt sich das Ger t innerhalb von 4 Stunden vollst ndig 3 Es empfiehlt sich das Ger t mindestens einmal pro Monat v...

Страница 45: ...m Bildschirm fort bis Sie die Zielposition erreicht haben Sie k nnen Symbole auf dem Hauptbildschirm verschieben um ihnen neue Positionen zu geben Bl ttern oder scrollen Um zu bl ttern oder zu scrolle...

Страница 46: ...2 1 Ber hren Sie das Symbol das sie bewegen m chten l nger 2 2 2 Ziehen Sie das Symbol dann auf eine neue Position auf dem Bildschirm Halten Sie am Bildschirmrand inne um das Symbol auf einen anderen...

Страница 47: ...ndung zu ffnen Dr cken Sie alternativ Zur ck um zur aktuellen Anwendung zur ckzukehren BERBLICK BER DIE STATUSLEISTE 1 Ber hren Sie die Spracheinstellung um die Sprache neu einzustellen 2 Ber hren Sie...

Страница 48: ...in Reichweite zu suchen 4 1 2 Erscheint der Name des gew nschten Bluetooth Ger tes in der Liste ber hren Sie diesen und beginnen Sie mit der Verbindung 4 2 Sichtbarmachen des Ger tes 4 2 1 Haken Sie d...

Страница 49: ...utomatisch abschaltet ORT SICHERHEIT 1 Drahtlosnetzwerke verwenden Der Standord wird durch WiFi und oder mobile Netzwerke ermittelt 3 Passwortsichtbarkeit Zeigt Passw rter beim Eintippen an ANWENDUNGE...

Страница 50: ...Finger um die auf dem Bildschirm anzutippen wenn diese erscheinen USB MODUSWAHL USB Moduswahl OTG HOST SLAVE Host Modus W hlen Sie den USB Hostmodus wenn Sie U disk oder 3G Module ausf hren m chten AK...

Страница 51: ...gen um die Eingabemethode herunterzuladen und zu installieren 6 Nach der Installation betreten Sie das Men EINSTELLUNGEN auf dem Hauptbildschirm und ffnen Sie dann SPRACHE UND TASTATUR um die installi...

Страница 52: ...els 30H stand by 7 4 V 1500mAH 10 Zoll Diagonale 1024 x 768 pixels 52H stand by 7 4 V 2600mAH Systemspeicher Kapazit t Flash Speicher Erweiterungsslot Bildschirmtyp Bildschirmgr e Seitenverh ltnis Bil...

Страница 53: ...E Mail an support ricatech com Achten Sie bitte darauf dass Sie Ihre Modellnummer und die Seriennummer des Produkts angeben teilen Sie uns au erdem Ihren Namen Ihre Adresse mit und beschreiben Sie Ihr...

Отзывы: