background image


5 | 

P a g e


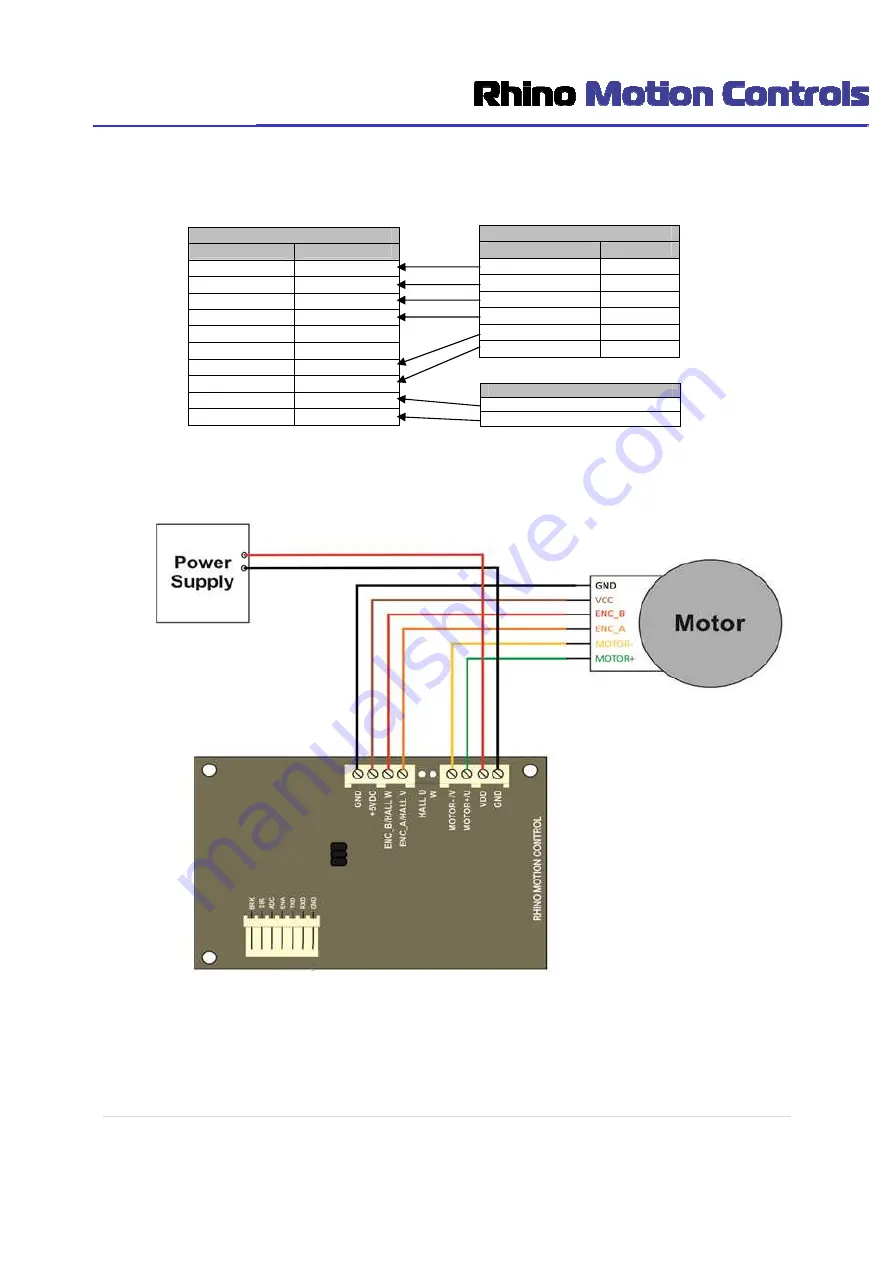
Drive & Motor Connection


Drive Pin outs 

Pin No. 

Description 

GND 

+5VDC 

10 

ENC_B/Hall W 

11 

ENC_A/Hall U 

12 

Hall U 

13 

14 

Motor- / V 

15 

Motor+ / U 

16 

VDD 

17 

GND 

Motor Pin outs 

Motor  

Wire Color 

GND 

Black 

VCC(5 V DC ) 

Brown 

ENC_B(Encoder B) 

Red 

ENC_A(Encoder A) 

Orange 

M-( Motor-) 

Yellow 

M+( Motor+) 

Green 

Power Supply Pin outs 

VCC – 10 to 30V 

GND 

Содержание RMCS - 2303

Страница 1: ...1 P a g e DC Servo Drive 10V 30V DC 50W with ASCII Modbus RMCS 2303 Operating Manual v1 0 ...

Страница 2: ...Using PC Software 10 Installation of Software 10 COM Port Selection 12 Selection of Modbus Slave Address 13 Parameters Read Write Save Reset 14 Control Modes 16 Analog Control Mode 16 Digital Speed Control Mode 18 Position Control Mode 20 Modbus Registers 23 Brief Description of all Registers 24 Control Through Microcontroller Arduino 27 Hardware Connection 27 Library Installation 28 Description o...

Страница 3: ... all speeds and the torque does not decrease with change in speeds It is possible to run the motor in three different modes Analog speed control mode Digital speed control mode and Position control mode It has short circuit protection for the motor outputs over voltage and under voltage protection and will survive accidental motor disconnects while powered up This drive is configured using MODBUS ...

Страница 4: ...e is as per below image Pins 1 7 are used for drive Configuration and UART control Pin No Description 8 GND 9 5VDC 10 ENC_B Hall W 11 ENC_A Hall U 12 Hall U 13 W 14 Motor V 15 Motor U 16 VDD 17 GND Pin No Description 1 GND 2 RXD 3 TXD 4 ENABLE 5 ADC 6 DIRECTION 7 BRAKE Pin No Description JP1 Jumper 1 JP2 Jumper 2 JP3 Jumper 3 Pins 8 17 are connected to motor and power supply as described JP1 to JP...

Страница 5: ... 8 GND 9 5VDC 10 ENC_B Hall W 11 ENC_A Hall U 12 Hall U 13 W 14 Motor V 15 Motor U 16 VDD 17 GND Motor Pin outs Motor Wire Color GND Black VCC 5 V DC Brown ENC_B Encoder B Red ENC_A Encoder A Orange M Motor Yellow M Motor Green Power Supply Pin outs VCC 10 to 30V GND ...

Страница 6: ...here there is no compromise in the torque output of the motor irrespective of the operational speed and voltage supply and control at higher speeds c This mode can be used when multiple motors are to be used to run at exactly the same RPM and same torque even though the voltage supply might be different d Also in this mode the direction of the motor can be controlled digitally via Modbus ASCII com...

Страница 7: ... and JP3 can be set in the configuration as per the below table to provide a physical slave address to the drive In the below table a value of 0 corresponds to a state where the jumper is not connected and a value of 1 corresponds to a state where the jumper is connected If none of the jumpers are connected the drive has been programmed to use the Slave ID 11 in default mode which can be changed f...

Страница 8: ... and direction of motor according to the pulses if number of Lines per Rotation is known For each line drive gets 4 counts for example if encoder is 334 lines drive can get 1336 334 x 4 counts per rotation This parameter can be set in register 10 It s a 16 bit unsigned number having range of 1 to 65535 In any of the 3 modes drive manages speed direction acceleration deceleration position of motor ...

Страница 9: ... motor drives drivers encoder dc servo rhino industrial encoder dc motor driver 50w with uart ascii compatible 10 to 30 v 10a Encoder DC Servo Motor Any DC motor 10 30VDC 50W max with encoder o https robokits co in rhino planetary encoder dc servo o https robokits co in rhino ig32 precision dc servo o https robokits co in motors encoder dc servo high torque dc encoder motor o https robokits co in ...

Страница 10: ... Installation Software is available here https robokits co in downloads Rhino 20DC 20Servo 202303 20Config 20Setup exe Download and run the setup executable Click Next button Verify installation destination and click Next ...

Страница 11: ...lick Finish when Installation Successful message shows up Now Software is ready to use find the shortcut on desktop and open the software Once the Software is installed connect USB UART as per shown in below figure ...

Страница 12: ...your device The software supports serial ports up to COM32 only If your device s port number is higher you can change it in Device Manager Ports COM LPT Double click on device name Port Settings Advanced COM Port number Once your drive is connected to COM Port and it shows Connected message When the drive communicates with software You can see a blinking Green indication ...

Страница 13: ...m slave id it will give indication in status bar and list the drive in Available Slaves drop down box To search slave address click on Search Once all the connected devices are found click on Stop Search Select any of detected slave address in Modbus Slave Address drop down box and drive will start communicating to software Make sure no multiple drives with same slave address is connected on seria...

Страница 14: ...ve vibrations and making movement of motor accurate Set Modbus slave address and lines per rotation Lines Per Rotation is very important because it does have effect on indication of speed feedback If slave address is changed the software will automatically change the slave id of currently connected device Set Speed and Acceleration as per the requirement of application WRITE PARAMETERS Once all th...

Страница 15: ...button is clicked software will ask for confirmation Click on Yes to reset the drive After Clicking on Yes if reset is successful confirmation message will be shown Power off and Power on the drive to load default parameters If any physical jumpers are preset at this point the slave id of the drive will be according to that otherwise slave id will be 11 ...

Страница 16: ...se loop drive high torque up to the maximum torque motor can provide is available even at low speed Connect external potentiometer to change speed of motor as per diagram Connect enable Pin 4 of drive to GND Pin 8 to enable motor in analog mode Direction of motor can be changed in analog mode by connecting the Direction Pin 6 to the GND Pin 8 Electronic brake can be applied to motor by connecting ...

Страница 17: ...h software Connect drive to PC and select Analog Control Mode in Operation Mode After selecting analog control mode click on Write Parameters to always start the drive in analog mode CP2102 Pin outs GND TXD RXD Drive Pin outs Pin No Description 1 GND 2 RXD 3 TXD 4 ENA 5 ADC 6 DIR 7 BRK Potentiometer Pin outs GND GND Output Signal VCC 3 3 V DC Voltage Divider Pin outs GND GND 3 3V Signal 5 V 5 V DC...

Страница 18: ... gains set Make sure that the set speed is always less than the motor can actually reach otherwise the drive can give uncertain result For example if the maximum speed motor can reach at given voltage is 18000 always set speed less than 18000 RPM Hardware Connection Digital Control Mode in Software a To run your motor on digital speed control mode select this mode from operation mode ...

Страница 19: ...ed using and respectively 2 Enable Motor Once speed is set click on Enable Motor to run motor on set speed 3 Change Direction Change the direction of motor Can be done when motor is running or stopped 4 Speed Feedback Current speed feedback from drive This depends on actual speed measured by encoder and Lines per rotation setting ...

Страница 20: ...ition It can be updated even when motor is moving Motor can be stopped any time or speed can be changed anytime even while moving Hardware Connection COUNT CALCULATION Lines per rotation concept is very important for Position Control mode For example we will use HIGH TORQUE HIGH PRECISION ENCODER DC GEARED MOTOR 12V 200RPM RMCS 5014 https robokits co in motors encoder dc servo high torque high pre...

Страница 21: ...ans output shaft will complete one rotation when Hex value of 120240 counts is set to register 16 and 18 LSB and MSB respectively Position Control in Software When drive is connected and put in Position Control mode software will look like this In Position control mode there are two ways to control position Absolute Position control and Relative Position control ABSOLUTE POSITION In this control m...

Страница 22: ...solute and then if direction is reverse M then it will move to 2000 position absolute There are also some preset command buttons to move motor Any of these buttons will not function if motor is moving speed is not 0 Other commands in Position mode Jog and Jog are used to move motor manually in forward and reverse direction It can be used when motor needs to be manually moved to some location like ...

Страница 23: ...tor in analog Control mode 0000 0 Disable motor in analog Control mode Digital Speed Control Mode 0101 257 Enable motor in CW 0100 256 Disable motor in CW 0104 260 Brake in CW 0109 265 Enable motor in CCW 0108 264 Disable motor in CCW 010C 268 Brake in CCW Position Control Mode 0201 513 Enable motor in position control mode 0200 512 Disable motor in position control mode 04 Position Proportional G...

Страница 24: ...ion For example if a DC servo is used in linear slider application and on one side there is a limit switch to detect home position this command can be used to set 0 position at the location Restart Drive 0900 2304 o This command restarts the drive This is a software restart and simulates power cycle Can be used to revert to EEPROM saved parameters Write Parameters to EEPROM FF 255 o When any param...

Страница 25: ...d gain Default value is 0X20 32 Range is 0 to FF in hex and 0 to 255 in decimal Register 10 Lines per Rotation Read Write This register is allocated for Lines per rotation of an Encoder which is connected to motor This is different than PPR or CPR In a quadrature encoder Lines Per Rotation PPR 4 Default value is 0x014E 334 The speed feedback and speed command depends on this parameter Register 12 ...

Страница 26: ... bar when giving any motion command Register 20 22 Position Feedback These registers are used to read current position of encoder Register 20 is LSB and register 22 is MSB It s a 32 bit unsigned number Range is 0 to FFFFFFFF in hex and 0 to 4294967295 in decimal This number can be converted to signed number to know forward or reverse motion pc software uses same method Positive range is 1 to 21474...

Страница 27: ...on ASCII Modbus protocol Following section shows how to use provided library for Arduino microcontroller Hardware Connection DRIVE ARDUINO MEGA CONNECTION DRIVE ARDUINO GND GND RXD TXn n 1 2 3 for Arduino mega2560 TXD RXn n 1 2 3 for Arduino mega2560 DRIVE ARDUINO UNO CONNECTION DRIVE ARDUINO GND GND RXD D3 Software Serial Tx TXD D2 Software Serial Rx ...

Страница 28: ...d There are many more functions other than covered in example codes Description of these functions as below In this code rmcs is object for library class it can be changed Functions for analog control mode rmcs Enable_Analog_Mode slave_id Enable analog mode rmcs Disable_Analog_Mode slave_id Disable motor in analog mode Functions for Digital speed control mode rmcs Speed slave_id 5000 Set speed to ...

Страница 29: ...ns byte slave_id 7 int INP_CONTROL_MODE 265 int PP_gain 32 int PI_gain 16 int VF_gain 32 int LPR 334 int acceleration 20000 int speed 320 Set all necessary parameters value as per application INP_CONTROL_MODE depends on Mode and type of control values are given in Hex in Appendix 1 so convert it in integer then store in INP_CONTROL_MODE variable LPR is Lines Per Rotation rmcs Serial_selection 1 Se...

Страница 30: ...ters Confirmation will be sent on Serial port shown as below when all parameters are written Successfully rmcs READ_PARAMETER slave_id This function read all current parameters and then print on Serial monitor Analog Mode rmcs Enable_Analog_Mode slave_id This function will enable your drive in Analog control mode Speed of motor can be changed by varying potentiometer rmcs Disable_Analog_Mode slave...

Страница 31: ...d motor may jerk Forward rmcs Brake_Motor slave_id 0 Reverse rmcs Brake_Motor slave_id 1 rmcs Disable_Digital_Mode slave_id 1 This function will disable Digital speed control mode in entered direction Should be used with direction as below if not drive may misbehave and motor may jerk Forward rmcs Disable_Digital_Mode slave_id 0 Reverse rmcs Disable_Digital_Mode slave_id 1 Position Control Mode rm...

Страница 32: ...d set all parameters at default value rmcs ESTOP slave_id This function will stop motor and cut off power from drive to motor rmcs STOP slave_id This function is used to stop motion of motor Motor will be locked as its still controlled by drive rmcs SET_HOME slave_id This function changes current encoder position to 0 rmcs Restart slave_id Restart the drive by software ...

Отзывы: