Rheem RPVE Series Скачать руководство пользователя страница 50

R e s i d e n t i a l   S p l i t

R e v. :   1 3   M a r c h ,   2 0 1 5

50

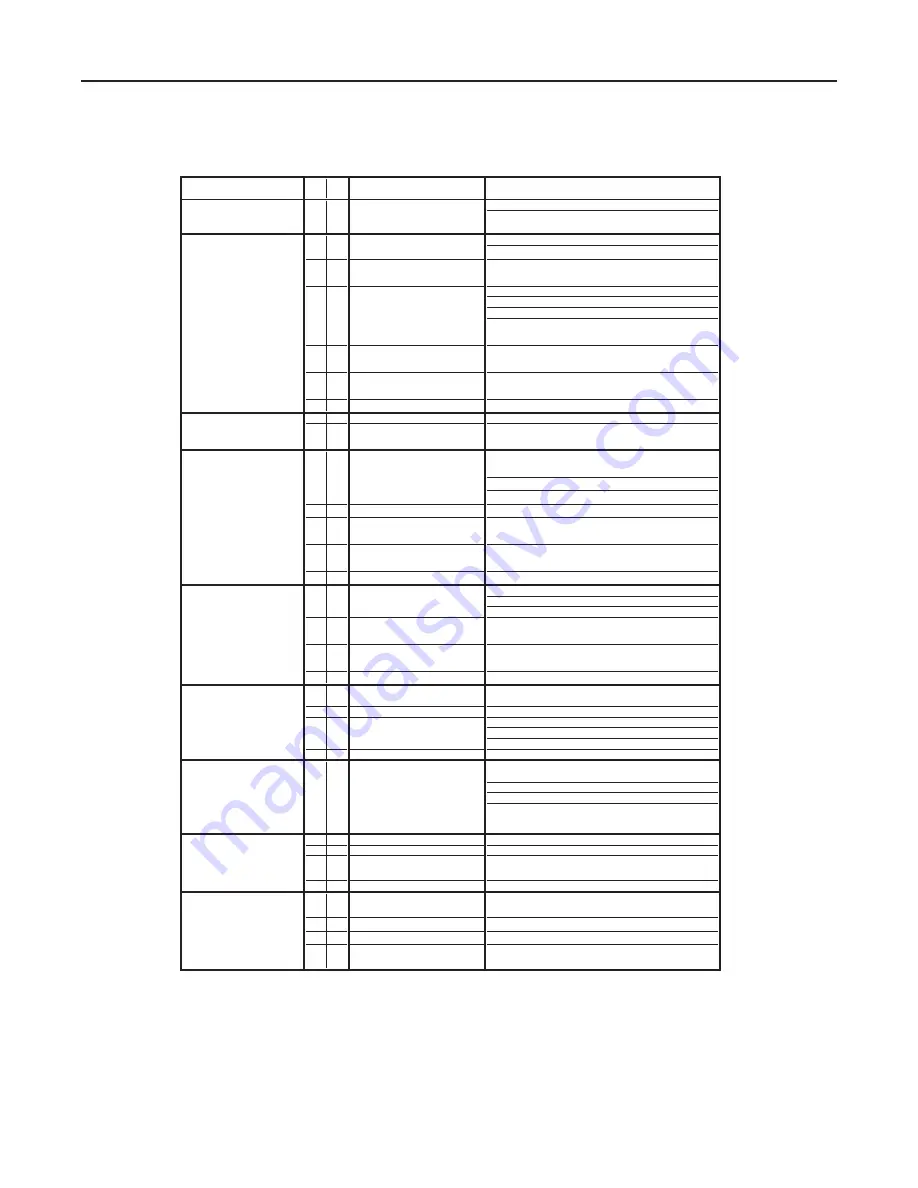
Functional Troubleshooting

Fault

Htg Clg Possible Cause

Solution

Main power Problems
Fault Code 27

X

X

Low or no line voltage

Check Line Voltage circuit breaker and disconnect
Check for line voltage between L1 and L2 on the control 
board

HP Fault-Code 29

X

Reduced or no water flow

Check pump operation or valve operation/setting

High pressure

in cooling

Check water flow adjust to proper flow rate

X

Water Temperature out of range in
cooling

Bring water temp within design parameters

X

Reduced or no Air flow

Check for dirty air filter and clean or replace

in heating

Check fan motor operation and airflow restrictions
Dirty Air Coil- construction dust etc.

Too high of external static.  Check static vs blower table

X

Air Temperature out of range in
heating

Bring return air temp within design parameters

X

X

Overcharged with refrigerant

Check superheat/subcooling vs typical operating condition
table

X

X

Bad HP Switch

Check switch continuity and operation. Replace

LP/LOC Fault-Code 21

X

X

Insufficient charge

Check for refrigerant leaks

Low Pressure/Loss of Charge

X

Compressor pump down at start-
up

Check charge and start-up water flow

FP1 Fault - Code 85

X

Reduced or no water flow

Check pump operation or water valve operation/setting

Water Coil low
temperature limit

in heating

Plugged strainer or filter.  Clean or replace.

Check water flow adjust to proper flow rate

X

Inadequate anti-freeze level

Check antifreeze density with hydrometer

X

Improper temperature limit setting
(30°F vs 10°F [-1°C vs -12°C])

Clip JW1 jumper for antifreeze (10°F [-12°C]) use

X

Water Temperature out of range

Bring water temp within design parameters

X

X

Bad thermistor

Check temp and impedance correlation per chart

FP2 fault - Code 86

X

Reduced or no Air flow

Check for dirty air filter and clean or replace

Air Coil low
temperature limit

in cooling

Check fan motor operation and airflow restrictions
Too high of external static.  Check static vs blower table

X

Air Temperature out of range

Too much cold vent air? Bring entering air temp within
design parameters

X

Improper temperature limit setting
(30°F vs 10°F [-1°C vs -12°C])

Normal airside applications will require 30°F [-1°C] only

X

X

Bad thermistor

Check temp and impedance correlation per chart

Condensate Fault-Code 25

X

X

Blocked Drain

Check for blockage and clean drain

X

X

Improper trap

Check trap dimensions and location ahead of vent

X

Poor Drainage

Check for piping slope away from unit
Check slope of unit toward outlet
Poor venting. Check vent location

X

Moisture on sensor

Check for moisture shorting to air coil

Under Voltage- Code 09

X

X

Under Voltage

Check power supply and 24VAC voltage before and during
operation.

(Auto resetting)

Check power supply wire size
Check compressor starting.  Need hard start kit?

Check 24VAC and unit transformer tap for correct power
supply voltage

Unit Short Cycles

X

X

Dirty Air Filter

Check and Clean air filter

X

X

Unit in "Test Mode"

Reset power or wait 20 minutes for auto exit.

X

X

Unit selection

Unit may be oversized for space.  Check sizing for actual
load of space.

X

X

Compressor Overload

Check and Replace if necessary

Only Fan Runs

X

X

Thermostat position

Insure thermostat set for heating or cooling operation

X

X

Unit locked out

Check for lockout codes.  Reset power.

X

X

Compressor Overload

Check compressor overload. Replace if necessary.

X

X

Thermostat wiring

Check thermostat wiring at heat pump.  Jumper Y and R
for compressor operation in test mode.

Содержание RPVE Series

Страница 1: ...er Quality Standards 14 Refrigeration Installation 15 22 Lineset Information 15 Hot Water Generator 23 25 HWG Module Refrigeration Installation For Outdoor Compressor Section Only 26 27 Electrical Lin...

Страница 2: ......

Страница 3: ...CKEL HEAT EXCHANGER EFFICIENCY REFERENCE 0 3 6 J C C N N 4 9 10 11 12 13 V 27 EER RETURN AIR FLOW CONFIGURATION VOLTAGE S SPLIT INDOOR CONFIGURATION HEAT EXCHANGER OPTIONS SUPPLY AIR FLOW MOTOR CONFIG...

Страница 4: ...nts If a compressor is removed from this unit refrigerant circuit oil will remain in the compressor To avoid leakage of compressor oil refrigerant lines of the compressor must be sealed after it is re...

Страница 5: ...autions must be taken to avoid physical damage to the units and contamination by foreign material Physical damage and contamination may prevent proper start up and may result in costly equipment clean...

Страница 6: ...ler Matches for ARI Ratings Compressor Section 025 036 048 062 Air Handler Model RHPL HM2421 RHPL HM3621 RHPL HM24 RHPL HM6024 Refrigerant HFC 10A Metering Device TXV Non Bleed required Air Coil Type...

Страница 7: ...er electrical and line set connections Any access panel screws that would be di cult to remove after the unit is installed should be removed prior to setting the unit Refer to Figure 1 for an illustra...

Страница 8: ...TEN or leaks may occur The female locking ring is threaded onto the pipe threads which holds the male pipe end against the rubber gasket and seals the joint HAND TIGHTEN ONLY DO NOT OVERTIGHTEN Intern...

Страница 9: ...30 Head ft GPM Speed 1 Speed 2 Speed 3 Figure 6 Pump Curves for RPVE internal pump s Double Pump 0 0 5 0 10 0 15 0 20 0 25 0 30 0 35 0 0 5 10 15 20 25 30 35 Head ft GPM Speed 1 Speed 2 Speed 3 CAUTION...

Страница 10: ...ic pressure will fluctuate with the seasons Pressures will be higher in the winter months than during the cooling season This fluctuation is normal and should be considered when charging the system in...

Страница 11: ...freeze 10 F 12 2 C set point and avoid nuisance faults see Low Water Temperature Cutout Selection in this manual NOTE Low water temperature operation requires extended range equipment Ground Loop Heat...

Страница 12: ...xpansion tank should be sized to provide at least one minute continuous run time of the pump using its drawdown capacity rating to prevent pump short cycling Discharge water from the unit is not conta...

Страница 13: ...ating valves should never be used with this equipment CAUTION Figure 6 Water Well Connections CAUTION Many units are installed with a field supplied manual or electric shut o valve DAMAGE WILL OCCUR i...

Страница 14: ...304 SS 400 ppm 250 ppm 150 ppm 316 SS 1000 ppm 550 ppm 375 ppm Titanium 1000 ppm 550 ppm 375 ppm Erosion and Clogging Particulate Size and Erosion All 10 ppm of particles and a maximum velocity of 1 8...

Страница 15: ...Installing the Line set at the Compressor Section Braze the line set to the service valve stubs as shown in Figure 7 Remove the schraeder cores and heat trap the valves to avoid overheating and damag...

Страница 16: ...ING WARNING If at all possible it is recommended that a new line set be used when replacing an existing R 22 system with an HFC 410A system In rare instances where replacing the line set is not possib...

Страница 17: ...tdoor unit If the unit is operational follow steps F L F First start the existing R 22 system in the cooling mode and close the liquid line valve G Completely pump all existing R 22 refrigerant into t...

Страница 18: ...d valve on the cylinder in this case keeping the cylinder upright 14 Once the liquid refrigerant has been completely recovered switch the recovery machine to vapor recovery so that the R 22 vapor can...

Страница 19: ...calculated for the unit and line set is now in the system Open the service valve fully counter clockwise so that the stem will backseat and prevent leakage through the schrader port while it is not in...

Страница 20: ...ng 1 Measure the temperature of the liquid line on the smaller refrigerant line liquid line just outside of the cabinet This location will be adequate for measurement in both modes unless a significan...

Страница 21: ...ressor Section Insulated Linesets Low Voltage Air pad or Extruded polystryene PVC Condensate with vented trap Power Disconnects Compressor Section TXV IN toward Compressor Section PVC Condensate with...

Страница 22: ...eady for charging If the system meets the requirements in Figure 10 it is ready for charging Figure 10 Evacuation Graph Charging The System There are two methods of charging a refrigerant system One m...

Страница 23: ...For example consider the amount of heat that can be generated by the HWG when using the 125 F set point versus the amount of heat that can be generated by the HWG when using the 150 F set point In a t...

Страница 24: ...SETPOINT MUST ONLY BE USED ON SYSTEMS THAT EMPLOY AN APPROVED ANTI SCALD VALVE PART NUMBER AVAS4 AT THE HOT WATER STORAGE TANK WITH SUCH VALVE PROPERLY SET TO CONTROL WATER TEMPERATURES DISTRIBUTED T...

Страница 25: ...water piping with no less than 3 8 10mm wall closed cell insulation 3 Open both shut o valves and make sure the tank drain valve is closed Water Tank Refill 1 Close valve 4 Ensure that the HWG valves...

Страница 26: ...ection and the refrigerant line connections on the HWG Maximum length should be 30 feet one way Evacuate the lineset to 500 microns through the hot gas valves in the outdoor unit Open the HWG valves i...

Страница 27: ...igure 13d HWG Bypass Valve Figure 15 HWG Wiring Valve Open HWG Bypassed Valve Closed HWG Activated Control Board Circulator HWG Water Out HWG Refr Out HWG Refr In High Voltage HWG Water In TO RELAY R1...

Страница 28: ...rify transformer tap with air handler wiring diagram to insure that the transformer tap is set to the correct voltage 208V or 230V CAUTION Use only copper conductors for field installed electrical wir...

Страница 29: ...Voltage Field Wiring ELECTRICAL HWG WIRING Figure 18 HWG Module Wiring For Use with Outdoor Compressor Section TO RELAY R1 IN COMPRESSOR SECTION CONDENSER CONDENSER HWG Module Electrical Line Voltage...

Страница 30: ...rature associated with thermistor FP1 Note that the FP1 thermistor is located on the refrigerant line between the coaxial heat exchanger and expansion device TXV Therefore FP1 is sensing refrigerant t...

Страница 31: ...tion Since the unit will operate on first stage 80 90 of the time significant water savings can be realized by using two parallel solenoid valves with two flow regulators In the example above stage on...

Страница 32: ...plate to the wall Thermostat wire must be 18 AWG wire Wire the appropriate thermostat as shown in Figures 26 through 30 to the low voltage terminal strip on the CXM control board Practically any heat...

Страница 33: ...gure 28 Typical Two Stage Thermostat Heat Pump with Electric Heat Using A Humidistat for Dehumidification Figure 29 Typical Two Stage Thermostat Heat Pump with Electric Heat Using A Two Stage Thermost...

Страница 34: ...o the following 1 A steady t appears on the ICC diagnostic display 2 The compressor and low speed pump outputs will be activated 3 The compressor and pump outputs will turn o after 5 seconds Note If a...

Страница 35: ...ay of one 1 second for each stage of heating or cooling The Blower control has an on o indoor blower delay for heating and cooling The ICC ignores the low pressure control for the first 120 seconds of...

Страница 36: ...0 continuous seconds three 3 times during the same command for compressor operation the ICC will lockout the compressor to keep it from continuing to operate and flash a L on the dual 7 segment LEDs f...

Страница 37: ...n occurs Active Protection Code L7 Compressor Open Run Circuit If the ICC detects current in the start circuit without current present in the run circuit the ICC will lockout the compressor to keep it...

Страница 38: ...more than 18 hours Low refrigerant charge Air ducts have substan tial leakage Dirty air filter or air coil 02 High Side Fault Compressor limit has opened four 4 times within a call for operation Dirty...

Страница 39: ...30 Fuse Open The ICC detects the on board fuse is open The 3 amp fuse on the ICC is open Low voltage wiring at R and C is damaged or miswired 80 Low Air Flow The ICC detects that the blower is not pr...

Страница 40: ...Stage Compressor Fan 1st Stage Pump Stage 2 Heating Y1 Y2 G 2nd Stage Compressor Fan 1st 2nd Stage Pumps Stage 3 Heating Y1 Y2 W1 W2 G 2nd Stage Compressor Fan 1st 2nd Stage Pumps Auxiliary Heat Emer...

Страница 41: ...41 Residential Spl i t Rev 13 M arch 2015 ICC Controls Table 9 Nominal resistance at various temperatures Temp C Temp F Temp C Temp F Resistance kOhm Resistance kOhm...

Страница 42: ...1 5 to 3 0 gpm ton 1 6 to 3 2 l m per kW Cooling Heating Air Limits Min ambient air DB 10 F 23 C 10 F 23 C Rated ambient air DB 80 6 F 27 C 68 F 20 C Max ambient air DB 110 F 43 C 85 F 29 C Min enter...

Страница 43: ...slag and strong chemical cleaning agents Some antifreeze solutions may require distilled water Flow Controller pump s Verify that the pump s is wired purged of air and in operating condition System c...

Страница 44: ...compare to Tables 13a through 13d Verify correct water flow by comparing unit pressure drop across the heat exchanger versus the data in Table 11 Heat of extraction HE can be calculated and compared...

Страница 45: ...of Rejection Heat of Extraction 30 F 50 F 70 F 90 F 100 F 30 F 50 F 70 F 90 F 025 1 3 5 5 8 7 0 600 24 4 24 6 24 7 24 1 24 4 24 5 23 1 23 3 23 4 22 0 22 3 22 4 21 5 21 7 21 8 9 5 10 0 10 2 13 5 14 2 1...

Страница 46: ...135 123 133 122 132 245 265 227 247 208 228 13 18 13 18 14 19 19 24 18 23 16 21 20 9 22 9 15 6 17 6 10 2 12 2 20 26 20 26 20 26 93 103 98 108 103 113 289 309 295 315 301 321 7 12 7 12 7 12 5 10 5 10 5...

Страница 47: ...he water coil and may need more frequent inspections In areas with extremely hard water a HWG is not recommended Filters Filters must be clean to obtain maximum performance Filters should be inspected...

Страница 48: ...at also has a wide range of fault and history information Sensor Inputs All sensor inputs are paired wires connecting each component to the board Therefore continuity on pressure switches for example...

Страница 49: ...history Refer to mechanical troubleshooting No No No Yes Yes Yes No No No Yes Yes Yes Compressor control 7 segment lit Check control voltage to control Y1 LED lit Check thermostat wiring Flashing c o...

Страница 50: ...water temp within design parameters X X Bad thermistor Check temp and impedance correlation per chart FP2 fault Code 86 X Reduced or no Air flow Check for dirty air filter and clean or replace Air Coi...

Страница 51: ...eplace in heating Check fan motor operation and airflow restrictions Too high of external static Check static vs blower table X Reduced or no water flow Check pump operation or valve operation setting...

Страница 52: ...035 6625 6 7 21 5 1 5 6 7 21 2035 6625 6 7 21 RROLQJ H SDQVLRQ YDOYH PHWHUV LQ WKH FRROLQJ PRGH DQG E SDVVHV LQ WKH KHDWLQJ PRGH HDWLQJ H SDQVLRQ YDOYH PHWHUV LQ WKH KHDWLQJ PRGH DQG E SDVVHV LQ WKH F...

Страница 53: ...RI WKH IDLOXUH RI VXFK SRUWLRQ RU FRPSRQHQW 3URGXFWV RQ ZKLFK WKH XQLW LGHQWL FDWLRQ WDJV RU ODEHOV KDYH EHHQ UHPRYHG RU GHIDFHG 3URGXFWV RQ ZKLFK SD PHQW WR 0DQXIDFWXUHU RU WR WKH RZQHU V VHOOHU RU L...

Страница 54: ...HPRYHG RU GHIDFHG 3URGXFWV RQ ZKLFK SD PHQW WR 0DQXIDFWXUHU RU WR WKH RZQHU V VHOOHU RU LQVWDOOLQJ FRQWUDFWRU LV LQ GHIDXOW 3URGXFWV VXEMHFWHG WR LPSURSHU RU LQDGHTXDWH LQVWDOODWLRQ PDLQWHQDQFH UHSDLU...

Страница 55: ...55 Residential Spl i t Rev 13 M arch 2015 Notes...

Страница 56: ...ch product at the time for order may be changed without notice and may not be as described herein Please contact the Manufacturer s Customer Service Department at 1 405 357 0409 for specific informati...

Отзывы: