REXROTH FXDAS-1022 Скачать руководство пользователя страница 15


15


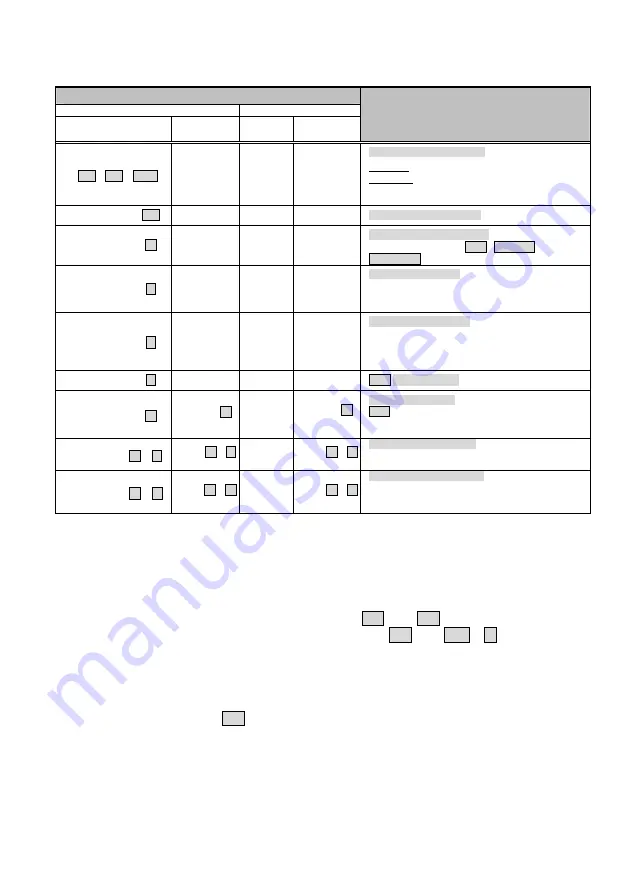
Computer Unit Hotkey Commands 

Mask Hotkey: OFF 

Mask Hotkey: ON 

Hotkey 

Alternative 

Hotkey  

Hotkey

Alternative 

Hotkey  

Function Description 

Ctrl + Ctrl + Alt+E  

N/A


N/A N/A


Cascading status selection 

One beep: enable 

Standard Mode


Two beeps: enable 

Compatibility Mode

, and


the users at 

Computer Unit accessing to the


KVM switch


that connects to the 

Computer Unit

[Leading Code]+Esc 

N/A


N/A N/A


Escape from hotkey mode 

[Leading Code]+ T

i


N/A


N/A N/A


Mode selection in sequence 

Toggle switch to select  

Auto 

Local On

 , or  

Remote On

  mode. 

[Leading Code]+ 1 

N/A


N/A N/A


Local mode selection 

enable the user at 

Computer Unit

 exclusive accessing to 

the 

PC 

(KVM Switch) that connects to

 Computer Unit

Disables the 

Console Unit

 user accessing. 

[Leading Code]+ 2 

N/A


N/A


N/A


Remote mode selection 

enable the user at 

Console Unit

 exclusive accessing to 

the 

PC

 (KVM Switch) that connects to 

Computer Unit

Disables the user at the 

Computer Unit 

accessing to the 

connected 

PC

 (KVM Switch). 

[Leading Code]+ 3 

N/A


N/A N/A


Auto


mode selection


[Leading Code]+F3 

[BTN]+ F3

(2 Sec.)


N/A 

[BTN]+ F3 

(2 Sec.)


Latch time selection 

Auto

 mode latch time setting, the extender generates 1 

to 4 beeps to indicate the duration of latch time:

 5, 15, 30, 

60

 seconds respectively. 

[Leading Code] + V   +  D 

[BTN]+ V  +  D

(2 Sec.)


N/A 

[BTN]+ V  +  D 

(2 Sec.)


DVI display mode setting 

 (factory default setting)


Set the display on both 

Console 

and 

Computer Units

 to 

DVI mode that is incapable of carrying any audio signals.  

[Leading Code] + V   +  M  [BTN]+ V  +  M

(2 Sec.)


N/A 

[BTN]+ V  +  M 

(2 Sec.)


HDMI display mode setting   

Set the display on both 

Console 

and 

Computer Units

 to 

HDMI mode that is capable of carrying high-definition 
digital audio and video signals.  

 
NOTE: Standard 

Mode

 denotes the state of the 

KVM Extender

 without additional 

connection to any

 KVM switch(es)

Compatibility Mode

 denotes the state of the 

KVM Extender

 with connection to 

KVM Switch(es)

.


NOTE:   [Leading Code] 

denotes  


in Standard Mode

, the hotkey sequence [

left


Ctrl + 

left

 Ctrl 


in Compatibility Mode

, the hotkey sequence  [

left


Ctrl + 

left

 Ctrl  + E 

 ]


NOTE:


[BTN]

 denotes Press and Hold the 

Push Button

 in the front panel for two seconds 


NOTE :

    After

 Press and Hold

 the Push-Button two seconds, the hotkey state will be 

automatically time-out,

 if 

1. There is no activity detected by the keyboard 

within 6 seconds

2. Press the button 

Esc

 once to escape from the hotkey state.  

3. Press the Push-Button once to escape from the hotkey state.  


Содержание FXDAS-1022

Страница 1: ...allation Considerations 25 Specifications 27 Please read this manual thoroughly and follow the Installation procedures to prevent any damage to the KVM switch or any connecting device The final specif...

Страница 2: ...Switch es easy computer access through push button hotkeys and mask hotkeys LED indicators for real time status monitoring serial interface for serial equipments and data communications HDCP complian...

Страница 3: ...iple computers High speed and long distance transmission by optical system Support serial interface for instant data transfer Fully compatible with DVI and or HDMI standard by DDWG HDCP compliant and...

Страница 4: ...e FXMAS 2022C FXMAS 012SC FXMAS 021PC SC SC duplex Fiber Optics Cable x 1 Hardware Requirements 1 Computer s with USB port s and DVI HDMI Video output port 2 USB Keyboard Mouse for console controlling...

Страница 5: ...owing figures show typical applications of KVM Extender series The model you have purchased may be slightly different from those described in the illustrations Console Unit FXDAS 012S FXMAS 012S Compu...

Страница 6: ...d mouse combo C4 Audio Jack Connect to Speakers and MIC C5 Mask Hotkey Switch see figure below OFF Standard mode see Hotkey Control chapter ON Disable the KVM Extender hotkey function P1 DCE Interface...

Страница 7: ...e personal injury and or property damage Connection Patterns The KVM Extender capability can be dynamically enhanced by using the KVM Switch es to expend the number of control on computers servers in...

Страница 8: ...to the DTE connector on the Console Unit Use a SC to SC duplex multi mode fiber optics cable for the SC SC fiber port connection between the Console and Computer Unit After all device connections are...

Страница 9: ...9 FXDAS 012S FXDAS 021P 2 Consoles 2 Computers FXMAS 012S FXMAS 021P 2 Consoles 2 Computers FXDAS 012S FXDAS 021P FXMAS 012S FXMAS 021P...

Страница 10: ...the following two statuses can be observed z 3 LEDs Num Caps and Scroll Lock on the keyboard are flashing The Computer Unit is now taking control of the system z 3 LEDs Num Caps and Scroll Lock on th...

Страница 11: ...e first served basis For example once the keyboard or mouse attached to Computer Unit is active the Local LED will light up and the Remote LED will light off This status indicates that the Computer Un...

Страница 12: ...12 The following figure indicates the order in which the switch control through Push Button on the top panel...

Страница 13: ...e keystrokes The built in buzzer generates a high pitched beep for correct hotkey command otherwise one short and one long beep are generated for a bad command in which the bad key command won t be se...

Страница 14: ...Cascading status selection One beep enable Standard Mode Two beeps enable Compatibility Mode and the user at Console Unit accessing to the KVM switch that is connecting to Computer Unit Leading Code...

Страница 15: ...atch time setting the extender generates 1 to 4 beeps to indicate the duration of latch time 5 15 30 60 seconds respectively Leading Code V D BTN V D 2 Sec N A BTN V D 2 Sec DVI display mode setting f...

Страница 16: ...et the display s of both Console and Computer Units to DVI mode that is incapable of carrying any audio signals Perform this setting before creating the connection between the Extender Units and or th...

Страница 17: ...the hotkey commands prefixed with Compatibility mode leading code left Ctrl left Ctrl E can be applied for directly accessing to the KVM Extender Even better than that instead of adding an E key for...

Страница 18: ...monitor attached to the Console Unit It is not necessary to make this setting on the Console Unit 2 Enable Compatibility Mode by inputting the hotkey command left Ctrl left Ctrl Alt E and then two be...

Страница 19: ...ched to the KVM Switch by applying the KVM Extender built in hotkey command prefixed with the cascade leading code left Ctrl left Ctrl E Users can configure the computer attached to the Extender Unit...

Страница 20: ...t of the Console Unit will be made available to the device attached to its serial port that can be remotely accessed from the connected Computer Unit Serial data is passed in real time and is not buff...

Страница 21: ...es in Standard Mode left Ctrl left Ctrl V D in Compatibility Mode left Ctrl left Ctrl E V D OR Press Hold Push Button 2 Sec V D z HDMI Mode for Monitor Display Set the display s on both Console and C...

Страница 22: ...tory Default in Standard Mode left Ctrl left Ctrl Q A in Compatibility Mode left Ctrl left Ctrl E Q A OR Set the video equalization to High in Standard Mode left Ctrl left Ctrl Q H in Compatibility Mo...

Страница 23: ...same size as a CD DVD HDCP Compatibility for FXDAS 2022 and FXMAS 2022 High Bandwidth Digital Content Protection HDCP protects video content as it is transmitted across DVI D or HDMI connections HDCP...

Страница 24: ...l fiber optics cables conforming to the application environment The maximum cable length should not exceed 2 000 meters otherwise the signal degradation may occur especially for video resolution For a...

Страница 25: ...Try to complete the installation in one pull Prior to any installation assess the route carefully to determine the methods of installation and obstacles likely to be encountered 4 Do not exceed the ca...

Страница 26: ...r continuity or loss if damage is suspected 11 Move small lightweight spools of fiber optic cable by hand Move larger reels with appropriate lifting equipment or using two or more installers skilled i...

Страница 27: ...MIC 1 Set FXDAS 021P Computer Unit Console Interface Serial DTE Status Local Remote Serial Front Panel LEDs Dual Color x 1 x 1 x 1 Rx x 1 Tx x 1 HDCP Support FXDAS 2022 only Push Button Control Status...

Страница 28: ...Set FXMAS 021P Computer Unit Console Interface Serial DTE Status Local Remote Serial Front Panel LEDs Dual Color x 1 x 1 x 1 Rx x 1 Tx x 1 HDCP Support Yes Push Button Control Status Switch Hotkey Ye...

Страница 29: ...expressed or implied with respect to the contents or use of this documentation and especially disclaims its quality performance merchantability or fitness for any particular purpose The direct vendor...

Отзывы: