background image

Installation  Guide 

Page 4 

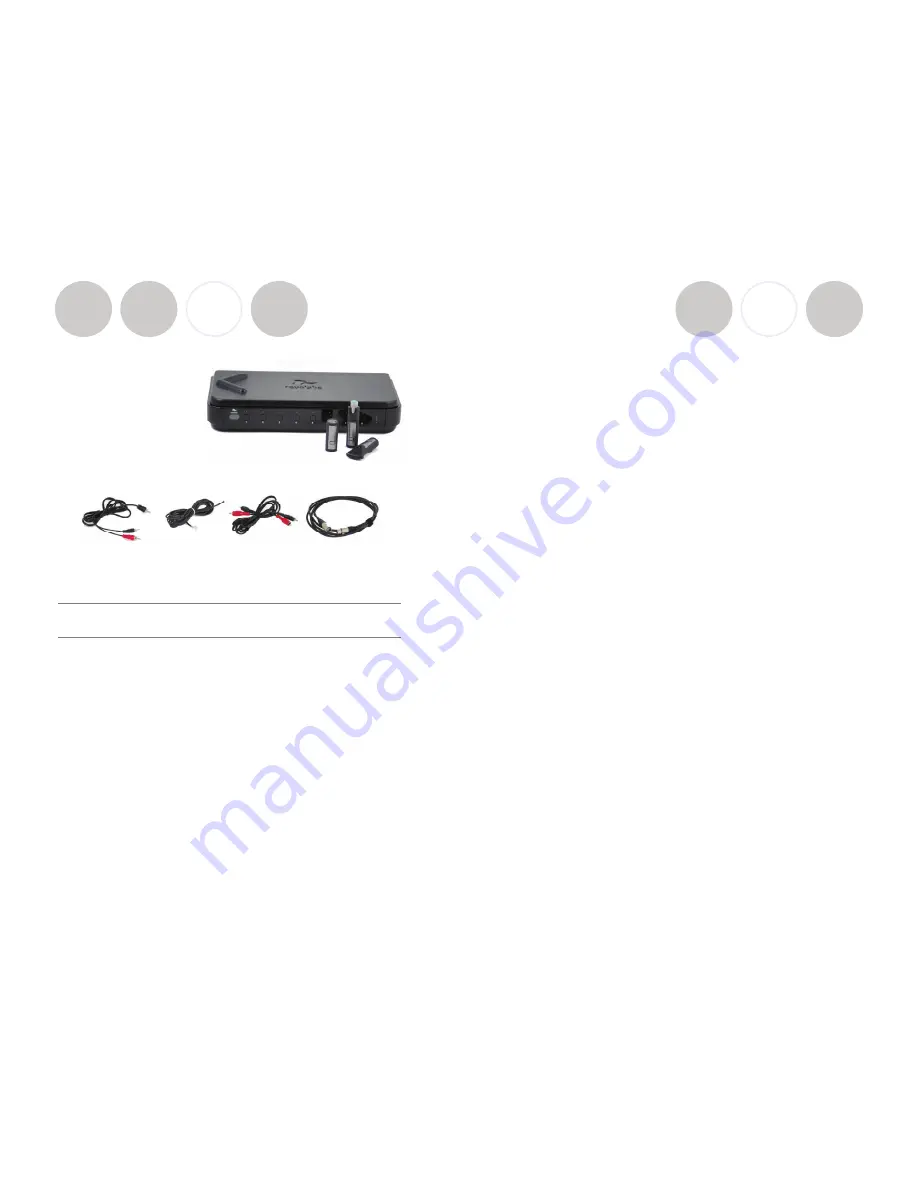
Contents of box:   

Fusion Base Station, Fusion Base 
Station vertical stand, AC power 
adapter for Base Station, four 
cables shown below, remote 
control, Charger Base, AC wall 
adapter for Charger Base, four 
or eight wireless microphones 
(optional).  Optional boxes:  
Four or eight wireless microphones, Remote IR Sensor, speakers. 


Fusion Set-up 

Decide if want to place Fusion Base Station horizontally or vertically on a flat 
surface.  To set-up vertically, place the Fusion Base Station vertical stand on the 
bottom of the Fusion unit.  Tighten bolt into Fusion Base Station. 

 
Fusion Base Station Placement 

WARNING:  Do not put Fusion Base Station behind metal doors.    

If you are putting Fusion into a cabinet with non-metal doors, you need to use 
the Remote IR Sensor (part number 07-IRREMO-01) for remote to work.  Plug 
the serial port end into the IR Remote port on the back Fusion panel, bring IR 
Sensor out of cabinet, and secure with Velcro.   

Power 

Plug power cord into the back of the Fusion Base Station and into wall outlet. 
Plug AC Adapter into the power outlet and the other end into the microphone 
Charger Base. 
Place wireless microphones in the Charger Base, let charge overnight or at least 
eight hours. 

CABLE A 

Speakers 

CABLE B 

Phone Cable 

CABLE C 

RCA 

CABLE D 

XLR 

Page 35 

NOTE:  

This equipment has been tested and found to comply with the limits 

for a Class B digital device, pursuant to part 15 of the FCC Rules.  These limits 
are designed to provide reasonable protection against harmful interference in a 
residential installation.  This equipment generates, uses, and can radiate radio 
frequency energy and, it not installed and used in accordance with the instruc-
tions, may cause harmful interference to radio communications. However, there 
is no guarantee that interference will not occur in a particular installation.  If this 
equipment does cause harmful interference to radio or television reception, 
which can be determined by turning the equipment off and on, the user is en-
couraged to try to correct the interference by one or more of the following 

measures: 

• 

Reorient or relocate the receiving antenna. 

• 

Increase the separation between the equipment and receiver. 

• 

Connect the equipment into an outlet on a circuit different from that to 
which the receiver is connected. 

• 

Consult the dealer or an experienced radio/TV technician for help. 

Revolabs Fusion™  

Содержание 01-4FUSIONEU-31

Страница 1: ...Microphones must be fully charged and paired to the Charger Base prior to first use Rev 1 1 Revolabs Fusion Wireless Microphone System Installation and User s Guide...

Страница 2: ...arable mics European 01 4FUSIONEU 31 Revolabs Fusion Base System with 3 tabletop omni s 1 wearable mics European 03 EXEMICEU BLK 11 Revolabs Solo Executive Microphone 03 EXECHGEU STD 11 Revolabs Solo...

Страница 3: ...ION 8CH EU 01 FUSION 4CH EU European Union Usage Restriction Due to the DECT frequencies used this product is licensed for operation only in the European Union countries Page 36 Installation Guide Rev...

Страница 4: ...end into the microphone Charger Base Place wireless microphones in the Charger Base let charge overnight or at least eight hours CABLE A Speakers CABLE B Phone Cable CABLE C RCA CABLE D XLR Page 35 N...

Страница 5: ...tion Guide Revolabs Fusion Audio Conferencing Plug Cable A single RCA to double RCA single RCA connector into Fusion Base Station Room Out RCA port and then plug the double RCA connectors into the spe...

Страница 6: ...1 88 to 1 90 GHz DECT EU 01 4FUSIONEU XX 1 88 to 1 90 GHz DECT EU Connectors Fusion Base Station IR Remote Serial DB9 CD Programming Serial DB9 for Revolabs use only Audio Control RJ45 for Revolabs u...

Страница 7: ...accident or Acts of God voids this warranty The Seller shall not be liable for any consequential damage resulting from the malfunction of this product Should the user experience unsatisfactory perform...

Страница 8: ...ed and muted N Flashing Microphone paired and live RED Pairing mode or confirmation of powering down ernating slow N and RED Microphone or channel not paired N Flashing Microphone low battery mic live...

Страница 9: ...nds RED F GREEN flash every 1 5 seconds GREE Solid RED Solid R Alternating slow GREEN and RED OFF or Alte GREE YELLOW flash alternat ing with GREEN GREE YELLOW flash alternat ing with two RED flashes...

Страница 10: ...0 seconds until the LED turns solid RED and release button Important Always remove the microphone from the Adapter by pressing the latch switch and separating the parts before returning the Adapter to...

Страница 11: ...onnector balanced audio for dynamic microphones 4 LED display visual status for mute un mute and pairing 5 Audio Out port accepts the 2 5mm plug for the earpiece 6 Power Charging Port docks to Charger...

Страница 12: ...y equipment or meeting paperwork Also do not place microphones too close to an audio or video conference speaker to avoid echoes With the microphone in position un mute the microphone by pressing and...

Страница 13: ...ts a 2 5mm plug 5 Charging port docks to all Solo Charger Base 6 Rubber feet non slip vibration absorbing pads To use the Revolabs Solo TableTop Microphone Remove the microphone from the Charger Base...

Страница 14: ...s ON press and hold the Mute button for 10 seconds until the LED turns solid RED do not release when you hear two beeps Release the button to turn the unit off Page 14 Installation Guide Page 25 Revol...

Страница 15: ...for the earpiece 7 Charging port charges in Charger Base Page 24 Installation Guide Page 15 Place the microphone unit into pairing mode by holding the Mute button down for seven seconds The LED will t...

Страница 16: ...use they should be properly inserted into the Charger Base It is important to ensure that the system microphones are inserted fully in the base so that charging will occur Features of the base are sh...

Страница 17: ...volume Phone Dial Pad Installation Guide Page 17 Fusion Back Panel 1 Power 2 6 RCA Plugs AUX IN AUX OUT RECORD OUT ROOM OUT CONFERENCE IN CONFERENCE OUT 3 XLR 4 Network RJ 45 Revolabs use only 5 Telep...

Страница 18: ...t off Programming Port 9 page 17 on the right is reserved for Revolabs Use Only OFF ON Transmit Power Medium Frequency A Mode Tabletop Master Mute Frequency B Mode Auto Answer Transmit Power Low 1 2 3...

Страница 19: ...s There are two settings that must be adjusted when more than one Fusion system is used within a 100 30 5 m foot range frequency and transmit power level These settings will enable several Fusion syst...

Отзывы: