Revo REHB0309-1 Скачать руководство пользователя страница 6


REHB0309-1, Quick Installation Guide 

2.2 Network Connection and IP assignment 

 
The Network Camera supports the operation through the network. When a camera is first connected 
to the network it has no IP address. So, it is necessary to allocate an IP address to the device with the 
“Smart Manager” utility on the CD.


1.  Connect the Network Camera / device to the network and power it up. 
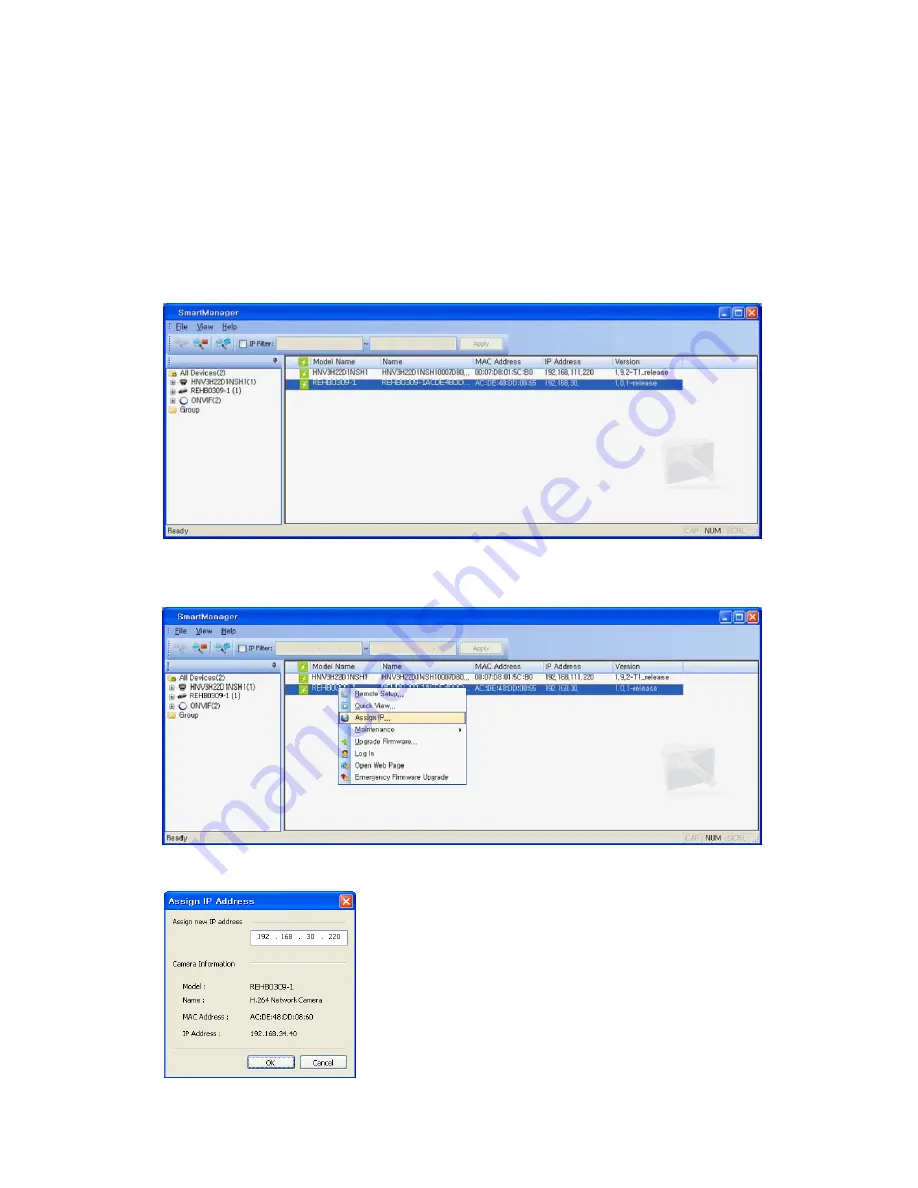
2.  Start SmartManager utility (Start>All programs>SmartManager>SmartManager), the main 

window will be displayed, after a short while any network devices connected to the network will 
be displayed in the list. 


3.  Select the camera on the list and click right button of the mouse. You can see the pop-up menu 

below. 


4.  Select Assign IP. You will see an Assign IP window. Enter the required IP address. 


Note:

 For more information, refer to the Smart Manager User’s 

Manual. 


6

Содержание REHB0309-1

Страница 1: ...ble on the network as real time full frame rate Motion JPEG and H 264 or MPEG 4 video streams The alarm input and alarm output can be used to connect various third party devices such as door sensors a...

Страница 2: ...n 1 Red DC12V White GND Main Power 2pin terminal DC12V 700mA 8 4W 2 Black Ethernet RJ 45 port compatible with 10 100Mbps having PoE functionality Modular Jack Parts and Description Carefully remove th...

Страница 3: ...Camera Dimension See the diagrams below for the exact dimension of the REHB0309 1 IR Bullet network cameras Dimensions Unit mm Base Installation Cable through the wall with the mount base There are t...

Страница 4: ...C Connect connection cable and network lines D Fit the screw holes of the mount base into the plastic anchors E Screw up the mount screws M5x20 F Adjust the camera suitably and fasten the mount screws...

Страница 5: ...the camera 2 Installation 2 1 Connection Connecting to the RJ 45 Connect a standard RJ 45 cable to the network port of the network camera Generally a cross over cable is used to connect directly to a...

Страница 6: ...ct the Network Camera device to the network and power it up 2 Start SmartManager utility Start All programs SmartManager SmartManager the main window will be displayed after a short while any network...

Страница 7: ...Live View or Setup to enter web page 4 The network camera s Live View page appears in your browser 3 2 Access from the internet Once connected the Network Camera on your local network LAN will be acc...

Страница 8: ...t suitable one out of those modes Please adjust the mode in accordance with your PC specifications and monitoring purposes 1 General controls Live View Page Search Playback Page Setup Page Help Page T...

Страница 9: ...images and video stream formats Your requirements and the properties of your network will determine the type you use The Live View page in the network camera provides access to H 264 MPEG 4 and Motio...

Страница 10: ...reen to activate the Zoom Focus control panel Adjusting Zoom Click button to zoom out and click button to zoom in The focus is moved slightly after adjusting zoom adjust the focus again as necessary A...

Страница 11: ...Switch off the Network Camera by disconnecting the power adapter 2 Remove the rear cap of the camera 3 Press and hold the Reset button with a straightened paperclip while reconnecting the power 3 Keep...

Отзывы: