background image

4 Channel Digital Video Recorder 


27 


PLAYING RECORDED VIDEO 

 
If a user who has 

Search 

authority logs into the system, the user can view the recorded images.  Once video has been 

recorded, you can view it by pressing the 

Playback Mode

 button on the remote control.  When playing video for the 

first time, the DVR will display the most recent image.  When playing video subsequent times, the DVR will start playing 
video from the last recalled image. 
 

Camera Buttons (1 to 4): 

 Pressing the individual camera buttons on the remote control will cause the selected camera 

to display full screen. 

 
Arrow Buttons:

  Pressing the   button on the remote control plays video backward at high speed.  Pressing the button 

again toggles the playback speed from 


and 

.  Pressing the   button plays video forward at high speed.  

Pressing the button again toggles the playback speed from  , 

 and 

.  When in the pause mode, pressing 

the 

 button moves to the next image and pressing the 

 button moves to the previous image. 

 
Pause Button:

  Pressing the 

 button on the remote control pauses playing video. 

 
Playback Mode Button:

  Pressing the 

Playback Mode

 button on the remote control enters the playback mode, and 

pressing the button again exits the playback mode.  When entering the playback mode, video is paused.  Pressing the 

 button plays back video at regular speed.  The screen displays   when the DVR is in the Pause mode and the screen 

displays   when the DVR is playing back video. 

 
Zoom Button:

  Pressing the 

Zoom

 button on the remote control zooms in the current image on the screen.  It is the 

same as selecting 

Zoom

 from the Camera Menu in the Search menu. 

 
You also can use the mouse for convenient playback control.  Position the mouse pointer on the playback screen, and 
the following Record Table Search screen (Compact View mode) will display.  Refer to the following 

Searching Video 

– Search 

section for information regarding the Record Table Search.  The individual controls on the toolbar perform 

the following functions: 


  Go to the previous image 

  Play/Pause


  Go to the next image 

  Fast backward play


  Fast forward play


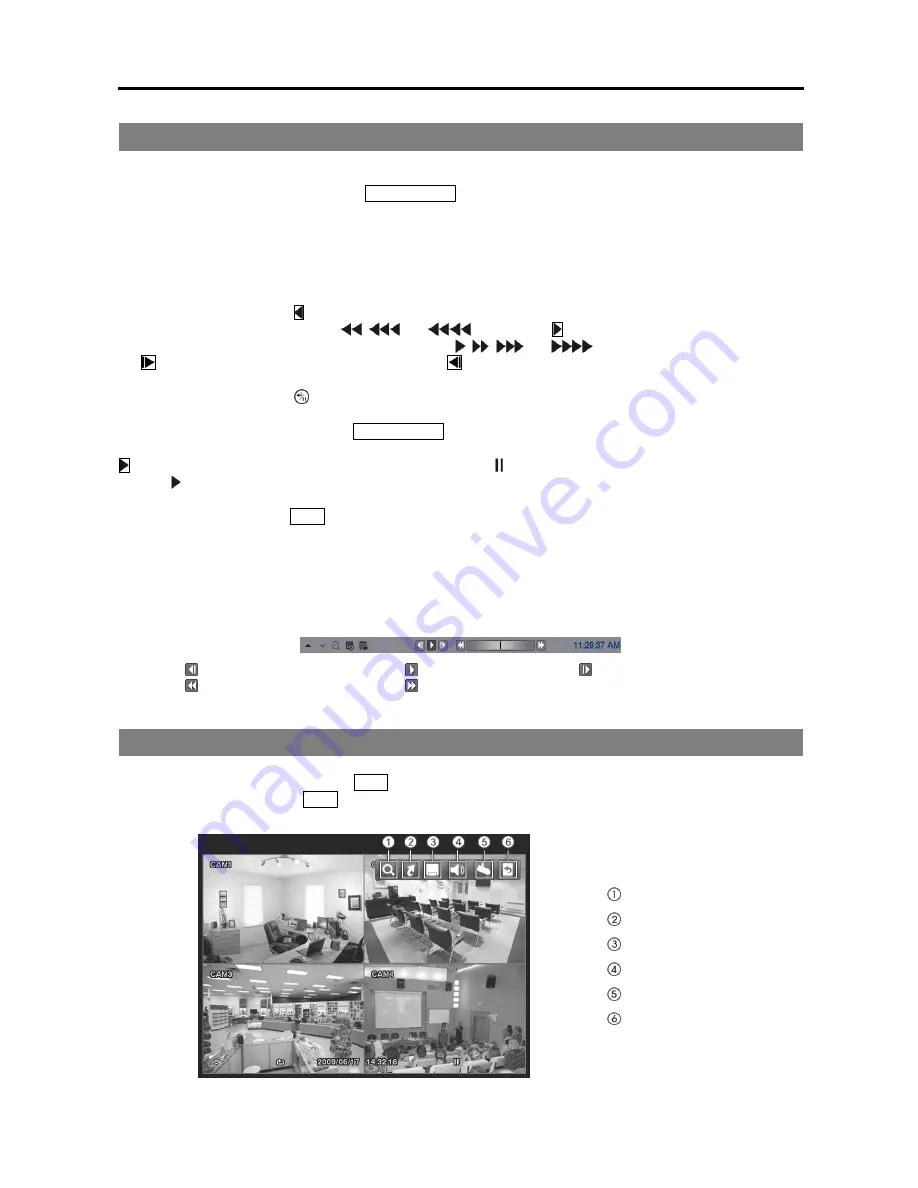
SEARCHING VIDEO 

 
While in the Search mode, pressing the 

Menu

 button on the remote control displays the following menu icons at the 

top of the screen.  Pressing the 

Menu

 button again hides the menu icons. 


  Search 


Go To 

  Export 


Speaker 

  Camera Menu 

  Exit 


Содержание 4 Channel Digital Video Recorder

Страница 1: ......

Страница 2: ......

Страница 3: ...T GENERATES USES AND CAN RADIATE RADIO FREQUENCY ENERGY AND IF NOT INSTALLED AND USED IN ACCORDANCE WITH THE INSTRUCTION MANUAL MAY CAUSE HARMFUL INTERFERENCE TO RADIO COMMUNICATIONS OPERATION OF THIS...

Страница 4: ...ified service personnel under the following conditions A When the power supply cord or the plug has been damaged B If liquid is spilled or objects have fallen into the equipment C If the equipment has...

Страница 5: ...11 Network Setup 13 Camera Setup 18 Record Setup 18 Event Setup 21 Display Setup 22 Chapter 3 Operation 24 Live Monitoring 24 Live Monitoring Menu 24 Mouse Display Menu 25 Recording Video 26 Playing R...

Страница 6: ...User s Manual iv...

Страница 7: ...rds while Playing Back and Transmitting to Remote Site User friendly Graphical User Interface GUI Menu System Multiple Recording Modes Time lapse Pre event Event Multiple Search Engines Date Time Even...

Страница 8: ...User s Manual 2...

Страница 9: ...Video Audio In Network Port Built In Speaker The built in speaker sounds the DVR s audio outputs Stand Handle The stand handle will be used to adjust the angle of the stand Loosen the handle first an...

Страница 10: ...HAS A GROUNDING PIN IF YOUR POWER OUTLET DOES NOT HAVE A GROUNDING PIN RECEPTACLE DO NOT MODIFY THE PLUG DO NOT OVERLOAD THE CIRCUIT BY PLUGGING TOO MANY DEVICES IN TO ONE CIRCUIT CAUTION Ensure the...

Страница 11: ...ill not function properly NOTE When you use wireless communication devices such as Wi Fi or Bluetooth near the DVR the remote control might not function properly TURNING ON THE POWER Connecting the po...

Страница 12: ...haracter with the left button Select the desired item and press the button to displays a virtual keyboard Move to the desired character by pressing the arrow buttons and press the button NOTE For simp...

Страница 13: ...cording Time Priority Profile NOTE The higher quality setting requires more storage space NOTE The recording resolution will be set to Very High when selecting High Video Quality Priority Profile High...

Страница 14: ...l Configuration for network configuration and then select the Test button to test the network configuration you selected NOTE Selecting Auto Configuration allows the DVR to automatically obtain LAN pa...

Страница 15: ...vice changes will not be saved NOTE When entering no name or a name already registered on the DVRNS server an error message displays REVO Dashboard Setup I Select the Next button to start the Dashboar...

Страница 16: ...ged on as the User live monitoring searching video and exporting recorded data clip copy can only be allowed NOTE Setting up a password is strongly recommended to ensure secure management of the syste...

Страница 17: ...r NOTE It is possible to have multiple DVRs with the same System ID in the same area In this case all DVRs with the same System ID will be controlled at the same time when using the infrared remote co...

Страница 18: ...Message Boot Up Setup Export Cancel Backup Cancel Local Remote Upgrade Local Schedule On Backup Failure Local Remote Upgrade Failure Local Schedule Off Time Change Local Setup Begin Clear All Data Loc...

Страница 19: ...been formatted the Clear All Data button changes to the Format button which is used to format the hard disk drive NETWORK SETUP General Settings NETWORK General Tab Transfer Speed Set the transfer sp...

Страница 20: ...ugh DHCP Dynamic Host Configuration Protocol The DVR reads the IP address from DHCP network when selecting the Save button ADSL You can select ADSL with PPPoE when the DVR is networked through ADSL En...

Страница 21: ...ng your Network changes by selecting the Save button Use DVR Name Service Checking the box when using the DVR Name Service function You will only be able to change the settings if Use DVR Name Service...

Страница 22: ...devices and enter http IP address REVO Remote port number NOTE Some media players might play video properly depending on network conditions NOTE RTSP service might not be supported depending on the ty...

Страница 23: ...vent is detected Schedule Settings NETWORK Schedule Tab Adds the notify schedule No Indicates a schedule number The higher the number the higher its priority i e The schedule No 20 has priority over a...

Страница 24: ...total ips of all camera channels See the table below No of cameras set to On and High resolution 0 1 2 3 4 30 ips 30 ips 20 ips 15 ips No of cameras set to On and Very High r solut n 0 1 2 3 4 30 ips...

Страница 25: ...lected camera channel Post Event Record Dwell Set the length of time you would like to record for the associated event Add Schedule Adds a schedule item Up to 20 schedules can be registered No Indicat...

Страница 26: ...User s Manual 20 the latest registered schedule item...

Страница 27: ...ive highlighted blocks or all inactive blocks and deactivates active highlighted blocks or all active blocks OK Accepts changes and closes Zone setup Cancel Exits Zone setup without saving changes NOT...

Страница 28: ...hreshold and C Celsius or F Fahrenheit If the temperature of hard disk drive exceeds the defined threshold the system triggers an alert Notify Set up the notify action the DVR will take whenever it de...

Страница 29: ...bar OSD Margin Set the Horizontal and Vertical margins so that text and icons will display within the edges of the monitor Main Monitor Settings DISPLAY Main Monitor Tab Sequence Interval Select the...

Страница 30: ...also can be displayed by moving the mouse pointer to the top of the screen LIVE MONITORING MENU Freeze Selecting Freeze in the Live Monitoring menu will freeze the current image on the screen It is t...

Страница 31: ...or to making any image adjustments using the DVR s controls NOTE Any image adjustments you make will be applied to both the live video on the monitors and the recorded video NOTE The Camera Menu also...

Страница 32: ...screen Recycle On or Recycle Off The factory default is Recycle On It does this by recording over the oldest video once the hard disk is full Setting the DVR to Recycle Off causes it to stop recording...

Страница 33: ...ayback Mode Button Pressing the Playback Mode button on the remote control enters the playback mode and pressing the button again exits the playback mode When entering the playback mode video is pause...

Страница 34: ...mage of the selected camera on the screen It is the same as pressing the Zoom button on the remote control Selecting Zoom again exits the Zoom mode Enable De Interlace Selecting Enable De Interlace wh...

Страница 35: ...and pressing the button toggles between On and Off You will be able to turn the Check Time Overlap on or off only if user defined date and time have been set in the From and To boxes If the DVR s date...

Страница 36: ...n more than one recording mode in the same time range the recording status bar displays recording information in the following priority order Pre Event Event Time The color of the bar indicates differ...

Страница 37: ...and hold the Backup button on the remote control for more than three seconds while in the Search mode or Live Monitoring mode and the Backup screen appears to allow backup setup From Pressing the but...

Страница 38: ...ents for using the REVO Remote program are Operating System Microsoft Windows XP x86 32 Bit Service Pack 3 Microsoft Windows Vista x86 32 Bit Service Pack 1 Microsoft Windows 7 x86 32 Bit CPU Intel Pe...

Страница 39: ...age transmission speed when using the Microsoft Windows Vista or higher operating system In this situation it is recommended that you disable the Auto Tuning capability of your computer Run the Comman...

Страница 40: ...way communication Clicking the button disables audio communication Aspect Ratio Changes the image aspect ratio Deinterlacing Using a deinterlace filter for interlaced video enhances image display qua...

Страница 41: ...the icon to enter the event search mode which allows you to search for event log entries using specific conditions and play back the images associated with those event entries Click the icon to save t...

Страница 42: ...sing the individual camera buttons will cause the selected camera to display full screen and pressing the button again changes the display format to the quad 2x2 mode Buttons 1 to 4 are also used to e...

Страница 43: ...from and and the screen displays and respectively While playing video pressing the button plays video forward at high speed Pressing the button again toggles the playback speed from and and the scree...

Страница 44: ...deo Check camera video cable and connections Check monitor video cable and connections Confirm that the camera has power Check camera lens settings DVR has stopped recording If hard disk drive is full...

Страница 45: ......

Страница 46: ...e any settings you have saved SPECIFICATIONS VIDEO Signal Format NTSC Video Input 4 RJ 12 inputs 1 Vp p auto terminating 75 Ohms Monitor Outputs Composite One RCA 1 Vp p 75 Ohms LCD 10 1 Playback Reco...

Отзывы: