background image

English

English

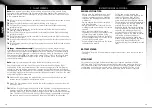
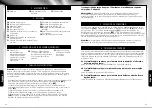
6   TrIM aDJUSTMeNT oF The CoNTrol

The correct trim is a basic requirement for fault-free flying behaviour of the multicopter. 

Its adjustment is simple, but it requires some patience and a feel for it. Please observe 

the following instructions precisely: Carefully move the thrust control up and raise the 

multicopter approximately 0.5 to 1 metre in altitude.

6A If the multicopter moves by itself slowly or quickly to the left or right …

press the trim adjustment for banking incrementally in the opposite direction. 

6B If the multicopter moves by itself slowly or quickly around its own axis …

press the trim adjustment for rotation incrementally in the opposite direction. 

6C If the multicopter moves by itself slowly or quickly forwards or backwards …

press the trim adjustment for forward and backwards flight incrementally in the 

opposite   direction.

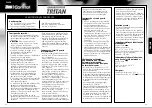
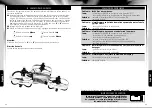
4   ChargINg The MUlTICopTer

Attention:

 The battery and motor must cool down for 10 to 15 minutes before 

charging and after every flight. Otherwise they can be damaged. The charging process 

must be constantly monitored. Always ensure that the charging process takes place on 

a fireproof surface in a fire-resistant environment.

• Unplug the multicopter from the battery, switch off the remote control and insert the 

USB charger in a USB hub or similar. The control LEDs on the charger are off 

(4A)

.

• Remove both batteries from the compartment (do not hold by the cable!) 

(4B)

.

• Now plug both batteries into the sides of the charger Pay attention to the polarity. 

Please do not use force. The LED on the charger will light up red when charging 

begins 

(4C)

.

• The charging process lasts approx. 150 minutes and must be continuously monitored. 

The red LED on the charger goes out as soon as the charging process is finished.

• Alternatively, the USB charger can also be plugged directly into the remote control 

(4D)

. For this purpose, switch on the remote control and move the left thrust 

controller briefly to full throttle and then back.
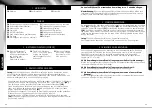
5   STarT preparaTIoN

The thrust controller (left controller on the remote control) must point down before 

switching on 

(5A)

. Then set the ON/OFF switch 

(5B)

 on the remote control to the „ON“ 

position and the Power LED begins to blink 

(5C)

.Connect the two battery cables with 

the connection cables 

(5D)

. Now the blue status LEDs on the rear of the multicopter 

blink. Once they are constantly illuminated blue, the model is ready. Place the 

multicopter on the ground so that the tail faces you and the two propellers arranged 

on top of one another face forward.

Attention!

 Make sure that you place your multicopter on a level surface – the control 

electronics align their neutral position to the ground!
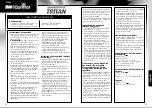
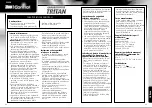
2   reMoTe CoNTrol

2A

 Controller for thrust and rotation

2B

 Control mode switch

2C

 Trim reset

2D

 Power LED

2E

 ON/OFF switch

2F

 Button for position sensor calibration

2G

 Flip button

2H

 Trim buttons for forwards and 

 backwards

2I

  Controller for forwards and backwards 

as well as sideways

2J

  Trim buttons for sideways flight

2K

 Trim buttons for rotation

2L

  Buttons for flip function

2M

 Battery compartment lock

2N

 Battery compartment securing screw

2O

 Battery compartment

After a charge time of approx. 150 minutes the multicopter can fly for  

approx. 5 minutes. 

Warning notice:

 The battery does not normally heat up while charging. If it should 

become warm or even hot and/or changes to the surface begin to appear, immediately 

discontinue the charging process!

3   INSerTINg BaTTerIeS (reMoTe CoNTrol)

3B


Insert 4 x 1.5 V AA batteries  

and pay attention to the 

polarity, as shown in the 

battery compartment.

3A


To open the battery 

 compartment,  unscrew 

the securing screw 

 anticlockwise then pull 

down the latch of the 

flap down.

3C


Replace the cover 

and screw in the 

securing screw 

clockwise.

1   MUlTICopTer

1A 

Motors 

1B 

Battery compartments 

1C 

Status LED

16

17

Содержание TRITAN

Страница 1: ...Conformity can be found at www revell control de Hiermit erklärt die Revell GmbH dass sich dieses Produkt in Übereinstimmung mit den grund legenden Anforderungen und den übrigen einschlägigen Bestim mungen der Richtlinie 1999 5 EC befindet Die Konformitätserklärung ist unter www revell control de zu finden Legge sui rifiuti elettronici Una volta concluso l utilizzo rimuovere le batterie e smaltire...

Страница 2: ...ement propeller Ersatz Propeller Ladegerät und Akku Radiocomando Emisora Zender Télécommande Remote control Fernsteuerung Istruzioni per l uso Manual de instrucciones Gebruiksaanwijzing Mode d emploi Operating manual Bedienungsanleitung Caricabatterie e batterie Chargeur et la batterie Charging unit and battery Lader en accu Cargador y la batería 2B 2D 2M 2N 2O 2E 2C 2A 2G 2H 2I 2J 2K 2F 2L 1 2 3 ...

Страница 3: ...5 5A 5B 5C 5D 8 8B 8A 8C 7I Looping 6 6C 6A 6B 7E 7F 7G 7H 7C 7D 7 7A 7B white rotor up white rotor red rotor front down red rotor back right 7J 4 4A 4B 4C 4D 5 4 ...

Страница 4: ...anden verletzen kann Bei der Entsorgung müssen Akkus entladen bzw die Batteriekapazität muss erschöpft sein Freiliegende Pole mit einem Klebestreifen abdecken um Kurzschlüsse zu vermeiden Wartung und Pflege Das Modell bitte nur mit einem sauberen feuchten Tuch abwischen Modell und Batterien vor direkter Sonneneinstrahlung und oder direkter Wärmeeinwirkung schützen Modell Fernsteuerung und Ladegerä...

Страница 5: ...ät vom Stromnetz Alternativ kann das USB Ladegerät auch direkt an der Fernsteuerung eingesteckt werden 4D Hierzu die Fernsteuerung einschalten und den Schubregler links einmal auf Vollgas und zurück bewegen 5 STARTVORBEREITUNG Der Schubregler der linke Regler der Fernsteuerung muss vor dem Einschalten nach unten zeigen 5A Anschließend den ON OFF Schalter 5B der Fernsteuerung auf ON stellen die Pow...

Страница 6: ...n Schub Drehregler nach hinten bewegen 7C Um nach vorn zu fliegen den Regler für Vor und Rückwärtsflug sowie Seitwärtsflug vorsichtig nach vorn bewegen 7D Um rückwärts zu fliegen den Regler für Vor und Rückwärtsflug sowie Seitwärtsflug vorsichtig nach hinten ziehen 7E Um nach links zu fliegen den Regler für Vor und Rückwärtsflug sowie Seitwärtsflugvorsichtig nach links bewegen 7F Um nach rechts zu...

Страница 7: ...peller mit einem kleinen aufgeprägten A oder B muss nach unten zeigen Flugrichtung Die beiden übereinander liegenden Rotoren sind vorn FEHLERBEHEBUNG Problem Die Propeller bewegen sich nicht Ursache Der ON OFF Schalter steht auf OFF Der Akku ist zu schwach bzw leer Abhilfe Den ON OFF Schalter auf ON stellen Den Akku aufladen Problem Der Multicopter stoppt ohne ersichtlichen Grund während des Fluge...

Страница 8: ...ntal disabilities We recommend that people who are unfamiliar with model helicopters operate the model under the guidance of an experienced pilot In general it must be ensured that the model cannot injure anyone in consideration of potential malfunctions and defects When disposing of batteries they must be discharged or their capacity must be fully depleted Cover exposed terminals with adhesive ta...

Страница 9: ...o be plugged directly into the remote control 4D For this purpose switch on the remote control and move the left thrust controller briefly to full throttle and then back 5 START PREPARATION The thrust controller left controller on the remote control must point down before switching on 5A Then set the ON OFF switch 5B on the remote control to the ON position and the Power LED begins to blink 5C Con...

Страница 10: ...by carefully moving the control for thrust and rotation forward 7B Move the thrust rotation control back for landing or to fly lower 7C Fly forward by moving the controller for forward backward flight and banking carefully forward 7D Fly backward by moving the controller for forward backward flight as well as banking carefully backward 7E Fly to the left by moving the controller for forward backwa...

Страница 11: ...move Cause The ON OFF switch is in the OFF position The battery is too weak or depleted Remedy Set the ON OFF switch to the ON position Charge the battery Problem The multicopter stops and descends during flight for no apparent reason Cause The battery is too weak Remedy Charge the battery Problem It isn t possible to control the multicopter using the remote control Cause The ON OFF switch is in t...

Страница 12: ...onnes n ayant aucune expérience avec les maquettes d hélicoptères de procéder à la mise en marche avec l aide d un pilote expérimenté En règle générale même en cas de dysfonctionnements et de pannes veiller à ce que la maquette ne puisse blesser personne La batterie Li Po doit être maintenue hors de portée des enfants Lors de leur élimination les batteries doivent être vides ou leur capacité de ch...

Страница 13: ...de 4D Pour ce faire mettre la radiocommande sous tension et pousser la commande des gaz gauche sur le maximum puis en position neutre 5 PRÉPARATION AU DÉMARRAGE La commande des gaz régulateur de gauche de la télécommande doit être positionnée vers le bas avant la mise sous tension 5A Ensuite mettre l interrupteur ON OFF 5B de la télécommande sur la position ON et la diode d alimentation clignote 5...

Страница 14: ...ur de poussée rotation vers l arrière 7C Pour voler en avant diriger légèrement le régulateur de déplacement avant arrière et de translation latérale vers l avant 7D Pour voler vers l arrière tirer le régulateur de déplacement avant arrière et de translation latérale vers l arrière 7E Pour voler vers la gauche diriger légèrement le régulateur de déplacement avant arrière et de translation latérale...

Страница 15: ...de l hélice affichant un petit A ou B doit être orientée vers le bas Direction de vol Les deux rotors superposés se situent à l avant DÉPANNAGE Problème Les hélices ne bougent pas Cause L interrupteur ON OFF est sur la position OFF La batterie est trop faible ou vide Solution Mettre l interrupteur ON OFF en position ON Charger la batterie Problème Le multicoptère s arrête sans raison apparente pen...

Страница 16: ...en personen zonder ervaring met modelhelikopters om de helikopter onder leiding van een ervaren piloot te leren gebruiken Laat de accu niet onbeheerd achter tijdens het laden Demonteer de contacten van de accu in geen geval en probeer ze niet aan te passen Beschadig de cellen van de accu niet en maak ze niet open Er bestaat ontploffingsgevaar Houd de LiPo accu buiten bereik van kinderen Accu s moe...

Страница 17: ...aden gaat de rode led op de lader uit De stekker van de USB lader kan ook rechtstreeks in de zender worden gestoken 4D Schakel vervolgens de zender in en beweeg de linkerregelaar eenmaal naar vol gas en terug naar nul 5 STARTVOORBEREIDING De schuifregelaar de linkerknop op de zender moet voor het inschakelen naar beneden staan 5A Vervolgens de ON OFF schakelaar 5B van de afstandsbediening op ON ze...

Страница 18: ... de piloot toe vliegt moet in de betreffende tegenovergestelde richting worden gestuurd 7A Beweeg de liftkracht draaiingsregelaar voorzichtig naar voren om op te stijgen of hoger te gaan vliegen 7B Beweeg de liftkracht draaiingsregelaar naar achteren om te landen of lager te vliegen 7C Beweeg de richtingsregelaar voorzichtig naar voren om vooruit te vliegen 7D Trek de richtingsregelaar voorzichtig...

Страница 19: ...weer voorzichtig met de klok mee vast Let op De zijde van elke rotor met een kleine uitstekende A of B moet naar beneden wijzen Vliegrichting De twee boven elkaar geplaatste rotoren zitten aan de voorkant PROBLEEMOPLOSSING Probleem De propellers bewegen niet Oorzaak De ON OFF schakelaar staat op OFF De accu is te zwak of leeg Oplossing Zet de ON OFF schakelaar op ON Laad de accu op Probleem De mul...

Страница 20: ...imentado la primera vez que pongan en marcha el helicóptero La batería no debe dejarse desatendida durante el proceso de carga Bajo ninguna circunstancia se deben desmontar o modificar los contactos de la batería Las celdas de la batería no se deben dañar ni perforar Existe el riesgo de explosión La batería LiPo debe mantenerse alejada del alcance de los niños Las baterías deben estar descargadas ...

Страница 21: ...anca de gas una vez hasta la posición de máxima aceleración y suéltela 5 SECUENCIA DE ENCENDIDO La palanca de gas palanca izquierda de la emisora debe apuntar hacia abajo antes del encendido 5A A continuación coloque el interruptor ON OFF 5B de la emisora en la posición ON el LED de estado parpadea 5C Conecte los cables de las dos baterías con los cables de conexión 5D El LED de estado azul en la ...

Страница 22: ... hacia delante detrás y vuelo lateral con cuidado hacia delante para volar hacia delante 7D Empuje la palanca de vuelo hacia delante detrás y vuelo lateral con cuidado hacia atrás para volar hacia atrás 7E Empuje la palanca de vuelo hacia delante detrás y vuelo lateral con cuidado hacia la izquierda para volar hacia la izquierda 7F Empuje la palanca de vuelo hacia delante detrás y vuelo lateral co...

Страница 23: ...rechas Atención El lado de la hélice con la A o la B pequeña debe estar hacia abajo Dirección de vuelo Las dos hélices superpuestas se encuentran delante SOLUCIÓN DE PROBLEMAS Problema las hélices no se mueven Causa el interruptor ON OFF se encuentra en la posición OFF la carga de la batería es insuficiente o la batería está descargada Solución coloque el interruptor ON OFF en la posición ON cargu...

Страница 24: ...eri da modellismo sportivo di mettere in funzione il veicolo con la supervisione di un pilota esperto In generale assicurarsi che il modello non possa provocare lesioni alle persone verificando anche la presenza di problemi di funzionamento e difetti Scaricare le batterie per lo smaltimento e o attendere che si siano esaurite Coprire i poli liberi con nastro adesivo per evitare cortocircuiti Cura ...

Страница 25: ... fine accendere il radiocomando e spostare una volta il regolatore di corsa totalmente a pieno regime e poi a zero 5 PREPARAZIONE DELL AVVIO Il regolatore di corsa regolatore sinistro del radiocomando deve essere rivolto verso il basso prima dell attivazione 5A Successivamente posizionare l interruttore ON OFF 5B del radiocomando su ON il LED Power lampeggia 5C Collegare i due cavi delle batterie ...

Страница 26: ...indietro e laterale con cautela a sinistra 7F Per volare a destra spostare il regolatore per volo in avanti indietro e laterale con cautela a destra 7G Per virare il multicottero a sinistra spostare con attenzione verso sinistra il regolatore corsa e virata 7H Per virare il multicottero a destra spostare con attenzione verso destra il regolatore per corsa e virata Volo Looping solo per esperti Se ...

Страница 27: ...re la vite di fissaggio con cautela in senso orario Attenzione Il lato dell elica con la A o B incisa deve essere rivolto verso il basso Direzione di volo I due rotori sovrapposti sono anteriori ELIMINAZIONE DEI GUASTI Problema Le eliche non si muovono Causa Il tasto ON OFF è su OFF Batteria scarica e o esaurita Soluzione Portare l interruttore ON OFF su ON Ricaricare la batteria Problema Il multi...

Страница 28: ...54 55 Notes Notes ...

Отзывы: