background image

SV9401/SV9402/SV9403, SV9501/SV9502/SV9503, SV9601/SV9602 SMARTVALVE™

11

69-1004—01

1.

Carefully check the main burner lightoff to make 

sure the burner lights smoothly and all the ports 

remain lit.

2.

Check the manifold pressure listed on the appli-

ance nameplate. The ignition system control full 

rate outlet pressure should match this rating.

3.

With the main burner operating, check the ignition 

system control flow using the meter clocking 

method or check pressure using a manometer con-

nected to the output pressure tap on the ignition 

system control.

4.

Adjust the pressure regulator (if necessary) to 

match the appliance rating. See Table 8 for factory 

set nominal outlet pressure and adjustment range.

a. Remove the pressure regulator adjustment cap 

screw.

b. Using a screwdriver, turn the inner adjustment 

screw clockwise to increase or counterclock-

wise to decrease the gas pressure to the 

burner.

c. Replace the cap screw and tighten firmly to 

prevent gas leakage.

5.

If the desired outlet pressure or flow rate cannot be 

achieved by adjusting the ignition system control, 

check the ignition system control inlet pressure 

using a manometer at the inlet pressure tap of the 

ignition system control. If the inlet pressure is in 

the nominal range (Table 8, replace the ignition 

system control. Otherwise, take the necessary 

steps to provide proper gas pressure to the control.

6.

Carefully check the burner lightoff at step pressure 

to make sure the burner lights smoothly, without 

flashback to the orifice. Make sure all ports remain 

lit.

7.

Cycle the burner several times, allowing at least 60 

seconds between cycles for the regulator to 

resume the step function.

8.

Repeat steps 6 and 7 after allowing the burner to 

cool.

9.

Readjust the full rate outlet pressure (if necessary) 

to improve lightoff characteristics.

Convertible (R) Models

Models with convertible (NAT/LP) regulators, used for 

mobile home applications, are not field-adjustable. Do 

not attempt to adjust outlet pressure on these controls. 

Use the instructions in this manual for changing between 

LP and natural gas.

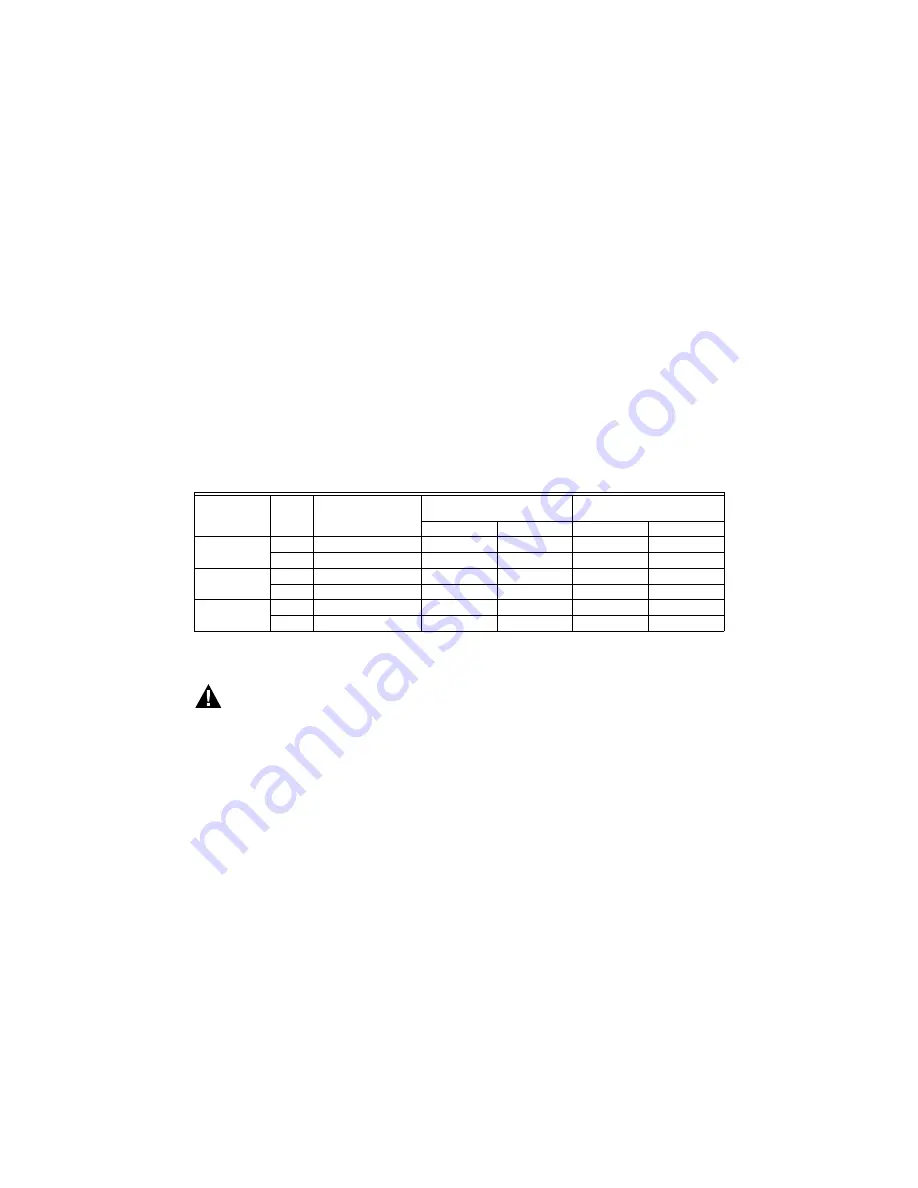
Table 8. Pressure Regulator Specification Pressures in. wc (kPa).

MAINTENANCE

WARNING

Fire or Explosion Hazard. Can cause property 

damage, severe injury, or death.

Do not attempt to take the control apart or clean 

it. Improper cleaning or reassembly can cause 

gas leakage.

Regular preventive maintenance is important in 

applications such as in the commercial cooking and

agricultural and industrial industries that place a heavy 

load on system controls because:

• In many such applications, particularly commercial 

cooking, the equipment operates 100,000 to 200,000 

cycles per year. Such heavy cycling can wear out the 

gas control in one to two years.

• Exposure to water, dirt, chemicals and heat can 

damage the gas control and shut down the control 

system.

The maintenance program should include regular 

checkout of the control as outlined in the Startup and 

Checkout section, and the control system as described in 

the appliance manufacturer literature. Maintenance 

frequency must be determined individually for each 

application. Some considerations are:

• Cycling frequency. Appliances that may cycle 20,000 

times annually should be checked monthly. 

• Intermittent use. Appliances that are used seasonally 

should be checked before shutdown and again before 

the next use.

• Consequence of unexpected shutdown. Where the 

cost of an unexpected shutdown would be high, the 

system should be checked more often.

• Dusty, wet, or corrosive environment. Because these 

environments can cause the gas control to deteriorate 

more rapidly, the system should be checked more 

often.

The system should be replaced if:

• It does not perform properly on checkout or 

troubleshooting.

• The gas control is likely to have operated for more 

than 200,000 cycles.

• The control is wet or looks as if it has been wet.

Model Type

Type of 

Gas

Nominal Inlet Pressure 

Range

Factory Set Nominal Outlet 

Pressure

Setting Range

Step

Full Rate

Step

Full Rate

Standard Slow NAT

5.0-7.0 (1.2-1.7)

3.5 (0.9)

3-5 (0.7-1.2)

LP

12.0-14.0 (2.9-3.9)

10.0 (2.5)

8-12 (2.0-3.0)

Step

NAT

5.0-7.0 (1.2-1.7)

0.9 (0.2)

3.5 (0.9)

None

3-5 (0.7-1.2)

LP

12.0-14.0 (2.9-3.9)

2.2 (0.5)

10.0 (2.5)

None

8-12 (2.0-3.0)

Convertible

NAT

5.0-7.0 (1.2-1.7)

3.5 (0.9)

None

None

LP

12.0-14.0 (2.9-3.9)

10.0 (2.5)

None

None

Содержание SmartValve SV9401

Страница 1: ... the appliance manufacturer See Table 2 for gas capacity and thread sizes SPECIFICATIONS WARNING Fire or Explosion Hazard Can cause property damage severe injury or death The SV9401 SV9402 SV9403 SV9501 SV9502 SV9503 SV9601 SV9602 provide direct replacement only Use the Y8610 to convert standing pilot systems to electronic ignition systems Ignition Sequences See Table 1 for available ignition sequ...

Страница 2: ...esponse Time 1 6 seconds maximum at 3 mA IMPORTANT All timings increase by 20 percent with 50 Hz input Gas Conversion Kits See Table 5 for gas conversion kit information NOTE See appliance manufacturer specifications and instructions and information in these installa tion instructions before attempting to convert an appliance Pipe Adapters Angle and straight flange adapters available for 3 8 1 2 a...

Страница 3: ...leaned with water or steam protect cover the control and wiring from water or steam flow Mount the control high enough above the bottom of the cabinet so it does not get wet during normal cleaning procedures High Humidity or Dripping Water Dripping water can cause the control to fail Never install an appliance where water can drip on the control In addition high ambient humidity can cause the cont...

Страница 4: ...ide Converting Ignition System Control from Natural Gas to LP Gas Application or LP Gas to Natural Gas Application WARNING Fire or Explosion Hazard Can cause product damage severe injury or death Follow these warnings exactly 1 Do NOT attempt to convert step opening models SV9401P SV9402P SV9403P SV9501P SV9502P SV9503P or SV9601P SV9602P 2 Always change the main and pilot burner orifices when con...

Страница 5: ...ibule on the gas manifold IMPORTANT Make sure the mounting location protects the control from dripping water and excessive humidity IMPORTANT Make sure the mounting location maximum and minimum ambient temperature are both within the specified acceptable range Install Piping on Control All piping must comply with local codes and ordinances or with the National Fuel Gas Code ANSI Z223 1 NFPA No 54 ...

Страница 6: ...or deform the tubing Do not bend the tubing at the ignition system control after the com pression nut is tightened because this can result in gas leakage at the connection 2 Square off and remove burrs from the end of the tubing 3 Unscrew the brass compression fitting from the pilot outlet as shown in Fig 6 4 Slip the fitting over the tubing and slide out of the way as shown in Fig 7 5 Push the tu...

Страница 7: ...er controls as required 2 Connect control circuit to the ignition system con trol using the keyed plug connector See Fig 8 through 11 Fig 7 Always use new compression fitting Fig 8 SV9401 SV9402 SV9403 SV9501 SV9502 SV9503 SV9601 SV9602 basic wiring diagram CONTROL IGNITER OFF ON OUTLET PRESSURE TAP PRESSURE REGULATOR ADJUSTMENT UNDER CAP SCREW INLET PRESSURE TAP INLET IGNITION SYSTEM CONTROL SWIT...

Страница 8: ...MOTOR LEADS C X XFMR SEC X EAC N HUM N CIR BLWR CONT COOL HEAT 24 VOLT COMMON 24 VOLT HOT EFT OUTPUT 24 VOLT THERMOSTAT OR PRESSURE SWITCH INDUCER MOTOR HUMIDIFIER DENOTES LINE VOLTAGE WIRING DENOTES LOW VOLTAGE WIRING 2 1 ST9120 NEUTRAL NOTE 3 1 2 CONNECT ONLY IF CONTINUOUS SPEED IS AVAILABLE AND USED CONNECT ONLY IF CONTINUOUS SPEED IS NOT USED CONNECT IF EAC AND HUM TERMINALS ARE AVAILABLE AND ...

Страница 9: ...ontrol with rich soap and water solution Bubbles indicate a gas leak 2 If a leak is detected tighten the pipe connections 3 Stand clear of the main burner while lighting to prevent injury caused from hidden leaks that could cause flashback in the appliance vestibule Light the main burner 4 With the main burner in operation paint the pipe joints including adapters and the control inlet and outlet w...

Страница 10: ... with main burner operating NOTE Check the inlet pressure before adjusting the pressure regulator Standard M and Slow Opening H Pressure Regulator Models 1 Carefully check the main burner lightoff to make sure the burner lights smoothly and all the ports remain lit 2 Check the full rate manifold pressure listed on the appliance nameplate The ignition system control full rate outlet pressure should...

Страница 11: ...anging between LP and natural gas Table 8 Pressure Regulator Specification Pressures in wc kPa MAINTENANCE WARNING Fire or Explosion Hazard Can cause property damage severe injury or death Do not attempt to take the control apart or clean it Improper cleaning or reassembly can cause gas leakage Regular preventive maintenance is important in applications such as in the commercial cooking and agricu...

Страница 12: ...sure the appliance is powered with the gas supply turned on Make sure the ignition system control switch is in the ON position TROUBLESHOOTING If Main Burner Will Not Come On With Call for Heat 1 Make sure the appliance has power and the gas supply is turned on 2 Make sure the ignition system control switch is in the ON position 3 Adjust the thermostat several degrees above room temperature 4 If t...

Страница 13: ...WERED PILOT LIGHTS AND FLAME IS SENSED DURING TRIAL FOR IGNITION IGNITER OFF MAIN VALVE OPENS FLAME SIGNAL LOST ELECTRONIC FAN TIMER EFT OUTPUT ENERGIZES THERMOSTAT CALL FOR HEAT ENDS MAIN AND PILOT VALVES CLOSE EFT OUTPUT DE ENERGIZES MAIN AND PILOT VALVES CLOSE EFT OUTPUT DE ENERGIZES FIVE MINUTE RETRY DELAY WAIT FOR FLAME SIGNAL TO DISAPPEAR PILOT VALVE IGNITER REMAIN OFF PILOT VALVE CLOSES IGN...

Страница 14: ...ND MAIN BURNER LIGHTS SYSTEM IS OKAY WITH PILOT BURNER CABLE CONNECTED MEASURE VOLTAGE AT SmartValve HSI ELEMENT OUTPUT SEE INSET B 24V NOMINAL YES REPLACE IGNITER FLAME ROD ASSEMBLY REPLACE IGNITER FLAME ROD ASSEMBLY CHECK THAT PILOT GAS IS FLOWING WAIT TO ASSURE PILOT GAS TUBING IS PURGED RECYCLE CALL FOR HEAT IF NECESSARY MEASURE VOLTAGE BETWEEN 24V HOT AND 24V COMMON LEADS TO SmartValve CONTRO...

Страница 15: ...eset the safety control 2 Disconnect all electric power to the appliance 3 Remove the ignition system control access panel 4 Move the ignition system control switch to the OFF position 5 Wait five minutes to clear out any unburned gas If you then smell gas STOP Follow the Warnings above If you do not smell gas continue with the next step 6 Move the ignition system control switch to the ON position...

Страница 16: ...Resideo Technologies Inc All rights reserved This product is manufactured by Resideo Technologies Inc and its affiliates www resideo com Resideo Technologies Inc 1985 Douglas Drive North Golden Valley MN 55422 1 800 468 1502 69 1004 01 M S Rev 04 20 Printed in United States ...

Отзывы: