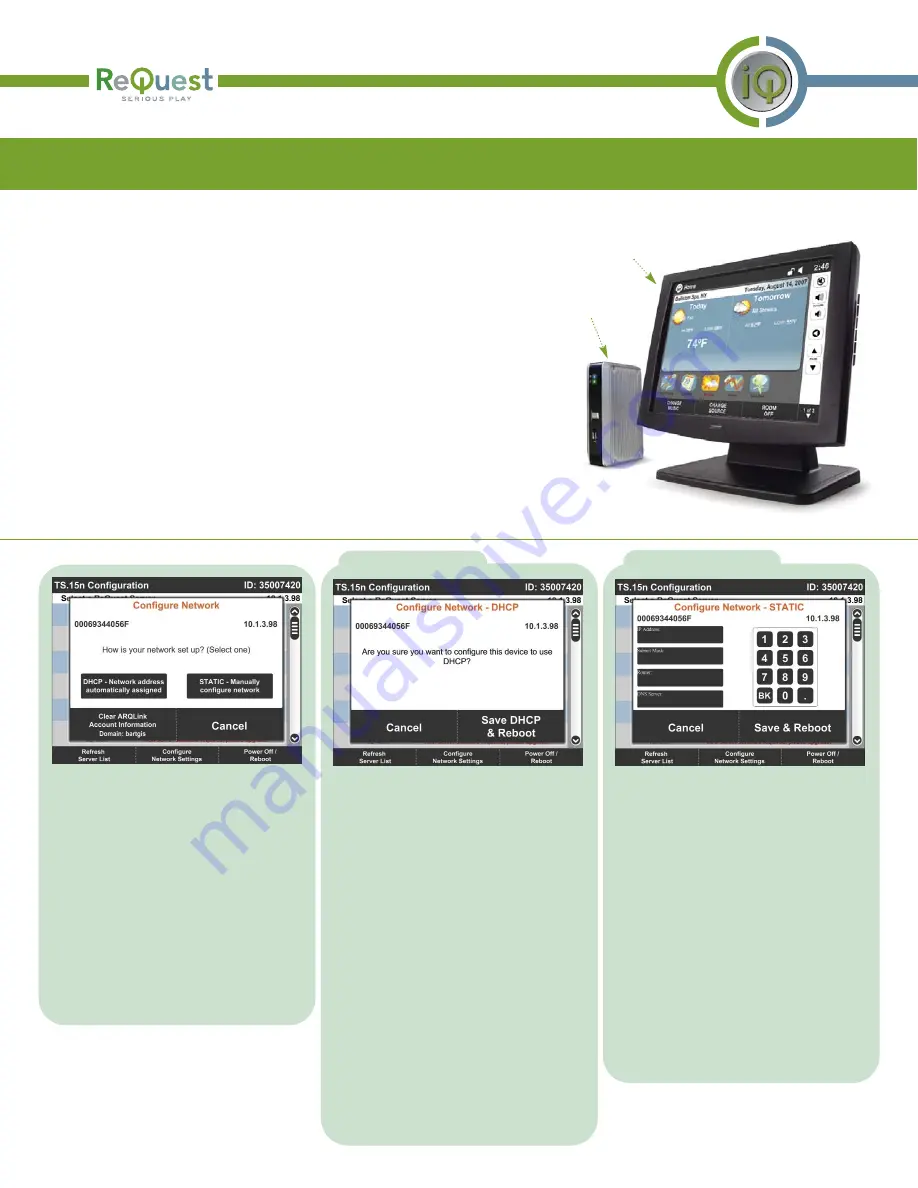
The default configuration of the TS.15N
is DHCP (Dynamic Host Configuration
Protocol). Upon initial boot, the TS.15N
will attempt to obtain its IP address and
network information automatically.
Typically, the routher that the TS.15N is
connected to provides this DHCP
service. Sometimes the router needs to
be configured to respond to the
TS.15N’s configuration request. If there
is no DHCP service available at all, the
static network information for the
TS.15N must be entered manually. If
the TS.15N is currently using static
network settings, it can be returned to
use DHCP by selecting the button
labeled, “DHCP – Network address
automatically assigned” in the Configure
Network dialog; the TS.15N will then
confirm that it should reconfigure itself
to use DHCP (which will require a
reboot).
If the TS.15N can not acquire its
network configuration from a DHCP,
then its network must be configured
statically. The button labeled, “STATIC –
Manually configure network” will bring
up the “Configure Network – STATIC”
dialog. Here one can enter the IP
Address, Subnet Mask, and Router
(sometimes known as a “Gateway”) for
the TS.15N. The IP Address of the
server that the TS.15N should contact
for DNS lookup services should also be
entered. If the TS.15N can not use
DHCP and you need assistance in
selecting the correct values for this
page, please contact the person
responsible for installing and
maintaining the local network.
The “Configure Network” dialog is
displayed if the NTC detects a network
error when it starts up. It can also be
displayed by pressing the “Configure
Network Settings”button in the bottom
row of the “Select a ReQuest Server”
screen. If the “Configure Network”
dialog is displayed due to an error, the
“Cancel” button is replaced with a
“Reboot” button; the TS.15N must be
rebooted to apply changes and correct
any network error.
Setting Up (Standalone From TS.15)
Connect the cables supplied with the TS.15 (longer, ~6’ VGA and USB cables) to
the ports on the TS.15N and the TS.15 touchscreen. Be sure the cables fit
snugly and completely.
Note: You may use either USB port on the NTC device.
Fit the NTC into the supplied vertical mount stand. You may need to spread the
stand open.
Attach an RJ-45 terminated network cable to the network jack on the NTC.
Attach the power cable to the TS.15N and plug the other end into a wall outlet.
Attach the power cable to the TS.15 touchscreen and plug the other end into a
wall outlet.
Turn on the TS.15 touchscreen and press the power button on the NTC.
You may place the NTC in any location desired provided the USB and VGA cables can reach the TS.15 touchscreen and
there is power and Ethernet access for the device. ReQuest supplies 6ft (~3m) VGA and USB cables. You may use up to 20ft
VGA and USB cables.
1.
2.
3.
4.
5.
6.
NTC
TS.15
DHCP Network
STATIC Network
Network Configuration
Setup Guide for the TS.15N Network Touch Screen Page 2


