background image

Reolink Wireless Battery-powered Camera

77

3.

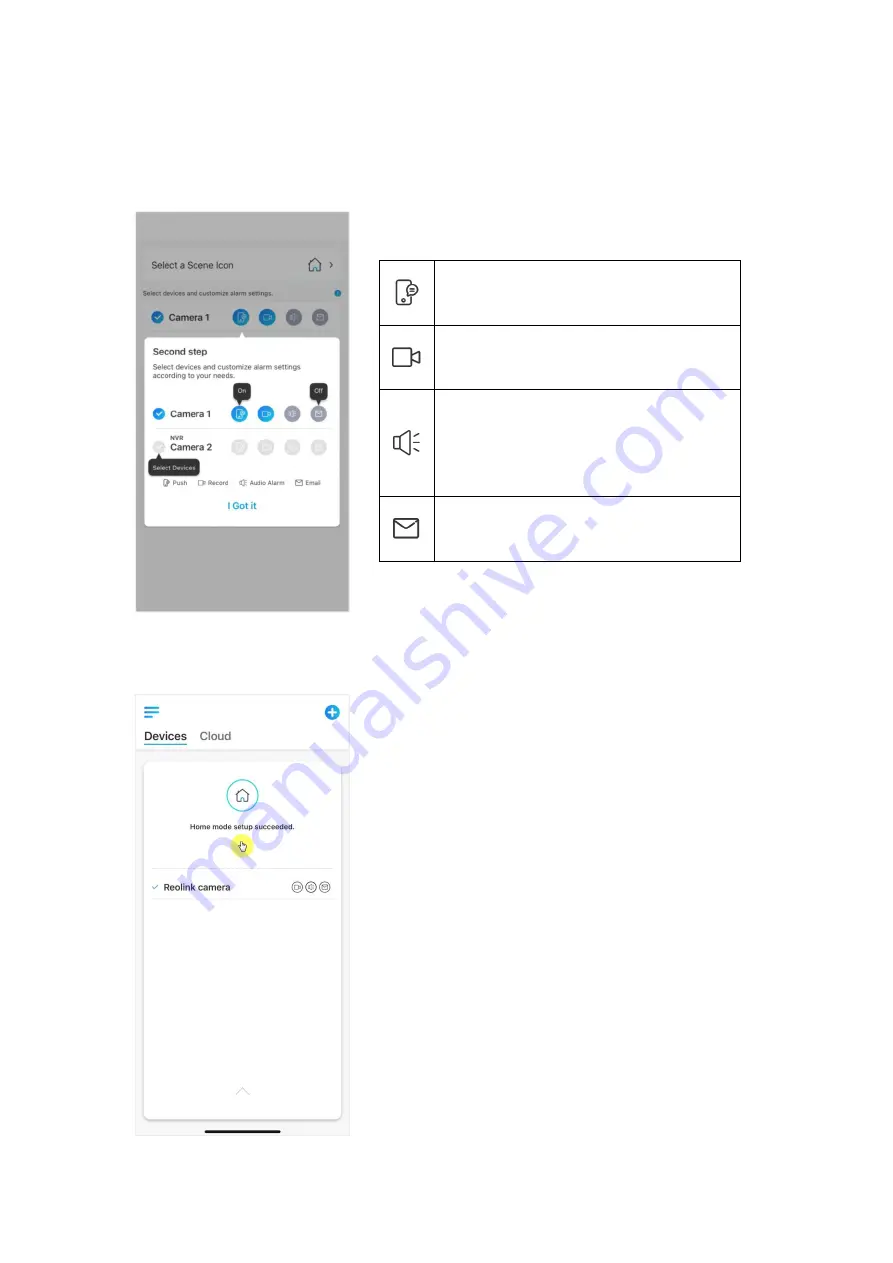
Select devices for this scene and customize the alarm settings.

If you want to receive push,email,audio alarm under this scene mode that you can
enable the alarm settings with push, email, audio, alarm,Blue icon means enable,
Grey means disable.

4.

Tap

Save

in upper right corner to save the settings.

Note:

If the selected cameras are successfully activated,the prompt

of “

xxx mode setup succeeded

” will be displayed.

Note:

push notifications,Blue means
enabled, grey means disable

recording,Blue means enable, Grey
means disable

audio alarm, if the motion triggered
the camera, it will alarm with
siren,Blue means enable, Grey means
disable

email notifications, Blue means
enable, Grey means disable

Содержание Argus 2

Страница 1: ...Sept 2021 QSG1_A Reolink Wireless Battery powered Camera CaCameraCamerCaCCamera User Manual ...

Страница 2: ... Motion Detection 53 5 Recording and Playback 56 Setup Recording 56 Playback and Download Recordings 57 Time Lapse 61 Cloud Recording 65 6 Use the Reolink App 73 Share your devices to others 73 Scene Modes 75 Add or Delete a Camera 78 Register Account 82 App Settings 84 7 Camera Settings 86 Network and Wi Fi Connection 86 SD card Storage 89 Device Information 93 Battery Information 94 Device Passw...

Страница 3: ...y make the camera totally wire free No network or power cable no drilling and no outlets needed Security is simple You can put it anywhere you want on a shelf or a table at the front door or back door from room to room to keep an eye on the elderly babies or pets Or use it at a temporary construction site rental house or holiday house 1 Daylight Sensor 2 6 PCS IR LEDs 3 Lens 4 Status LED 5 Built i...

Страница 4: ...echargeable battery Without power cables it provides clean easy and flexible installation You can put it anywhere you want indoors or outdoors 1 Daylight Sensor 2 6 PCS IR LEDs 3 Lens 4 Status LED 5 Built in PIR Motion Sensor 6 Built in Mic 7 Reset Button 8 Micro SD Card Slot 9 Outdoor Security Mount ...

Страница 5: ... security camera with motion spotlight and siren See what s going on in 2K Super HD enjoy color night vision and stop the crime before it happens 1 Status LED 2 Spotlight 3 6 PCS IR LEDs 4 Lens 5 Daylight Sensor 6 Built in Mic 7 PIR Motion Sensor 12 Battery Status LED 13 Micro USB Port 14 Speaker 8 Reset Button 9 Power Switch 10 Micro SD Card Slot 11 Bracket ...

Страница 6: ...ble Wi Fi connection Flexible and weatherproof you can put it anywhere with 5 minute installation 1 Status LED 2 Built in Mic 3 4 PCS IR LEDs 4 Lens 5 Daylight Sensor 6 Built in PIR Motion Sensor 7 Reset Hole 8 On Off Switch 9 Micro SD Card Slot 10 Speaker 11 Antenna 12 Micro USB Port 13 Battery Status LED ...

Страница 7: ...rated security camera anywhere to have an ultra wide viewing angle backed by unique 355 pan and 140 tilt design Set it up in seconds and enjoy the peace of mind and convenience Argus PT brings you 1 Speaker 2 Lens 3 Daylight Sensor 4 Built in PIR Sensor 5 Built in Mic 6 6 Pcs IR LEDs 7 Status LED 8 Antenna 9 Battery Status LED 10 Micro USB Port 11 Power Switch 12 Reset Hole 13 Micro SD Card Slot ...

Страница 8: ...the Box Note The package content may vary and update with different version and platforms please take the below information only for a reference And the actual package content are subject to the latest information on the product selling page Argus 2 Argus Pro Argus 2 Argus Pro 1 Outdoor Security Mount 1 Skin 1 Surveillance Sticker 1 Mount Template 1 Wall Mount 1 Pack of Screws 2 Quick Start Guide ...

Страница 9: ...no wall mount and the first mount template for Argus Pro Argus 2E Argus 3 Argus 3 Pro Note Others of Argus 3 Argus 3 pro are the same as those of Argus 2E Security Bracket 1 Surveillance Sticker 1 Pack of Screws 2 Reset Needle 1 Strap 1 Argus 2E 1 Mounting Template 2 Quick Start Guide 1 Argus 3 Argus 3 pro 1 Security Bracket 1 USB Cable 1 ...

Страница 10: ...ame as Argus 2 Argus PT Note Except for the above parts the surveillance sticker quick start guide reset needle and USB cable are the same as others but just one pack of screw in this box Install a Rechargeable Battery Argus PT 1 Mounting Template 1 Bracket 1 Strap 1 Slide the battery downward and lock it firmly Check the button status to see if the battery is installed correctly Argus Eco 1 ...

Страница 11: ... in the box which is commonly used for smartphones A micro USB cable is included in the box Here we ll guide you to charge Reolink Argus 2 Argus Pro by using the following three different methods Method 1 Pull out the battery and open the charging port then connect the battery with the USB adapter via a USB cable and plug it into the electrical outlet To remove the battery from the camera please p...

Страница 12: ...om or Reolink Amazon official stores There is a status LED under the micro USB port of the battery which indicates the battery charging status Set up the Camera on the App Please follow the steps below to do initial setup for the battery powered cameras via Reolink App Step 1 Power on the camera and wait for it starting up After hearing a startup sound you will hear repeated Ding sounds or Please ...

Страница 13: ... to hear the sample sound If you couldn t hear the repeated Ding sounds please reset your camera Step 2 Tap on the icon in the top right corner to start the initial setup Step 3 Scan the QR code on the back of the camera If the phone doesn t respond please tap Input UID IP and then manually type in the UID 16 digit characters under the QR code of the camera Note You may tap Light to enable flash l...

Страница 14: ...dd the camera and set it up or the ding sounds please tick I have heard the voice prompt from the camera or I have heard ding sounds from the camera then tap Next Step 5 Enter the Wi Fi password of the selected Wi Fi network you may tap to see the Wi Fi password you entered and double check the password is correct and tap Next ...

Страница 15: ...e camera s lens at a distance of about 20 cm 8 inches and let the camera scan the QR code Tick I have heard the beep sound from the camera or I have heard the voice prompt and tap Next Note 1 Please rip off the protection film of the camera s lens 2 You may double tap on the QR code to enlarge it Step 7 After the beep sound the camera will try to connect to the router please wait for 60 seconds ...

Страница 16: ...eless Battery powered Camera 15 Step 8 You may initialize your camera Create device password and Name your device Forgetting this password could be troublesome in the future please remember it for your convenience ...

Страница 17: ...Reolink Wireless Battery powered Camera 16 Note For Argus 3 Pro after the camera is named you need to select scene Indoor or Outdoor Step 9 Initialization finished Tap Use Now and start to preview now ...

Страница 18: ...odels can be found on it s Quick Start Guide here https reolink com download center Mount the Camera to the Wall Press the button to release the plate from the security mount Screw the security mo unt plate into the wall Lock the security mou nt on its plate Make sure the top edge of the plate is inserted int o the mount Press the security mount button until its plate clicks into the mount Screw t...

Страница 19: ... 3 5 in the wall mounting to finish installation Press the security mount button to remove the mount out Unscrew the camera from the security mount Put up the skin provided in the packa ge for Reolink Argus 2 camera There is an anti falling Safety rope Please fasten the other end of the rope to the wall mount when mounting it into a wall Stick the camera to the wall mount and twist the camera to a...

Страница 20: ...osition with the maximum sunlight exposure throughout the year for your solar panel For Reolink Solar Panel it only needs a few hours of direct sunlight exposure to sufficiently power your camera daily The amount of energy that the solar panel can generate is affected by weather conditions seasonal changes geographic locations etc 2 Mount the bracket with the mounting template and the screws provi...

Страница 21: ...d make sure that it s secure 4 Loosen the adjusting control on the bracket and adjust the angle of the solar panel to make it receive direct sunlight exposure then tighten the adjusting control to fix the solar panel 5 Connect the solar panel to a Reolink camera with the micro USB cable ...

Страница 22: ...l the solar panel completely horizontally Otherwise your solar panel might accumulate dust and other debris easily It s advised to install the solar panel angularly to make it receive direct sunlight exposure 3 Wipe the solar panel regularly to remove the dust and debris 4 Make sure that the camera is plugged in all the way and that the waterproof wire cover protects the interface between the came...

Страница 23: ...Spotlight only for Argus 3 and Argus 3 Pro Turn on the spotlight Multiple views Display Pause Audio Enable audio Manually capture Manually record Manually being recording Live view in sub stream mode Live view in main stream mode View your camera in a full screen mode Talk Tap to talk two way audio Clip Drag the rectangle to the position you want to see Only for Argus 3 Pro PTZ Pan and tilt Only f...

Страница 24: ...mode during different times of the day and night Color The camera will capture color images that usually appear during the day Black White The camera will capture black and white images that usually appear during the night with the IR LEDs on Auto The camera will automatically switch between Color and Black White modes according to the light conditions ...

Страница 25: ... Mode The immersive mode has a larger viewing area with less interference and focuses on previewing It is suitable for viewing 2 or 3 cameras on one screen Note One screen can accommodate up to three cameras You could slip the screen to preview other cameras ...

Страница 26: ...Battery powered Camera 25 Multiple Views If you have several cameras added in your Reolink App you can view multiple streams at the same screen on Reolink App Full screen View Tap icon to enter into the full screen mode ...

Страница 27: ...Reolink Wireless Battery powered Camera 26 Tap to exit the full screen Two Way Audio 1 Tap to enter into the two way audio page 2 Tap to talk ...

Страница 28: ...ss Battery powered Camera 27 Clip 1 Tap to enter into the clip page 2 Drag the rectangle to the position you want to see PTZ 1 Tap to enter into the PTZ page 2 Choose the direction you want the camera to pan and tilt ...

Страница 29: ...ered Camera 28 Display Settings Flip Tap then the image will be turned upside down Quality 1 Tap Quality to enter into the Quality page 2 Tap Clear mode or Fluent mode to enter into the settings page for Clear mode or Fluent mode ...

Страница 30: ...Reolink Wireless Battery powered Camera 29 3 Tap Save to save the settings ...

Страница 31: ...vices such as TV screens and lights are flickering 50Hz Used for Australia and the UK 60Hz Used for the USA and Canada 1 Tap Anti flicker 2 Choose a proper setting Day and Night Tap Day and Night to enter into the settings page Note It is the same as the settings on the Live View part ...

Страница 32: ...Reolink Wireless Battery powered Camera 31 Select Scene Tap Select Scene to enter into the settings page and it includes Indoor and Outdoor scenes Note This setting is just for Argus 3 pro ...

Страница 33: ...Reolink Wireless Battery powered Camera 32 Brightness Drag the circle in the progress bar to adjust the brightness of the image Camera Name You can set the position of the camera name on the screen ...

Страница 34: ...Reolink Wireless Battery powered Camera 33 Date You can set the position of the date on the screen Watermark Tap to disable the watermark to be shown on the screen ...

Страница 35: ...o protect your privacy Press and drag to draw a black rectangle up to 3 rectangles on the screen to block out a specific area Lights and LED Infrared Lights By default the infrared lights on the cameras are set to Auto They will be automatically turned on in dim environment If there is enough illumination you may choose to turn off the lights ...

Страница 36: ...ng mode there is no live view or video recording Working Mode The camera is running at full capacity It enters the working status when someone is accessing the camera via Reolink software or the PIR motion sensor detects movement Status LED There is a LED light in the front of the camera which indicates the camera s different status Color Meaning Status Red Wi Fi Connection failed Blinking Standby...

Страница 37: ...s when the camera is in the standby status Spotlight When an alarm event is detected it will be automatically turned on and the spotlight can also add light sources to produce full color images It s only applicable for model Argus 3 and Argus 3 Pro By default the Night Mode is set as Auto ...

Страница 38: ...Reolink Wireless Battery powered Camera 37 And you can also enable the Auto On for Live View which means the spotlight will automatically turn on when viewing the live feed and turn off afterwards ...

Страница 39: ...round like a wall the temperature at that point in the sensor s field of view will rise from room temperature to body temperature and then return again The sensor converts the resulting change in the incoming infrared radiation into a change in the output voltage which triggers the detection Objects of similar temperature but different surface characteristics may also have a different infrared emi...

Страница 40: ...Reolink Wireless Battery powered Camera 39 Set up PIR Motion Detection Sensitivity 1 Tap on 2 Choose PIR Motion Sensor and tap to enable PIR Motion Sensor ...

Страница 41: ...mid to high or adjust the sensitivity from 1 to 100 For cameras with digital PIR sensors there s also an option to reduce false alarms Reduce false alarms If you have received frequently false alarms please enable reduce false alarms option Set up PIR Motion Detection Schedule This option is for models except Argus 3 Pro 1 Tap on Then choose PIR Motion Sensor ...

Страница 42: ...Reolink Wireless Battery powered Camera 41 2 Tap to enable PIR Motion Sensor Then tap Schedule to set up the schedule and decide when the PIR motion detection works ...

Страница 43: ...Camera 42 Set up Motion Alerts Push Notification When the camera detects a motion it will send a push notification which pops up on your mobile phone Setup Push Notification 1 Tap on 2 Tap on Push Notifications to enable this function ...

Страница 44: ...Reolink Wireless Battery powered Camera 43 3 Set a push Schedule if you need For camera model Argus 3 Pro you can also select Person Vehicle or Others ...

Страница 45: ... phone Settings find Notifications and among the App list find the Reolink App Make sure the Reolink App can send notifications Alarm Email When the camera detects a motion it will send an alarm email with plain texts or the camera s live image Set up Alarm Email 1 Tap on then tap Email Alerts and enable this function ...

Страница 46: ...Reolink Wireless Battery powered Camera 45 2 Tap Set up Now to enter Email Settings and enter the Email address and Email password SMTP server and port Then tap on Save ...

Страница 47: ...like to receive the email alerts and tap Save For Argus 3 Pro you can also choose the Detection Type Person Vehicle or Others 4 Tap Email Content to choose for the camera to send Email with Text or Picture For model Argus 3 Pro you can choose Text Picture Text with Picture or Text with Video ...

Страница 48: ...s Battery powered Camera 47 5 Tap Email Settings then Add Email Address to add more recipients of Email alerts then tap Save Alarm Siren You can set up the camera siren to make an alert sound when a motion is detected ...

Страница 49: ...attery powered Camera 48 Set up Siren 1 Tap on Tap on Siren and enable Siren 2 Tap on Custom Alarm Sound if you want to use a custom sound Tap Custom sounds then tap Change custom sounds to record an up to 5 second sound ...

Страница 50: ...ing Tap on Sound Test to test the recorded sound or tap Re record to record again till you re satisfied Then tap Apply to save the changes 3 Tap Schedule to set up a schedule when you want the siren to work then tap Save For Argus 3 Pro you can also choose the Detection Type Person Vehicle or Others ...

Страница 51: ... 3 Pro have built in spotlights which can automatically turn on when a motion is detected Setup Alarm Spotlight 1 Tap on Then tap Advanced then tap Spotlight 2 Tap Night Mode to set it as Auto in this way when a motion is detected during night time it ll automatically turn on the spotlights ...

Страница 52: ... part of Install the Micro SD card in Chapter 7 about choose the correct SD card and learn how to insert the SD card Set up Motion Recording 1 Tap on Then tap on Camera Recording tap again to enable Camera Recording 2 Tap Schedule to set up a schedule when you want the camera to save motion recordings then tap Save This is only applicable for Argus 3 Pro and you can also choose the Detection Type ...

Страница 53: ...Reolink Wireless Battery powered Camera 52 3 Tap Post Motion Record Duration to set up the motion recording length you can choose 8 sec 15 sec or 30 sec ...

Страница 54: ...a first Then make sure that the monitoring area is well within its field of view 2 The ideal viewing distance is 2 10 meters 7ft 33ft within which people will be recognized To achieve a better viewing experience it s advised not to place the camera too far away or too high suggested mounting height 2 3 meters from the designated monitoring area Tip 2 Install cameras according to the detecting fiel...

Страница 55: ...s etc 2 Do not place the camera too close to a place where many vehicles move frequently 15 meters 55ft away from the vehicle is the recommended distance based on our numerous tests 3 Stay away from the outlets including the air conditioner vents humidifier outlets the heat transfer vent of projectors etc 4 Do not install the camera facing the mirror 5 Keep the camera at least 1 meter away from an...

Страница 56: ...era in the direction crossing the possible intruder instead of facing him her so that it can detect motion more accurately 3 Adjust the installation height it s suggested to mount camera 2 to 3 meters from the ground Mount the camera too low or too high both will cause it hard to detect alarm 4 Ensure the detecting target is within the detection range of the PIR sensor Ideal monitoring range is fr...

Страница 57: ...p Recording Reolink battery powered cameras only support motion recordings but not continuous recordings And recordings can be saved into micro SD cards For details of the setup steps please refer to the part of Set up Motion Recording in Chapter 4 Record with Audio 1 Tap on ...

Страница 58: ...ap on Advanced and then find Record Audio tap to enable record audio option Then the camera will record audio in video recordings Playback and Download Recordings Playback Recording 1 Open live view of the camera Then tap on Playback on the bottom ...

Страница 59: ...date to search the recordings Slide through the timeline to find the recordings you want to replay tap on the selected recording and it ll automatically starts to play 3 Tap on to choose Fluent or Clear to replay the recordings in clear mode or fluent mode ...

Страница 60: ... show the alarm recordings only This is only applicable for the Argus 3 Pro camera and you can select motion recording type of Person Vehicle or Others to replay 5 To replay the recording in slow or fast speed please tap on icon and then choose the playback speed at 0 25X 0 5X or 1X ...

Страница 61: ...oad Recordings 1 Open live view of the camera Tap on Playback on the bottom 2 Select a date to search the recordings Slide through the timeline to find the recordings you want to replay tap on the selected recording and then tap on the Download icon ...

Страница 62: ...shoots a group of photos or videos by connecting photo series or extracting video frames the process of several minutes hours or even several years is compressed into a short period of time and played as a video In a time lapse video the process of slowly changing objects or scenes is compressed into a short period of time presenting a wonderful scene that is usually undetectable by the naked eyes...

Страница 63: ...Wireless Battery powered Camera 62 Set up Time Lapse 1 Tap on Then tap on Time Lapse 2 Tap Try Now or Create New Time Lapse Capture 3 Select a scene from the list or tap on Customize to create a customized time ...

Страница 64: ...apture 4 Customize the settings of Capture Starts time Duration Interval Quality and File Type then tap on Start The camera will automatically start to capture at the set time 5 Later when the time lapse video is created you can tap on View on the Time ...

Страница 65: ...wnload it It usually takes several seconds or minutes for the time lapse video to cache before playback starts You can also tap on the trash icon to manually delete the time lapse video 6 Tap on Settings icon here you can turn on or off the option Overwrite Time Lapse Files ...

Страница 66: ...e Reolink provides free basic plan that supports uploading one camera s video to cloud as well as paid plans for multiple cameras More information can be found on Reolink Cloud website https cloud reolink com Supported Models and Countries For Reolink battery powered Wi Fi cameras model Argus 2 Argus Pro Argus Eco Argus PT Argus 3 and Argus 3 Pro support cloud recording And Reolink Cloud recording...

Страница 67: ...Account and Set Up to Upload Cloud Recording Register an Account 1 Open up Reolink app and tap on Cloud then tap Cloud Storage 2 Tap Sign up then enter your Email address and password Tick terms and conditions and then tap on Sign up to register an account ...

Страница 68: ...l be sent to your inbox Tap the link in the email to verify your account 4 Then you can use the registered account to Log in Reolink App Subscribe to a cloud plan and bind the camera to cloud 1 Tap Cloud Storage then tap Subscribe Choose to buy the free basic plan or a paid plan ...

Страница 69: ...cloud Choose the camera you want to bind to cloud and tap Add Note If your camera firmware is outdated it ll show Upgrade Tap Upgrade to update the firmware to the latest first then tap Add to bind the camera Turn on off cloud recording and unbind the camera 1 Tap Cloud Storage then tap the three dots on rights side of your plan ...

Страница 70: ...9 2 Tap your camera Here you can tap to turn off or turn on Cloud Recording 3 Tap Delete and it ll unbind this camera from cloud plan Change Uploaded Video Resolution Tap Video Resolution and choose Fluent or Clear to change the resolution of ...

Страница 71: ...link Wireless Battery powered Camera 70 uploaded videos Upgrade the Cloud Recording Plan 1 Tap Cloud Storage then tap the three dots on the right hand corner of your plan card 2 At the bottom tap on Switch ...

Страница 72: ...tinue to checkout Once upgraded all cameras currently bound will be updated to the new plan Playback and Download the Cloud Recording Via Reolink App 1 Tap Cloud Storage and it ll show uploaded recordings autocratically 2 Select the device and date to find the recordings you want to play back then ...

Страница 73: ...Camera 72 tap the video to play back 3 Tap on the download icon to start downloading the recording 4 To delete the cloud recordings tap on Edit then select the videos you want to delete Tap on Delete icon to delete the selected videos ...

Страница 74: ...Wireless Battery powered Camera 73 5 Use the Reolink App Share your devices with others 1 Launch Reolink App on your phone then tap to enter the Device Settings page Tap Share Camera to get the camera s QR code ...

Страница 75: ...p in another smart phone and tap button to scan the QR code Or you can manually input the camera s UID to add the device The camera UID consists of 16 digits that start with 9527000xxxxxxxxx After entering the UID please tap Next to enter the camera password to log in ...

Страница 76: ...usage scenarios You could control all your cameras under different modes as you need For instance you could disable all cameras alarm under home mode when you re home but enable all the alarms under outside mode when you are away 1 Scroll down the Devices list to find the Scene Modes configuration entrance ...

Страница 77: ...Reolink Wireless Battery powered Camera 76 2 Tap it to name the scene and select a scene 1 Name the scene 2 Select a scene icon 3 Select devices 4 Customize the alarm settings ...

Страница 78: ...ble Grey means disable 4 Tap Save in upper right corner to save the settings Note If the selected cameras are successfully activated the prompt of xxx mode setup succeeded will be displayed Note push notifications Blue means enabled grey means disable recording Blue means enable Grey means disable audio alarm if the motion triggered the camera it will alarm with siren Blue means enable Grey means ...

Страница 79: ... stay in this mode until you change to another mode Add or Delete a Camera Add the camera in LAN 1 If you want to add the camera in LAN we recommend that you enable the Add Devices Automatically option once your smart phone and camera are connected the same network the Reolink App can find the Reolink device automatically in LAN 2 Tap and go to Settings Add Devices Automatically ...

Страница 80: ...Reolink Wireless Battery powered Camera 79 Or you can go to the home page and tap LAN and select the camera you want to add 3 Enter the camera password to log in ...

Страница 81: ...Reolink Wireless Battery powered Camera 80 Add the camera by scan the QR code 1 Tap and scan the QR code on the camera body 2 Enter the camera password to log in ...

Страница 82: ... entering the UID 1 Select Input UID IP please note that you are unable to add the battery powered camera with IP address Note The camera UID consists of 16 digits that start with 9527000xxxxxxx 2 Enter the camera UID tap Next to log in with the camera password ...

Страница 83: ...Reolink account can be used to place orders on the Reolink website check order history and log into Reolink cloud or smart home like Google Home or Alexa You can follow up the steps below to register a Reolink Account Tab and enter your email address and password to sign up Note Only check I have read agree to Terms Conditions and privacy policy ...

Страница 84: ...Reolink Wireless Battery powered Camera 83 After that you will receive a verify email Once verified the email you can log in your Reolink Account ...

Страница 85: ...ttings Launch the Reolink App Tap and you can adjust the device order change sound settings App password clean cache etc Adjust Device Order Adjust order for a quicker access to the devices you want tap and drag the device to the position as you want ...

Страница 86: ...ated When you use the app Clearing cache will not affect the normal use of Reolink App Auto live view While you launch the Reolink App the app will start the live stream automatically Add Devices Automatically It will add the Reolink devices in LAN automatically Data usage warning You will get a warning like play over cellular data when trying to see the live feed Stretch mode Play on stretched as...

Страница 87: ...tion Check the Wi Fi and wireless signal You can see which Wi Fi network this camera connected and how about the wireless signal Launch the Reolink App and go to camera Settings then tap on Network menu and you d see which Wi Fi the camera is connected to and how is the signal strength ...

Страница 88: ...powered Camera 87 Check the network information 1 Launch the Reolink App and tap on Device Settings then tap camera name go to Device Info 2 Tap Network Info and you will see the camera s IP address default gateway and DNS info ...

Страница 89: ...nnection of the camera 1 Tap on camera Device Settings then tap Network menu 2 Choose the available Wi Fi you want the camera to connect to and input the Wi Fi password Then tap Save to connect It ll take a minute for the camera to re connect to the new Wi Fi ...

Страница 90: ... wireless camera and the router Change the wireless channel on your router to avoid interference from Wi Fi networks around Keep the wireless camera away from appliances or electronic devices like a microwave computer wireless router etc Install the wireless camera to somewhere with fewer walls and obstacles in between with the router Fasten the antennas on the wireless camera Change a router whic...

Страница 91: ... 1 Switch off the camera before installing the micro SD card 2 Insert the micro SD card into the micro SD card slot on the right side of the camera Note Please use your fingernail or use the provided reset needle to push the SD card in until you feel that it s locked or you hear a Tap ...

Страница 92: ...oving the SD card 2 Find the micro SD card slot and please use something sharp such as the reset pin or a paperclip or your fingernail to push the SD to make it pop out Note For other models the steps to install or remove the SD card are similar Please refer to the part of Device Overview in Chapter 1 to find the SD card slot ...

Страница 93: ...Camera 92 Check the micro SD card status 1 Launch the Reolink App and tap Settings then tap the camera to enter Device Info page 2 Tap Storage and you can see the SD card used space total storage space Tap Format to format the SD card ...

Страница 94: ... the basic information about your camera include Model No UID and firmware version 1 Launch the Reolink App then tap then go to Device Info Device name Camera name Model camera model No UID starts with 9527xxxxxxxx Storage SD card storage Network Info Camera IP address Firmware Ver camera firmware version ...

Страница 95: ...l here 1 Launch the Reolink App and tap Battery The camera battery level will be displayed as picture below low battery level below 15 full battery 15 30 connected with charger not charging connect with DC charger and charging connected with solar panel not charging connected with solar panel and charging ...

Страница 96: ...nd Continue This will allow to count your battery consumption data for last 4 weeks You can also check the battery level and charging status from Devices page low battery level below 15 15 30 30 100 100 connected with charger connected with solar panel ...

Страница 97: ...n and password is blank no password During setup the camera it ll ask for creating a password before you can access the camera Change Device Password 1 Launch Reolink App and tap Settings Advanced Change Device Password 2 Enter the old password and new password then tap on Save Note Confirm password should be the same with new password ...

Страница 98: ...Reolink Wireless Battery powered Camera 97 3 Tab Save to save the changes Date and Time Sync camera time with your smart phone 1 Launch Reolink App and tap Advanced Date and Time ...

Страница 99: ...the same as your mobile phone then this option is not available Reboot and Restore Launch the Reolink App and tap Advanced Reboot or Restore Here you can choose to reboot the camera or restore the camera to default Note Restoring will remove all the camera settings including camera password camera name PIR settings etc ...

Страница 100: ...Reolink Wireless Battery powered Camera 99 Firmware Upgrade 1 Launch the Reolink App and tap Device Info Upgrade Device ...

Страница 101: ...ade turned on the camera will upgrade to the latest firmware automatically If the Auto upgrade is off you can choose to upgrade manually If you see the image below that means the camera s firmware is already the latest one there is no newer firmware to upgrade ...

Страница 102: ...nd cameras coming with the NVR system cannot work with Google home or Alexa 1 Launch the Reolink App to tap to log in your Reolink account and go to cloud Smart home 2 Tap Enable to add the device to Google Home in the Smart Home page Note only when it turns to disable that means the smart home feature is enabled ...

Страница 103: ...reless Battery powered Camera 102 3 Launch the Google Home sign in your account and then Get Started to create a home 4 Name your home and tap Next to build a connection between the Chromecast and the Google Home ...

Страница 104: ... 103 5 After the Chromecast found please check the code shown on your TV and tap Yes to continue 6 Connect the Wi Fi network you would like to use with your Chromecast then you can customize a room name which will be added to your room list ...

Страница 105: ...Reolink Wireless Battery powered Camera 104 7 Now tap the button to enter the account page and then tap Settings Assistant Home Control 8 Tap the button and search Reolink in the search bar ...

Страница 106: ...Reolink Wireless Battery powered Camera 105 9 Enter your Reolink account and password to log in first then tap Allow 10 Assign the room for the camera you enabled in the cloud account via Reolink App ...

Страница 107: ...Amazon Echoshow Amazon Echo dot and your mobile phone and 2 apps on your phone the Reolink App and Amazon Alexa App Alexa doesn t support all countries currently it is only available for the below countries America United States Brazil Canada Mexico Europe Germany Spain France Italy United Kingdom Asia Oceania Japan India Australia 1 Launch the Reolink App to tap to log in your Reolink account and...

Страница 108: ...nch the Amazon Alexa APP sign into your Alexa account and then tap on Devices in the bottom right corner 4 Select Your Smart Home Skills and tap Enable Smart Home Skills Please tap the Search icon at the top right corner and search Reolink Smart Home ...

Страница 109: ...search and find Reolink Smart Home tap ENABLE TO USE 6 Type in your Reolink account and then Tap Log in After logging in successfully then tap Allow the App will remind that Reolink Smart Home has been successfully linked Tap Close to go to the next step ...

Страница 110: ...vices or say a voice command Alexa discover devices Alexa will scan and show the cameras bound to your Reolink account 8 Tap Set up Device You can tap Choose Group to add your device to a group if you want to or you can skip this step and tap Close to finish the set ...

Страница 111: ...Go Reolink Go plus is able to remove 2 Charge the rechargeable battery with a standard and high quality DC 5V 9V battery charger or Reolink solar panel Do not charge the battery with solar panels from any other brands 3 Charge the battery at temperatures between 0 C and 45 C and use the battery at temperatures between 20 C and 60 C 4 Keep the USB charging port dry clean and free of any debris and ...

Страница 112: ...ging the camera with USB charger Q5 Can this camera work with Your NVR A No our battery powered camera cannot work with NVR Q6 Can this camera work with Blue iris Synology QNAP or other brand third party software A No the camera cannot work on other software it can only work with Reolink App or Reolink PC client Q7 How long can the battery last A In normal use and one time charge the battery can l...

Страница 113: ...k please contact Reolink Support https support reolink com 2 Camera Failed to Scan QR Code on the Phone If the camera cannot scan the QR code on your phone please try the following solutions Remove the protective film from the camera lens Wipe the camera lens with a dry paper towel tissue Narrow the distance between your camera and the mobile phone so that the camera can focus better Make sure ther...

Страница 114: ...rect sunlight And please note that your camera is not working in temperatures below 0 C 32 F or above 45 C 113 F Charge this camera using the USB charger DC 5V2A and see if it can be charged fully Please reduce or stop using your camera for a day or two to see whether the battery level will increase At the same time please turn off the PIR sensor Because extensive use of your battery powered camer...

Страница 115: ...f you still have a phone or computer that can access the camera please directly restore the device via the software After restore you can create a new password For Reolink App go to camera Settings Advanced page click Restore For Reolink Client go to camera Settings System Maintenance click Restore If currently no device has access to the camera you have to reset it by press the reset button on th...

Отзывы: