background image

This device complies with part 15 of the FCC Rules. Operation is subject to the following two 

conditions: (1) This device may not cause harmful interference, and (2) this device must accept any 

interference received, including interference that may cause undesired operation. This equipment 

has been tested and found to comply with the limits for a Class B digital device, pursuant to part 

15 of the FCC Rules. These limits are designed to provide reasonable protection against harmful 

interference in a residential installation. This equipment generates, uses and can radiate radio fre-

quency energy and, if not installed and used in accordance with the instructions, may cause harmful 

interference to radio communications. 

However, there is no guarantee that interference will not occur in a particular installation. If this 

equipment does cause harmful interference to radio or television reception, which can be deter-

mined by turning the equipment off and on, the user is encouraged to try to correct the interference 

by one or more of the following measures: Reorient or relocate the receiving antenna. Increase the 

separation between the equipment and receiver. Connect the equipment into an outlet on a circuit 

different from that to which the receiver is connected. Consult the dealer or an experienced radio/

TV technician for help.

§ 15.21 Information to user.

The users manual or instruction manual for an intentional or unintentional radiator shall caution the 

user that changes or modifications not expressly approved by the party responsible for compliance 

could void the user’s authority to operate the equipment. In cases where the manual is provided only 

in a form other than paper, such as on a computer disk or over the Internet, the information required 

by this section may be included in the manual in that alternative form, provided the user can reason-

ably be expected to have the capability to access information in that form.

FCC Statement

Revision: 01.25.2018

To learn more about Rently Blue, visit www.RentlyBlue.

com. For any questions please contact Rently using the 

information below.

Email: [email protected]

Phone: 888-659-9596 8am - 5pm PST.

Содержание RKDB02

Страница 1: ...ENTERPRISE BLUETOOTH LOCK Installation User Manual www RentlyBlue com Model RKDB02 ...

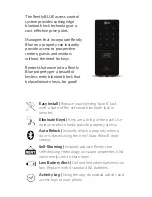
Страница 2: ...good Eliminate Keys Keys are a thing of the past Use unique codes to easily provide property access Auto Relock Instantly relock a property when a door is closed using the new Auto Relock door sensor Self Showing Instantly activate Rently com self showing technology on vacant properties Visit www rently com to learn more Low Battery Alert Get notified when batteries run low Replace with 4 standard...

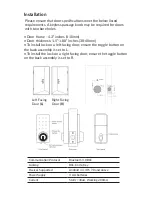
Страница 3: ... 38 48mm To install lock on a left facing door ensure the toggle button on the back assembly is set to L To install the lock on a right facing door ensure the toggle button on the back assembly is set to R Communication Protocol Bluetooth 4 0 BLE Locking BLE Code Key Devices Supported Android 4 3 iOS 7 0 and above Power Supply 4 AA batteries Current Static 30uA Working 200mA Left Facing Door L Rig...

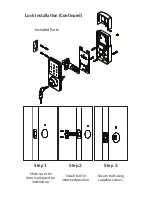
Страница 4: ...Lock Installation Continued Included Parts Step 1 Step 3 Make sure the door is prepped for installation Step 2 Install bolt in unlocked position Secure bolt using supplied screws ...

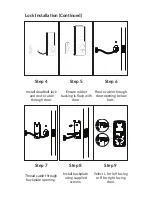
Страница 5: ...nd route cable through door Step 4 Step 5 Ensure rubber backing is flush with door Step 6 Route cable through door opening below bolt Thread cable through backplate opening Step 7 Step 8 Install backplate using supplied screws Step 9 Select L for left facing or R for right facing door ...

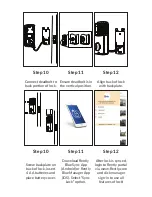
Страница 6: ...k with backplate Step 10 Step 12 Screw backplate on back of lock insert 4 AA batteries and place battery cover Step 11 Download Rently Blue Sync App Android or Rently Blue Manager App iOS Select Sync Lock option After lock is synced login to Rently portal via www Rently com and click manager sign in to use all features of lock ...

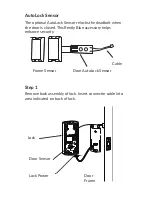
Страница 7: ... deadbolt when the door is closed This Rently Blue accessory helps enhance security Cable Door AutoLock Sensor Frame Sensor Door Sensor Step 1 Remove back assembly of lock Insert connector cable into area indicated on back of lock Lock Door Frame Lock Power ...

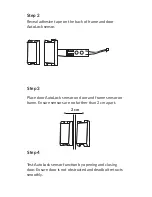
Страница 8: ...AutoLock sensor Step 3 Place door AutoLock sensor on door and frame sensor on frame Ensure sensors are no farther than 2 cm apart Step 4 Test AutoLock sensor function by opening and closing door Ensure door is not obstructed and deadbolt retracts smoothly 2 cm ...

Страница 9: ...To activate Rently self showing for vacant properties login to www rently com with your manager credentials Locking Touchscreen Press and Hold button until deadbolt engages Unlocking Key To unlock insert key Rotate key until deadbolt disengages Code to unlock type in code followed by key App After pairing lock select lock tap Unlock Ensure you are within 10 feet of lock Resident Codes To issue a r...

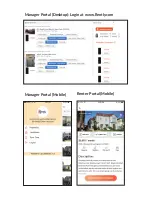
Страница 10: ...Manager Portal Desktop Login at www Rently com Manager Portal Mobile Renter Portal Mobile ...

Страница 11: ...NOTES ...

Страница 12: ...ed to try to correct the interference by one or more of the following measures Reorient or relocate the receiving antenna Increase the separation between the equipment and receiver Connect the equipment into an outlet on a circuit different from that to which the receiver is connected Consult the dealer or an experienced radio TV technician for help 15 21 Information to user The users manual or in...

Отзывы: